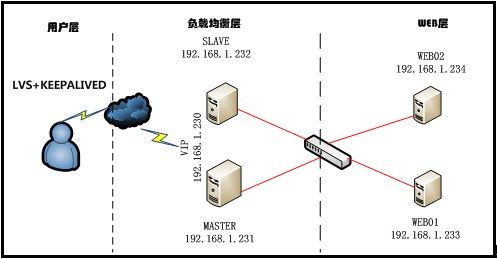
说明:此lvs+keepalived是参照网上诸多资料配置出来的。
这是在debian 6.0上实验的,除了keepalived ipvsadm 命令是apt-get安装的,其他没什么区别。
一、LVS+Keepalived介绍
LVS是Linux Virtual Server的简写,即linux虚拟服务器,是一个虚拟的服务器集群系统。目前有三种IP负载均衡技术(NAT、DR、TUN)。
Keepalived在文档配置中主要是Realserver的健康状态检查以及LoadBalance主机和backup主机失败后切换。
二、网站负载均衡拓扑图
LVS-Vip 192.168.1.230
LVS-DR-Master 192.168.1.231
LVS-DR-Backup 192.168.1.232
WEB1-Realserver 192.168.1.233
WEB2-Realserver 192.168.1.234
GATEWAY 192.168.1.1
三、LVS-DR配置
说明:只需要keepalived全部搞定。
\\使用debian源自动安装keepalived
apt-get install keepalived
cp /usr/share/doc/keepalived/samples/ /etc/keepalived
\\启动keepalived
/etc/init.d/keepalived restart
Keepalived配置:
! Configuration File for keepalived
global_defs {
notification_email {
[email protected] \\事件发生时发送到的Email
}
notification_email_from [email protected]
smtp_server 127.0.0.1
# smtp_connect_timeout 30
router_id LVS_DEVEL \\运行keepalived的机器标识
}
vrrp_instance VI_1 {
state MASTER
interface eth0
virtual_router_id 50 \\vrid标记
# nopreempt \\不抢占,防止列脑,只能放置在BACKUP主机上,并且优先级比另一台高,主从都是backup状态下使用,通过优先级来控制,添加在优先级高的机器上。
priority 100 \\高优先级为Master,Master至少比BACKUP高50
advert_int 1 \\检查间隔,默认1秒
authentication {
auth_type PASS
auth_pass 1111
}
virtual_ipaddress { \\VIP地址,可以添加多个,另起一行
192.168.1.230
}
}
virtual_server 192.168.1.230 80 { \\VIP port
delay_loop 6 \\每隔10秒查询realserver的状态
lb_algo wrr \\LVS算法
lb_kind DR \\集群模式
persistence_timeout 50 \\会话保持时间
protocol TCP \\使用的协议
real_server 192.168.1.233 80 {
weight 3 \\权重设置
TCP_CHECK {
connect_timeout 10 \\连接超时时间
nb_get_retry 3 \\重连次数
delay_before_retry 3 \\重连间隔
connect_port 80
}
}
real_server 192.168.1.234 80 {
weight 3
TCP_CHECK {
connect_timeout 10
nb_get_retry 3
delay_before_retry 3
connect_port 80
}
}
四、WEB-Realserver 配置
#sed -i 's/exit 0/#exit 0/g' /etc/rc.local
#ifconfig lo:0 192.168.1.230 netmask 255.255.255.255 broadcast 192.168.1.230 up
# route add -host 192.168.1.230 dev lo:0
在/etc/sysctl.conf写入
net.ipv4.conf.lo.arp_ignore = 1
net.ipv4.conf.all.arp_ignore = 1
net.ipv4.conf.lo.arp_announce = 2
net.ipv4.conf.all.arp_announce = 2
sysctl -p
五、web页面准备
使用nginx做webserver,版本此处任选的,目的为输出一个index.html的静态页面。
server
{
listen 80;
server_name 192.168.1.230; \\此处为VIP地址,若为本机服务器地址,访问会出现403页面无法访问。
access_log /var/log/nginx/test_access.log;
location /
{
index index.html;
root /data/nginx/test.com;
}
}
六、查看LVS服务是否正常
apt-get install ipvsadm
Ipvsadm -ln
结果会出现realserver的ip地址
七、LVS-DR-BACKUP配置
只需更改keepalived.conf文件
state BACKUP
priority 50 \\高优先级为Master,Master至少比BACKUP高50
重启keepalived
