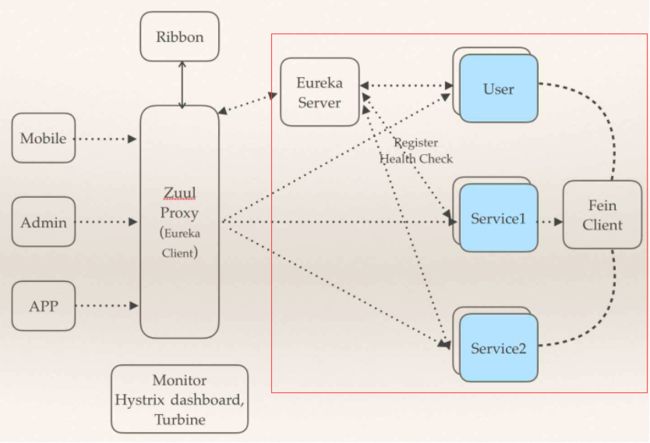
案例中有三个角色:服务注册中心、服务提供者、服务消费者,流程是首先启动注册中心,服务提供者生产服务并注册到服务中心中,消费者从服务中心中获取服务并执行。
其中我们分别使用到Spring Cloud Netflix中的Eureka作为服务发现,而服务提供者和服务消费者均为Spring Boot提供的Restful接口。
而Feign则作为调用实现
(Feign是一个声明式Web Service客户端。使用Feign能让编写Web Service客户端更加简单, 它的使用方法是定义一个接口,然后在上面添加注解,同时也支持JAX-RS标准的注解。Feign也支持可拔插式的编码器和解码器。Spring Cloud对Feign进行了封装,使其支持了Spring MVC标准注解和HttpMessageConverters。Feign可以与Eureka和Ribbon组合使用以支持负载均衡。)
部署服务发现Eureka
首先创建Maven项目,并在pom文件里配置所需的依赖。以下是我的服务发现配置文件。
    4.0.0

    com.eureka
    demo
    0.0.1-SNAPSHOT
    jar

    spring-cloud-eureka
    Demo project for Spring Boot


        org.springframework.boot
        spring-boot-starter-parent
        2.0.0.RELEASE


        UTF-8
        UTF-8
        1.8
        Finchley.BUILD-SNAPSHOT


            org.springframework.cloud
            spring-cloud-starter-netflix-eureka-server


            org.springframework.boot
            spring-boot-starter-test
            test


                org.springframework.cloud
                spring-cloud-dependencies
                ${spring-cloud.version}
                pom
                import


                org.springframework.boot
                spring-boot-maven-plugin


            spring-snapshots
            Spring Snapshots
            https://repo.spring.io/snapshot

                true


            spring-milestones
            Spring Milestones
            https://repo.spring.io/milestone

                false
然后更新Maven依赖,然后在入口文件添加@EnableEurekaServer注解
package com.eureka.demo;

import org.springframework.boot.SpringApplication;
import org.springframework.boot.autoconfigure.SpringBootApplication;
import org.springframework.cloud.netflix.eureka.server.EnableEurekaServer;

@SpringBootApplication
//启用服务注册服务
@EnableEurekaServer
public class SpringCloudEurekaApplication {

    public static void main(String[] args) {
        SpringApplication.run(SpringCloudEurekaApplication.class, args);
    }
}
配置application.properties文件
spring.application.name=spring-cloud-eureka

server.port=8000
eureka.client.register-with-eureka=false
eureka.client.fetch-registry=false

eureka.client.serviceUrl.defaultZone=http://localhost:8000/eureka/
配置好配置文件之后就可以,启动服务发现服务了。配置文件中详细的提供了服务发现的地址。
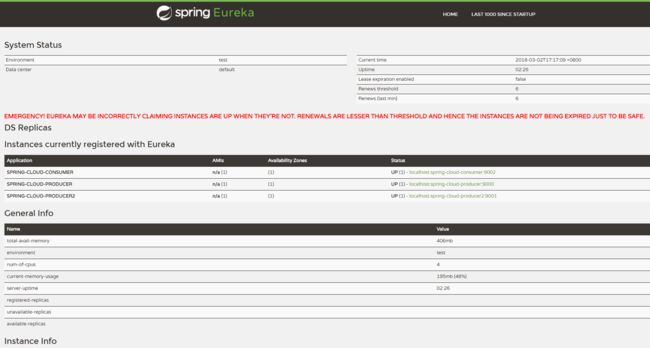
然后访问 http://localhost:8000/显示以下页面表示启动成功了。
部署服务提供者
创建Maven项目,并在pom文件里配置所需的依赖。以下是我的服务提供者配置文件。
    4.0.0

    com.example
    demo
    0.0.1-SNAPSHOT
    jar

    spring-cloud-producer
    Demo project for Spring cloud producer


        org.springframework.boot
        spring-boot-starter-parent
        1.5.3.RELEASE


        UTF-8
        UTF-8
        1.8
        Dalston.RELEASE


            org.springframework.cloud
            spring-cloud-starter-eureka


            org.springframework.boot
            spring-boot-starter-test
            test


                org.springframework.cloud
                spring-cloud-dependencies
                ${spring-cloud.version}
                pom
                import


                org.springframework.boot
                spring-boot-maven-plugin
然后更新Maven依赖,然后在入口文件添加@EnableEurekaClient注解,声明这个一个服务提供者。
package com.example.producer;

import org.springframework.boot.SpringApplication;
import org.springframework.boot.autoconfigure.SpringBootApplication;
import org.springframework.cloud.netflix.eureka.EnableEurekaClient;

@SpringBootApplication
@EnableEurekaClient
public class SpringCloudProducerApplication {

    public static void main(String[] args) {
        SpringApplication.run(SpringCloudProducerApplication.class, args);
    }
}
配置application.properties文件
#指定微服务的名称后续在调用的时候只需要使用该名称就可以进行服务的访问
spring.application.name=spring-cloud-producer
#配置端口号
server.port=9000
#服务注册中心的配置内容,指定服务注册中心的Url
eureka.client.serviceUrl.defaultZone=http://localhost:8000/eureka/
编写一个服务用例,其中服务用例可以使用restful api提供服务,也可以使用传统的api方式提供服务。使用Spring mvc的声明方式即可!
package com.example.producer.controller;

import org.springframework.web.bind.annotation.GetMapping;
import org.springframework.web.bind.annotation.PathVariable;
import org.springframework.web.bind.annotation.RestController;

@RestController
public class HelloController {

    //restful api方式
    @GetMapping("/hello/{name}")
    public String index(@PathVariable String name){
        return "hello!" + name;
    }
//  传统api方式
//  @RequestMapping("/hello")
//   public String index(@RequestParam String name) {
//       return "hello "+name+",this is first messge";
//   }

}
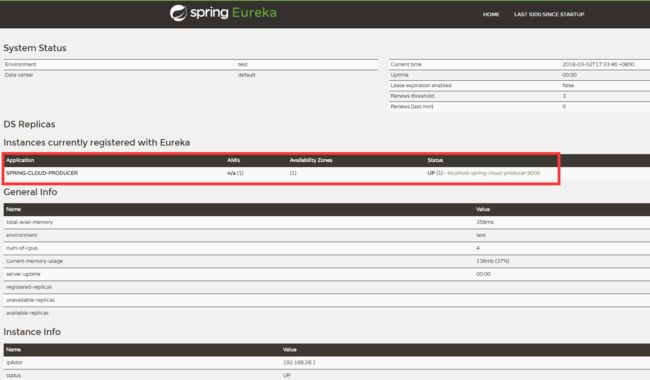
然后启动服务,刷新http://localhost:8000/就可以看见我们创建的服务已经被服务发现了。
部署服务消费者
我们提供了服务当然是想要服务消费者去使用这些服务,接下来我们搭建服务消费者。
创建Maven项目,并在pom文件里配置所需的依赖。以下是我的服务消费者配置文件。
    4.0.0

    com.example
    demo
    0.0.1-SNAPSHOT
    jar

    spring-cloud-consumer
    Demo project for Spring Boot


        org.springframework.boot
        spring-boot-starter-parent
        1.5.3.RELEASE


        UTF-8
        UTF-8
        1.7
        Dalston.RELEASE


            org.springframework.cloud
            spring-cloud-starter-feign


            org.springframework.cloud
            spring-cloud-starter-eureka


            org.springframework.boot
            spring-boot-starter-test
            test


                org.springframework.cloud
                spring-cloud-dependencies
                ${spring-cloud.version}
                pom
                import


                org.springframework.boot
                spring-boot-maven-plugin
然后更新Maven依赖,然后在入口文件添加@EnableDiscoveryClient注解和@EnableFeignClients注解,声明这个一个服务消费者。
package com.example.consumer;

import org.springframework.boot.SpringApplication;
import org.springframework.boot.autoconfigure.SpringBootApplication;
import org.springframework.cloud.client.discovery.EnableDiscoveryClient;
import org.springframework.cloud.netflix.feign.EnableFeignClients;

@SpringBootApplication
//启用服务注册与发现
@EnableDiscoveryClient
//启用feign进行远程调用
@EnableFeignClients
public class SpringCloudConsumerApplication {

    public static void main(String[] args) {
        SpringApplication.run(SpringCloudConsumerApplication.class, args);
    }
}
配置application.properties文件
#指定微服务的名称后续在调用的时候只需要使用该名称就可以进行服务的访问
spring.application.name=spring-cloud-consumer
#配置端口号
server.port=9002
#服务注册中心的配置内容,指定服务注册中心的Url
eureka.client.serviceUrl.defaultZone=http://localhost:8000/eureka/
编写feign调用实现接口
package com.example.consumer.remote;

import org.springframework.cloud.netflix.feign.FeignClient;
import org.springframework.web.bind.annotation.GetMapping;
import org.springframework.web.bind.annotation.PathVariable;

@FeignClient(name= "spring-cloud-producer")
public interface HelloRemote {

    //restful api 调用
    @GetMapping("/hello/{name}")
    public String hello(@PathVariable("name") String name);

    //传统api调用
    //@GetMapping(value = "/hello")
    //public String hello(@RequestParam(value = "name") String name);
}
web层调用远程服务
package com.example.consumer.controller;

import com.example.consumer.remote.HelloRemote;
import com.example.consumer.remote.HiRemote;
import org.springframework.beans.factory.annotation.Autowired;
import org.springframework.web.bind.annotation.GetMapping;
import org.springframework.web.bind.annotation.PathVariable;
import org.springframework.web.bind.annotation.RestController;

@RestController
public class ConsumerController {

    @Autowired
    HelloRemote helloRemote;

    @GetMapping("/hello/{name}")
    public String index(@PathVariable("name") String name) {
        return helloRemote.hello(name);;
    }
}
然后启动服务,访问服务显示返回结果及表示成功!


