背景
动画由CoreAnimation框架作为基础支持,理解动画之前要先理解CALayer这个东西的扮演的角色,了解它是负责呈现视觉内容的东西,它有3个图层树,还有知道CATransaction负责对layer的修改的捕获和提交。
参考【重读iOS】认识CALayer
除了系统实现层面的东西,还是通用意义上的动画。动画就是动起来的画面,画面不断变换产生变化效果。并不是真的有一个东西在动,一切都只是对大脑的欺骗。认识到这个,就知道动画需要:一系列的画面,这些画面之间具有相关性。
所以对于动画系统而言,它需要:(1)知道变化规律,然后根据这个规律,(2)不断的去重绘画面。
最简单的动画
有了这个认识,再来看最简单的UIView的动画:
//建一个button
button = [[UIButton alloc] initWithFrame:CGRectMake(0, 0, 100, 40)];
button.backgroundColor = [UIColor orangeColor];
[self.view addSubview:button];
......
//一个简单的移动动画
[UIView animateWithDuration:3 animations:^{
    button.frame = CGRectMake(0, 300, 100, 40);
}];
这是一个移动的动画,移动是因为frame发生了改变。然后把这个修改放在UIView animateWithDuration:的block里。对于系统而言,它有了button开始的位置,block里有了结束的位置,而且有了时间。
一个物体从一个点移动到另一个点,而且时间已知,那么就可以求出在任何一个中间时间,这个物体的位置。这就是变化规律。而不断重绘这个就是屏幕的刷新了,这个是操作系统负责了,对于开发者而言,创造不同动画就在于提供不同的变化规律。
CoreAnimation
UIView的一些动画方法只是提供了更方便的API,理解了CoreAnimation的动画,UIView的这些方法都自然清楚了,直接看CoreAnimation吧。
这个动画类的继承图,iOS9时又添加了CASpringAnimation,继承自CABasicAnimation。
每一个动画类代表了某一种类型的动画,代表着它们有着不同的变化规律。
CAAnimation
这个是基类,所以它不会有特别有特色的属性,而是一些通用性的东西。在属性里值得注意的是timingFunction和delegate。timingFunction提供了时间的变化函数,可以理解成时间流速变快或变慢。delegate就两个方法,通知你动画开始了和结束了,没什么特别的。
CAMediaTiming
这是一个协议,CAAnimation实现了这个协议,里面有一些跟时间相关的属性挺有用的:
- duration 动画时间
- repeatCount 重复次数
- autoreverses 自动反转动画,如一个动画是从A到B,这个为true时,会接着执行从B再到A的动画。
CAPropertyAnimation
You do not create instances of CAPropertyAnimation: to animate the properties of a Core Animation layer, create instance of the concrete subclasses CABasicAnimation or CAKeyframeAnimation.
这个也还是一个抽象类,跟UIGestureRecognizer一样直接构建对象用不了的。但它的属性还是值得解读一下:
-
keyPath而且有一个以keyPath为参数的构建方法,所以这个属性是核心级别。回到动画的定义上,除了需要变化规律外,还需要变化内容。巧妇难为无米之炊,动画是一种连续的变化,那就需要知道是什么在变化。这里选取内容的方式就是指定一个属性,这个属性是谁的属性?CALayer的,动画是加载在layer上的,layer是动画的载体。打开CALayer的文档,在属性的注释里写着Animatable的就是可以进行动画的属性,也就是可以填入到这个keyPath里的东西。
之所以是keyPath而不是key,是因为可以像position.y这样使用点语法指定连续一连串的key。
从CAPropertyAnimation继承的动画,也都是按照这种方式来指定变化内容的。
-
additive和cumulative需要例子才好证实效果,到下面再说。 -
valueFunction这个属性类为CAValueFunction,只能通过名称来构建,甚至没有数据输入的地方,也是从这突然看明白CAPropertyAnimation构建对象是没有意义的。因为没有数据输入,就没有动画,就没法实际应用,这个类只是为了封装的需要而创建的。
总结一下,动画需要3个基本要素:内容、时间和变化规律,不同的动画都是在这3者上有差异。
CABasicAnimation
这个类就增加了3个属性:fromValue toValue byValue。这3个属性就正好是提供了输入数据,确定了开始和结束状态。
到现在,内容(keyPath)有了,时间(duration和timingFunction)有了,开始和结束状态有了。通过插值(Interpolates)就可以得到任意一个时间点的状态,然后渲染绘制形成一系列关联的图像,形成动画。
| 非空属性 | 开始值 | 结束值 |
|---|---|---|
| fromValue toValue |
fromValue | toValue |
| fromValue byValue |
fromValue | fromValue+byValue |
| toValue byValue |
toValue -byValue | toValue |
| fromValue | fromValue | currentValue |
| toValue | currentValue | toValue |
| byValue | currentValue | byValue+currentValue |
上面的表表示的是当3个属性哪些是非空的时候,动画是从哪个值开始、到哪个值结束。而且上面的情况优先于下面的情况。
测试additive和cumulative属性
button.frame = CGRectMake(200, 400, 100, 40);

CABasicAnimation *basicAnim = [CABasicAnimation animationWithKeyPath:@"position"];

//mediaTiming
basicAnim.duration = 1;
basicAnim.repeatCount = 3;

//CAAnimation
basicAnim.removedOnCompletion = NO;
basicAnim.delegate = self;

//property
basicAnim.additive = NO;
basicAnim.cumulative = YES;

//basic
basicAnim.fromValue = [NSValue valueWithCGPoint:CGPointMake(100, 60)];
basicAnim.toValue = [NSValue valueWithCGPoint:CGPointMake(100, 200)];

[button.layer addAnimation:basicAnim forKey:@"move"];
-
additive为true时,变化值整体加上layer的当前值,如button开始位置为x为200,fromValue的x为100,开启additive则动画开始时button的x为200+100=300,不开启则100. -
cumulative这个指每次的值要加上上一次循环的的结束值。这个就需要repeatCount>1的时候才能看出效果。比如这里button第一次动画结束后位置为(100, 200),再次开始时位置不是(100, 60),而是加上之前的结束值,即(200,260)。
对于不同类型的值叠加方式是不同的,如矩阵,并不是直接单个元素相加,而是使用矩阵加法。
CAKeyframeAnimation
终于到了明星关键帧动画。
关键帧动画,帧指一副画面,动画就是一帧帧画面连续变动而得到的。而关键帧,是特殊的帧,举个例子,一个物体按照矩形的路线运动,那么提供4个角的坐标就可以了,其他位置可以通过4个角的位置算出来。而关键帧就是那些不可缺少的关键的画面,而其他帧可以通过这些关键帧推算出来。
所以关键帧动画就是提供若干关键的数据,系统通过这些关键数据,推算出整个流程,然后完成动画。
有了这个理解,再看CAKeyframeAnimation的属性里的values和keyTimes就好理解了。
values就是各个关键帧的数据,keyTimes是各个关键帧的时间点,而且这两组数据时一一对应的,第一个value和第一个keyTime都是第一帧画面的,以此类推。
按照这种思路,其实整个动画就被切割成n个小阶段了,每个节点有开始和结束数据和时间,就会发现这一小段其实就是一个CABasicAnimation,而CABasicAnimation也可以看成是一个特殊的关键帧动画,只有开始和结束两个关键帧。
所以在使用上和CABasicAnimation并没有特别的地方,只是从传from、to两个数据,变成传一组数据罢了。
属性path
这个是一种特殊的动画,如果要实现一个view按照某个路径进行移动,就使用这个属性,提供了路径后,values属性会被忽略。路径可以通过贝塞尔曲线的类提供:
//内容
CAKeyframeAnimation *keyframeAnim = [CAKeyframeAnimation animationWithKeyPath:@"position"];
//时间
keyframeAnim.duration = 5;
//变化规律
UIBezierPath *path = [[UIBezierPath alloc] init];
[path addArcWithCenter:CGPointMake(200, 300) radius:100 startAngle:0 endAngle:M_PI*2 clockwise:YES];
keyframeAnim.path = [path CGPath];
如果不提供这个path属性,那就要我们提供许多的点来完成动画,哪怕是简单的转圈圈,点数据也超级多,越平滑的动画就需要越多的点。这个属性可以说是为了这种需求而提供的特殊福利。
属性calculationMode
这个属性影响着关键帧之间的数据如何进行推算,一个个来说:
-
kCAAnimationLinear默认属性,线性插值。 -
kCAAnimationDiscrete不进行插值,只显示关键帧的画面,看到的动画就是跳跃的 -
kCAAnimationPaced,这个也是线性插值,但跟第一个的区别是它是整体考虑的。举个例子,移动一个view,从A到B,再到C,假设A-B之间距离跟B-C之间距离一样,但是前者的时间是10s,后者是20s,那么动画里,后半段就会跑得慢。而Paced类型,就忽略掉keyTimes属性,达到全局匀速的效果,重新计算keyTimes。这个例子里就变成A-B 15s,B-C也15s。 -
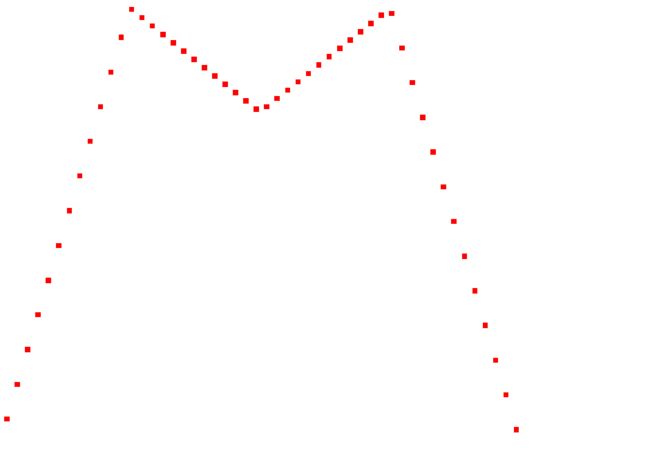
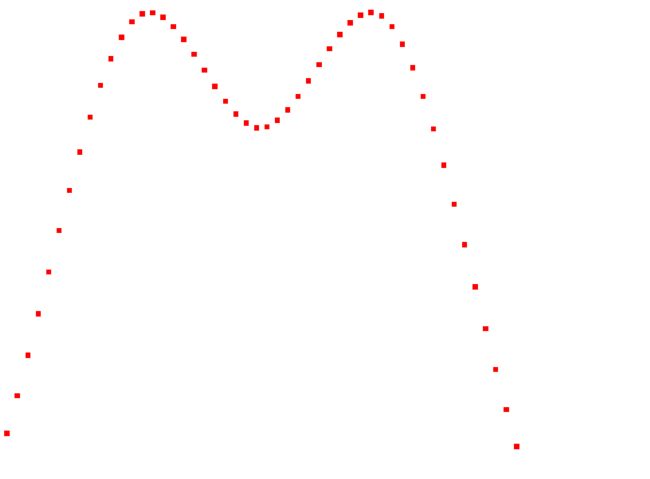
kCAAnimationCubic这个使用新的插值,算法是Catmull-Rom spline,效果就是把转折点变得圆滑。看一下这两种路径对比就立马明白,第一个是线性插值。kCAAnimationCubicPaced这个就是两种效果叠加。
属性rotationMode
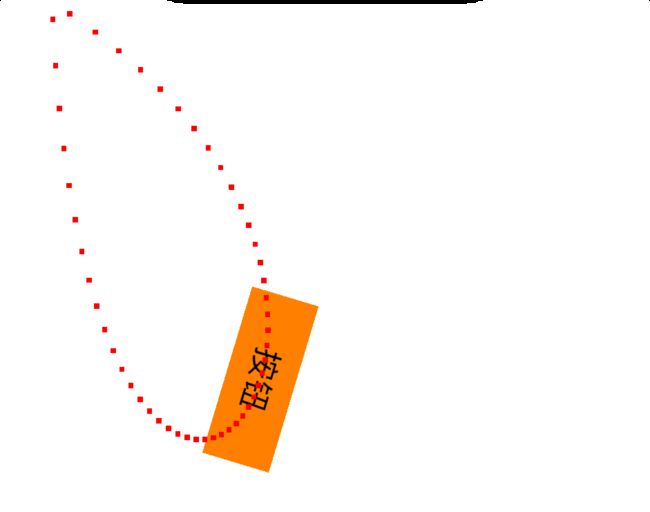
这个是配合路径使用的,在使用路径动画时才有意义。当值为kCAAnimationRotateAuto是,会把layer旋转,使得layer自身的x轴是跟路径相切的,并且x轴方向跟运动方向一致,使用kCAAnimationRotateAutoReverse也是相切,但x轴方向跟运动方向相反。
CATransition
这个看似简单,用起来却似乎有点摸不着头脑。transition过渡的意思,这个动画用来完成layer的两种状态之间的过渡。
问题的核心就在这个两种状态,查看CATransition的属性,发现并没有开始状态、结束状态之类的输入。那这两种状态怎么确定?How does CATransition work?这个问题里的回答很清楚,截取一段:
The way the CATransition performs this animation to to take a snapshot of the view before the layer properties are changed, and a snapshot of what the view will look like after the layer properties are changed
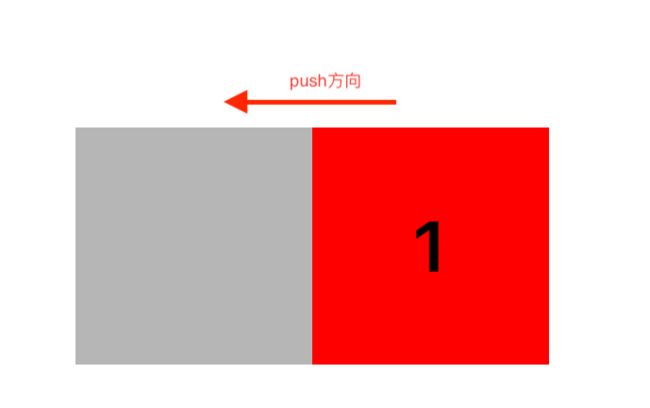
两种状态分别是:layer修改之前和之后。也就是把CATransition的动画加到layer上之后,这时会生成一个快照,这个开始状态;然后你要立马对layer进行修改,这时layer呈现出另一种状态,这是修改后,也就是动画的结束状态。这时系统得到了两张快照,在这两张快照之间做过渡效果,就是这个动画。
所以如果你添加动画后不做修改,好像看不出什么效果。
一个例子:
[CATransaction begin];
UIView *container = [[UIView alloc] initWithFrame:CGRectMake(150, 200, 100, 100)];
container.backgroundColor = [UIColor colorWithWhite:0.95 alpha:1];
[self.view addSubview:container];

UILabel *label1 = [[UILabel alloc] initWithFrame:container.bounds];
label1.backgroundColor = [UIColor redColor];
label1.text = @"1";
label1.font = [UIFont boldSystemFontOfSize:30];
label1.textAlignment = NSTextAlignmentCenter;
[container addSubview:label1];

UILabel *label2 = [[UILabel alloc] initWithFrame:container.bounds];
label2.backgroundColor = [UIColor orangeColor];
label2.text = @"2";
label2.font = [UIFont boldSystemFontOfSize:30];
label2.textAlignment = NSTextAlignmentCenter;
[container addSubview:label2];

[CATransaction commit];

CATransition *fade = [[CATransition alloc] init];
fade.duration = 2;
fade.type = kCATransitionPush;
fade.subtype = kCATransitionFromRight;

//位置1
[container.layer addAnimation:fade forKey:nil];
//位置2
[container insertSubview:label2 belowSubview:label1];
一个view上面添加了两个子view,动画加载父视图上,添加动画后修改子view的上下关系来修改layer的样式。
为什么要使用[CATransaction begin]和[CATransaction commit]把添加子视图的代码包起来呢?
这本是一个bug,没想到却是一个对CATransaction理解加深的好例子。原因简单说:
- 不使用显式事务的时候,对layer的修改触发隐式事务,而这种事务需要等到下一次runloop循环时才提交,
- 所以添加动画的时候(位置1)事务还没提交,
container的layer数据时空的,那么开始状态就没有,所以开始画面是空白。 - 等到后面隐式事务提交,这时layer的修改(位置2)已经结束了,修改后的样子成了动画结束状态。这个是对的。
//位置1
[CATransaction begin];
UIView *container = [[UIView alloc] initWithFrame:CGRectMake(150, 200, 100, 100)];
container.backgroundColor = [UIColor colorWithWhite:0.9 alpha:1];
[self.view addSubview:container];
[CATransaction commit];

//位置5
UILabel *label1 = [[UILabel alloc] initWithFrame:container.bounds];
label1.backgroundColor = [UIColor redColor];
label1.text = @"1";
label1.font = [UIFont boldSystemFontOfSize:30];
label1.textAlignment = NSTextAlignmentCenter;
[container addSubview:label1];

UILabel *label2 = [[UILabel alloc] initWithFrame:container.bounds];
label2.backgroundColor = [UIColor orangeColor];
label2.text = @"2";
label2.font = [UIFont boldSystemFontOfSize:30];
label2.textAlignment = NSTextAlignmentCenter;
[container addSubview:label2];

//位置2
[CATransaction begin];
container.backgroundColor = [UIColor colorWithWhite:0 alpha:1];
[CATransaction commit];

CATransition *fade = [[CATransition alloc] init];
fade.duration = 2;
fade.type = kCATransitionPush;
fade.subtype = kCATransitionFromRight;

//位置3
[container.layer addAnimation:fade forKey:nil];
//位置4
[container insertSubview:label2 belowSubview:label1];
如果做一下简单的修改:改成位置1和位置2两个事务,位置1时container颜色是灰色,位置2时是黑色。中间label1和label2的处理代码不加入显式事务。
结果会怎么样?
动画变成开始画面是灰色的container,结束状态是label1的样式。
还是开始状态的问题,有两个问题:
- 开始状态为什么不是label2的样式
- 开始状态为什么不是黑色,而是灰色
中间有一段(位置5)没有加入显式事务,那么它就开启了隐式事务,它要等到下一次runloop循环才提交,反正是要等到这个方法执行结束。那么这一段都没有加入到container的layer里,所以不会是label2的样式。
因为隐式事务开启了,又还没有结束,所以位置2的事务变成了一个嵌套事务,而嵌套事务我只找到这么一句话文档位置:
Only after you commit the changes for the outermost transaction does Core Animation begin the associated animations.
很大的可能是,嵌套时,内部的事务提交的东西是提给外层的事务,然后一层层提交,最后一层才把数据提交给CoreAnimation系统,系统这时才会得到数据刷新,才会更新layer的画面。
所以位置2的事务虽然提交了,但是它还是等到隐式事务提交才能起作用。把位置5处代码删掉就能看出区别。
CAAnimationGroup
这个没什么可说的,让多个动画一起执行,显示出符合效果。值得注意的是:
- group的时间是有意义的,但它不影响子动画怎么执行,只是到了时间就停止所有子动画,不管子动画是否结束。所以在超出自动化时间后,修改这个值就没意义了。
- 每个子动画是独立执行的,如动画1时长1s,动画2时长5s,那么后4s就是动画2的效果。
CASpringAnimation
Spring是弹簧的意思,这个动画就是像弹簧一样摆动的效果。
button.center = CGPointMake(0, 200);

CASpringAnimation *springAnim = [CASpringAnimation animationWithKeyPath:@"position"];
springAnim.toValue = [NSValue valueWithCGPoint:CGPointMake(200, 200)];
springAnim.duration = 10;
springAnim.mass = 10;
springAnim.stiffness = 50;
springAnim.damping = 1;
springAnim.initialVelocity = 0;
springAnim.delegate = self;

[button.layer addAnimation:springAnim forKey:@"spring"];
这个类继承自CABasicAnimation,所以还是需要keyPath、fromValue、toValue等数据。因为keyPath存在,所以它不只是用于物体的运动,还可以是其他的,比如颜色。CASpringAnimation提供了像弹簧一样的变化规律,而不只是运动的动画。
然后CASpringAnimation自身的属性用于计算弹簧的运动模式:
- mass 越大运动速度会慢,但衰减慢
- stiffness 越大,速度越快,弹性越好
- damping 越大衰减越快
- initialVelocity 初始速度,越大动画开始时越快
动画时间不影响动画的运行模式,这一点跟其他的动画不一样,这里时间到了,物体还在动就会直接掐掉、动画停止。
CALayer子类的特殊动画
CALayer还有一系列的子类,每种layer还有它们自己特有的动画。同样,进文档查看属性的注释,带有Animatable的是有动画的,配合CABasicAnimation和CAKeyframeAnimation使用。
CATextLayer
CATextLayer有两个动画属性,fontSize和foregroundColor。
CABasicAnimation *anim = [CABasicAnimation animationWithKeyPath:@"fontSize"];
anim.duration = 5;
anim.fromValue = @(10);
anim.toValue = @(30);

CATextLayer *textLayer = [[CATextLayer alloc] init];
textLayer.foregroundColor = [UIColor blackColor].CGColor;
textLayer.string = @"一串字符串";
textLayer.frame = CGRectMake(0, 300, 300, 60);
[textLayer addAnimation:anim forKey:@"text"];

[self.view.layer addSublayer:textLayer];
CAShapeLayer
CAShapeLayer里有许多动画属性,但最神奇的就是strokeStart和strokeEnd,特别是两个组合使用的使用简直刷新认知!!!
CAShapeLayer的图形是靠路径提供的,而strokeStart和strokeEnd这两个属性就是用来设定绘制的开始和结束为止。0代表path的开始位置,1代表path的结束为止,比如strokeStart设为0.5,strokeEnd设为1,那么layer就只绘制path的后半段。
通过修改这两个属性,就可以达到只绘制path一部分的目的,然后它们还都支持动画,就可以创造出神奇的效果!
-(void)shaperLayerAnimations{
//图形开始位置的动画
CABasicAnimation *startAnim = [CABasicAnimation animationWithKeyPath:@"strokeStart"];
startAnim.duration = 5;
startAnim.fromValue = @(0);
startAnim.toValue = @(0.6);

//图形结束位置的动画
CABasicAnimation *endAnim = [CABasicAnimation animationWithKeyPath:@"strokeEnd"];
endAnim.duration = 5;
endAnim.fromValue = @(0.4);
endAnim.toValue = @(1);

//把两个动画合并,绘制的区域就会不断变动
CAAnimationGroup *group = [[CAAnimationGroup alloc] init];
group.animations = @[startAnim, endAnim];
group.duration = 5;
group.autoreverses = YES;

CAShapeLayer *shapeLayer = [[CAShapeLayer alloc] init];
shapeLayer.frame = self.view.bounds;

//图形是一大一小两个圆相切嵌套
UIBezierPath *path = [[UIBezierPath alloc] init];
[path addArcWithCenter:CGPointMake(100, 300) radius:100 startAngle:0 endAngle:M_PI*2 clockwise:YES];
[path addArcWithCenter:CGPointMake(150, 300) radius:50 startAngle:0 endAngle:M_PI*2 clockwise:YES];
shapeLayer.path = [path CGPath];
shapeLayer.strokeColor = [UIColor redColor].CGColor;
shapeLayer.fillColor = [UIColor whiteColor].CGColor;

[shapeLayer addAnimation:group forKey:@"runningLine"];
[self.view.layer addSublayer:shapeLayer];
}
Animations
交互式动画
iOS10有了UIViewPropertyAnimator,可以控制动画的流程,核心是fractionComplete这个参数,可以指定动画停留在某个位置。这里用一个pan手势来调整fractionComplete,实现手指滑动时,动画跟随执行的效果。
这感觉有点像,拖动进度条然后电影前进或后退,随意控制进度。
UIViewPropertyAnimator *animator;
-(void)interactiveAnimations{

    button.frame = CGRectMake(200, 100, 100, 100);
    button.layer.cornerRadius = button.bounds.size.width/2;
    button.layer.masksToBounds = YES;

    animator = [[UIViewPropertyAnimator alloc] initWithDuration:5 curve:(UIViewAnimationCurveEaseOut) animations:^{
        button.transform = CGAffineTransformMakeScale(0.1, 0.1);
    }];

    [animator startAnimation];
    [animator pauseAnimation];

    UIPanGestureRecognizer *pan = [[UIPanGestureRecognizer alloc] initWithTarget:self action:@selector(panAction:)];
    [self.view addGestureRecognizer:pan];
}

float startFrac;
-(void)panAction:(UIPanGestureRecognizer *)pan{
    if (pan.state == UIGestureRecognizerStateChanged) {
        [animator pauseAnimation];
        float delta = [pan translationInView:self.view].y / self.view.bounds.size.height;
        animator.fractionComplete = startFrac+delta;
    }else if (pan.state == UIGestureRecognizerStateBegan){
        startFrac = animator.fractionComplete;
    }else if (pan.state == UIGestureRecognizerStateEnded){
        [animator startAnimation];
    }
}
ViewController的转场动画
两种,一个是navigation的push和pop,通过navigationController的delegate提供:
- 动画
UIViewControllerAnimatedTransitioning - 交互性动画
UIViewControllerInteractiveTransitioning
另一种是VC的present和dismiss,通过VC自身的transitioningDelegate提供:
- 动画
UIViewControllerAnimatedTransitioning - 交互性动画
UIViewControllerInteractiveTransitioning
提供的数据时一样的类型,所以这两种其实逻辑上是一样的。
先看提供动画的UIViewControllerAnimatedTransitioning,就两个方法:
-
transitionDuration:让你提供动画的时间 -
animateTransition:在这里面执行动画
站在设计者的角度来看一下整个流程,这样会帮助对这个框架的理解:
一切从push开始,nav开始push,它会去查看自己的delegate,有没有实现提供转场动画的方法,没有就使用默认的效果,结束。
有,那么就可以拿到实现UIViewControllerAnimatedTransitioning的对象,然后从这个对象里拿到动画时间,用这个时间去同步处理其他的操作,比如导航栏的动画。
同时调用这个对象的animateTransition:执行我们提供的动画。
这个过程了解了,就明白每个类在这个过程里的意义。因为这些名词都太长,命名也很像,很容易混淆意义。
一个例子:
-(NSTimeInterval)transitionDuration:(id)transitionContext{
    return _duration;
}

-(void)animateTransition:(id)transitionContext{

    UIViewController *fromVC = [transitionContext viewControllerForKey:UITransitionContextFromViewControllerKey];
    UIViewController *toVC = [transitionContext viewControllerForKey:UITransitionContextToViewControllerKey];

    UIView *fromView = fromVC.view;
    UIView *toView = toVC.view;

    if (self.type == TransitionTypePush) {

        [transitionContext.containerView addSubview:toView];
        float scale = 0.7f;
        toView.transform = CGAffineTransformConcat(CGAffineTransformMakeTranslation(toView.bounds.size.width*(1+1/scale)/2, 0), CGAffineTransformMakeScale(scale, scale));

        [UIView animateWithDuration:_duration animations:^{

            fromView.transform = CGAffineTransformMakeScale(scale, scale);

            toView.transform = CGAffineTransformIdentity;

        } completion:^(BOOL finished) {
            fromView.transform = CGAffineTransformIdentity;

            [transitionContext completeTransition:YES];
        }];
    }else if (self.type == TransitionTypePop){

        [transitionContext.containerView insertSubview:toView belowSubview:fromView];
        float scale = 0.7f;
        toView.transform = CGAffineTransformMakeScale(scale, scale);

        [UIView animateWithDuration:_duration animations:^{

            fromView.transform = CGAffineTransformConcat(CGAffineTransformMakeTranslation(toView.bounds.size.width*(1+1/scale)/2, 0), CGAffineTransformMakeScale(scale, scale));

            toView.transform = CGAffineTransformIdentity;
        } completion:^(BOOL finished) {
            [fromView removeFromSuperview];

            [transitionContext completeTransition:YES];
        }];
    }
}
push时的效果是进来的view,即toView从右边缘一边进来一边放大,直到铺满屏幕;退出的view,即fromView,逐渐缩小。合在一起有一种滚筒的感觉。pop时就是反操作。
除了动画内容之外,值得注意的是:
- 第一个方法提供的时间用来做转场时的其他变化,如push时系统导航栏的动画,而且在这期间交互式禁止的。所以这个时间跟下面我们提供的动画时间要一样。
-
toView需要我们自己加到containerView上 - 不管动画是否执行成功,一定要调用
[transitionContext completeTransition:],这个标识这一次的VC切换结束了,否则后面的push、pop等都没效果。


