技能1:对于自定义转场动画
modal弹出这个东西,在 iphone上系统只有一种形态, 就是从下往上进行弹出.
不过对于它的 弹出样式, 苹果接口中指出,有9 种样式,但是对于iPhone来说无论除了自定义意外,其余都是 从下往上进行弹出.
因为设计modal 的多种样式,本身就是给ipad使用的, 可以用ipad进行相关测试
关于自定义 modal样式,custom
var animationDelegate = PopoverAnimationDelegate()
...//
 // 2. 创建菜单
        let sb = UIStoryboard(name: "Popover", bundle: nil)
        let vc = sb.instantiateInitialViewController()!
        // 设置自定义专场
        // 必须使用强指针引用

        vc.transitioningDelegate = animationDelegate
  // `animationDelegate`是一个自定义专门管理modal样式的类
        animationDelegate.delegate = self
        vc.modalPresentationStyle = .Custom
        // 3. 弹出菜单
        presentViewController(vc, animated: true, completion: nil)
animationDelegate中的代码:
这里需要说明的几点 :
- 我建立协议 专门用于处理modal状态关闭的反馈
- 建立标记, 专门记录modal的当前状态.
- 建立关联类 ,
PopoverPresentationController专门用于 界面的 管理 .
也就是说,PopoverPresentationController是界面的管理,PopoverAnimationDelegate负责动画的实现
import UIKit
protocol PopoverAnimationDelegateDelegate: NSObjectProtocol{
    func popoverDismiss(popoverAnimation: PopoverAnimationDelegate)
}

class PopoverAnimationDelegate:NSObject{
    // 记录当前是否弹出model
    var isPresented: Bool = false
    var delegate : PopoverAnimationDelegateDelegate?
}

extension PopoverAnimationDelegate: UIViewControllerTransitioningDelegate {


    // MARK: - 代理方法实现
    /**
    定义该 代理方法用于返回 负责转场的控制器对象

    - parameter presented:  <#presented description#>
    - parameter presenting: <#presenting description#>
    - parameter source:     <#source description#>

    - returns: <#return value description#>
    */
    func presentationControllerForPresentedViewController(presented: UIViewController, presentingViewController presenting: UIViewController, sourceViewController source: UIViewController) -> UIPresentationController? {

        return PopoverPresentationController(presentedViewController: presented, presentingViewController: presenting)
    }
    // 该代理方法 用于 告诉系统谁来负责控制器 如何弹出
    func animationControllerForPresentedController(presented: UIViewController, presentingController presenting: UIViewController, sourceController source: UIViewController) -> UIViewControllerAnimatedTransitioning? {
        isPresented = true
        return self
    }
    // 该代理方法 用于 告诉系统谁来负责控制器的 关闭
    func animationControllerForDismissedController(dismissed: UIViewController) -> UIViewControllerAnimatedTransitioning? {
        isPresented = false
        return self
    }

}
extension PopoverAnimationDelegate: UIViewControllerAnimatedTransitioning{
    // 用于返回动画的时长, 默认不用
    func transitionDuration(transitionContext: UIViewControllerContextTransitioning?) -> NSTimeInterval {
        return 998
    }
    /**
     该方法用于负责控制器如何弹出和如何消失
     只要是自定义转场,控制器弹出和消失都会调用
     需要在该方法中告诉系统控制器如何弹出和消失, 如果重写,那么就只会按照这个方法干

     注意点: 一旦告诉系统由我们来控制控制器的弹出和消失
     也就是实现了UIViewControllerAnimationTransitioning的方法之后,那么系统就不会再控制我们控制器的动画了,所有的操作都需要我们自己来完成

     系统调用该方法时会传递一个 transitionContext参数, 该参数中包含了我们所有需要的值
     - parameter transitionContext: <#transitionContext description#>
     */
    func animateTransition(transitionContext: UIViewControllerContextTransitioning) {
        LXLLog("modal")
        if isPresented{
            animationPresentedController(transitionContext)
        }else{
            animationDismissController(transitionContext)
        }
    }

    private func animationPresentedController(transitionContext: UIViewControllerContextTransitioning){
        // 1. 拿到被弹出的控制器的View
        // 如果是弹出, 那么ToViewControllerKey就是被弹出的控制器
        //        let vc1 = transitionContext.viewControllerForKey(UITransitionContextToViewControllerKey)!
        //
        //        let vc2 = transitionContext.viewControllerForKey(UITransitionContextFromViewControllerKey)!
        //        LXLLog(vc1)
        //        LXLLog(vc2)

        guard let toView = transitionContext.viewForKey(UITransitionContextToViewKey) else {
            return
        }
        // 2.将被弹出的控制器View添加到容器视图上
        transitionContext.containerView()?.addSubview(toView)
        // 3. 执行动画
        // 3.1 现将菜单View压扁
        toView.transform = CGAffineTransformMakeScale(1.0, 0.0)
        toView.layer.anchorPoint = CGPointMake(0.5, 0)
        // 3.2 再清空菜单压扁的形变
        UIView.animateWithDuration(0.4, animations: { () -> Void in
            toView.transform = CGAffineTransformIdentity
            }) { (_) -> Void in
                transitionContext.completeTransition(true)
        }
    }

    private func animationDismissController(transitionContext: UIViewControllerContextTransitioning){
        // 1. 拿到被弹出的控制器的View
        // 如果是弹出, 那么ToViewControllerKey就是被弹出的控制器
        //        let vc1 = transitionContext.viewControllerForKey(UITransitionContextToViewControllerKey)!
        //
        //        let vc2 = transitionContext.viewControllerForKey(UITransitionContextFromViewControllerKey)!
        //        LXLLog(vc1)
        //        LXLLog(vc2)

        guard let fromView = transitionContext.viewForKey(UITransitionContextFromViewKey) else {
            return
        }
        // 2.将被弹出的控制器View添加到容器视图上
        transitionContext.containerView()?.addSubview(fromView)
        // 3. 执行动画
        // 3.1 现将菜单View压扁

        fromView.layer.anchorPoint = CGPointMake(0.5, 0)
        // 3.2 再清空菜单压扁的形变
        UIView.animateWithDuration(0.4, animations: { () -> Void in
            fromView.transform = CGAffineTransformMakeScale(1.0, 0.0001)
            }) { (_) -> Void in
                transitionContext.completeTransition(true)
                self.delegate?.popoverDismiss(self)
        }

    }
}
PopoverPresentationController代码的实现
//
//  PopoverPresentationController.swift
//  刘小龙微博
//
//  Created by 博兴 on 16/5/9.
//  Copyright © 2016年 xalxl. All rights reserved.
//

import UIKit

/**
 什么时候使用自定义转场
 1. 需要修改modal的样式
 2. 需要修改modal出来控制器的尺寸
 3. 需要保留被挡住的控制器

 使用自定义转场的步骤
 1. 设置被弹出控制器的转场代理
 vc.transitioningDelegate = self
 2. 设置被弹出控制器的转场样式
 vc.modalPresentationStyle = .Custom
 3. 实现代理方法, 在代理方法中返回用于管理自定义转场动画的控制器
 /// 该代理方法用于负责转场的控制器对象
 func presentationControllerForPresentedViewController(presented: UIViewController, presentingViewController presenting: UIViewController, sourceViewController source: UIViewController) -> UIPresentationController? {

 return UIPresentationController(presentedViewController: presented, presentingViewController: presenting)
 }

 注意:
 所有被弹出的内容,都是放在容器视图上的
 */
class PopoverPresentationController: UIPresentationController {
    /**
     创建一个负责管理自定义转场动画的控制器

     - parameter presentedViewController:  被弹出的控制器
     - parameter presentingViewController: 发起弹出的控制器
     Xcode7开始给我们传递的是一个 野指针

     - returns: 负责管理自定义转场动画的控制器
     */
    override init(presentedViewController: UIViewController, presentingViewController: UIViewController) {
//        LXLLog(presentedViewController)
//        LXLLog(presentingViewController)
        super.init(presentedViewController: presentedViewController, presentingViewController: presentingViewController)
    }
    // 自定义转场即将展示时调用
    override func presentationTransitionWillBegin() {
        super.presentationTransitionWillBegin()

        // 1.添加蒙版
        coverButton.backgroundColor = UIColor(white: 0.7, alpha: 0.5)
        coverButton.frame = containerView!.bounds
        coverButton.addTarget(self, action: Selector("coverBtnClick"), forControlEvents: .TouchUpInside)
        containerView?.addSubview(coverButton)
    }
    /**
     设置内容的布局样式
     和 layoutSubviews() 一个意义
     */
    override func containerViewWillLayoutSubviews() {

        /*
            通过当前对象的containerView属性 可以获取容器视图
            通过当前对象的 presentedView()方法, 可以获取被弹出的控制器View
        */
        presentedView()?.frame = CGRect(x: 100, y: 56, width: 200, height: 200)
    }
    // MARK: - 懒加载
    private lazy var coverButton = UIButton()

    func coverBtnClick(){
        presentedViewController.dismissViewControllerAnimated(true, completion: nil)
    }
}
技能2: 比较实用的几款工具
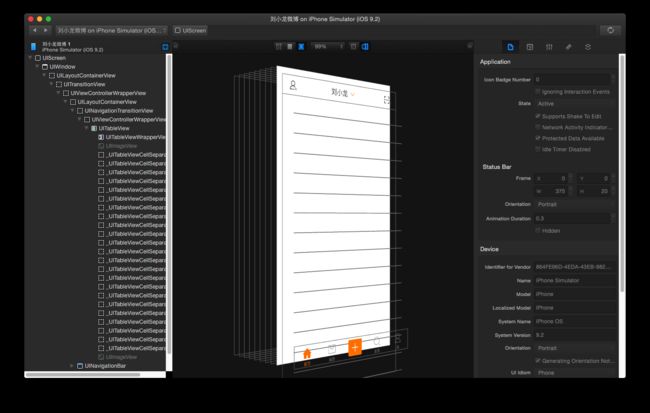
1.Reveal , 用于UI调试图的预览
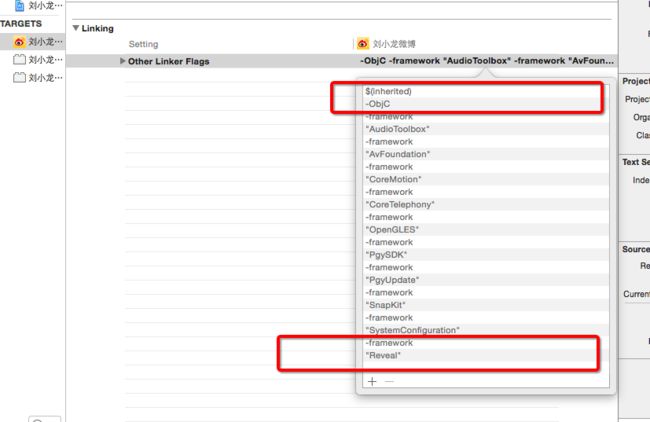
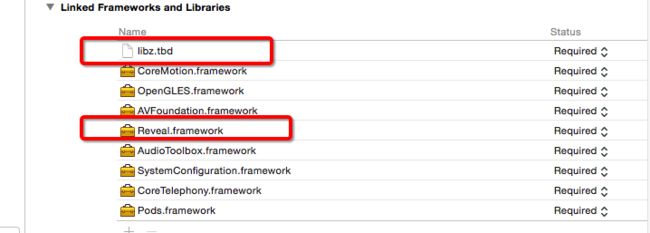
第一步,安装好的 Reveal 中 ,找到对应的调试 框架. , 并将框架 加入到自己的应用中
第二部, 对于导入的库添加 附带库, 以及额外连接, 和cocoapod用法有点像
一旦有了Other Linker 就相当于 将这个库已经预先应用到程序中了, 那么你的程序就和 Reveal 已经进行了连接了.
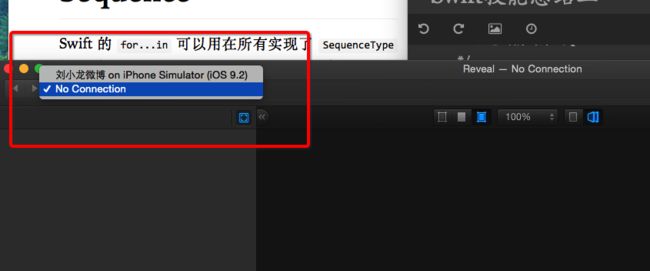
一旦运行你的程序, Reveal中就会产生你的程序的选项, 点击打开
2.分发平台 蒲公英, 可供内测 用户使用. 同时还兼顾了 产品更新提示, 以及用于反馈等功能, 当然友盟也可以, 但友盟没有分发. 西安的公司做的比较喜欢.
分享网页 https://www.pgyer.com/


