Android Surface的创建 已经大致说了下Surface在三个进程中创建的过程,但是并没有详细的说Surface, 那么这个Surface到底是什么呢? (这里的所指的Surface是Native层的Surface)
先推荐两篇
Android图形显示之硬件抽象层Gralloc,对 Gralloc讲得非常非常好
Android显示系统设计框架介绍 这个写得很全,也很多,但是也写得非常好
前面APP进程已经将要绘制的内容绘制到了图形缓冲区中了,下一步就是SurfaceFlinger进行合成并显示出来了。
一、Surface到底是什么
1.1 Surface定义
先看下Surface的定义, 如下
class Surface : public ANativeObjectBase {
}

template
class ANativeObjectBase : public NATIVE_TYPE, public REF {
}
ANativeObjectBase是一个模板类,归根到底就是Surface继承于ANativeWindow. 那么ANativeWindow又是什么呢? 看下ANativeWindow的定义, system/core/include/system/window.h
struct ANativeWindow
{
    struct android_native_base_t common;
    const uint32_t flags;
    const int   minSwapInterval;
    const float xdpi, ydpi;

    int (*queueBuffer)(struct ANativeWindow* window, struct ANativeWindowBuffer* buffer, int fenceFd);
    int (*dequeueBuffer)(struct ANativeWindow* window, struct ANativeWindowBuffer** buffer, int* fenceFd);
    int (*perform)(struct ANativeWindow* window, int operation, ... );
}
每种操作系统都定义了自己的窗口系统,而EGL是定义跨平台的接口,Android中EGL中的窗口类型EGLNativeWindowType定义在frameworks/native/opengl/include/EGL/eglplatform.h
#elif defined(__ANDROID__) || defined(ANDROID)  #Android平台相关
struct ANativeWindow;
typedef struct ANativeWindow*           EGLNativeWindowType;
EGLNativeWindowType是平台无关的,它在Android平台下被定义成ANativeWindow, 也就是说其实Surface本质上就是一个Android的Native Window.
另外 Surface 中还定义了64个BufferSlot
BufferSlot mSlots[NUM_BUFFER_SLOTS];
每个BufferSlot中有一个GraphicBuffer, 这个GraphicBuffer指向了一块图形缓冲区,其实就是一个ASHmem, 与SurfaceFlinger共同映射到同块内存上。 App所有的绘制都是写入到该图形缓冲区的。
所以Surface还包含本地的图形缓冲区用于保存UI绘制的内容。这个后面会讲
1.2 Surface(APP进程)与SurfaceFlinger进程之间的通信
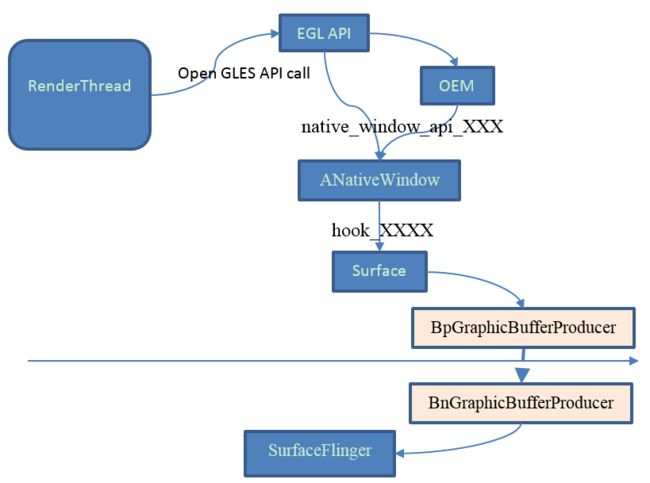
RenderThread线程并没有直接操作Surface, 而是通过操作EGLSurface来间接操作Surface.
以 EglManager中的createSurface为例来简要的说下,createSurface调用了eglCreateWindowSurface来创建EGL Surface. 代码位于 frameworks/native/opengl/libs/EGL/eglApi.cpp
EGLSurface eglCreateWindowSurface(  EGLDisplay dpy, EGLConfig config,
                                    NativeWindowType window,
                                    const EGLint *attrib_list)
{
    egl_connection_t* cnx = NULL;
    egl_display_ptr dp = validate_display_connection(dpy, cnx);
    if (dp) {
        EGLDisplay iDpy = dp->disp.dpy;
        NativeWindowType android_window = NULL;
        if (dp->disp.native == EGL_DEFAULT_DISPLAY) {
            android_window = window; //获得Native Window, 也就是ANativeWindow
        }

        if (android_window) {
            //调用native window connect API
            int result = native_window_api_connect(window, NATIVE_WINDOW_API_EGL);

            if (format != 0) {
                //同样调用native window API
                int err = native_window_set_buffers_format(window, format);
            }

            if (dataSpace != 0) {
                int err = native_window_set_buffers_data_space(window, dataSpace);
            }

            ANativeWindow* anw = reinterpret_cast(window);
            anw->setSwapInterval(anw, 1);
        }

        //OEM 自己的EGL实现, 创建EGLSurface
        EGLSurface surface = cnx->egl.eglCreateWindowSurface(iDpy, config, window, attrib_list);
        if (surface != EGL_NO_SURFACE) {
            //将ANativeWindow封装到egl_surface_t中,也就是 EGLSurface
            egl_surface_t* s = new egl_surface_t(dp.get(), config, android_window,
                    surface, cnx);
            return s;
        }
    }
}
以native_window_api_connect为例, 代码位于system/core/include/system/window.h
static inline int native_window_api_connect(
        struct ANativeWindow* window, int api)
{
    return window->perform(window, NATIVE_WINDOW_API_CONNECT, api);
}
由1.1小节可知 window->perform 也就是调用ANativeWindow::hook_perform,也就是Surface::hook_perform
int Surface::hook_perform(ANativeWindow* window, int operation, ...) {
    va_list args;
    va_start(args, operation);
    Surface* c = getSelf(window);
    int result = c->perform(operation, args);
    va_end(args);
    return result;
}
而最终就调用到 Surface::perform中了,接着调用到 Surface::dispatchConnect -> Surface::connect
int Surface::connect(int api, const sp& listener) {
    IGraphicBufferProducer::QueueBufferOutput output;
    int err = mGraphicBufferProducer->connect(listener, api, mProducerControlledByApp, &output);
    ...
}
最后通过 (Binder) BpGraphicBufferProducer 去触发SurfaceFlinger执行connect函数。
上面就是一个具体的API调用流程,其它的API可以类推,只不过对于OEM相关的EGL实现由于没有源码,就不好分析了,不过如果要与SurfaceFlinger通信,最终都是一样的, 都是通过Surface实现的。
好了,Surface是什么大概知道了,并且APP进程是怎么与SurfaceFlinger进程通信的也知道了,下面就来看BufferQueue相关概念
二、BufferQueue
2.1 BufferQueue生产者消费者模型
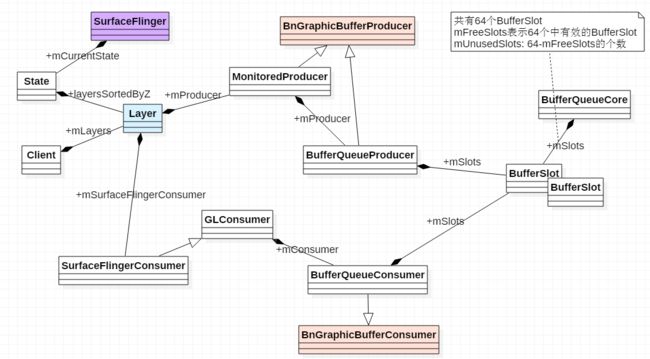
Android Surface创建 中第4小节已经提到过SurfaceFlinger中Surface(Layer)创建了,接着又为Layer创建了相关的BufferQueue。BufferQueue像是一个工具类,通createBufferQueue来建立起BufferQueue的模型
void BufferQueue::createBufferQueue(sp* outProducer,
        sp* outConsumer,
        const sp& allocator) {
    sp core(new BufferQueueCore(allocator));
    sp producer(new BufferQueueProducer(core));
    sp consumer(new BufferQueueConsumer(core));
    *outProducer = producer;
    *outConsumer = consumer;
}
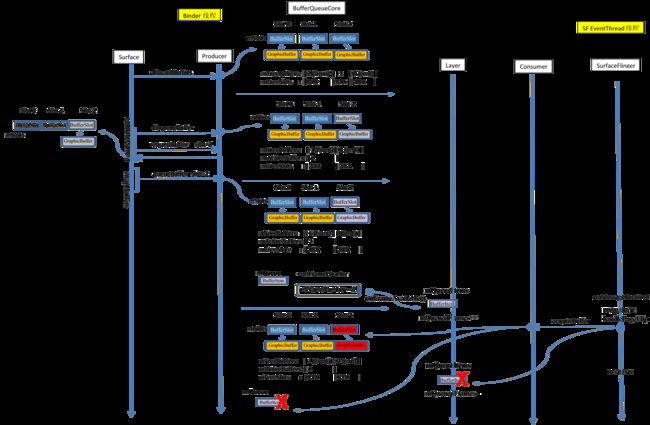
如图所示, BufferQueue模型是一个典型的生产者/消费者模型,主要包含三个重要的类
BufferQueueCore
BufferQueueProducer
生产者BufferQueueConsumer
消费者
2.2 BufferQueueCore重要的变量
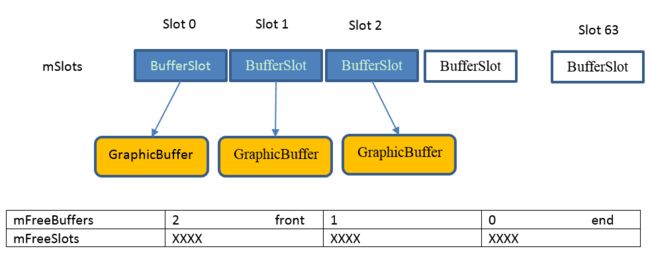
BufferQueueCore里有几个很重要的 set/list定义变量,用于指明BufferSlot的状态
mSlots
定义了64个BufferSlot, BufferSlot直接持有GraphicBufferstd::set
mFreeSlots
mFreeSlots里面的slot值表明当前slot的BufferSlot是FREE状态, 并且没有GraphicBufferstd::list
mUnusedSlots
mSlots的大小是64个,而mUnusedSlots就是除掉mFreeSlots剩下的BufferSlotstd::list
mFreeBuffers
mFreeBuffers里面的slot表明当前slot对应的BufferSlot是FREE状态,并且有GraphicBufferstd::set
mActiveBuffers
mActiveBuffers里面的slot表明当前slot对应的BufferSlot都有GraphicBuffer,并且是NON FREE状态
BufferQueueCore在初始化时就对mFreeSlots/mUnusedSlots初始化了
BufferQueueCore::BufferQueueCore(...)
{
    int numStartingBuffers = getMaxBufferCountLocked();
    for (int s = 0; s < numStartingBuffers; s++) {
        mFreeSlots.insert(s);
    }
    for (int s = numStartingBuffers; s < BufferQueueDefs::NUM_BUFFER_SLOTS;
            s++) {
        mUnusedSlots.push_front(s);
    }
}
getMaxBufferCountLocked是当前Buffer个数, double-buffers 或 triple buffers 又或是single buffers, 现在一般都是triple buffers.
2.3 GraphicBuffer
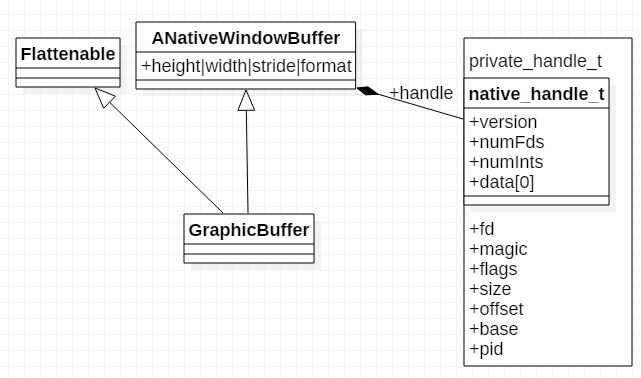
看下GraphicBuffer定义
class GraphicBuffer
    : public ANativeObjectBase< ANativeWindowBuffer, GraphicBuffer, RefBase >,
      public Flattenable
和1.1 Surface定义类似,ANativeObjectBase是一个模板类,这样GraphicBuffer就间接继承 ANativeWindowBuffer与Flattenable类,
fd: 指向一个文件描述符,这个要么是帧缓冲区设备,要么是指向一块图形缓冲区(ashmem匿名共享内存)
flags: 缓冲区flag
offset: 缓冲区偏移
base: 缓冲区实际地址
参考 Android图形显示之硬件抽象层Gralloc
- 分配图形缓冲区
GraphicBuffer::GraphicBuffer
  -> initSize
    -> GraphicBufferAllocator::alloc
      -> alloc_device_t::alloc
        -> gralloc_alloc
          -> gralloc_alloc_buffer
            -> fd = ashmem_create_region("gralloc-buffer", size);
            -> mapBuffer -> gralloc_map -> mmap
创建一块匿名共享内存,fd 指向这块内存的文件句柄
- 分配系统帧缓冲区
先打开 /dev/graphics/fbXX, 然后做mmap, 并且将映射后的地址保存到 private_module_t -> private_handle_t ->base中
fb_device_open() -> mapFrameBuffer -> mapFrameBufferLocked -> mmap
调用 gralloc_alloc去分配帧缓存, 也就是使用fb_device_open映射好的那个内存空间, 并保存到 GraphicBuffer中的private_handle_t中的base中.
此时 GraphicBuffer中private_handle_t中的fd指向 /dev/graphics/fbXX 的文件句柄
GraphicBuffer::GraphicBuffer
  -> initSize
    -> GraphicBufferAllocator::alloc
      -> alloc_device_t::alloc
        -> gralloc_alloc
          -> gralloc_alloc_framebuffer
            -> gralloc_alloc_framebuffer_locked
也就是说应用进程分配一块图形缓冲区,并且将这块图形缓冲区映射到应用进程的地址空间中,这样应用程序就可以往里面写入绘制画面的内容了。 最后应用程序将准备好的图形缓冲区渲染到帧缓冲区中(通过fb设备), 即将图形缓冲区的内容绘制到显示屏中去。参考Android帧缓冲区(Frame Buffer)硬件抽象层(HAL)模块Gralloc的实现原理分析
另外Android图形显示之硬件抽象层Gralloc对Gralloc写得非常非常好。
下面以gralloc_alloc_buffer为例
static int gralloc_alloc_buffer(alloc_device_t* dev,
        size_t size, int /*usage*/, buffer_handle_t* pHandle)
{
    int err = 0;
    int fd = -1;

    size = roundUpToPageSize(size);

    fd = ashmem_create_region("gralloc-buffer", size);

    if (err == 0) {
        private_handle_t* hnd = new private_handle_t(fd, size,0);
        gralloc_module_t* module = reinterpret_cast(
                dev->common.module);
        err = mapBuffer(module, hnd);
        if (err == 0) {
            *pHandle = hnd;
        }
    }

    return err;
}
在创建好ashmem后,并做好地址映射后,输出明明是GraphicBuffer中的handle,也就是buffer_handle_t的,为何在这里被赋值成private_handle_t的地址了呢?
struct private_handle_t : public native_handle {
    enum {
        PRIV_FLAGS_FRAMEBUFFER = 0x00000001
    };

    // file-descriptors
    int     fd;
    // ints
    int     magic;
    int     flags;
    int     size;
    int     offset;

    // FIXME: the attributes below should be out-of-line
    uint64_t base __attribute__((aligned(8)));
    int     pid;

    static inline int sNumInts() {
        return (((sizeof(private_handle_t) - sizeof(native_handle_t))/sizeof(int)) - sNumFds);
    }
    static const int sNumFds = 1;
    static const int sMagic = 0x3141592;

    private_handle_t(int fd, int size, int flags) : fd(fd), magic(sMagic), flags(flags), size(size), offset(0),
        base(0), pid(getpid())
    {
        version = sizeof(native_handle);
        numInts = sNumInts();
        numFds = sNumFds;
    }
    ~private_handle_t() {
        magic = 0;
    }
    ...
};
原来private_handle_t继承于native_handle, 仅仅是将private_handle_t的地址保存到 GraphicBuffer中的handle而已,但是能反过来通过handle找到private_handle_t么?答案是可以的, 原因是native_handle_t最后定义了一个int data[0],
其中data的地址与fd的地址是一样的,这里利用了GCC的一个trick. 而native_handle_t里保存的就是data所指地址的长度。
来看下numInts的赋值
    static inline int sNumInts() {
        return (((sizeof(private_handle_t) - sizeof(native_handle_t))/sizeof(int)) - sNumFds);
    }
可以看出numInts被赋值为除去native_handle_t的private_handle_t自己的成员变量的个数,但是这里减1了,这个在GraphicBuffer的flatten与unflatten会一一对应起来,(减1是减掉了fd).
由于GraphicBuffer继承于Flattenable, Flattenable的数据类型可以通过Binder传递,Parcel中有对Flattenable数据的处理.
status_t Parcel::write(const FlattenableHelperInterface& val)
{
    status_t err;

    // size if needed
    const size_t len = val.getFlattenedSize();
    const size_t fd_count = val.getFdCount();
    ...
    err = this->writeInt32(len);
    err = this->writeInt32(fd_count);

    // payload
    void* const buf = this->writeInplace(pad_size(len)); //获得长度为len的buffer

    int* fds = NULL;
    if (fd_count) {
        fds = new (std::nothrow) int[fd_count];
    }

    err = val.flatten(buf, len, fds, fd_count);
    for (size_t i=0 ; iwriteDupFileDescriptor( fds[i] );
    }

    if (fd_count) {
        delete [] fds;
    }

    return err;
}
来看下GraphicBuffer中的getFlattenedSize
size_t GraphicBuffer::getFlattenedSize() const {
    return static_cast(11 + (handle ? handle->numInts : 0)) * sizeof(int);
}
getFlattenedSize 这里多加了11个字节,也是特定的,这11个字节用来存放一些width/height, 头部等等数据,然后就是private_handle_t中的变量.
接着来看下GraphicBuffer的flatten函数
status_t GraphicBuffer::flatten(void*& buffer, size_t& size, int*& fds, size_t& count) const {
    size_t sizeNeeded = GraphicBuffer::getFlattenedSize();
    if (size < sizeNeeded) return NO_MEMORY;

    size_t fdCountNeeded = GraphicBuffer::getFdCount();
    if (count < fdCountNeeded) return NO_MEMORY;

    int32_t* buf = static_cast(buffer);
    buf[0] = 'GBFR';
    buf[1] = width;
    buf[2] = height;
    buf[3] = stride;
    buf[4] = format;
    buf[5] = usage;
    buf[6] = static_cast(mId >> 32);
    buf[7] = static_cast(mId & 0xFFFFFFFFull);
    buf[8] = static_cast(mGenerationNumber);
    buf[9] = 0;
    buf[10] = 0;

    if (handle) {
        buf[9] = handle->numFds;
        buf[10] = handle->numInts;
        memcpy(fds, handle->data,
                static_cast(handle->numFds) * sizeof(int));
        memcpy(&buf[11], handle->data + handle->numFds,
                static_cast(handle->numInts) * sizeof(int));
    }

    buffer = static_cast(static_cast(buffer) + sizeNeeded);
    size -= sizeNeeded;
    if (handle) {
        fds += handle->numFds;
        count -= static_cast(handle->numFds);
    }

    return NO_ERROR;
}
flatten函数是将SurfaceFlinger中的GraphicBuffer中成员变量flatten到Buffer中,用于 Binder 传输到应用进程中去。
从flatten可以看出,在获得flatten size的时间多加的11个int型用于储存相关的数据, 然后将private_handle_t中fd的拷到fds中,再将private_handle_t中其它的数据拷到buffer+11开始的地址中去, 那么整个buffer的值就是
同理 unflatten 与flatten相反,就是将buffer内存块储存的值转换到应用进程的GraphicBuffer中
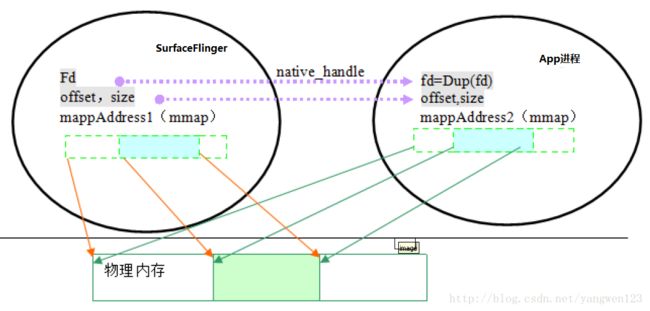
注意,这里面有个非常重要的字段 fd, fd 是 surfacelinger 中的文件描述符,当将GraphicBuffer传递给App进程里, Binder会在内核中将SurfaceFlinger进程中的fd所指向的文件描述块赋值给App进程中的新的fd, 具体可以参考binder ---传递文件描述符.
最后还有一个非常非常重要的App进程去映射Ashmem匿名内存,具体是在GraphicBuffer的unflatten中完成的
GraphicBuffer::unflatten
  -> GraphicBufferMapper::registerBuffer
    -> gralloc_module_t::registerBuffer
      -> gralloc_register_buffer
        -> gralloc_map -> mmap
建立好GraphicBuffer中的private_handle_t结构体,至此,App进程就和SurfaceFlinger映射到同一块内存了,App也就可以往这块内存里写内容了。
盗用Android图形缓冲区映射过程源码分析
三、BufferQueue之Producer(由Surface通过Binder线程调用)
3.1 SurfaceFlinger进程预分配GraphicBuffer
App进程通过Binder线程向SurfaceFlinger进程发起allocateBuffer请求,Android硬件渲染环境初始化中提到了allocateBuffer函数,它的作用是预先分配Buffer, 这样可以避免在渲染时分配带来的延时。 allocateBuffer最终会触发BufferQueueProducer去allocateBuffer
void BufferQueueProducer::allocateBuffers(uint32_t width, uint32_t height,
        PixelFormat format, uint32_t usage) {
    while (true) {
        {
            ...
            //这里 newBufferCount 为 3
            newBufferCount = mCore->mFreeSlots.size();
            ...
            mCore->mIsAllocating = true; //bool类型指明当前正在分配GraphicBuffer
        }

        Vector> buffers;
        for (size_t i = 0; i <  newBufferCount; ++i) {
            status_t result = NO_ERROR;
            //创建GraphicBuffer
            sp graphicBuffer(mCore->mAllocator->createGraphicBuffer(
                    allocWidth, allocHeight, allocFormat, allocUsage, &result));
            buffers.push_back(graphicBuffer);
        }
        { // Autolock scope
            for (size_t i = 0; i < newBufferCount; ++i) {
                if (mCore->mFreeSlots.empty()) {
                    continue;
                }
                auto slot = mCore->mFreeSlots.begin();
                mCore->clearBufferSlotLocked(*slot); // Clean up the slot first
                mSlots[*slot].mGraphicBuffer = buffers[i];
                mSlots[*slot].mFence = Fence::NO_FENCE;
                //此时分配了GraphicBuffer, 放入mFreeBuffers中
                mCore->mFreeBuffers.push_front(*slot);
                //已经分配了GraphicBuffer, 那么mFreeSlots就不再保存这些slot
                mCore->mFreeSlots.erase(slot);
            }

            mCore->mIsAllocating = false;
        } // Autolock scope
    }
}
3.2 dequeueBuffer
3.2.1 App进程通过Binder线程向SurfaceFlinger进程发起dequeueBuffer请求
syncFrameState()
  -> eglMakeCurrent
    -> eglMakeCurrent(OEM EGL)
      -> Surface::hook_dequeueBuffer()
        -> Surface::dequeueBuffer()
            -> BpGraphicBufferProducer::dequeueBuffer()
            -> BpGraphicBufferProducer::requestBuffer()
上述的dequeueBuffer的调用过程在不同的平台实现可能不同,不必太深究
3.2.2 SurfaceFlinger进程中的dequeueBuffer
App进程发起BpGraphicBufferProducer::dequeueBuffer的请求,在SurfaceFlinger进程会触发dequeueBuffer
status_t BufferQueueProducer::dequeueBuffer(int *outSlot,
        sp *outFence, uint32_t interval,
        uint32_t width, uint32_t height, PixelFormat format, uint32_t usage) {
    { // Autolock scope
        int found = BufferItem::INVALID_BUFFER_SLOT;
        //找到一个BufferSlot
        while (found == BufferItem::INVALID_BUFFER_SLOT) {
            status_t status = waitForFreeSlotThenRelock(FreeSlotCaller::Dequeue,&found);
        }

        if (mCore->mSharedBufferSlot != found) {
            //现在的状态是DEQUEUE, 所以将slot插入到mActiveBuffers中
            mCore->mActiveBuffers.insert(found);
        }
        *outSlot = found;

        attachedByConsumer = mSlots[found].mNeedsReallocation;
        mSlots[found].mNeedsReallocation = false;
        //设置为DEQUEUE
        mSlots[found].mBufferState.dequeue();

        //检查下是否需要重新分配GraphicBuffer
        if ((buffer == NULL) ||
                buffer->needsReallocation(width, height, format, usage))
        {
            returnFlags |= BUFFER_NEEDS_REALLOCATION;
        } else {
            mCore->mBufferAge =
                    mCore->mFrameCounter + 1 - mSlots[found].mFrameNumber;
        }
        ...
    } // Autolock scope

    //如果需要重新分配的话,进入该分支
    if (returnFlags & BUFFER_NEEDS_REALLOCATION) {
        status_t error;
        sp graphicBuffer(mCore->mAllocator->createGraphicBuffer(
                width, height, format, usage, &error));
        { // Autolock scope
            if (graphicBuffer != NULL && !mCore->mIsAbandoned) {
                graphicBuffer->setGenerationNumber(mCore->mGenerationNumber);
                mSlots[*outSlot].mGraphicBuffer = graphicBuffer;
            }
            ...
            mCore->mIsAllocating = false;
            mCore->mIsAllocatingCondition.broadcast();
        } // Autolock scope
    }
    return returnFlags;
}
dequeueBuffer 主要做了以下几件事情
-
- 获得一个可用的BufferSlot
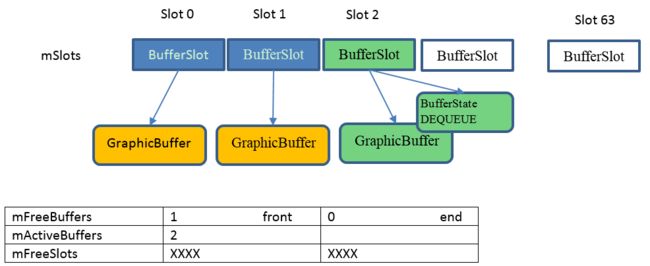
通过waitForFreeSlotThenRelock函数从mFreeBuffers(getFreeBufferLocked)或者从mFreeSlots(getFreeSlotLocked)获得一个BufferSlot,
- 获得一个可用的BufferSlot
-
- 将BufferSlot插入到mActiveBuffers中
-
- 设置BufferSlot的状态为 DEQUEUE
状态变化 FREE -> DEQUEUE
- 设置BufferSlot的状态为 DEQUEUE
4.检查是否需要重新分配GraphicBuffer
由于可能是从1中的mFreeBuffers中获得可用的BufferSlot, 而该BufferSlot已经分配过GraphicBuffer了,但是此时dequeueBuffer需要的width/height/format/usage与该BufferSlot不对应,此时就需要重新分配一个新的GraphicBuffer-
- 将最后的BufferSlot返回给 APP进程中的Surface
如图所示,dequeueBuffer找到了第三个BufferSlot.
3.3 requestBuffer
status_t BnGraphicBufferProducer::onTransact(
    uint32_t code, const Parcel& data, Parcel* reply, uint32_t flags)
{
    switch(code) {
        case REQUEST_BUFFER: {
            CHECK_INTERFACE(IGraphicBufferProducer, data, reply);
            int bufferIdx   = data.readInt32();
            sp buffer; //局部变量
            int result = requestBuffer(bufferIdx, &buffer);
            reply->writeInt32(buffer != 0);
            if (buffer != 0) {
                reply->write(*buffer);
            }
            reply->writeInt32(result);
            return NO_ERROR;
        }
       ....
    }
}

status_t BufferQueueProducer::requestBuffer(int slot, sp* buf)
{
    ...
    *buf = mSlots[slot].mGraphicBuffer;
    return NO_ERROR;
}
requestBuffer很简单,App进程请求SurfaceFlinger将slot对应的BufferSlot中的GraphicBuffer传给App进程,由2,2节,当Surface去dequeueBuffer时,找到了Slot2中的BufferSlot,requestBuffer就将该BufferSlot中的GraphicBuffer传递给App进程的Surface, 详细可以参见 2.2.2 GraphicBuffer。
3.4 queueBuffer
status_t BufferQueueProducer::queueBuffer(int slot,
        const QueueBufferInput &input, QueueBufferOutput *output) {
    //input是Surface传过来的,input是flattenable的,这个可以看下前面的GraphicBuffer
    input.deflate(×tamp, &isAutoTimestamp, &autoTimestamp, &dataSpace, &crop, &scalingMode,
            &transform, &interval, &fence, &stickyTransform);

    sp frameAvailableListener;
    sp frameReplacedListener;
    BufferItem item;
    { // Autolock scope
        //获得slot中的GrahicBuffer
        const sp& graphicBuffer(mSlots[slot].mGraphicBuffer);

        mSlots[slot].mFence = fence;
        //状态从DEQUQUE -> QUEUE
        mSlots[slot].mBufferState.queue();

        //将slot对应的BufferSlot的数据拷贝到BufferItem中
        item.mAcquireCalled = mSlots[slot].mAcquireCalled;
        item.mGraphicBuffer = mSlots[slot].mGraphicBuffer;
        item.mSlot = slot;

        //mQueue是一个FIFO队列,里面保存的queued buffers
        if (mCore->mQueue.empty()) {
            mCore->mQueue.push_back(item);
            frameAvailableListener = mCore->mConsumerListener;
        } else {
            //当前队列不为空,那么说明Consumer还没消费掉,既然有新的Buffer来,那旧的理论上是可以不用再显示了
            const BufferItem& last = mCore->mQueue.itemAt(mCore->mQueue.size() - 1);
            if (last.mIsDroppable) { //是否是可以Drop掉
                if (!last.mIsStale) {
                    //如果已经过期了,则修改一些该BufferSlot的一些状态,
                    //比如将它从 mActiveBuffers中移出,加入到mFreeBuffers中
                    ...
                }

                // Overwrite the droppable buffer with the incoming one
                //用最新的BufferItem替换最后那个
                mCore->mQueue.editItemAt(mCore->mQueue.size() - 1) = item;
                frameReplacedListener = mCore->mConsumerListener;
            } else {
                //如果最后那个是不能Drop的,那新来的Buffer也只能放在最后了。
                mCore->mQueue.push_back(item);
                frameAvailableListener = mCore->mConsumerListener;
            }
        }
        //output是传给App的
        output->inflate(mCore->mDefaultWidth, mCore->mDefaultHeight,
                mCore->mTransformHint,
                static_cast(mCore->mQueue.size()));

    } // Autolock scope

    // Don't send the GraphicBuffer through the callback, and don't send
    // the slot number, since the consumer shouldn't need it
    //看注释是说Consumer不会用到slot值,以及GraphicBuffer,???
    item.mGraphicBuffer.clear();
    item.mSlot = BufferItem::INVALID_BUFFER_SLOT;

    { // scope for the lock
        if (frameAvailableListener != NULL) {
            frameAvailableListener->onFrameAvailable(item); // 回调 frame available
        } else if (frameReplacedListener != NULL) {
            frameReplacedListener->onFrameReplaced(item);
        }
    }
    ...
}
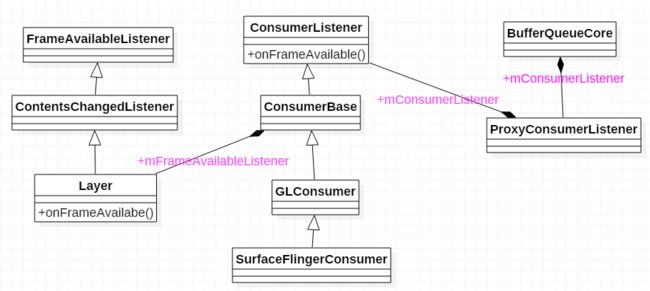
当新的一帧准备好后(queueBuffer),这时就要通知 Consumer去消费了,这时调用的是 BufferQueueCore::mConsumerListener -> onFrameAvailable
如图所示,最终会调用到Layer的onFrameAvailable中
void Layer::onFrameAvailable(const BufferItem& item) {
    { // Autolock scope
        //push到 mQueueItems中去
        mQueueItems.push_back(item);
        android_atomic_inc(&mQueuedFrames);
        ...
    }

    mFlinger->signalLayerUpdate();
    if (mQueuedFrames>1) {  //如果有两个以上的Frames, 表示已经mQueueItems已经满了
        queueLengthState = QUEUE_IS_FULL;
    }
}

void SurfaceFlinger::signalLayerUpdate() {
    mEventQueue.invalidate();
}
mQueuedFrames表示当前已经Queued 的 Frame的个数
接下来看下 MessageQueue::invalidate(),
#define INVALIDATE_ON_VSYNC 1
void MessageQueue::invalidate() {
#if INVALIDATE_ON_VSYNC
    mEvents->requestNextVsync();
#else
    mHandler->dispatchInvalidate();
#endif
}
从MessageQueue中的invalidate可以看出来,会直接调用 mEvents的requestNextVsync()
那这个mEvents是什么呢? 具体参考 Android SurfaceFlinger SW Vsync模型, mEvents也就是SF EventThread里创建的一个EventThread::Connection
链接 Android SurfaceFlinger SW Vsync模型里面的 vsync信号产生图, 如图中 1、3、3_1 所示
requestNextVsync经过SF EventThead后,最后在MessageQueue中的eventReceiver又会调用 mHandler->dispatchInvalidate()
mHandler->dispatchInvalidate()
  ->SurfaceFlinger::onMessageReceived()
    -> handleMessageInvalidate()
    -> signalRefresh()
看到这里, dispatchInvalidate分为两个步聚了,一个是handleMessageInvalidate() 这个是Layer对GraphicBuffer做一些处理,当处理完成后,就通过HWConsumer去合成buffer, 然后显示了
四、BufferQueue之Consumer (SurfaceFlinger EventThread里消费数据)
当Layer通过onFrameAvailable回调并通过requestNextVsync去请求一个VSYNC同步信号去唤醒Consumer去消费掉新数据。 最后在SF EventThread里收到INVALDATE信息,处理完INVALIDATE信息后又signalRefresh触发 REFRESH信息,将APP要显示的内容刷新到屏幕上
void SurfaceFlinger::onMessageReceived(int32_t what) {
    ATRACE_CALL();
    switch (what) {
        case MessageQueue::INVALIDATE: {
            bool refreshNeeded = handleMessageTransaction();
            refreshNeeded |= handleMessageInvalidate();
            refreshNeeded |= mRepaintEverything;
            if (refreshNeeded) {
                // Signal a refresh if a transaction modified the window state,
                // a new buffer was latched, or if HWC has requested a full
                // repaint
                signalRefresh();
            }
            break;
        }
        case MessageQueue::REFRESH: {
            handleMessageRefresh();
            break;
        }
    }
}
4.1 handleMessageTransaction
SurfaceFlinger和Layer分别处理事务, 分别跟新Drawing State, 这个Drawing 状态用在后续的操作中,作为当前绘制帧的状态存在
SurfaceFlinger事务处理
4.2 handleMessageInvalidate
从 QUEUED 的Buffer中找到最合适的Buffer用于后面合成显示
SurfaceFlinger之handlePageFlip
4.3 handleMessageRefresh
对Layer进行合成,刷新到屏幕上
SurfaceFlinger之Refresh
