目录
- 环境setup
- 标注数据
- 训练和识别
1.环境setup
之前由于硬件平台的原因, 不支持tensorflow,用caffe作识别
我的GPU上有三个版本的caffe, 一个是原生的native-caffe, 一个是适配faster rcnn的内嵌在py-faster-rcnn中的caffe, 一个是适配ssd的caffe
caffe目前处于没有人维护的状态, 如果不是条件所限还是尽量使用tensorflow, 如果受限使用caffe应该考虑使用docker的手段隔离环境, 否则极易产生环境冲突
前提是装好opencv, cuda和cudnn
- clone整个工程,内嵌工程内的caffe:
git clone –recursive https://github.com/rbgirshick/py-faster-rcnn.git, 设置工程根目录为$FRCN_ROOT=clone 根目录 - Build the Cython modules: cd $FRCN_ROOT/lib, make
- build caffe
- cd $FRCN_ROOT/caffe-fast-rcnn 创建make file:cp Makefile.config.example Makefile.config
- 修改Makefile.config:开启OPENCV_VERSION := 3, WITH_PYTHON_LAYER := 1;
- 修改USE_OPENCV := 1,INCLUDE_DIRS := $(PYTHON_INCLUDE) /usr/local/include /usr/include/hdf5/serial/,LIBRARY_DIRS := $(PYTHON_LIB) /usr/local/lib /usr/lib /usr/lib/x86_64-linux-gnu/hdf5/serial/ /usr/local/lib/lib/ /usr/lib/x86_64-linux-gnu/(没有添加会报错no hdf5.h found)
其中有一个点比较奇怪: 原生的caffe USE_CUDNN := 1 build是ok的, py faster内嵌的caffe版本同样的环境开启USE_CUDNN := 1就会编译失败, 后面训练+识别都用到了gpu, 这个版本的Makefile.config默认就是注释掉的,所以无伤大雅
附上配置
cat $FRCN_ROOT/caffe-fast-rcnn/Makefile.config
## Refer to http://caffe.berkeleyvision.org/installation.html
# Contributions simplifying and improving our build system are welcome!

# cuDNN acceleration switch (uncomment to build with cuDNN).
# USE_CUDNN := 1

# CPU-only switch (uncomment to build without GPU support).
# CPU_ONLY := 1

# uncomment to disable IO dependencies and corresponding data layers
USE_OPENCV := 1
# USE_LEVELDB := 0
USE_LMDB := 1

# uncomment to allow MDB_NOLOCK when reading LMDB files (only if necessary)
#   You should not set this flag if you will be reading LMDBs with any
#   possibility of simultaneous read and write
# ALLOW_LMDB_NOLOCK := 1

# Uncomment if you're using OpenCV 3
OPENCV_VERSION := 3

# To customize your choice of compiler, uncomment and set the following.
# N.B. the default for Linux is g++ and the default for OSX is clang++
# CUSTOM_CXX := g++

# CUDA directory contains bin/ and lib/ directories that we need.
CUDA_DIR := /usr/local/cuda
# On Ubuntu 14.04, if cuda tools are installed via
# "sudo apt-get install nvidia-cuda-toolkit" then use this instead:
# CUDA_DIR := /usr

# CUDA architecture setting: going with all of them.
# For CUDA < 6.0, comment the *_50 lines for compatibility.
CUDA_ARCH := -gencode arch=compute_20,code=sm_20 \
        -gencode arch=compute_20,code=sm_21 \
        -gencode arch=compute_30,code=sm_30 \
        -gencode arch=compute_35,code=sm_35 \
        -gencode arch=compute_50,code=sm_50 \
        -gencode arch=compute_50,code=compute_50

# BLAS choice:
# atlas for ATLAS (default)
# mkl for MKL
# open for OpenBlas
BLAS := atlas
# Custom (MKL/ATLAS/OpenBLAS) include and lib directories.
# Leave commented to accept the defaults for your choice of BLAS
# (which should work)!
# BLAS_INCLUDE := /path/to/your/blas
# BLAS_LIB := /path/to/your/blas

# Homebrew puts openblas in a directory that is not on the standard search path
# BLAS_INCLUDE := $(shell brew --prefix openblas)/include
# BLAS_LIB := $(shell brew --prefix openblas)/lib

# This is required only if you will compile the matlab interface.
# MATLAB directory should contain the mex binary in /bin.
# MATLAB_DIR := /usr/local
# MATLAB_DIR := /Applications/MATLAB_R2012b.app

# NOTE: this is required only if you will compile the python interface.
# We need to be able to find Python.h and numpy/arrayobject.h.
PYTHON_INCLUDE := /usr/include/python2.7 \
        /usr/lib/python2.7/dist-packages/numpy/core/include
# Anaconda Python distribution is quite popular. Include path:
# Verify anaconda location, sometimes it's in root.
# ANACONDA_HOME := $(HOME)/anaconda
# PYTHON_INCLUDE := $(ANACONDA_HOME)/include \
        # $(ANACONDA_HOME)/include/python2.7 \
        # $(ANACONDA_HOME)/lib/python2.7/site-packages/numpy/core/include \

# Uncomment to use Python 3 (default is Python 2)
# PYTHON_LIBRARIES := boost_python3 python3.5m
# PYTHON_INCLUDE := /usr/include/python3.5m \
#                 /usr/lib/python3.5/dist-packages/numpy/core/include

# We need to be able to find libpythonX.X.so or .dylib.
PYTHON_LIB := /usr/lib
# PYTHON_LIB := $(ANACONDA_HOME)/lib

# Homebrew installs numpy in a non standard path (keg only)
# PYTHON_INCLUDE += $(dir $(shell python -c 'import numpy.core; print(numpy.core.__file__)'))/include
# PYTHON_LIB += $(shell brew --prefix numpy)/lib

# Uncomment to support layers written in Python (will link against Python libs)
 WITH_PYTHON_LAYER := 1

# Whatever else you find you need goes here.
INCLUDE_DIRS := $(PYTHON_INCLUDE) /usr/local/include /usr/include/hdf5/serial/ /usr/include/opencv/ /usr/include/opencv2/
LIBRARY_DIRS := $(PYTHON_LIB) /usr/local/lib /usr/lib /usr/lib/x86_64-linux-gnu/hdf5/serial/  /usr/local/lib/lib/ /usr/lib/x86_64-linux-gnu/

# If Homebrew is installed at a non standard location (for example your home directory) and you use it for general dependencies
# INCLUDE_DIRS += $(shell brew --prefix)/include
# LIBRARY_DIRS += $(shell brew --prefix)/lib

# Uncomment to use `pkg-config` to specify OpenCV library paths.
# (Usually not necessary -- OpenCV libraries are normally installed in one of the above $LIBRARY_DIRS.)
# USE_PKG_CONFIG := 1

BUILD_DIR := build
DISTRIBUTE_DIR := distribute

# Uncomment for debugging. Does not work on OSX due to https://github.com/BVLC/caffe/issues/171
# DEBUG := 1

# The ID of the GPU that 'make runtest' will use to run unit tests.
TEST_GPUID := 0

# enable pretty build (comment to see full commands)
Q ?= @
配置好了之后make all -j12 && make pycaffe
- 构建数据集结构: cd $FRCN_ROOT/data, 数据目录结构如下:

下载vgg16的模型参数到下:./data/scripts/fetch_imagenet_models.sh, 这个脚本是从dropbox下的, 但是dropbox访问非常慢,可以从网上找然后放到$FRCN_ROOT/data/imagenet_models下
调试过程中可以使用原生的数据集,运行命令
./experiments/scripts/faster_rcnn_alt_opt.sh [GPU_ID] [NET] [--set ...]
# GPU_ID is the GPU you want to train on
# NET in {ZF, VGG_CNN_M_1024, VGG16} is the network arch to use
# --set ... allows you to specify fast_rcnn.config options, e.g.
#   --set EXP_DIR seed_rng1701 RNG_SEED 1701
比如:nohup ./experiments/scripts/faster_rcnn_end2end.sh 0 VGG16 pascal_voc 2>&1 &
但是启动可能会遇到如下一些问题, 此处都是其他同事告诉我的(https://www.douban.com/note/630834963/?type=rec#sep):
AttributeError: 'module' object has no attribute ‘text_format'
解决方法:在/home/xxx/py-faster-rcnn/lib/fast_rcnn/train.py的头文件导入部分加上 :import google.protobuf.text_formatTypeError: 'numpy.float64' object cannot be interpreted as an index
这里是因为numpy版本不兼容导致的问题,最好的解决办法是卸载你的numpy,安装numpy1.11.0, 但是重新装numpy1.11.0又和tensorflow冲突
就修改代码兼容, 所以这里最好用docker做环境, 相互隔离:
- $FRCN_ROOT/lib/roi_data_layer/minibatch.py
将第26行:fg_rois_per_image = np.round(cfg.TRAIN.FG_FRACTION * rois_per_image)
改为:fg_rois_per_image = np.round(cfg.TRAIN.FG_FRACTION * rois_per_image).astype(np.int)
- $FRCN_ROOT/lib/datasets/ds_utils.py
将第12行:hashes = np.round(boxes * scale).dot(v)
改为:hashes = np.round(boxes * scale).dot(v).astype(np.int)
- $FRCN_ROOT/lib/fast_rcnn/test.py
将第129行: hashes = np.round(blobs['rois'] * cfg.DEDUP_BOXES).dot(v)
改为: hashes = np.round(blobs['rois'] * cfg.DEDUP_BOXES).dot(v).astype(np.int)
- $FRCN_ROOT/lib/rpn/proposal_target_layer.py
将第60行:fg_rois_per_image = np.round(cfg.TRAIN.FG_FRACTION * rois_per_image)
改为:fg_rois_per_image = np.round(cfg.TRAIN.FG_FRACTION * rois_per_image).astype(np.int)
TypeError: slice indices must be integers or None or have an index method
修改 /home/lzx/py-faster-rcnn/lib/rpn/proposal_target_layer.py,转到123行:
for ind in inds:
cls = clss[ind]
start = 4 * cls
end = start + 4
bbox_targets[ind, start:end] = bbox_target_data[ind, 1:]
bbox_inside_weights[ind, start:end] = cfg.TRAIN.BBOX_INSIDE_WEIGHTS
return bbox_targets, bbox_inside_weights
这里的ind,start,end都是 numpy.int 类型,这种类型的数据不能作为索引,所以必须对其进行强制类型转换,转化结果如下:
for ind in inds:
ind = int(ind)
cls = clss[ind]
start = int(4 * cos)
end = int(start + 4)
bbox_targets[ind, start:end] = bbox_target_data[ind, 1:]
bbox_inside_weights[ind, start:end] = cfg.TRAIN.BBOX_INSIDE_WEIGHTS
return bbox_targets, bbox_inside_weights
不排除build 还有其他问题, 需要分析Google解决
看到原生的数据集可以开始训练环境setup基本就可以了
2.标注数据
git clone https://github.com/tzutalin/labelImg.git
我是在mac上标注,按照教程setup 没有遇到问题
Python 3 + Qt5 (Works on macOS High Sierra)
brew install qt  # will install qt-5.x.x
brew install libxml2
make qt5py3
python labelImg.py
python  labelImg.py [IMAGE_PATH] [PRE-DEFINED CLASS FILE]
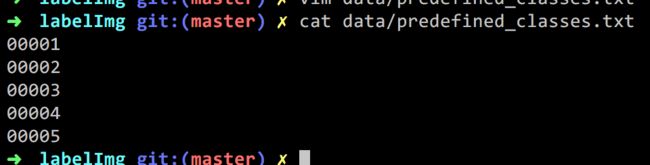
在data/predefined_classes.txt下提前写入好的分类的label,设置输出目录
3.训练和识别
-
训练
- 当label数量和种类发生变化时需要清除cache文件: rm -rf data/cache, 否则训练启动时包box框的assert错误
- xml文件放入$FRCN_ROOT/data/VOCdevkit2007/VOC2007/Annotations
- jpg文件放入$FRCN_ROOT/data/VOCdevkit2007/VOC2007/JPEGImages
- list.py生成trainval.txt放入ImageSets/Main下
cd $FRCN_ROOT/data/VOCdevkit2007/ && python list.py VOC2007/ mv trainval.txt ImageSets/Main/- 根据训练的类别与种类修改lib下datasets下pascal_voc.py文件, self._classes =('')例如五个分类+背景:
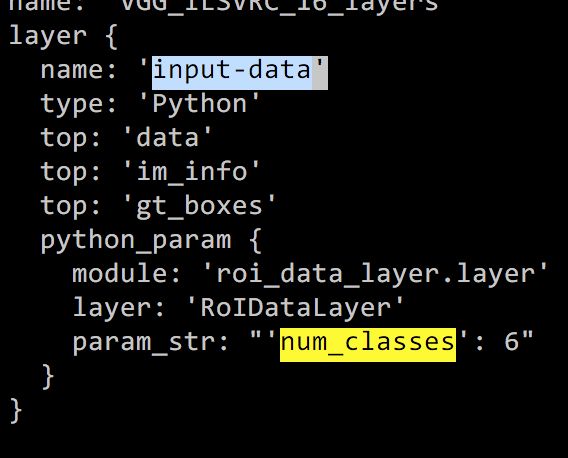
self._classes = ('__background__', # always index 0 '00001', '00002', '00003','00004', '00005')- 以vgg16为例修改$FRCN_ROOT/models/pascal_voc/VGG16/faster_rcnn_end2end/train.prototxt ,找到input_data修改num_classes = 6 (五个分类+背景)
找到roi-data下的python_param修改num_classes = 6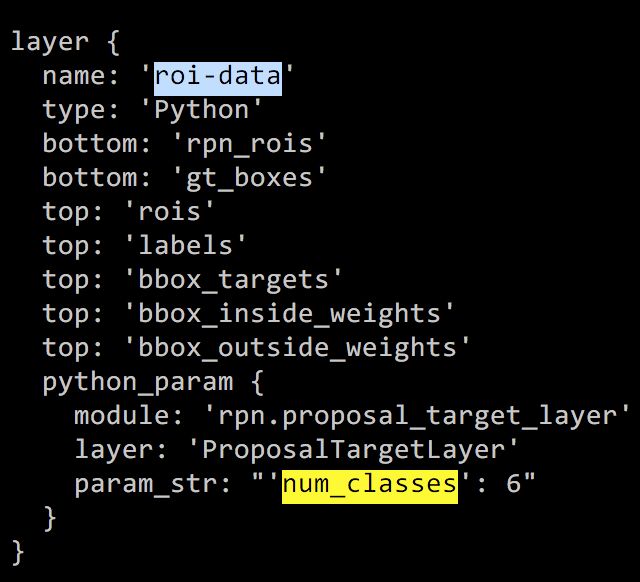
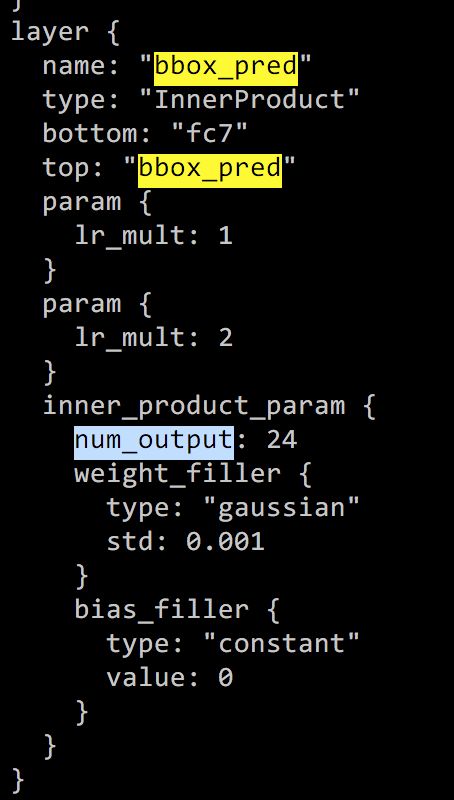
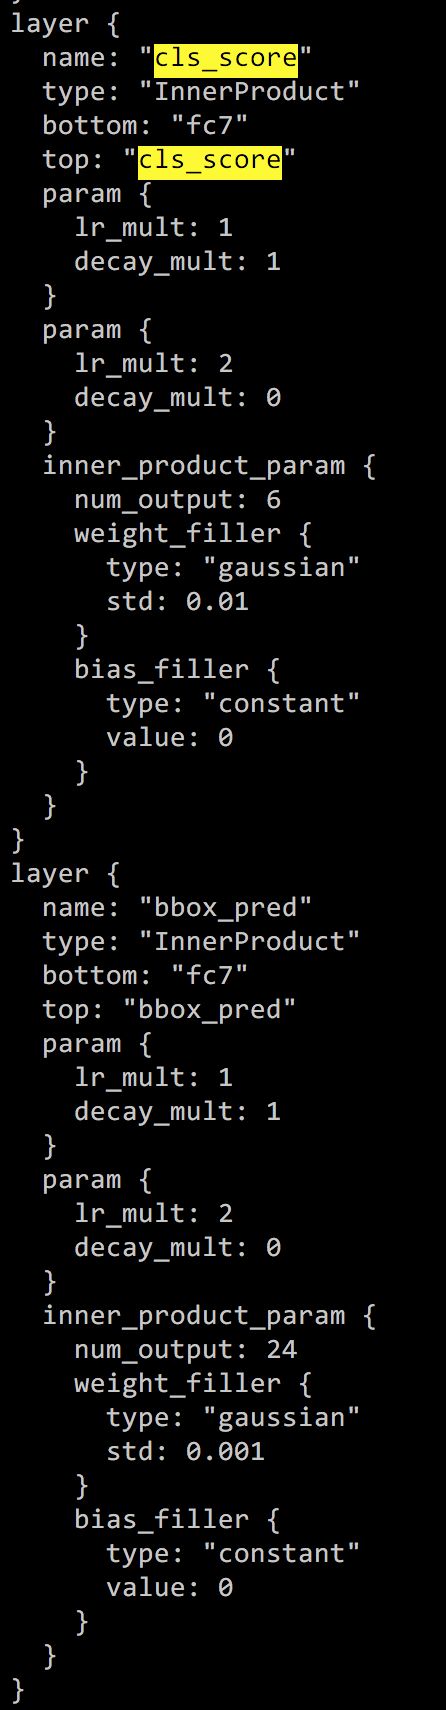
找到cls_score下inner_product_param的num_output, 注意cls_score有多处,找到name和top都是'cls_score'的那个同理修改bbox_pred下的num_output为24(label数目*4)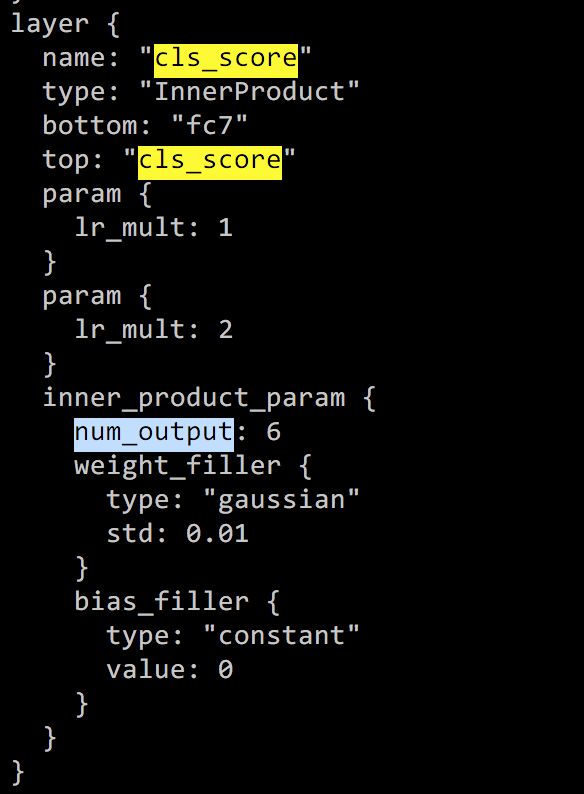
-
同样道理修改
$FRCN_ROOT/models/pascal_voc/VGG16/faster_rcnn_end2end/test.prototxt test.prototxt中没有input-data层,所以只需按照train中的修改cls_score层以及bbox_pred层即可
-
开始训练nohup ./experiments/scripts/faster_rcnn_end2end.sh 0 VGG16 pascal_voc 2>&1 & 看到solving就是开始训练了
  Solving...
  I0125 16:44:55.569564 29848 solver.cpp:229] Iteration 0, loss = 3.72803
  I0125 16:44:55.569602 29848 solver.cpp:245]     Train net output #0: loss_bbox = 0.0788447 (* 1 = 0.0788447 loss)
  I0125 16:44:55.569607 29848 solver.cpp:245]     Train net output #1: loss_cls = 2.51337 (* 1 = 2.51337 loss)
  I0125 16:44:55.569612 29848 solver.cpp:245]     Train net output #2: rpn_cls_loss = 0.77974 (* 1 = 0.77974 loss)
  I0125 16:44:55.569614 29848 solver.cpp:245]     Train net output #3: rpn_loss_bbox = 0.10321 (* 1 = 0.10321 loss)
  I0125 16:44:55.569618 29848 sgd_solver.cpp:106] Iteration 0, lr = 0.001
  I0125 16:45:05.665946 29848 solver.cpp:229] Iteration 20, loss = 1.29099
  I0125 16:45:05.665966 29848 solver.cpp:245]     Train net output #0: loss_bbox = 0.387312 (* 1 = 0.387312 loss)
  I0125 16:45:05.665971 29848 solver.cpp:245]     Train net output #1: loss_cls = 0.453434 (* 1 = 0.453434 loss)
  I0125 16:45:05.665974 29848 solver.cpp:245]     Train net output #2: rpn_cls_loss = 0.119676 (* 1 = 0.119676 loss)
  I0125 16:45:05.665992 29848 solver.cpp:245]     Train net output #3: rpn_loss_bbox = 0.0238676 (* 1 = 0.0238676 loss)
  I0125 16:45:05.665995 29848 sgd_solver.cpp:106] Iteration 20, lr = 0.001
  I0125 16:45:15.740180 29848 solver.cpp:229] Iteration 40, loss = 1.198
  I0125 16:45:15.740201 29848 solver.cpp:245]     Train net output #0: loss_bbox = 0.735388 (* 1 = 0.735388 loss)
  I0125 16:45:15.740221 29848 solver.cpp:245]     Train net output #1: loss_cls = 0.691414 (* 1 = 0.691414 loss)
  I0125 16:45:15.740224 29848 solver.cpp:245]     Train net output #2: rpn_cls_loss = 0.055582 (* 1 = 0.055582 loss)
  I0125 16:45:15.740228 29848 solver.cpp:245]     Train net output #3: rpn_loss_bbox = 0.0227136 (* 1 = 0.0227136 loss)
  I0125 16:45:15.740231 29848 sgd_solver.cpp:106] Iteration 40, lr = 0.001
  I0125 16:45:25.829916 29848 solver.cpp:229] Iteration 60, loss = 0.757013
  I0125 16:45:25.829936 29848 solver.cpp:245]     Train net output #0: loss_bbox = 0.599626 (* 1 = 0.599626 loss)
  I0125 16:45:25.829939 29848 solver.cpp:245]     Train net output #1: loss_cls = 0.348519 (* 1 = 0.348519 loss)
  I0125 16:45:25.829942 29848 solver.cpp:245]     Train net output #2: rpn_cls_loss = 0.0327966 (* 1 = 0.0327966 loss)
  I0125 16:45:25.829960 29848 solver.cpp:245]     Train net output #3: rpn_loss_bbox = 0.0138469 (* 1 = 0.0138469 loss)
  I0125 16:45:25.829963 29848 sgd_solver.cpp:106] Iteration 60, lr = 0.001
可以修改$FRCN_ROOT/lib/fast_rcnn/config.py 控制保存model间隔, 尤其是调试的时候设置小一点快速发现问题, __C.TRAIN.SNAPSHOT_ITERS = 10000
-
识别&测试
训练好的模型在output/faster_rcnn_end2end/voc_2007_trainval/下db24gt@db24gt-XPS-8930:~/workspace/github/py-faster-rcnn$ ls output/faster_rcnn_end2end/voc_2007_trainval/vgg16_faster_rcnn_iter_* output/faster_rcnn_end2end/voc_2007_trainval/vgg16_faster_rcnn_iter_10000.caffemodel output/faster_rcnn_end2end/voc_2007_trainval/ vgg16_faster_rcnn_iter_50000.caffemodel output/faster_rcnn_end2end/voc_2007_trainval/vgg16_faster_rcnn_iter_20000.caffemodel output/faster_rcnn_end2end/voc_2007_trainval/ vgg16_faster_rcnn_iter_60000.caffemodel output/faster_rcnn_end2end/voc_2007_trainval/vgg16_faster_rcnn_iter_30000.caffemodel output/faster_rcnn_end2end/voc_2007_trainval/ vgg16_faster_rcnn_iter_70000.caffemodel output/faster_rcnn_end2end/voc_2007_trainval/vgg16_faster_rcnn_iter_40000.caffemodel测试代码样例
加入环境变量可以找到python库, 我写的是本机绝对路径"""Set up paths for Fast R-CNN.""" import os.path as osp import sys def add_path(path): if path not in sys.path: sys.path.insert(0, path) #this_dir = osp.dirname(__file__) # Add caffe to PYTHONPATH caffe_path = osp.join('/home/db24gt/workspace/github/py-faster-rcnn/caffe-fast-rcnn/python') #caffe_path = osp.join(this_dir, '..', 'caffe-ssd', 'python') add_path(caffe_path) # Add lib to PYTHONPATH lib_path = osp.join('/home/db24gt/workspace/github/py-faster-rcnn/lib') add_path(lib_path)#!/usr/bin/env python import _init_paths import json import caffe import matplotlib.pyplot as plt import numpy as np import os from fast_rcnn.config import cfg from fast_rcnn.nms_wrapper import nms from fast_rcnn.test import im_detect from utils.timer import Timer import cv2 CLASSES = ( '__background__', '00001-RED_TEA', '00002-N_QUICK_LINE', '00003-HEART_WATER', '00004-LAYS', '00005-ICE_SUGAR') cfg.TEST.HAS_RPN = True # Use RPN for proposals demo_net = 'vgg16' prototxt = '/home/db24gt/workspace/github/py-faster-rcnn/models/pascal_voc/VGG16/faster_rcnn_end2end/test.prototxt' caffemodel = '/home/db24gt/workspace/github/py-faster-rcnn/output/faster_rcnn_end2end/voc_2007_trainval/ vgg16_faster_rcnn_iter_70000.caffemodel' if not os.path.isfile(caffemodel): raise IOError(('{:s} not found.\nDid you run ./data/script/' 'fetch_faster_rcnn_models.sh?').format(caffemodel)) gpu_id = 0 caffe.set_mode_gpu() caffe.set_device(0) cfg.GPU_ID = 0 net = caffe.Net(prototxt, caffemodel, caffe.TEST) def output_csv(class_name, dets, result_dict, thresh=0.5): inds = np.where(dets[:, -1] >= thresh)[0] if len(inds) == 0: return sku = [] for i in inds: bbox = dets[i, :4] score = dets[i, -1] # print class_name,bbox[0],bbox[1],bbox[2],bbox[3] sku = [class_name, bbox[0], bbox[1], bbox[2], bbox[3], score] result_dict.append(sku) def detect(im, THRESHOLD=0.5): # Detect all object classes and regress object bounds caffe.set_mode_gpu() caffe.set_device(0) timer = Timer() timer.tic() # im = cv2.imread(im_name) scores, boxes = im_detect(net, im) timer.toc() print ('Detection took {:.3f}s for {:d} object proposals').format(timer.total_time, boxes.shape[0]) # Visualize detections for each class CONF_THRESH = THRESHOLD NMS_THRESH = 0.2 im = im[:, :, (2, 1, 0)] # fig, ax = plt.subplots(figsize=(12, 12)) # ax.imshow(im, aspect='equal') result_dict = [] for cls_ind, cls in enumerate(CLASSES[1:]): cls_ind += 1 # because we skipped background cls_boxes = boxes[:, 4 * cls_ind:4 * (cls_ind + 1)] cls_scores = scores[:, cls_ind] dets = np.hstack((cls_boxes, cls_scores[:, np.newaxis])).astype(np.float32) keep = nms(dets, NMS_THRESH) dets = dets[keep, :] output_csv(cls, dets, result_dict, thresh=CONF_THRESH) return result_dict vc = cv2.VideoCapture(0) i = 0 while True: r, f = vc.read() height, width, channels = f.shape roi = f[0:height, 0:width/2] resize = cv2.resize(roi, (roi.shape[1]/2,roi.shape[0]/2), interpolation=cv2.INTER_CUBIC) res = detect(resize) if len(res) > 0: print ('detect %s' % (res[0])) left = ( res[0][1],res[0][2]) right = ( res[0][3], res[0][4]) cv2.rectangle(resize,left, right ,(55,255,155),2) cv2.imwrite(str(i) + '.jpg', resize) i += 1 cv2.imshow('x', resize) k = cv2.waitKey(5) if k == ord('q'): vc.release()-
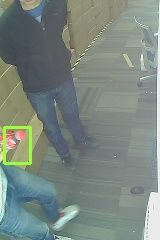
实验效果:
训练集合5个品类,3600个图片,简单测试一下准确召回尚可
测了几十次都识别对了


-