从iOS9开始的常见报错
Application windows are expected to have a root view controller at the end of application launch
- 从iOS9开始, 在
程序启动完毕那一刻显示出来的窗口必须要设置根控制器
有些图片显示出来会自动渲染成蓝色
比如
- 设置tabBarItem的选中图片
vc.tabBarItem.selectedImage = image;
- 设置UIButtonTypeSystem样式按钮的image时
UIButton *btn = [UIButton buttonWithType:UIButtonTypeSystem];
[btn setImage:image forState:UIControlStateNormal];
解决方案
- 再次产生一张不会进行渲染的图片
// 加载图片
UIImage *tempImage = [UIImage imageNamed:@"tabBar_essence_click_icon"];
// 产生一张不会进行自动渲染的图片
UIImage *selectedImage = [tempImage imageWithRenderingMode:UIImageRenderingModeAlwaysOriginal];
vc.tabBarItem.selectedImage = selectedImage;
-
直接在xcassets文件中配置
设置TabBarItem的文字属性
- 直接设置每一个tabBarItem对象
// 普通状态下的文字属性
NSMutableDictionary *normalAttrs = [NSMutableDictionary dictionary];
normalAttrs[NSFontAttributeName] = [UIFont systemFontOfSize:14];
normalAttrs[NSForegroundColorAttributeName] = [UIColor grayColor];
[vc.tabBarItem setTitleTextAttributes:normalAttrs forState:UIControlStateNormal];

// 选中状态下的文字属性
NSMutableDictionary *selectedAttrs = [NSMutableDictionary dictionary];
selectedAttrs[NSForegroundColorAttributeName] = [UIColor darkGrayColor];
[vc.tabBarItem setTitleTextAttributes:selectedAttrs forState:UIControlStateSelected];


// 字典中用到的key
1.iOS7之前(在UIStringDrawing.h中可以找到)
- 比如UITextAttributeFont\UITextAttributeTextColor
- 规律:UITextAttributeXXX

2.iOS7开始(在NSAttributedString.h中可以找到)
- 比如NSFontAttributeName\NSForegroundColorAttributeName
- 规律:NSXXXAttributeName
- 通过UITabBarItem的appearance对象统一设置
/**** 设置所有UITabBarItem的文字属性 ****/
UITabBarItem *item = [UITabBarItem appearance];
// 普通状态下的文字属性
NSMutableDictionary *normalAttrs = [NSMutableDictionary dictionary];
normalAttrs[NSFontAttributeName] = [UIFont systemFontOfSize:14];
normalAttrs[NSForegroundColorAttributeName] = [UIColor grayColor];
[item setTitleTextAttributes:normalAttrs forState:UIControlStateNormal];
// 选中状态下的文字属性
NSMutableDictionary *selectedAttrs = [NSMutableDictionary dictionary];
selectedAttrs[NSForegroundColorAttributeName] = [UIColor darkGrayColor];
[item setTitleTextAttributes:normalAttrs forState:UIControlStateSelected];
Appearance的使用场合
- 只要后面带有
UI_APPEARANCE_SELECTOR的方法或者属性,都可以通过appearance对象统一设置 - 比如
@interface UISwitch : UIControl

@property(nullable, nonatomic, strong) UIColor *onTintColor NS_AVAILABLE_IOS(5_0) UI_APPEARANCE_SELECTOR;

@end

UISwitch *s = [UISwitch appearance];
s.onTintColor = [UIColor redColor];
项目的图片资源
- 可以利用一个Mac软件解压
- https://github.com/devcxm/iOS-Images-Extractor
颜色相关的一些知识
- 颜色的基本组成
- 一种颜色由N个颜色通道组成
- 颜色通道
- 1个颜色通道占据8bit
- 1个颜色通道的取值范围
- 10进制 : [0, 255]
- 16进制 : [00, ff];
- 常见的颜色通道
- 红色 red R
- 绿色 green G
- 蓝色 blue B
- 透明度 alpha A
- R\G\B一样的是灰色
- 颜色的种类
- 24bit颜色
- 由R\G\B组成的颜色
- 常见的表示形式
- 10进制(
仅仅是用在CSS)- 红色 : rgb(255,0,0)
- 绿色 : rgb(0,255,0)
- 蓝色 : rgb(0,0,255)
- 黄色 : rgb(255,255,0)
- 黑色 : rgb(0,0,0)
- 白色 : rgb(255,255,255)
- 灰色 : rgb(80,80,80)
- 16进制(
可以用在CSS\android)- 红色 : #ff0000 #f00
- 绿色 : #00ff00 #0f0
- 蓝色 : #0000ff #00f
- 黄色 : #ffff00 #ff0
- 黑色 : #000000 #000
- 白色 : #ffffff #fff
- 灰色 : #979797
- 10进制(
- 32bit颜色
- 由R\G\B\A组成的颜色
- 常见的表示形式
- 10进制(
仅仅是用在CSS)- 红色 : rgba(255,0,0,255)
- 绿色 : rgba(0,255,0,255)
- 蓝色 : rgba(0,0,255,255)
- 黄色 : rgba(255,255,0,255)
- 黑色 : rgba(0,0,0,255)
- 白色 : rgba(255,255,255,255)
- 16进制(#AARRGGBB,
仅仅是用在android)- 红色 : #ffff0000
- 绿色 : #ff00ff00
- 蓝色 : #ff0000ff
- 黄色 : #ffffff00
- 黑色 : #ff000000
- 白色 : #ffffffff
- 10进制(
- 24bit颜色
PCH文件可能引发的错误
- 解决方案
#ifndef PrefixHeader_pch
#define PrefixHeader_pch

/*** 如果希望某些内容能拷贝到任何源代码文件(OC\C\C++等), 那么就不要写在#ifdef __OBJC__和#endif之间 ***/


/***** 在#ifdef __OBJC__和#endif之间的内容, 只会拷贝到OC源代码文件中, 不会拷贝到其他语言的源代码文件中 *****/
#ifdef __OBJC__


#endif
/***** 在#ifdef __OBJC__和#endif之间的内容, 只会拷贝到OC源代码文件中, 不会拷贝到其他语言的源代码文件中 *****/


#endif
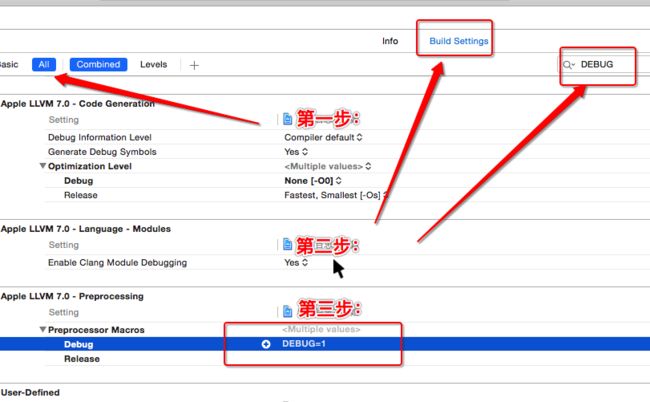
在Build Setting中配置宏
- 如果项目中有些宏找不到, 可能是配置在Build Setting中
注意点:宏的名字不能全部是小写字母
-
如果宏的名字全部是小写, 会出现以下错误
控制台可能会输出以下警告信息
- 警告的原因: [UIImage imageNamed:nil]
CUICatalog: Invalid asset name supplied: (null)
CUICatalog: Invalid asset name supplied: (null)
- 警告的原因: [UIImage imageNamed:@""]
CUICatalog: Invalid asset name supplied:
CUICatalog: Invalid asset name supplied:
准确判断一个字符串是否有内容
if (string.length) {

}

/*
错误写法:
if (string) {

}
*/
替换UITabBarController内部的tabBar
// 这里的self是UITabBarController
[self setValue:[[LYWTabBar alloc] init] forKeyPath:@"tabBar"];
center和size的设置顺序
- 建议的设置顺序
- 先设置size
- 再设置center
给系统自带的类增加分类
- 建议增加的分类属性名\方法名前面加上前缀, 比如
@interface UIView (LYWExtension)

@property (nonatomic,assign) CGFloat LYW_X;
@property (nonatomic,assign) CGFloat LYW_Y;
@property (nonatomic,assign) CGFloat LYW_W;
@property (nonatomic,assign) CGFloat LYW_H;
@property (nonatomic,assign) CGSize  LYW_size;
@property (nonatomic,assign) CGPoint LYW_point;
@property (assign, nonatomic) CGFloat LYW_centerX;
@property (assign, nonatomic) CGFloat LYW_centerY;
@property (nonatomic,assign) CGFloat LYW_right;
@property (nonatomic,assign) CGFloat LYW_bottom;

+(instancetype)LYWviewFromXib;

@end
按钮常见的访问方法
[button imageForState:UIControlStateNormal].size;
button.currentImage.size;

[button backgroundImageForState:UIControlStateNormal];
button.currentBackgroundImage;

[button titleForState:UIControlStateNormal];
button.currentTitle;

[button titleColorForState:UIControlStateNormal];
button.currentTitleColor;
设置按钮的内边距
@property(nonatomic) UIEdgeInsets contentEdgeInsets UI_APPEARANCE_SELECTOR;
@property(nonatomic) UIEdgeInsets titleEdgeInsets;
@property(nonatomic) UIEdgeInsets imageEdgeInsets;
解决导航控制器pop手势失效
self.interactivePopGestureRecognizer.delegate = self;

- (BOOL)gestureRecognizerShouldBegin:(UIGestureRecognizer *)gestureRecognizer
{
    // 手势何时有效 : 当导航控制器的子控制器个数 > 1就有效
    return self.childViewControllers.count > 1;
}
frame和bounds的重新认识
- frame
- 以
父控件内容的左上角为坐标原点, 计算出的控件自己矩形框的位置和尺寸
- 以
- bounds
- 以
控件自己内容的左上角为坐标原点, 计算出的控件自己矩形框的位置和尺寸
- 以
- 概括
- frame.size == bounds.size
- scrollView.bounds.origin == scrollView.contentOffset
bounds和frame的区别
矩形框和内容的理解
- 矩形框
- 控件自己的显示位置和尺寸
- 内容
- 控件内部的东西,比如它的子控件
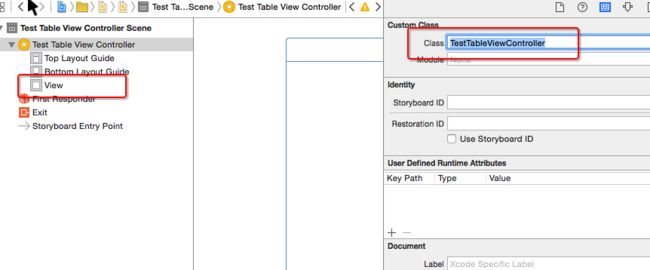
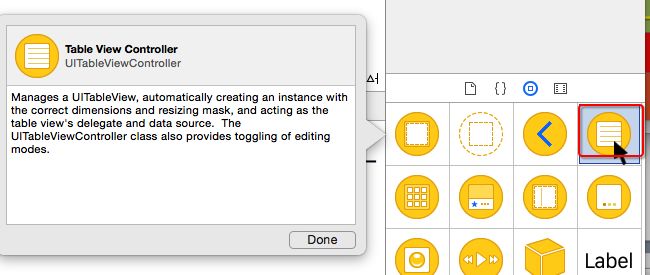
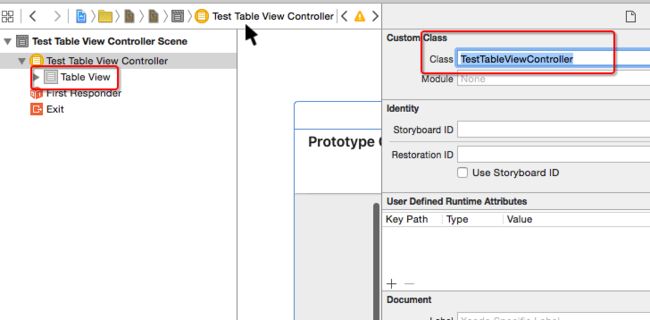
在使用UITableViewController过程中,可能会出现的错误
@interface TestTableViewController : UITableViewController

@end

'-[UITableViewController loadView] instantiated view controller with identifier "UIViewController-BYZ-38-t0r" from storyboard "Main", but didn't get a UITableView.'
- 造成这个错误的原因
- 错误地将一个UIViewController当做UITableViewController来用
-
错误做法
- 正确做法
contentInset的调整
- 默认情况下, 如果一个控制器A处在导航控制器管理中, 并且控制器A的第一个子控件是UIScrollView, 那么就会自动调整这个UIScrollView的contentInset
- UIEdgeInsetsMake(64, 0, 0, 0) // 有导航栏
- UIEdgeInsetsMake(20, 0, 0, 0) // 没有导航栏
- 默认情况下, 如果一个控制器A处在导航控制器管理中, 并且导航控制器又处在UITabBarController管理中, 并且控制器A的第一个子控件是UIScrollView, 那么就会自动调整这个UIScrollView的contentInset
- UIEdgeInsetsMake(64, 0, 49, 0)
- 如何禁止上述的默认问题?
控制器A.automaticallyAdjustsScrollViewInsets = NO;
文字内容换行
- 如何让storyboard\xib中的文字内容换行
- 快捷键: option + 回车键
- 在storyboard\xib输入\n是无法实现换行的
- 在代码中输入\n是可以实现换行的
self.label.text = @"534534534\n5345345\n5345";
修改状态栏样式
-
使用UIApplication来管理
[[UIApplication sharedApplication] setStatusBarStyle:UIStatusBarStyleLightContent];
在Info.plist中做了图中的配置,可能会出现以下警告信息
- 使用UIViewController来管理
@implementation LYWLoginRegisterViewController
- (UIStatusBarStyle)preferredStatusBarStyle
{
    return UIStatusBarStyleLightContent;
}
@end
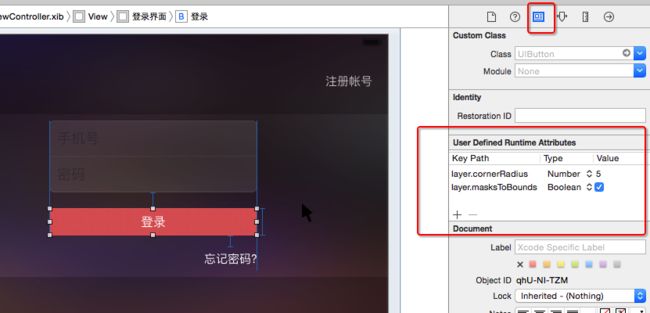
在xib\storyboard中使用KVC
修改UITextField的光标颜色
textField.tintColor = [UIColor whiteColor];
UITextField占位文字相关的设置
// 设置占位文字内容
@property(nullable, nonatomic,copy)   NSString               *placeholder;
// 设置带有属性的占位文字, 优先级 > placeholder
@property(nullable, nonatomic,copy)   NSAttributedString     *attributedPlaceholder;
NSAttributedString
- 带有属性的字符串, 富文本
- 由2部分组成
- 文字内容 : NSString *
- 文字属性 : NSDictionary *
- 文字颜色 - NSForegroundColorAttributeName
- 字体大小 - NSFontAttributeName
- 下划线 - NSUnderlineStyleAttributeName
- 背景色 - NSBackgroundColorAttributeName
- 初始化
NSMutableDictionary *attributes = [NSMutableDictionary dictionary];
attributes[NSForegroundColorAttributeName] = [UIColor yellowColor];
attributes[NSBackgroundColorAttributeName] = [UIColor redColor];
attributes[NSUnderlineStyleAttributeName] = @YES;
NSAttributedString *string = [[NSAttributedString alloc] initWithString:@"123" attributes:attributes];
- 使用场合
- UILabel - attributedText
- UITextField - attributedPlaceholder
NSMutableAttributedString
- 继承自NSAttributedString
- 常见方法
// 设置range范围的属性, 重复设置同一个范围的属性, 最后一次设置才是有效的(之前的设置会被覆盖掉)
- (void)setAttributes:(nullable NSDictionary *)attrs range:(NSRange)range;
// 添加range范围的属性, 同一个范围, 可以不断累加属性
- (void)addAttribute:(NSString *)name value:(id)value range:(NSRange)range;
- (void)addAttributes:(NSDictionary *)attrs range:(NSRange)range;
- 图文混排
UILabel *label = [[UILabel alloc] init];
label.frame = CGRectMake(100, 100, 200, 25);
label.backgroundColor = [UIColor redColor];
label.font = [UIFont systemFontOfSize:14];
[self.view addSubview:label];

// 图文混排
NSMutableAttributedString *attributedText = [[NSMutableAttributedString alloc] init];
// 1 - 你好
NSAttributedString *first = [[NSAttributedString alloc] initWithString:@"你好"];
[attributedText appendAttributedString:first];

// 2 - 图片
// 带有图片的附件对象
NSTextAttachment *attachment = [[NSTextAttachment alloc] init];
attachment.image = [UIImage imageNamed:@"header_cry_icon"];
CGFloat lineH = label.font.lineHeight;
attachment.bounds = CGRectMake(0, - ((label.lyw_height - lineH) * 0.5 - 1), lineH, lineH);
// 将附件对象包装成一个属性文字
NSAttributedString *second = [NSAttributedString attributedStringWithAttachment:attachment];
[attributedText appendAttributedString:second];

// 3 - 哈哈哈
NSAttributedString *third = [[NSAttributedString alloc] initWithString:@"哈哈哈"];
[attributedText appendAttributedString:third];

label.attributedText = attributedText;
- 一个Label显示多行不同字体的文字
UILabel *label = [[UILabel alloc] init];
// 设置属性文字
NSString *text = @"你好\n哈哈哈";
NSMutableAttributedString *attributedText = [[NSMutableAttributedString alloc] initWithString:text];
[attributedText addAttribute:NSFontAttributeName value:[UIFont systemFontOfSize:10] range:NSMakeRange(0, text.length)];
[attributedText addAttribute:NSFontAttributeName value:[UIFont boldSystemFontOfSize:13] range:NSMakeRange(3, 3)];
label.attributedText = attributedText;
// 其他设置
label.numberOfLines = 0;
label.textAlignment = NSTextAlignmentCenter;
label.frame = CGRectMake(0, 0, 100, 40);
[self.view addSubview:label];
self.navigationItem.titleView = label;
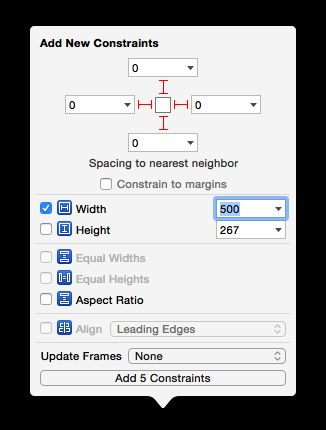
在storyboard\xib中给UIScrollView子控件添加约束
- 给添加一个UIView类型的子控件A(这将是UIScrollView唯一的一个子控件)
- 设置A距离UIScrollView上下左右间距都为0
-
往A中再添加其他子控件
- 上下滚动(垂直滚动)
-
设置A的高度(这个高度就是UIScrollView的内容高度: contentSize.height)
-
设置A在UIScrollView中左右居中(水平居中)
-
- 左右滚动(水平滚动)
- 设置A的宽度(这个宽度就是UIScrollView的内容宽度: contentSize.width)
- 设置A在UIScrollView中上下居中(垂直居中)
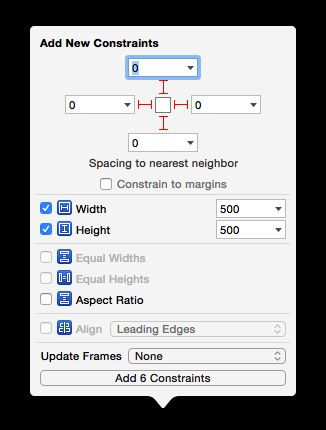
- 上下左右滚动(水平垂直滚动)
- 设置A的宽度(这个宽度就是UIScrollView的内容宽度: contentSize.width)
- 设置A的高度(这个高度就是UIScrollView的内容高度: contentSize.height)
修改UITextField占位文字的颜色
- 使用attributedPlaceholder
@property(nullable, nonatomic,copy) NSAttributedString *attributedPlaceholder;
- 重写- (void)drawPlaceholderInRect:(CGRect)rect;
- (void)drawPlaceholderInRect:(CGRect)rect;
- 修改内部占位文字Label的文字颜色
[textField setValue:[UIColor grayColor] forKeyPath:@"placeholderLabel.textColor"];
如何监听一个控件内部的事件
- 如果继承自UIControl
- (void)addTarget:(nullable id)target action:(SEL)action forControlEvents:(UIControlEvents)controlEvents;
代理
通知
-
利用内部的某些机制
- 比如重写UITextField的
becomeFirstResponder和resignFirstResponder来监听UITextField的获得焦点和失去焦点事件
- 比如重写UITextField的
assign和weak的区别
- 本质区别
- 速度比较: __unsafe_unretained > __weak
@property (nonatomic, assign) MyDog *dog;  // MyDog *__unsafe_unretained _dog;

__unsafe_unretained的特点:
1.不是强引用, 不能保住OC对象的命
2.如果引用的OC对象销毁了, 指针并不会被自动清空, 依然指向销毁的对象(很容易产生野指针错误: EXC_BAD_ACCESS)

@property (nonatomic, weak) MyDog *dog;  // MyDog * _Nullable __weak _dog;

__weak的特点:
1.不是强引用, 不能保住OC对象的命
2.如果引用的OC对象销毁了, 指针会被自动清空(变为nil), 不再指向销毁的对象(永远不会产生野指针错误)
- 用途
- assign一般用在基本数据类型上面, 比如int\double等
- weak一般用在代理对象上面, 或者用来解决循环强引用的问题
监听UITextField的获得焦点和失去焦点事件
- addTarget
[textField addTarget:target action:@selector(editingDidBegin) forControlEvents:UIControlEventEditingDidBegin];
[textField addTarget:target action:@selector(editingDidEnd) forControlEvents:UIControlEventEditingDidEnd];

UIControlEventEditingDidBegin
1.开始编辑
2.获得焦点
3.弹出键盘

UIControlEventEditingDidEnd
1.结束编辑
2.失去焦点
3.退下键盘
- delegate
textField.delegate = self;

#pragma mark -
- (void)textFieldDidBeginEditing:(UITextField *)textField
{

}

- (void)textFieldDidEndEditing:(UITextField *)textField
{

}
- 通知
[[NSNotificationCenter defaultCenter] addObserver:self selector:@selector(beginEditing) name:UITextFieldTextDidBeginEditingNotification object:textField];
[[NSNotificationCenter defaultCenter] addObserver:self selector:@selector(endEditing) name:UITextFieldTextDidEndEditingNotification object:textField];

- (void)dealloc
{
    [[NSNotificationCenter defaultCenter] removeObserver:self];
}

- (void)beginEditing
{

}

- (void)endEditing
{

}
- 重写UITextField的
becomeFirstResponder和resignFirstResponder方法
/**
 *  调用时刻 : 成为第一响应者(开始编辑\弹出键盘\获得焦点)
 */
- (BOOL)becomeFirstResponder
{

    return [super becomeFirstResponder];
}

/**
 *  调用时刻 : 不做第一响应者(结束编辑\退出键盘\失去焦点)
 */
- (BOOL)resignFirstResponder
{

    return [super resignFirstResponder];
}
枚举值的某个规律
- 凡是使用了1 << n格式的枚举值, 都可以使用|进行组合使用
UIControlEventEditingDidBegin                                   = 1 << 16,
UIControlEventEditingChanged                                    = 1 << 17,
UIControlEventEditingDidEnd                                     = 1 << 18,
UIControlEventEditingDidEndOnExit                               = 1 << 19,

[textField addTarget:self action:@selector(test) forControlEvents:UIControlEventEditingDidBegin | UIControlEventEditingChanged];
通知相关的补充
使用block监听通知
// object对象发出了名字为name的通知, 就在queue队列中执行block
self.observer = [[NSNotificationCenter defaultCenter] addObserverForName:UITextFieldTextDidBeginEditingNotification object:self queue:[[NSOperationQueue alloc] init] usingBlock:^(NSNotification * _Nonnull note) {
    // 一旦监听到通知, 就会执行这个block中的代码
}];

// 最后需要移除监听
[[NSNotificationCenter defaultCenter] removeObserver:self.observer];
一次性通知(监听1次后就不再监听)
id observer = [[NSNotificationCenter defaultCenter] addObserverForName:UITextFieldTextDidBeginEditingNotification object:self queue:[[NSOperationQueue alloc] init] usingBlock:^(NSNotification * _Nonnull note) {


    // 移除通知
    [[NSNotificationCenter defaultCenter] removeObserver:observer];
}];
其他
dispatch_async(dispatch_get_global_queue(0, 0), ^{
    // 因为是在子线程注册了通知监听器, 所以beginEditing和endEditing会在子线程中执行
    [[NSNotificationCenter defaultCenter] addObserver:self selector:@selector(beginEditing) name:UITextFieldTextDidBeginEditingNotification object:self];
    [[NSNotificationCenter defaultCenter] addObserver:self selector:@selector(endEditing) name:UITextFieldTextDidEndEditingNotification object:self];
});
CocoaPods
- Podfile.lock文件
- 最后一次更新Pods时, 所有第三方框架的版本号
- 常用指令的区别
- pod install
- 会根据Podfile.lock文件中列举的版本号来安装第三方框架
- 如果一开始Podfile.lock文件不存在, 就会按照Podfile文件列举的版本号来安装第三方框架
- 安装框架之前, 默认会执行pod repo update指令
- pod update
- 将所有第三方框架更新到最新版本, 并且创建一个新的Podfile.lock文件
- 安装框架之前, 默认会执行pod repo update指令
- pod install --no-repo-update
- pod update --no-repo-update
- 安装框架之前, 不会执行pod repo update指令
- pod install
利用SDWebImage设置UIButton的图片
- 正确用法
[button sd_setImageWithURL:[NSURL URLWithString:url] forState:UIControlStateNormal placeholderImage:image];
解决tableView设置tableFooterView时contentSize不正确的问题
tableView.tableFooterView = footerView;
// 重新刷新数据(会重新计算contentSize)
[tableView reloadData];
查找字符串的常见方法
// 如果range.location == 0, 说明是以searchString开头
// 如果range.location == NSNotFound或者range.length == 0, 说明没找到对应的字符串
- (NSRange)rangeOfString:(NSString *)searchString;
// 是否以str开头
- (BOOL)hasPrefix:(NSString *)str;
// 是否以str结尾
- (BOOL)hasSuffix:(NSString *)str;
// 是否包含了str(不管头部\中间\尾部)
- (BOOL)containsString:(NSString *)str;
计算某个文件\文件夹的大小
@implementation NSString (LYWExtension)
//- (unsigned long long)fileSize
//{
//    // 总大小
//    unsigned long long size = 0;
//
//    // 文件管理者
//    NSFileManager *mgr = [NSFileManager defaultManager];
//
//    // 文件属性
//    NSDictionary *attrs = [mgr attributesOfItemAtPath:self error:nil];
//
//    if ([attrs.fileType isEqualToString:NSFileTypeDirectory]) { // 文件夹
//        // 获得文件夹的大小  == 获得文件夹中所有文件的总大小
//        NSDirectoryEnumerator *enumerator = [mgr enumeratorAtPath:self];
//        for (NSString *subpath in enumerator) {
//            // 全路径
//            NSString *fullSubpath = [self stringByAppendingPathComponent:subpath];
//            // 累加文件大小
//            size += [mgr attributesOfItemAtPath:fullSubpath error:nil].fileSize;
//        }
//    } else { // 文件
//        size = attrs.fileSize;
//    }
//
//    return size;
//}

- (unsigned long long)fileSize
{
    // 总大小
    unsigned long long size = 0;

    // 文件管理者
    NSFileManager *mgr = [NSFileManager defaultManager];

    // 是否为文件夹
    BOOL isDirectory = NO;

    // 路径是否存在
    BOOL exists = [mgr fileExistsAtPath:self isDirectory:&isDirectory];
    if (!exists) return size;

    if (isDirectory) { // 文件夹
        // 获得文件夹的大小  == 获得文件夹中所有文件的总大小
        NSDirectoryEnumerator *enumerator = [mgr enumeratorAtPath:self];
        for (NSString *subpath in enumerator) {
            // 全路径
            NSString *fullSubpath = [self stringByAppendingPathComponent:subpath];
            // 累加文件大小
            size += [mgr attributesOfItemAtPath:fullSubpath error:nil].fileSize;
        }
    } else { // 文件
        size = [mgr attributesOfItemAtPath:self error:nil].fileSize;
    }

    return size;
}
@end

LYWLog(@"%zd", @"/Users/lyw/Desktop".fileSize);
计算文字的宽度
CGFloat titleW = [字符串 sizeWithFont:字体大小].width;
CGFloat titleW = [字符串 sizeWithAttributes:@{NSFontAttributeName : 字体大小}].width;
有透明度的颜色
[UIColor colorWithRed:1.0 green:1.0 blue:1.0 alpha:0.2];
[UIColor colorWithWhite:1.0 alpha:0.2];
[[UIColor whiteColor] colorWithAlphaComponent:0.2];
viewWithTag:内部的大致实现思路
@implementation UIView
- (UIView *)viewWithTag:(NSInteger)tag
{
    if (self.tag == tag) return self;

    for (UIView *subview in self.subviews) {
        return [subview viewWithTag:tag];
    }
}
@end
addObject:和addObjectsFromArray:的区别
self.topics = @[20, 19, 18]
moreTopics = @[17, 16, 15]

self.topics = @[20, 19, 18, @[17, 16, 15]]
[self.topics addObject:moreTopics];

self.topics = @[20, 19, 18, 17, 16, 15]
[self.topics addObjectsFromArray:moreTopics];
服务器分页的做法
服务器数据库的数据 = @[23, 22, 21, 20, 19, 18, 17, 16, 15, 14, 13, 12, 11, 10]


第1页数据 == @[20, 19, 18, 17, 16]

做法1:
发送page参数 : page=2
第2页数据 == @[18, 17, 16, 15, 14]

做法2:
发送maxid参数 : maxid=16
第2页数据 == @[15, 14, 13, 12, 11]
集成MJRefresh
- github
- 基本用法
self.tableView.mj_header = [MJRefreshNormalHeader headerWithRefreshingTarget:self refreshingAction:@selector(loadNewTopics)];
[self.tableView.mj_header beginRefreshing];

self.tableView.mj_footer = [MJRefreshAutoNormalFooter footerWithRefreshingTarget:self refreshingAction:@selector(loadMoreTopics)];
利用AFN取消请求
// 取消所有请求
for (NSURLSessionTask *task in self.manager.tasks) {
    [task cancel];
}

// 取消所有请求
[self.manager.tasks makeObjectsPerformSelector:@selector(cancel)];

// 关闭NSURLSession + 取消所有请求
// NSURLSession一旦被关闭了, 就不能再发请求
[self.manager invalidateSessionCancelingTasks:YES];

// 注意: 一个请求任务被取消了(cancel), 会自动调用AFN请求的failure这个block, block中传入error参数的code是NSURLErrorCancelled
NSDateFormatter的作用
- NSString * -> NSDate *
- (nullable NSDate *)dateFromString:(NSString *)string;
- NSDate * -> NSString *
- (NSString *)stringFromDate:(NSDate *)date;
常见的日期格式
- http://www.cnblogs.com/mailingfeng/archive/2011/07/28/2120422.html
NSString * -> NSDate *
- 2015-11-20 09:10:05
// 时间字符串
NSString *string = @"2015-11-20 09:10:05";

// 日期格式化类
NSDateFormatter *fmt = [[NSDateFormatter alloc] init];
// 设置日期格式(为了转换成功)
fmt.dateFormat = @"yyyy-MM-dd HH:mm:ss";

// NSString * -> NSDate *
NSDate *date = [fmt dateFromString:string];

NSLog(@"%@", date);
- 11月-20号/2015年 09-10:05秒
// 时间字符串
NSString *string = @"11月-20号/2015年 09-10:05秒";

// 日期格式化类
NSDateFormatter *fmt = [[NSDateFormatter alloc] init];
fmt.dateFormat = @"MM月-dd号/yyyy年 HH-mm:ss秒";

NSLog(@"%@", [fmt dateFromString:string]);
- Tue May 31 17:46:55 +0800 2011
// 时间字符串
NSString *string = @"Tue May 31 17:46:55 +0800 2011";

// 日期格式化类
NSDateFormatter *fmt = [[NSDateFormatter alloc] init];
fmt.dateFormat = @"EEE MMM dd HH:mm:ss Z yyyy";
// fmt.dateFormat = @"EEE MMM dd HH:mm:ss ZZZZ yyyy";
// 设置语言区域(因为这种时间是欧美常用时间)
fmt.locale = [[NSLocale alloc] initWithLocaleIdentifier:@"en_US"];

NSLog(@"%@", [fmt dateFromString:string]);
- 1745645645645
// 时间戳 : 从1970年1月1号 00:00:00开始走过的毫秒数

// 时间字符串 - 时间戳
NSString *string = @"1745645645645";
NSTimeInterval second = string.longLongValue / 1000.0;

// 时间戳 -> NSDate *
NSDate *date = [NSDate dateWithTimeIntervalSince1970:second];
NSLog(@"%@", date);
NSCalendar的注意点
#define iOS(version) ([UIDevice currentDevice].systemVersion.doubleValue >= (version))

NSCalendar *calendar = nil;
if ([UIDevice currentDevice].systemVersion.doubleValue >= 8.0) {
    calendar = [NSCalendar calendarWithIdentifier:NSCalendarIdentifierGregorian];
} else {
    calendar = [NSCalendar currentCalendar];
}

NSCalendar *calendar = nil;
if ([NSCalendar respondsToSelector:@selector(calendarWithIdentifier:)]) {
    calendar = [NSCalendar calendarWithIdentifier:NSCalendarIdentifierGregorian];
} else {
    calendar = [NSCalendar currentCalendar];
}
NSDate * -> NSString *
NSDate *date = [NSDate date];

NSDateFormatter *fmt = [[NSDateFormatter alloc] init];
fmt.dateFormat = @"yyyy年MM月dd号 HH:mm:ss";

NSString *string = [fmt stringFromDate:date];
获得日期元素
NSString *string = @"2015-11-20 09:10:05";

NSString *month = [string substringWithRange:NSMakeRange(5, 2)];

NSLog(@"%@", month);
// 时间字符串
NSString *string = @"2015-11-20 09:10:05";

// 日期格式化类
NSDateFormatter *fmt = [[NSDateFormatter alloc] init];
// 设置日期格式(为了转换成功)
fmt.dateFormat = @"yyyy-MM-dd HH:mm:ss";

// NSString * -> NSDate *
NSDate *date = [fmt dateFromString:string];

// 利用NSCalendar处理日期
NSCalendar *calendar = [NSCalendar currentCalendar];
NSInteger month = [calendar component:NSCalendarUnitMonth fromDate:date];
NSInteger hour = [calendar component:NSCalendarUnitHour fromDate:date];
NSInteger minute = [calendar component:NSCalendarUnitMinute fromDate:date];

NSLog(@"%zd %zd %zd", month, hour, minute);
// 时间字符串
NSString *string = @"2015-11-20 09:10:05";

// 日期格式化类
NSDateFormatter *fmt = [[NSDateFormatter alloc] init];
// 设置日期格式(为了转换成功)
fmt.dateFormat = @"yyyy-MM-dd HH:mm:ss";

// NSString * -> NSDate *
NSDate *date = [fmt dateFromString:string];

// 利用NSCalendar处理日期
NSCalendar *calendar = [NSCalendar currentCalendar];

NSCalendarUnit unit = NSCalendarUnitYear | NSCalendarUnitMonth | NSCalendarUnitDay | NSCalendarUnitHour | NSCalendarUnitMinute | NSCalendarUnitSecond;
NSDateComponents *cmps = [calendar components:unit  fromDate:date];

//    NSLog(@"%zd %zd %zd", cmps.year, cmps.month, cmps.day);
NSLog(@"%@", cmps);
日期比较
// 时间字符串
NSString *createdAtString = @"2015-11-20 11:10:05";
NSDateFormatter *fmt = [[NSDateFormatter alloc] init];
fmt.dateFormat = @"yyyy-MM-dd HH:mm:ss";
NSDate *createdAtDate = [fmt dateFromString:createdAtString];

// 手机当前时间
NSDate *nowDate = [NSDate date];

/**
 NSComparisonResult的取值
 NSOrderedAscending = -1L, // 升序, 越往右边越大
 NSOrderedSame,  // 相等
 NSOrderedDescending // 降序, 越往右边越小
 */
// 获得比较结果(谁大谁小)
NSComparisonResult result = [nowDate compare:createdAtDate];
if (result == NSOrderedAscending) { // 升序, 越往右边越大
    NSLog(@"createdAtDate > nowDate");
} else if (result == NSOrderedDescending) { // 降序, 越往右边越小
    NSLog(@"createdAtDate < nowDate");
} else {
    NSLog(@"createdAtDate == nowDate");
}
// 时间字符串
NSString *createdAtString = @"2015-11-20 09:10:05";
NSDateFormatter *fmt = [[NSDateFormatter alloc] init];
fmt.dateFormat = @"yyyy-MM-dd HH:mm:ss";
NSDate *createdAtDate = [fmt dateFromString:createdAtString];

// 手机当前时间
//    NSDate *nowDate = [NSDate date];

// 获得createdAtDate和nowDate的时间间隔(间隔多少秒)
//    NSTimeInterval interval = [nowDate timeIntervalSinceDate:createdAtDate];
NSTimeInterval interval = [createdAtDate timeIntervalSinceNow];
NSLog(@"%f", interval);
NSDateFormatter *fmt = [[NSDateFormatter alloc] init];
fmt.dateFormat = @"yyyy-MM-dd HH:mm:ss";

// 时间字符串
NSString *createdAtString = @"2015-11-01 09:10:05";
NSDate *createdAtDate = [fmt dateFromString:createdAtString];

// 其他时间
NSString *otherString = @"2015-10-31 08:56:45";
NSDate *otherDate = [fmt dateFromString:otherString];

// 获得NSCalendar
NSCalendar *calendar = nil;
if ([NSCalendar respondsToSelector:@selector(calendarWithIdentifier:)]) {
    calendar = [NSCalendar calendarWithIdentifier:NSCalendarIdentifierGregorian];
} else {
    calendar = [NSCalendar currentCalendar];
}

// 获得日期之间的间隔
NSCalendarUnit unit = NSCalendarUnitYear | NSCalendarUnitMonth | NSCalendarUnitDay | NSCalendarUnitHour | NSCalendarUnitMinute | NSCalendarUnitSecond;
NSDateComponents *cmps = [calendar components:unit fromDate:createdAtDate toDate:otherDate options:0];

NSLog(@"%@", cmps);
条件判断的一些注意点
1.判断一个数组中是否有具体内容
1> 正确
if (array.count) {

}

2> 错误
if (array) {

}

2.判断一个字符串是否有具体内容
1> 正确
if (string.length) {

}

2> 错误
if (string) {

}
自动拉伸问题
- 从xib中加载进来的控件的
autoresizingMask属性值默认是UIViewAutoresizingFlexibleWidth | UIViewAutoresizingFlexibleHeight
- 如果一个控件显示出来的大小和当初设置的frame大小不一致,有可能是因为
autoresizingMask属性值包含了UIViewAutoresizingFlexibleWidth | UIViewAutoresizingFlexibleHeight,解决方案
控件.autoresizingMask = UIViewAutoresizingNone;
获得自定义的所有相簿
// 获得所有的自定义相簿
PHFetchResult *assetCollections = [PHAssetCollection fetchAssetCollectionsWithType:PHAssetCollectionTypeAlbum subtype:PHAssetCollectionSubtypeAlbumRegular options:nil];
// 遍历所有的自定义相簿
for (PHAssetCollection *assetCollection in assetCollections) {

}
获得相机胶卷相簿
// 获得相机胶卷
PHAssetCollection *cameraRoll = [PHAssetCollection fetchAssetCollectionsWithType:PHAssetCollectionTypeSmartAlbum subtype:PHAssetCollectionSubtypeSmartAlbumUserLibrary options:nil].lastObject;
获得某个相簿的缩略图
PHImageRequestOptions *options = [[PHImageRequestOptions alloc] init];
// 同步获得图片, 只会返回1张图片
options.synchronous = YES;

// 获得某个相簿中的所有PHAsset对象
PHFetchResult *assets = [PHAsset fetchAssetsInAssetCollection:assetCollection options:nil];
for (PHAsset *asset in assets) {
    CGSize size = CGSizeZero;

    // 从asset中获得图片
    [[PHImageManager defaultManager] requestImageForAsset:asset targetSize:size contentMode:PHImageContentModeDefault options:options resultHandler:^(UIImage * _Nullable result, NSDictionary * _Nullable info) {
        NSLog(@"%@", result);
    }];
}
获得某个相簿的原图
PHImageRequestOptions *options = [[PHImageRequestOptions alloc] init];
// 同步获得图片, 只会返回1张图片
options.synchronous = YES;

// 获得某个相簿中的所有PHAsset对象
PHFetchResult *assets = [PHAsset fetchAssetsInAssetCollection:assetCollection options:nil];
for (PHAsset *asset in assets) {
    CGSize size = CGSizeMake(asset.pixelWidth, asset.pixelHeight);

    // 从asset中获得图片
    [[PHImageManager defaultManager] requestImageForAsset:asset targetSize:size contentMode:PHImageContentModeDefault options:options resultHandler:^(UIImage * _Nullable result, NSDictionary * _Nullable info) {
        NSLog(@"%@", result);
    }];
}
利用UIImagePickerController挑选图片
// UIImagePickerController : 可以从系统自带的App(照片\相机)中获得图片

// 判断相册是否可以打开
if (![UIImagePickerController isSourceTypeAvailable:UIImagePickerControllerSourceTypePhotoLibrary]) return;

UIImagePickerController *ipc = [[UIImagePickerController alloc] init];
// 打开照片应用(显示所有相簿)
ipc.sourceType = UIImagePickerControllerSourceTypePhotoLibrary;
// 打开照片应用(只显示"时刻"这个相簿)
// ipc.sourceType = UIImagePickerControllerSourceTypeSavedPhotosAlbum;
// 照相机
// ipc.sourceType = UIImagePickerControllerSourceTypeCamera;
ipc.delegate = self;
[self presentViewController:ipc animated:YES completion:nil];

#pragma mark -
- (void)imagePickerController:(UIImagePickerController *)picker didFinishPickingMediaWithInfo:(NSDictionary *)info
{
    // 销毁控制器
    [picker dismissViewControllerAnimated:YES completion:nil];

    // 设置图片
    self.imageView.image = info[UIImagePickerControllerOriginalImage];
}
NaN错误
- 错误起因:0被当做除数, 比如 10 / 0
最简单的方法保存图片到相机胶卷
UIImageWriteToSavedPhotosAlbum(self.imageView.image, self, @selector(image:didFinishSavingWithError:contextInfo:), nil);

/**
 *  通过UIImageWriteToSavedPhotosAlbum函数写入图片完毕后就会调用这个方法
 *
 *  @param image       写入的图片
 *  @param error       错误信息
 *  @param contextInfo UIImageWriteToSavedPhotosAlbum函数的最后一个参数
 */
- (void)image:(UIImage *)image didFinishSavingWithError:(NSError *)error contextInfo:(void *)contextInfo
{
    if (error) {
        [SVProgressHUD showErrorWithStatus:@"图片保存失败!"];
    } else {
        [SVProgressHUD showSuccessWithStatus:@"图片保存成功!"];
    }
}
保存图片到自定义相册
- (IBAction)save {
    /*
     PHAuthorizationStatusNotDetermined,     用户还没有做出选择
     PHAuthorizationStatusDenied,            用户拒绝当前应用访问相册(用户当初点击了"不允许")
     PHAuthorizationStatusAuthorized         用户允许当前应用访问相册(用户当初点击了"好")
     PHAuthorizationStatusRestricted,        因为家长控制, 导致应用无法方法相册(跟用户的选择没有关系)
     */

    // 判断授权状态
    PHAuthorizationStatus status = [PHPhotoLibrary authorizationStatus];
    if (status == PHAuthorizationStatusRestricted) { // 因为家长控制, 导致应用无法方法相册(跟用户的选择没有关系)
        [SVProgressHUD showErrorWithStatus:@"因为系统原因, 无法访问相册"];
    } else if (status == PHAuthorizationStatusDenied) { // 用户拒绝当前应用访问相册(用户当初点击了"不允许")
        LYWLog(@"提醒用户去[设置-隐私-照片-xxx]打开访问开关");
    } else if (status == PHAuthorizationStatusAuthorized) { // 用户允许当前应用访问相册(用户当初点击了"好")
        [self saveImage];
    } else if (status == PHAuthorizationStatusNotDetermined) { // 用户还没有做出选择
        // 弹框请求用户授权
        [PHPhotoLibrary requestAuthorization:^(PHAuthorizationStatus status) {
            if (status == PHAuthorizationStatusAuthorized) { // 用户点击了好
                [self saveImage];
            }
        }];
    }
}

- (void)saveImage
{
    // PHAsset : 一个资源, 比如一张图片\一段视频
    // PHAssetCollection : 一个相簿

    // PHAsset的标识, 利用这个标识可以找到对应的PHAsset对象(图片对象)
    __block NSString *assetLocalIdentifier = nil;

    // 如果想对"相册"进行修改(增删改), 那么修改代码必须放在[PHPhotoLibrary sharedPhotoLibrary]的performChanges方法的block中
    [[PHPhotoLibrary sharedPhotoLibrary] performChanges:^{
        // 1.保存图片A到"相机胶卷"中
        // 创建图片的请求
        assetLocalIdentifier = [PHAssetCreationRequest creationRequestForAssetFromImage:self.imageView.image].placeholderForCreatedAsset.localIdentifier;
    } completionHandler:^(BOOL success, NSError * _Nullable error) {
        if (success == NO) {
            [self showError:@"保存图片失败!"];
            return;
        }

        // 2.获得相簿
        PHAssetCollection *createdAssetCollection = [self createdAssetCollection];
        if (createdAssetCollection == nil) {
            [self showError:@"创建相簿失败!"];
            return;
        }

        [[PHPhotoLibrary sharedPhotoLibrary] performChanges:^{
            // 3.添加"相机胶卷"中的图片A到"相簿"D中

            // 获得图片
            PHAsset *asset = [PHAsset fetchAssetsWithLocalIdentifiers:@[assetLocalIdentifier] options:nil].lastObject;

            // 添加图片到相簿中的请求
            PHAssetCollectionChangeRequest *request = [PHAssetCollectionChangeRequest changeRequestForAssetCollection:createdAssetCollection];

            // 添加图片到相簿
            [request addAssets:@[asset]];
        } completionHandler:^(BOOL success, NSError * _Nullable error) {
            if (success == NO) {
                [self showError:@"保存图片失败!"];;
            } else {
                [self showSuccess:@"保存图片成功!"];;
            }
        }];
    }];
}

/**
 *  获得相簿
 */
- (PHAssetCollection *)createdAssetCollection
{
    // 从已存在相簿中查找这个应用对应的相簿
    PHFetchResult *assetCollections = [PHAssetCollection fetchAssetCollectionsWithType:PHAssetCollectionTypeAlbum subtype:PHAssetCollectionSubtypeAlbumRegular options:nil];
    for (PHAssetCollection *assetCollection in assetCollections) {
        if ([assetCollection.localizedTitle isEqualToString:LYWAssetCollectionTitle]) {
            return assetCollection;
        }
    }

    // 没有找到对应的相簿, 得创建新的相簿

    // 错误信息
    NSError *error = nil;

    // PHAssetCollection的标识, 利用这个标识可以找到对应的PHAssetCollection对象(相簿对象)
    __block NSString *assetCollectionLocalIdentifier = nil;
    [[PHPhotoLibrary sharedPhotoLibrary] performChangesAndWait:^{
        // 创建相簿的请求
        assetCollectionLocalIdentifier = [PHAssetCollectionChangeRequest creationRequestForAssetCollectionWithTitle:LYWAssetCollectionTitle].placeholderForCreatedAssetCollection.localIdentifier;
    } error:&error];

    // 如果有错误信息
    if (error) return nil;

    // 获得刚才创建的相簿
    return [PHAssetCollection fetchAssetCollectionsWithLocalIdentifiers:@[assetCollectionLocalIdentifier] options:nil].lastObject;
}

- (void)showSuccess:(NSString *)text
{
    dispatch_async(dispatch_get_main_queue(), ^{
        [SVProgressHUD showSuccessWithStatus:text];
    });
}

- (void)showError:(NSString *)text
{
    dispatch_async(dispatch_get_main_queue(), ^{
        [SVProgressHUD showErrorWithStatus:text];
    });
}
Xcode插件的安装路径
/Users/用户名/Library/Application Support/Developer/Shared/Xcode/Plug-ins
属性名注意点
- 对象属性名不能以new开头
@property (nonatomic, strong) NSMutableArray *newComments;
常见错误
-[__NSArray0 objectForKeyedSubscript:]: unrecognized selector sent to instance 0x7fb738c01870
// 错误地将NSArray当做NSDictionary来使用了
block细节
- 如果【block内部】使用【外部声明的强引用】访问【对象A】, 那么【block内部】会自动产生一个【强引用】指向【对象A】
- 如果【block内部】使用【外部声明的弱引用】访问【对象A】, 那么【block内部】会自动产生一个【弱引用】指向【对象A】
矩形框比较的2个函数
- bool CGRectContainsRect(CGRect rect1, CGRect rect2)
- 判断rect1是否包含了rect2
- bool CGRectIntersectsRect(CGRect rect1, CGRect rect2)
- 判断rect1和rect2是否有重叠
注意:rect1和rect2要在同一个坐标系,比较结果才准确
转换坐标系总结
view2坐标系 : 以view2的左上角为坐标原点
view1坐标系 : 以view1的左上角为坐标原点

CGRect newRect = [view1 convertRect:rect fromView:view2];
// 让rect这个矩形框, 从view2坐标系转换到view1坐标系, 得出一个新的矩形框newRect
// rect和view2的含义 : 用来确定矩形框原来在哪

CGRect newRect = [view1 convertRect:rect toView:view2];
// 让rect这个矩形框, 从view1坐标系转换到view2坐标系, 得出一个新的矩形框newRect
// rect和view1的含义 :用来确定矩形框原来在哪
获得一个控件在window中的位置和尺寸
- 以获得redView在window中的位置和尺寸为例
CGRect newRect = [[UIApplication sharedApplication].keyWindow convertRect:redView.bounds fromView:redView];
CGRect newRect = [[UIApplication sharedApplication].keyWindow convertRect:redView.frame fromView:redView.superview];
CGRect newRect = [redView convertRect:redView.bounds toView:[UIApplication sharedApplication].keyWindow];
CGRect newRect = [redView.superview convertRect:redView.frame toView:[UIApplication sharedApplication].keyWindow];
CGRect newRect = [redView convertRect:redView.bounds toView:nil];
CGRect newRect = [redView.superview convertRect:redView.frame toView:nil];
关于tableView的估算高度的那个属性的深入研究
// 所有cell的高度 -> contentSize.height -> 滚动条长度
// 1000 * 20 -> contentSize.height -> 滚动条长度
// contentSize.height -> 200 * 20 -> 16800
/*
使用estimatedRowHeight的优缺点
1.优点
1> 可以降低tableView:heightForRowAtIndexPath:方法的调用频率
2> 将【计算cell高度的操作】延迟执行了(相当于cell高度的计算是懒加载的)
2.缺点
1> 滚动条长度不准确、不稳定,甚至有卡顿效果(如果不使用estimatedRowHeight,滚动条的长度就是准确的)
*/
/**
这个方法的特点:
1.默认情况下(没有设置estimatedRowHeight的情况下)
1> 每次刷新表格时,有多少数据,这个方法就一次性调用多少次(比如有100条数据,每次reloadData时,这个方法就会一次性调用100次)
2> 每当有cell进入屏幕范围内,就会调用一次这个方法
2.设置estimatedRowHeight的情况下
1> 用到了(显示了)哪个cell,才会调用这个方法计算那个cell的高度(方法调用频率降低了)
*/


