前言:
当做Android开发一段时间后,对于了解熟悉系统源码是一个无法逃避的劫,因为不管在以后找工作面试,还是提升自己的技术水平都能起着(高逼格)不小的作用,这里就从Activity的setContentView() 开始,一点一点的揭开Android系统源码的神秘面纱 同时本文是基于25的版本可能对于低版本源码有些出入。
分析:
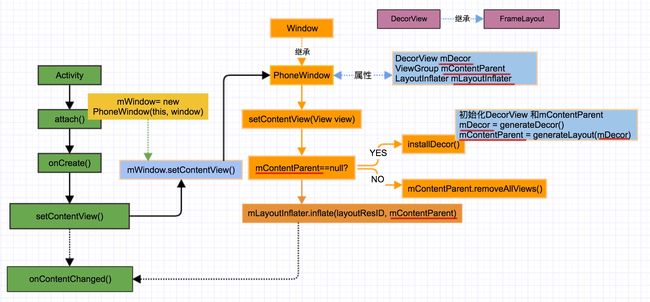
在分析源码先来一张个人整理的思维导图
都说要带着问题去分析:
- setContentView到底做了些什么,为什么调用后就可以显示出我们想要的布局页面?
- PhoneWindow倒是什么东西?Window和它是什么关系?
- DecorView是干什么用的?和我们的布局又有什么样的关系
- requestFeature为什么要在setContentView之前调用?
源码阅读:
public class MainActivity extends AppCompatActivity{
  @Override
  protected void onCreate(Bundle savedInstanceState) {
     super.onCreate(savedInstanceState);
     setContentView(R.layout.activity_main);
  }
}
这段代码谁都熟悉 没什么好讲的 直接进入Activity setContentView()
public void setContentView(@LayoutRes int layoutResID) {
        getWindow().setContentView(layoutResID);
        initWindowDecorActionBar();
    }
调用了getWindow().setContentView(layoutResID); getWindow()获取到的是什么呢
public Window getWindow() {
        return mWindow;
    }

//Window类型的成员变量mWindow 继续跟进
private Window mWindow;

//找到mWindow赋值的地方
final void attach(...){
    //在Activity的attach()生命周期方法内创建了一个PhoneWindow对象
    mWindow = new PhoneWindow(this, window);
    mWindow.setCallback(this);
}
进入PhoneWindow看看与Window是什么关系
public class PhoneWindow extends Window implements MenuBuilder.Callback {...}
PhoneWindow就是Window的子类 那就是调用了PhoneWindow的setContentView()
public class PhoneWindow extends Window implements MenuBuilder.Callback {

  private ViewGroup mContentParent;
  private LayoutInflater mLayoutInflater;

    @Override
    public void setContentView(int layoutResID) {
        if (mContentParent == null) {
            installDecor();
        } else if (!hasFeature(FEATURE_CONTENT_TRANSITIONS)) {
            mContentParent.removeAllViews();
        }

        if (hasFeature(FEATURE_CONTENT_TRANSITIONS)) {
            final Scene newScene = Scene.getSceneForLayout(mContentParent, layoutResID,
                    getContext());
            transitionTo(newScene);
        } else {
            mLayoutInflater.inflate(layoutResID, mContentParent);
        }
        mContentParent.requestApplyInsets();
        final Callback cb = getCallback();
        if (cb != null && !isDestroyed()) {
            cb.onContentChanged();
        }
    }
}
分析以上源码 当mContentParent为null时 会走 installDecor()函数
private DecorView mDecor;

private void installDecor() {
        if (mDecor == null) {
            //初始化mDecor
            mDecor = generateDecor();
            mDecor.setDescendantFocusability(ViewGroup.FOCUS_AFTER_DESCENDANTS);
            mDecor.setIsRootNamespace(true);
            if (!mInvalidatePanelMenuPosted && mInvalidatePanelMenuFeatures != 0) {
                mDecor.postOnAnimation(mInvalidatePanelMenuRunnable);
            }
        }
        if (mContentParent == null) {
            //初始化mContentParent
            mContentParent = generateLayout(mDecor);
            .......
        }
}
在为mContentParent初始化的时候 先初始化了DecorView 有必要了解下DecorView
private final class DecorView extends FrameLayout implements RootViewSurfaceTaker {...}
DecorView 就是PhoneWindow一个内部类 并且继承自FrameLayout 再看 mContentParent是怎么初始化的
 protected ViewGroup generateLayout(DecorView decor) {
        //获取Activity的主题
        TypedArray a = getWindowStyle();
        //主题是否为浮动的
        mIsFloating = a.getBoolean(R.styleable.Window_windowIsFloating, false);
        int flagsToUpdate = (FLAG_LAYOUT_IN_SCREEN|FLAG_LAYOUT_INSET_DECOR)
                & (~getForcedWindowFlags());
        if (mIsFloating) {
            setLayout(WRAP_CONTENT, WRAP_CONTENT);
            setFlags(0, flagsToUpdate);
        } else {
            setFlags(FLAG_LAYOUT_IN_SCREEN|FLAG_LAYOUT_INSET_DECOR, flagsToUpdate);
        }
        //NoTitle 没有tite主题
        if (a.getBoolean(R.styleable.Window_windowNoTitle, false)) {
            //设置主题样式
            requestFeature(FEATURE_NO_TITLE);
        } else if (a.getBoolean(R.styleable.Window_windowActionBar, false)) {
            //带有ACTION_BAR主题
            requestFeature(FEATURE_ACTION_BAR);
        }
        /*... 后面一个套路 获取主题样式并且设置对应的主题样式...*/
        //是否全屏
        if (a.getBoolean(R.styleable.Window_windowFullscreen, false)) {
            setFlags(FLAG_FULLSCREEN, FLAG_FULLSCREEN & (~getForcedWindowFlags()));
        }
        ....................................................
        //主题样式 和window样式都在这一块设置 这里先不去讲解 有兴趣的可以自下了解 同时也证明一点 调用requestFeature() 或者需要改变Theme有效 必须在setContentView()的原因就在这里
         ...................................................

        int layoutResource;
        //根据不同的主题设置不同的根布局
        int features = getLocalFeatures();
        // System.out.println("Features: 0x" + Integer.toHexString(features));
        if ((features & (1 << FEATURE_SWIPE_TO_DISMISS)) != 0) {
            layoutResource = R.layout.screen_swipe_dismiss;
        } else if ((features & ((1 << FEATURE_LEFT_ICON) | (1 << FEATURE_RIGHT_ICON))) != 0) {
            if (mIsFloating) {
                TypedValue res = new TypedValue();
                getContext().getTheme().resolveAttribute(
                        R.attr.dialogTitleIconsDecorLayout, res, true);
                layoutResource = res.resourceId;
            } else {
                layoutResource = R.layout.screen_title_icons;
            }
            // XXX Remove this once action bar supports these features.
            removeFeature(FEATURE_ACTION_BAR);
            // System.out.println("Title Icons!");
        } else if ((features & ((1 << FEATURE_PROGRESS) | (1 << FEATURE_INDETERMINATE_PROGRESS))) != 0
                && (features & (1 << FEATURE_ACTION_BAR)) == 0) {
            // Special case for a window with only a progress bar (and title).
            // XXX Need to have a no-title version of embedded windows.
            //带progress的布局文件
            layoutResource = R.layout.screen_progress;
            // System.out.println("Progress!");
        } else if ((features & (1 << FEATURE_CUSTOM_TITLE)) != 0) {
            if (mIsFloating) {
                TypedValue res = new TypedValue();
                getContext().getTheme().resolveAttribute(
                        R.attr.dialogCustomTitleDecorLayout, res, true);
                layoutResource = res.resourceId;
            } else {
                //带ACTION_BAR的布局文件
                layoutResource = R.layout.screen_custom_title;
            }
            removeFeature(FEATURE_ACTION_BAR);
        } else if ((features & (1 << FEATURE_NO_TITLE)) == 0) {
            if (mIsFloating) {
                TypedValue res = new TypedValue();
                getContext().getTheme().resolveAttribute(
                        R.attr.dialogTitleDecorLayout, res, true);
                layoutResource = res.resourceId;
            } else if ((features & (1 << FEATURE_ACTION_BAR)) != 0) {
                layoutResource = a.getResourceId(
                        R.styleable.Window_windowActionBarFullscreenDecorLayout,
                        R.layout.screen_action_bar);
            } else {
            //带title的布局
                layoutResource = R.layout.screen_title;
            }
            // System.out.println("Title!");
        } else if ((features & (1 << FEATURE_ACTION_MODE_OVERLAY)) != 0) {
            layoutResource = R.layout.screen_simple_overlay_action_mode;
        } else {
            //默认的布局文件 也是最常用的
            layoutResource = R.layout.screen_simple;
        }

        mDecor.startChanging();
        //mLayoutInflater解析布局文件
        View in = mLayoutInflater.inflate(layoutResource, null);
        //添加到 DecorView中(FrameLayout) 并且宽高属性设置为match_parent
        decor.addView(in, new ViewGroup.LayoutParams(MATCH_PARENT, MATCH_PARENT));
        //初始化mContentRoot为in
        mContentRoot = (ViewGroup) in;
        //contentParent的值为id为:ID_ANDROID_CONTENT的View
        ViewGroup contentParent = (ViewGroup)findViewById(ID_ANDROID_CONTENT);
        if (contentParent == null) {
            throw new RuntimeException("Window couldn't find content container view");
        }
        .....
        //将contentParent返回
        return contentParent;
    }
R.layout.screen_simple
public static final int ID_ANDROID_CONTENT = com.android.internal.R.id.content;
以上操作就是根据不同的主题获取不同的根布局文件 并添加到DecorView中 同时将根布局文件View对象赋值给 mContentRoot 同时找到布局文件中id为:R.id.content的view 返回赋值给 mContentParent 这时mContentParent就是布局文件中的FrameLayout
接着往下走 当mContentParent不为空时会将其包含的子View全部删除
mContentParent.removeAllViews();
最后通LayoutInflater 将布局文件解析并添加到mContentParent中
mLayoutInflater.inflate(layoutResID, mContentParent);
因为篇幅有限 这里先不分析LayoutInflater 是如何解析xml布局文件 并且将view添加到rootView中
到这里Activity中的View树差不多是这样子的
最后还有一段代码
final Callback cb = getCallback();
if (cb != null && !isDestroyed()) {
      cb.onContentChanged();
 }

//getCallback()
public final Callback getCallback() {
        return mCallback;
}

//有getCallback() 肯定有setCallback()
public void setCallback(Callback callback) {
        mCallback = callback;
}

//这个Callback 是什么呢
public abstract class Window {
 //Window中接口
 public interface Callback {
    public void onContentChanged();
     ..............
 }
}

//因为Activity实现了该接口 并且在attach设置了setCallback(this)
public class Activity extends ContextThemeWrapper implements Window.Callback{

  final void attach(...){
      //在Activity的attach()生命周期方法内创建了一个PhoneWindow对象
      mWindow = new PhoneWindow(this, window);
      //设置Callback对象
      mWindow.setCallback(this);
  }
}
由以上分析所以这里得到的是Activity对象
final Callback cb = getCallback();
if (cb != null && !isDestroyed()) {
    //调用Activity的onContentChanged()
     cb.onContentChanged();
}
再看Activity的onContentChanged()
//空函数
public void onContentChanged() {}
该函数什么都操作 那定义该函数的意义何在 于是又去看了下 Window中Callback接口对该函数的定义:
 //Window中接口
 public interface Callback {
       /**
         * This hook is called whenever the content view of the screen changes
         * (due to a call to
         * {@link Window#setContentView(View, android.view.ViewGroup.LayoutParams)
         * Window.setContentView} or
         * {@link Window#addContentView(View, android.view.ViewGroup.LayoutParams)
         * Window.addContentView}).
         */
     public void onContentChanged();
     ..............
 }
其中大概意思是:
当屏幕的内容发生改变完成时调用该函数 而导致屏幕内容发生改变的操作有
Window#setContentView(View, android.view.ViewGroup.LayoutParams)
Window#addContentView(View, android.view.ViewGroup.LayoutParams)
到这里 结合上面的源码分析就明白了一个大概 google留此函数给我们重写 用于初始化子控件或者其他操作 因为在onCreate()做初始化操作 容易因系统某些操作没完成 造成空指针异常(在Java 5之后有并发编程)
public class MainActivity extends AppCompatActivity implements SensorEventListener {
    private SensorManager sensorManager;//重力感应
    private Sensor sensor;
    @Override
    protected void onCreate(Bundle savedInstanceState) {
        super.onCreate(savedInstanceState);
        setContentView(R.layout.activity_main);
    }

    /**
     * 初始化操作
     */
    @Override
    public void onContentChanged() {
        jbox_view = (CollisionView) findViewById(R.id.jbox_view);
        initView();
        sensorManager= (SensorManager) getSystemService(Context.SENSOR_SERVICE);
        sensor=sensorManager.getDefaultSensor(Sensor.TYPE_ACCELEROMETER);//重力传感器
    }
这里以 findViewById()函数为例来分析
public class Activity{
   @Nullable
   public View findViewById(@IdRes int id) {
        //调用Window的findViewById(id)
        return getWindow().findViewById(id);
    }
}

public class Window{
     @Nullable
    public View findViewById(@IdRes int id) {
        //getDecorView()顾名思义就是PhoneWindow中的DecorView
        return getDecorView().findViewById(id);
    }
}
public class PhoneWindow{
     @Override
    public final View getDecorView() {
        if (mDecor == null) {
            //这里有看到了熟悉的函数 里面就是DecorView的初始化操作 前面已经分析过了
            installDecor();
        }
        return mDecor;
    }
}
经过上面分析 在并发编程的情况下 如果我们在onCreate()中进行findViewById操作可能会与setContentView()一起执行 虽然系统中有对null的判断操作 但是站在程序执行流程顺序来讲findViewById()更适合放在onContentChanged()中去执行

