在uiview的- (void)drawRect:(CGRect)rect方法之前会自动生成一个画布并放在栈顶。通过UIGraphicsGetCurrentContext()方法获取当前的画布。
苹果原本文档如下:
The current graphics context is nil
by default. Prior to calling its drawRect:
method, view objects push a valid context onto the stack, making it current. If you are not using a UIView
object to do your drawing, however, you must push a valid context onto the stack manually using the UIGraphicsPushContextfunction.
上下文的用处一般有三种,本文介绍第一种
- UIView调用drawRect:之前系统生成的,用于界面的绘制;
- UIGraphicsBeginImageContext(), 用于生成图片;
- UIGraphicsBeginPDFContextToFile和UIGraphicsBeginPDFContextToData,用于生成PDF;
1、画布的坐标转换(Coordinate space transformations)
当前变换矩阵CTM(current transformation matrix )用来改变坐标环境,实现画布的平移、缩放、旋转等操作。
- 画布平移
/* Translate the current graphics state's transformation matrix (the CTM) by
`(tx, ty)'. */
CG_EXTERN void CGContextTranslateCTM(CGContextRef cg_nullable c,
CGFloat tx, CGFloat ty)
CG_AVAILABLE_STARTING(__MAC_10_0, __IPHONE_2_0);
- 画布缩放
/* Scale the current graphics state's transformation matrix (the CTM) by
`(sx, sy)'. */
CG_EXTERN void CGContextScaleCTM(CGContextRef cg_nullable c,
CGFloat sx, CGFloat sy)
CG_AVAILABLE_STARTING(__MAC_10_0, __IPHONE_2_0);
- 画布旋转
/* Rotate the current graphics state's transformation matrix (the CTM) by
`angle' radians. */
CG_EXTERN void CGContextRotateCTM(CGContextRef cg_nullable c, CGFloat angle)
CG_AVAILABLE_STARTING(__MAC_10_0, __IPHONE_2_0);
- 将变换矩阵合并到画布中
之前有写过关于仿射矩阵变换的文章,此处就是放射变换方法的一处应用场景
/* Concatenate the current graphics state's transformation matrix (the CTM)
with the affine transform `transform'. */
CG_EXTERN void CGContextConcatCTM(CGContextRef cg_nullable c,
CGAffineTransform transform)
CG_AVAILABLE_STARTING(__MAC_10_0, __IPHONE_2_0);
- 获取当前变换矩阵
/* Return the current graphics state's transformation matrix. Returns
CGAffineTransformIdentity in case of inavlid context. */
CG_EXTERN CGAffineTransform CGContextGetCTM(CGContextRef cg_nullable c)
CG_AVAILABLE_STARTING(__MAC_10_0, __IPHONE_2_0);
实例
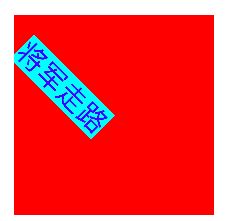
将一个字符串画到UIView 上,偏移tx=10,ty=10,放大2倍,旋转45度。
- (void)drawRect:(CGRect)rect {
    // Drawing code
    CGContextRef ct = UIGraphicsGetCurrentContext();
    // 放大 2 倍
    CGContextScaleCTM(ct, 2, 2);
    // 移动 10
    CGContextTranslateCTM(ct, 10, 10);
    // 旋转 绕45度
    CGContextRotateCTM(ct, M_PI_4);
    [@"将军走路" drawInRect:rect withAttributes:@{NSForegroundColorAttributeName:[UIColor blueColor],NSFontAttributeName:[UIFont systemFontOfSize:14],NSBackgroundColorAttributeName:[UIColor cyanColor]}];

}
最终效果如下:
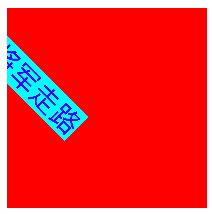
注意所有的操作都是针对画布坐标的变换,所以并不是中心旋转,而是坐标的变换。所以转换的顺序不一样,得到的结果也不一样。把代码调一下顺序,得到的结果如下:
    - (void)drawRect:(CGRect)rect {
    // Drawing code
    CGContextRef ct = UIGraphicsGetCurrentContext();
    // 旋转 绕45度
    CGContextRotateCTM(ct, M_PI_4);
    // 放大 2 倍
    CGContextScaleCTM(ct, 2, 2);
    // 移动 10
    CGContextTranslateCTM(ct, 10, 10);
    [@"将军走路" drawInRect:rect withAttributes:@{NSForegroundColorAttributeName:[UIColor blueColor],NSFontAttributeName:[UIFont systemFontOfSize:14],NSBackgroundColorAttributeName:[UIColor cyanColor]}];

}
2、上下文的绘图方式(Path drawing functions)
基本绘制方法
void CGContextDrawPath(CGContextRef cg_nullable c,
CGPathDrawingMode mode)
typedef CF_ENUM (int32_t, CGPathDrawingMode) {
kCGPathFill, //填充
kCGPathEOFill,//奇偶填充
kCGPathStroke,//划线
kCGPathFillStroke,//填充并划线
kCGPathEOFillStroke //奇偶填充并划线
};
苹果提供的一些方便的绘制方法
- CGContextFillPath
- CGContextEOFillPath
- CGContextStrokePath
- CGContextFillRect
- CGContextFillRects
- CGContextStrokeRect
- CGContextStrokeRectWithWidth
- CGContextClearRect
- CGContextFillEllipseInRect
- CGContextStrokeEllipseInRect
- CGContextStrokeLineSegments
3、上下文绘制属性设置方法(Drawing attribute functions)
void CGContextSetLineWidth(CGContextRef cg_nullable c, CGFloat width)
void CGContextSetLineCap(CGContextRef cg_nullable c, CGLineCap cap)
void CGContextSetLineJoin(CGContextRef cg_nullable c, CGLineJoin join)
void CGContextSetMiterLimit(CGContextRef cg_nullable c, CGFloat limit)
void CGContextSetLineDash(CGContextRef cg_nullable c, CGFloat phase,
const CGFloat * __nullable lengths, size_t count)void CGContextSetFlatness(CGContextRef cg_nullable c, CGFloat flatness)
void CGContextSetAlpha(CGContextRef cg_nullable c, CGFloat alpha)
void CGContextSetBlendMode(CGContextRef cg_nullable c, CGBlendMode mode)
4、路径的构建(Path construction functions)
路径的基本构建方法
void CGContextBeginPath(CGContextRef cg_nullable c)
void CGContextMoveToPoint(CGContextRef cg_nullable c,
CGFloat x, CGFloat y)void CGContextAddLineToPoint(CGContextRef cg_nullable c,
CGFloat x, CGFloat y)void CGContextAddCurveToPoint(CGContextRef cg_nullable c, CGFloat cp1x,
CGFloat cp1y, CGFloat cp2x, CGFloat cp2y, CGFloat x, CGFloat y)void CGContextAddQuadCurveToPoint(CGContextRef cg_nullable c,
CGFloat cpx, CGFloat cpy, CGFloat x, CGFloat y)void CGContextClosePath(CGContextRef cg_nullable c)
在基本构建方法上,苹果有封装了一些方便的构建方法
- void CGContextAddRect(CGContextRef cg_nullable c, CGRect rect)
- void CGContextAddRects(CGContextRef cg_nullable c,
const CGRect * __nullable rects, size_t count) - void CGContextAddLines(CGContextRef cg_nullable c,
const CGPoint * __nullable points, size_t count) - void CGContextAddEllipseInRect(CGContextRef cg_nullable c, CGRect rect)
- void CGContextAddArc(CGContextRef cg_nullable c, CGFloat x, CGFloat y,
CGFloat radius, CGFloat startAngle, CGFloat endAngle, int clockwise) - void CGContextAddArcToPoint(CGContextRef cg_nullable c,
CGFloat x1, CGFloat y1, CGFloat x2, CGFloat y2, CGFloat radius) - void CGContextAddPath(CGContextRef cg_nullable c,
CGPathRef cg_nullable path)
实例
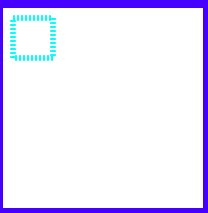
画虚线
-
效果
代码及注释
    //设置为虚线
//    CGFloat lengths[] = {2,2};
//    CGContextSetLineDash(ct, 0, lengths, 2);
    //默认线条的cap类型就是kCGLineCapButt,而且,虚线必须是这个类型
//    CGContextSetLineCap(ct, kCGLineCapButt);
//    CGContextSetLineCap(ct, kCGLineCapRound);
//    CGContextSetLineCap(ct, kCGLineCapSquare);

    CGPoint points[] = {
        CGPointMake(10, 10),CGPointMake(50, 10),
        CGPointMake(50, 10),CGPointMake(50, 50),
        CGPointMake(50, 50),CGPointMake(10, 50),
        CGPointMake(10, 50),CGPointMake(10, 10)
    };
    // 多点连线方法
    CGContextStrokeLineSegments(ct, points, 8);
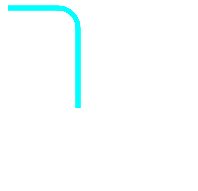
画弧线
-
效果
- 代码
从当前点开始画,然后画一个圆角。
两个点加上当前点计算圆角的两条切线,来确定圆角的角度。
半径参数决定圆角的大小
    CGContextMoveToPoint(ct, 10, 10);
    CGContextAddArcToPoint(ct,80,10,80,30,20);
    CGContextAddLineToPoint(ct, 80, 110);
画圆弧
-
效果
- 代码
CGContextAddArc(ct, 30, 30, 20, 0, M_PI_2*3, 0);
批量添加直线
-
效果
直线是连接着的,kCGLineJoinRound 设置后有连接样式改变
- 代码
// 设置连接点为圆角
    CGContextSetLineJoin(ct, kCGLineJoinRound);
    CGPoint points[] = {
        CGPointMake(10, 10),
        CGPointMake(50, 10),
        CGPointMake(50, 50),
        CGPointMake(10, 50),

    };

    CGContextAddLines(ct, points, 4);
    CGContextClosePath(ct);
    CGContextStrokePath(ct);
批量画直线
只是单独的画很多直线,但是相互并没有连接,利用kCGLineJoinRound 设置后并没有任何反应。
-
效果
- 代码
// 设置连接点为圆角,但是这些点并没有连接
CGContextSetLineJoin(ct, kCGLineJoinRound);
    CGPoint points[] = {
        CGPointMake(10, 10),CGPointMake(50, 10),
        CGPointMake(50, 10),CGPointMake(50, 50),
        CGPointMake(50, 50),CGPointMake(10, 50),
        CGPointMake(10, 50),CGPointMake(10, 10)
    };

    // 多点连线方法
    CGContextStrokeLineSegments(ct, points, 8);
