感觉Crossoverjie的一个开源cim(即时通讯系统,源码和设计个人觉得不错,空闲的时候分析一下。
cim github地址: https://github.com/crossoverJie/cim
- 第一篇: CIM-client 功能和设计分析
- 第二篇:CIM-router功能和设计分析
- 第三篇:CIM-server功能和设计分析
协议设计
1. 请求协议类图
-
BaseRequest作为基类,具有所有的请求都应该具备的两个属性
public class BaseRequest {
    // 请求的序列号
    private String reqNo;
   //请求的时间戳,构造的时候就设置为System.currentTimeMillis() / 1000
    private int timeStamp;
}
-
GoogleProtocolVO增加了requestId和msg两个字段,表示传输GoogleProtocol 消息。 -
GroupReqVO增加了userId,msg两个字段,表示传输的是群聊消息。 -
LoginReqVO增加了userId,userName两个字段,表示传输的是登录消息 -
P2PReqVO增加了userId,receiveUserId,msg字段,表示传输的是一对一私聊消息 -
SendMsgReqVO增加了msg,userId字段,表示通常的传输发送消息 -
StringReqVO增加了msg字段,表示用来传输String的消息
2. 相应协议类图
-
CIMServerResVO用来接收查询路由选中的服务器的响应消息,格式如下:
{
      code : 9000
      message : 成功
      reqNo : null
      dataBody : {"ip":"127.0.0.1","port":8081}
}
-
OnlineUsersResVO用来接受查询所有在线用户的响应消息,格式如下:
{
     code : 9000
     message : 成功
     reqNo : null
     dataBody : [{"userId":1545574841528,"userName":"zhangsan"},{"userId":1545574871143,"userName":"crossoverJie"}]
}
-
SendMsgResVO表示发送消息的响应
3. 程序运行流程
3.1 程序入口类
public class CIMClientApplication implements CommandLineRunner{

    private final static Logger LOGGER = LoggerFactory.getLogger(CIMClientApplication.class);

    @Autowired
    private ClientInfo clientInfo ;
    public static void main(String[] args) {
        SpringApplication.run(CIMClientApplication.class, args);
        LOGGER.info("启动 Client 服务成功");
    }

    @Override
    public void run(String... args) throws Exception {
        Scan scan = new Scan() ;
        Thread thread = new Thread(scan);
        thread.setName("scan-thread");
        thread.start();
        clientInfo.saveStartDate();
    }
- 标准的Springboot启动流程,重写run方法在Springboot应用启动后就启动一个线程去监听控制台,根据用户的命令,做相应的操作。
3.2 Scan扫描用户的输入命令
 public void run() {
        Scanner sc = new Scanner(System.in);
        while (true) {
            String msg = sc.nextLine();
            //检查消息,保证输入消息不能不为null
            if (msgHandle.checkMsg(msg)) {
                continue;
            }
            //系统内置命令
            if (msgHandle.innerCommand(msg)){
                continue;
            }
            //真正的发送消息
            msgHandle.sendMsg(msg) ;
            //写入聊天记录
            msgLogger.log(msg) ;
            LOGGER.info("{}:【{}】", configuration.getUserName(), msg);
        }
    }
- 经过检查消息是否为空字符串,是否是内置命令,最后剩下的是用户发送的消息。
3.3 内置命令的处理
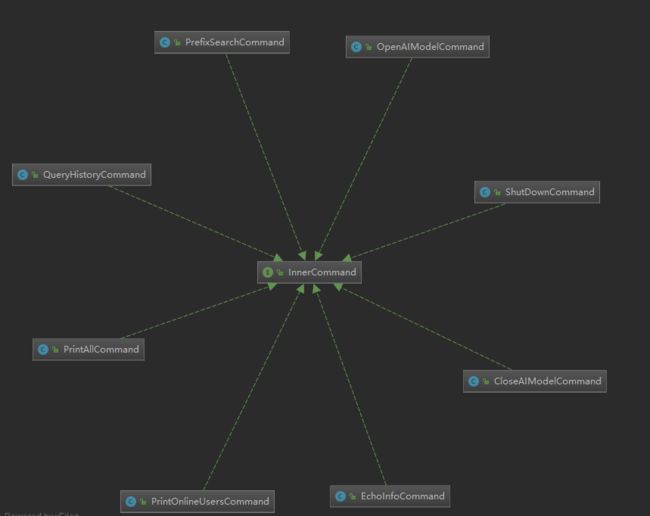
如果是内置命令,转而通过反射实例化每个命令,这里用到命令模式。
public boolean innerCommand(String msg) {

        if (msg.startsWith(":")) {

            InnerCommand instance = innerCommandContext.getInstance(msg);
            //调用里面的方法
            instance.process(msg) ;
            return true;
        } else {
            return false;
        }
    }

 public InnerCommand getInstance(String command) {
        //// 每个命令对应一个实现类
        Map allClazz = SystemCommandEnum.getAllClazz();

        //兼容需要命令后接参数的数据 :q cross
        String[] trim = command.trim().split(" ");
        String clazz = allClazz.get(trim[0]);
        InnerCommand innerCommand = null;
        try {
            if (StringUtil.isEmpty(clazz)){
                clazz = PrintAllCommand.class.getName() ;
            }
            //根据类名获取到在容器里面的实例
            innerCommand = (InnerCommand) SpringBeanFactory.getBean(Class.forName(clazz));
        } catch (Exception e) {
            LOGGER.error("Exception", e);
        }

        return innerCommand;
    }
-
内部完整命令,以及他们的实现类如下
完整命令类类图如下:
看其中一个实现类
public class PrintOnlineUsersCommand implements InnerCommand {
    private final static Logger LOGGER = LoggerFactory.getLogger(PrintOnlineUsersCommand.class);

    @Autowired
    private RouteRequest routeRequest ;

    @Override
    public void process(String msg) {
        try {
            // 查询所有的在线用户,委托routeRequest 来查询
            List onlineUsers = routeRequest.onlineUsers();

            LOGGER.info("~~~~~~~~~~~~~~~~~~~~~~~~~~~~~~~~~~~~~~~~~~~~~~~~");
            for (OnlineUsersResVO.DataBodyBean onlineUser : onlineUsers) {
                LOGGER.info("userId={}=====userName={}", onlineUser.getUserId(), onlineUser.getUserName());
            }
            LOGGER.info("~~~~~~~~~~~~~~~~~~~~~~~~~~~~~~~~~~~~~~~~~~~~~~~~");

        } catch (Exception e) {
            LOGGER.error("Exception", e);
        }
    }
}
都是通过其中的process来处理逻辑
3.4 处理内置命令后,接着来看处理发送消息
public void sendMsg(String msg) {

        if (aiModel) {
           //ai 模式主要是调侃之前那个价值两亿的融资项目
            aiChat(msg);
        } else {
           // 正常的聊天
            normalChat(msg);
        }
    }

private void normalChat(String msg) {
        String[] totalMsg = msg.split(";;");
        // 私聊的格式是:12345;;hello
        if (totalMsg.length > 1) {
            //私聊
            P2PReqVO p2PReqVO = new P2PReqVO();
            p2PReqVO.setUserId(configuration.getUserId());
            p2PReqVO.setReceiveUserId(Long.parseLong(totalMsg[0]));
            p2PReqVO.setMsg(totalMsg[1]);
            try {
                p2pChat(p2PReqVO);
            } catch (Exception e) {
                LOGGER.error("Exception", e);
            }

        } else {
            //群聊 直接发消息就行
            GroupReqVO groupReqVO = new GroupReqVO(configuration.getUserId(), msg);
            try {
                groupChat(groupReqVO);
            } catch (Exception e) {
                LOGGER.error("Exception", e);
            }
        }
    }
群聊和私聊也都委托 routeRequest来实现
 @Override
    public void groupChat(GroupReqVO groupReqVO) throws Exception {
        routeRequest.sendGroupMsg(groupReqVO);
    }

    @Override
    public void p2pChat(P2PReqVO p2PReqVO) throws Exception {

        routeRequest.sendP2PMsg(p2PReqVO);

    }
3.5 处理聊天记录
接着最开始的时候看,聊天完成后,需要把聊天记录写入文件,实现如下
 public void log(String msg) {
        //开始消费,异步完成
        startMsgLogger();
        try {
          //往阻塞队列里面添加
            blockingQueue.put(msg);
        } catch (InterruptedException e) {
            LOGGER.error("InterruptedException", e);
        }
    }
启动消息线程,往阻塞队列里面添加消息
private class Worker extends Thread {


        @Override
        public void run() {
            while (started) {
                try {
                    //往阻塞队列里面取
                    String msg = blockingQueue.take();
                    writeLog(msg);
                } catch (InterruptedException e) {
                    break;
                }
            }
        }

    }
真正写入文件的实现如下:
private void writeLog(String msg) {

        LocalDate today = LocalDate.now();
        int year = today.getYear();
        int month = today.getMonthValue();
        int day = today.getDayOfMonth();

        String dir = appConfiguration.getMsgLoggerPath() + appConfiguration.getUserName() + "/";
        String fileName = dir + year + month + day + ".log";

        Path file = Paths.get(fileName);
        boolean exists = Files.exists(Paths.get(dir), LinkOption.NOFOLLOW_LINKS);
        try {
            if (!exists) {
                Files.createDirectories(Paths.get(dir));
            }

            List lines = Arrays.asList(msg);

            Files.write(file, lines, Charset.forName("UTF-8"), StandardOpenOption.CREATE, StandardOpenOption.APPEND);
        } catch (IOException e) {
            LOGGER.info("IOException", e);
        }

    }
查找聊天记录的实现如下,就是简单的查找每个文件的每行,然后看是否包含,这样的方式很暴力,后期的话有很大改进:
@Override
    public String query(String key) {
        StringBuilder sb = new StringBuilder();

        Path path = Paths.get(appConfiguration.getMsgLoggerPath() + appConfiguration.getUserName() + "/");

        try {
            Stream list = Files.list(path);
            List collect = list.collect(Collectors.toList());
            for (Path file : collect) {
                List strings = Files.readAllLines(file);
                for (String msg : strings) {
                    if (msg.trim().contains(key)) {
                        sb.append(msg).append("\n");
                    }
                }

            }
        } catch (IOException e) {
            LOGGER.info("IOException", e);
        }

        return sb.toString().replace(key, "\033[31;4m" + key + "\033[0m");
    }
3.6 RouteRequestImpl的实现
这个实现里面包含众多的功能,例如,群聊,私聊,离线,获取在线用户,获取一个可用的服务ip。这些功能的实现都是依靠 RouteRequestImpl来完成,而RouteRequestImpl里面的实现是通过okhttp远程调用cim-router的http接口实现的。看其中的群聊功能:
 public void sendGroupMsg(GroupReqVO groupReqVO) throws Exception {
        //序列化
        JSONObject jsonObject = new JSONObject();
        jsonObject.put("msg",groupReqVO.getMsg());
        jsonObject.put("userId",groupReqVO.getUserId());
        RequestBody requestBody = RequestBody.create(mediaType,jsonObject.toString());

        Request request = new Request.Builder()
                .url(groupRouteRequestUrl)
                .post(requestBody)
                .build();
        //发送http请求cim-router
        Response response = okHttpClient.newCall(request).execute() ;
        try {
            if (!response.isSuccessful()){
                throw new IOException("Unexpected code " + response);
            }
        }finally {
            response.body().close();
        }
    }
3.7 客户端的启动
上面所有的都是内置命令的处理以及和cim-router的通信。但是,client最终是要和server通信的,所以在这个过程中,客户端作为netty客户端需要启动。这个启动过程可以在CIMClient实例化的过程中启动
@Component
public class CIMClient {
   //构造函数完成后调用
  @PostConstruct
    public void start() throws Exception {

        //登录 + 获取可以使用的服务器 ip+port
        CIMServerResVO.ServerInfo cimServer = userLogin();

        //启动客户端
        startClient(cimServer);

        //向服务端注册
        loginCIMServer();


    }
}
向路由注册并返回可用的服务器地址
private CIMServerResVO.ServerInfo userLogin() {
        LoginReqVO loginReqVO = new LoginReqVO(userId, userName);
        CIMServerResVO.ServerInfo cimServer = null;
        try {
          //获取可用的服务器
            cimServer = routeRequest.getCIMServer(loginReqVO);

            //保存系统信息
            clientInfo.saveServiceInfo(cimServer.getIp() + ":" + cimServer.getCimServerPort())
                    .saveUserInfo(userId, userName);

            LOGGER.info("cimServer=[{}]", cimServer.toString());
        } catch (Exception e) {
            errorCount++;

            if (errorCount >= configuration.getErrorCount()) {
                LOGGER.error("重连次数达到上限[{}]次", errorCount);
                msgHandle.shutdown();
            }
            LOGGER.error("登录失败", e);
        }
        return cimServer;
    }
启动客户端到服务端(上一步获取的)的channel
private void startClient(CIMServerResVO.ServerInfo cimServer) {
        Bootstrap bootstrap = new Bootstrap();
        bootstrap.group(group)
                .channel(NioSocketChannel.class)
                .handler(new CIMClientHandleInitializer())
        ;

        ChannelFuture future = null;
        try {
            future = bootstrap.connect(cimServer.getIp(), cimServer.getCimServerPort()).sync();
        } catch (InterruptedException e) {
            errorCount++;

            if (errorCount >= configuration.getErrorCount()) {
                LOGGER.error("链接失败次数达到上限[{}]次", errorCount);
                msgHandle.shutdown();
            }
            LOGGER.error("连接失败", e);
        }
        if (future.isSuccess()) {
            LOGGER.info("启动 cim client 成功");
        }
        channel = (SocketChannel) future.channel();
    }
向服务器注册
 private void loginCIMServer() {
        CIMRequestProto.CIMReqProtocol login = CIMRequestProto.CIMReqProtocol.newBuilder()
                .setRequestId(userId)
                .setReqMsg(userName)
                .setType(Constants.CommandType.LOGIN)
                .build();
        ChannelFuture future = channel.writeAndFlush(login);
        future.addListener((ChannelFutureListener) channelFuture ->
                LOGGER.info("注册成功={}", login.toString()));
    }
总结
到这里整cim-client的功能就完成了,客户端就是通过命令模式通过okhttp远程调用特定的服务地址来注册,获取服务器地址,完成运维。通过从cim-router拿到的服务器地址,建立客户端-服务端的连接,即可完成消息私聊,群聊。


