作者:刘刚,叩丁狼高级讲师。原创文章,转载请注明出处。
Dubbo 服务部署解决方案:基于 Assembly 拆包部署
本文主要以 SpringBoot + Dubbo 为基础框架,为你提供一套比较通用的
Dubbo 服务部署解决方案。
I. 前了个言
首先,直接百度可以搜索到一大堆部署方案,包括我现在推荐的这一种,这里不去比较任何一种的好坏,我只是以我认为更好的方式去写下这篇文章
II. 简述下技术
在写具体部署步骤前,我们先简单了解下会涉及到的这几项技术:
-
Dubbo:这个在现在来讲应该不用多介绍了,阿里开源的 RPC 框架,目前已提交 Apache 组织,现在还处于孵化中。我们使用 Dubbo 来作为 RPC 服务的开发框架,选择的原因主要有以下几点
- 使用简单,代码侵入性低(使用 @Service 与 @Reference 注解即可完成 RPC 调用,几乎与本地开发没有啥区别)
- 支持切换 RPC 协议实现,如 Hessian、Thrift、WebService 等,可拓展性强(考虑支持其他语言,可以采用 Thrift 协议)
- 友好的服务治理功能(微服务开发,较为头疼的就是服务治理问题了,Dubbo 提供了比较全面的一套服务治理方案)
SpringBoot:SpringBoot 的火爆程度就不用多说了,它几乎帮你完成了一切事情,你几乎可以不用考虑太多各种依赖的管理,一大堆的配置文件,是的,统统没有,你只需要认真写代码就好了(如果你现在对 SpringBoot 还不是很了解,那一定要去看看这个视频了 叩丁狼:SpringBoot 高级实战 免费的)
Assembly:Maven 提供的一款插件,可以通过一个简单的配置,让你的项目打包后变成你想要的格式。微服务架构下,统一的打包方式与部署流程显得尤其重要,可以让我们较方便的实现持续集成与自动化运维
Maven-Jar-Plugin:同样是 Maven 为我们提供的一款插件,它的主要功能是让 Maven 将我们的项目打成一个可执行的 jar 包,这样我们可以直接使用命令将应用跑起来
III. 搭建项目
好了,废话不多说,以上技术先介绍到这里,接下来就开始搭建我们的项目吧,项目的创建可以直接选用 IntelJ IDEA / Eclipse / STS 等任意一种开发工具创建就行
-
项目结构
本文只涉及到 Dubbo 提供者的服务部署,客户端的选择方案很多就不提了,预期的打包后的结构如下图
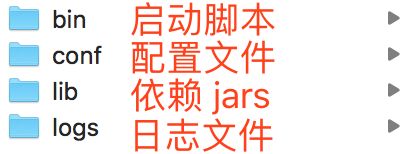 demo-package.png
项目结构稍微再增加了一点内容,也就是 Assembly 相关的配置以及打包后的启动脚本的管理,如下图
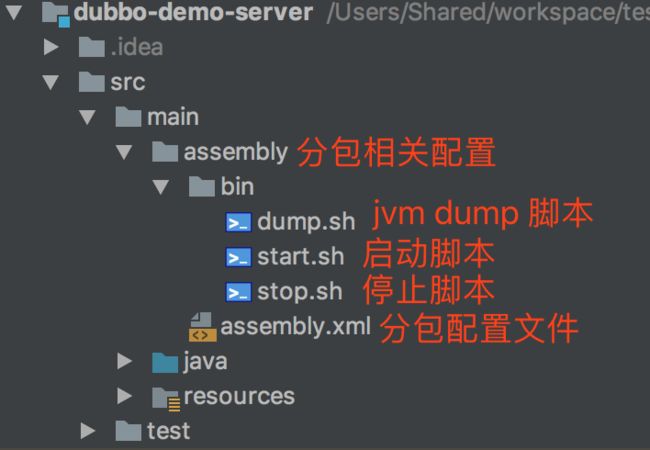 project.png
 引入相关依赖 pom.xml
    4.0.0

    cn.wolfcode
    dubbo-demo-server
    1.0.0


        org.springframework.boot
        spring-boot-starter-parent
        1.5.6.RELEASE


        1.8


            org.springframework.boot
            spring-boot-starter-logging


            com.gitee.reger
            spring-boot-starter-dubbo
            1.0.10


                org.apache.maven.plugins
                maven-jar-plugin
                2.3.1


                            cn.wolfcode.dubbo.main.DubboDemoServer

                            true

                            ./


                        **/*.properties

                        **/*.xml


                maven-assembly-plugin


                    src/main/assembly/assembly.xml


                        make-assembly
                        package


                            single


                maven-compiler-plugin


            dev

                dev
                dubbo-demo-server-dev
                N/A
                dubbo
                20880
                cn.wolfcode.dubbo.service


                true


            test

                test
                dubbo-demo-server-test
                N/A
                dubbo
                20880
                cn.wolfcode.dubbo.service


            prd

                prd
                dubbo-demo-server
                zookeeper://192.168.56.101:2181
                dubbo
                20880
                cn.wolfcode.dubbo.service
- Dubbo 服务配置 application.properties,配置内容配合 Maven 的 Profile 实现在打包时根据不同环境的切换,具体配置内容可查看 pom.xml 中
中的内容,依赖于 spring-boot-parent 中的 中的文件置换功能(默认开启)
# dubbo 服务名
[email protected]@
# 注册中心地址(N/A表示为不启用)
[email protected]@
# rpc 协议实现使用 dubbo 协议
[email protected]@
# 服务暴露端口
[email protected]@
# 基础包扫描
[email protected]@
PS:SpringBoot 中引用 profile 的值使用 @propertyName@,传统 Spring 项目使用 ${propertyName} 引用
- Assembly 分包配置 assembly.xml
打包后的项目结构,主要就是依赖该配置文件来指定了,你可以修改以下配置信息,更改为你自己想要的结构
    dev


        tar.gz


    true


            true
            /lib


            src/main/resources
            /conf

                **/*.xml
                **/*.properties


            true


            src/main/assembly/bin
            /bin

                *.sh


            0755
-
对外暴露服务
此处没有另建 API 项目,仅作为部署演示项目- 接口文件 IUserinfoService.java
/** * @author hox */ public interface IUserinfoService { /** * 注册接口 * * @param username * @param password */ void register(String username, String password); }- 服务实现 UserinfoServiceImpl.java
import cn.wolfcode.dubbo.service.IUserinfoService; import com.alibaba.dubbo.config.annotation.Service; /** * @author hox */ // 注意要使用 dubbo 的 Service 注解 @Service public class UserinfoServiceImpl implements IUserinfoService { @Override public void register(String username, String password) { System.out.println("用户注册:" + username + "\t" + password); } } -
启动服务主类
我们使用 jar 包启动应用,需要指定一个程序入口,而在以 SpringBoot 作为基础框架的架构下,我们需要先将 SpringBoot 容器启动起来,不能再直接使用 Dubbo 为我们提供的启动类com.alibaba.dubbo.container.Main,那么此时我们则需要自己新建一个服务启动类import org.springframework.boot.SpringApplication; import org.springframework.boot.autoconfigure.SpringBootApplication; import org.springframework.context.ConfigurableApplicationContext; /** * @author hox */ @SpringBootApplication public class DubboDemoServer { public static void main(String[] args) { // 启动容器 SpringApplication.run(DubboDemoServer.class, args); } }但如果仅仅这样,则会有一个问题,当主线程跑完后,容器会立即关闭。为了避免这个问题,我们需要使用一种方式来阻塞主线程不退出。大概百度看了下,有些方式有点惊呆了,比如:
- 死循环(cpu 在哭泣): 确实可行,不过缺点也太明显了,即使不考虑这点性能损失但这种方案实在。。。
-
System.in.read(): 这行代码的作用是读取一行控制台的输入,本身带有阻塞线程的功能,在绝大部分简单例子当中也可以使用(因为简单),但同样存在缺陷,比如一旦接受到输入后,线程会立即往下执行,同样会导致主线程执行完毕并退出
以上两种方式都有着些许问题,不能用。突然想到貌似使用 Dubbo 提供的
com.alibaba.dubbo.container.Main启动时并不会存在线程退出的问题。看源码,恍然大悟,用锁,以下为修改后的启动类import org.slf4j.Logger; import org.slf4j.LoggerFactory; import org.springframework.boot.SpringApplication; import org.springframework.boot.autoconfigure.SpringBootApplication; import org.springframework.context.ConfigurableApplicationContext; import java.io.IOException; import java.util.concurrent.locks.Condition; import java.util.concurrent.locks.ReentrantLock; /** * @author hox */ @SpringBootApplication public class DubboDemoServer { /** * 控制主线程状态,应用正常启动后,使其进入等待 */ private static final ReentrantLock LOCK = new ReentrantLock(); private static final Condition STOP = LOCK.newCondition(); private static final Logger logger = LoggerFactory.getLogger(DubboDemoServer.class); public static void main(String[] args) throws IOException, InterruptedException { // 启动 SpringBoot 容器 ConfigurableApplicationContext ctx = SpringApplication.run(DubboDemoServer.class, args); // 添加停止容器回调,当 JVM 退出时,会执行该线程 addJVMShutdownHook(ctx); try { LOCK.lock(); // 修改主线程为等待状态,当 JVM 退出时唤醒主线程正常退出 STOP.await(); } catch (InterruptedException e) { logger.warn("Dubbo service server stopped, interrupted by other thread!", e); } finally { LOCK.unlock(); } } private static void addJVMShutdownHook(ConfigurableApplicationContext ctx) { // 添加 JVM 退出时的回调线程 Runtime.getRuntime().addShutdownHook(new Thread(() -> { try { // 容器退出,可执行销毁操作 ctx.stop(); logger.info("Service " + DubboDemoServer.class.getSimpleName() + " stopped!"); } catch (Exception e) { logger.error("springboot continer shutdown exception.", e); } try { LOCK.lock(); // 唤醒主线程,使其正常退出 STOP.signal(); } finally { LOCK.unlock(); } }, "DubboDemoServer-Thread-Shutdown-Hook")); } }
IV. 项目部署
以上,我们的服务就算构建完成了,接下来便可以进行打包并部署服务了
-
项目打包
这个相信大家都比较熟悉了,如果你使用的是 IDEA,你可以直接在右侧的 Maven Projects 中双击 Lifecycle 中的 package 进行打包(打包前要先选定 profiles 中对应的环境配置)
当然,你也可以直接在项目根目录输入 maven 的打包命令# -P 参数指定使用哪个环境(Maven 中的 profile) mvn package -P dev打包完成后,在 target 目录下会出现
dubbo-demo-server-1.0.0-prd.tar.gz文件,这便是按照指定配置后打包的文件了 -
将项目上传至服务器
上传的方式有很多种,一般用的比较多的工具有 FileZilla、Xftp 等,这些工具的使用都比较简单,就不多介绍了,我使用一种命令的上传方式scp,当然如果你也要使用这种方式,你的电脑上必须要安装 ssh server 才行# 第一个参数为需要上传的文件 [email protected]:~/Downloads 为使用 root 用户连接到 `192.168.56.101` 这个机器,并将文件上传到 home 目录下的 Downloads 文件夹中 scp ./dubbo-demo-server-1.0.0-prd.tar.gz [email protected]:~/Downloads -
启动服务
# 登陆服务器,并进入到 Downloads 目录
root@wolfcode>cd ~/Downloads

# 查看当前目录下是否有刚刚上传的文件
root@wolfcode>ls -lh
total 12M
-rw-r--r--. 1 root root 12M 5月   8 00:42 dubbo-demo-server-1.0.0-prd.tar.gz

# 解压该文件
root@wolfcode>tar -zxf dubbo-demo-server-1.0.0-prd.tar.gz

# 再次查看文件夹下的内容
root@wolfcode>ls -lh
total 12M
drwxr-xr-x. 5 root root  40 5月   8 00:44 dubbo-demo-server-1.0.0
-rw-r--r--. 1 root root 12M 5月   8 00:42 dubbo-demo-server-1.0.0-prd.tar.gz

# 进入到 dubbo-demo-server-1.0.0 目录(服务器部署可以移动到指定位置后启动)
root@wolfcode>cd dubbo-demo-server-1.0.0

# 查看解压后的目录结构是否符合预期
root@wolfcode>ls -lh
total 4.0K
drwxr-xr-x. 2 root root   52 5月   8 00:44 bin
drwxr-xr-x. 2 root root   62 5月   8 00:44 conf
drwxr-xr-x. 2 root root 4.0K 5月   8 00:44 lib

# 此时并没有 logs 目录,因为项目还没启动,执行启动命令启动服务
root@wolfcode>bin/start.sh
/root/Downloads/dubbo-demo-server-1.0.0
SERVER_NAME: dubbo-demo-server-dev
SERVER_PROTOCOL_NAME: dubbo
SERVER_PROTOCOL_PORT: 20880
APP_PID:
LOGS_DIR :/root/Downloads/dubbo-demo-server-1.0.0/logs
Starting the dubbo-demo-server-dev ...
START SUCCESSED APP_PID: 1664
STDOUT: /root/Downloads/dubbo-demo-server-1.0.0/logs/stdout.log

# 可以看到,日志输出到了 logs 下面的 stdout.log 文件中,我们可以查看该文件,检查服务启动过程中时候有出错
root@wolfcode>tail -n200 logs/stdout.log
  .   ____          _            __ _ _
 /\\ / ___'_ __ _ _(_)_ __  __ _ \ \ \ \
( ( )\___ | '_ | '_| | '_ \/ _` | \ \ \ \
 \\/  ___)| |_)| | | | | || (_| |  ) ) ) )
  '  |____| .__|_| |_|_| |_\__, | / / / /
 =========|_|==============|___/=/_/_/_/
 :: Spring Boot ::        (v1.5.6.RELEASE)

2018-05-08 00:51:31.215 [background-preinit] INFO  org.hibernate.validator.internal.util.Version - HV000001: Hibernate Validator 5.3.5.Final
2018-05-08 00:51:31.276 [main] INFO  cn.wolfcode.dubbo.main.DubboDemoServer - Starting DubboDemoServer v1.0.0 on local-vm with PID 1664 (/root/Downloads/dubbo-demo-server-1.0.0/lib/dubbo-demo-server-1.0.0.jar started by root in /root/Downloads/dubbo-demo-server-1.0.0)
2018-05-08 00:51:31.276 [main] DEBUG cn.wolfcode.dubbo.main.DubboDemoServer - Running with Spring Boot v1.5.6.RELEASE, Spring v4.3.10.RELEASE
2018-05-08 00:51:31.276 [main] INFO  cn.wolfcode.dubbo.main.DubboDemoServer - The following profiles are active: dev
2018-05-08 00:51:31.398 [main] INFO  o.s.c.a.AnnotationConfigApplicationContext - Refreshing org.springframework.context.annotation.AnnotationConfigApplicationContext@5d47c63f: startup date [Tue May 08 00:51:31 CST 2018]; root of context hierarchy
2018-05-08 00:51:32.153 [main] INFO  com.alibaba.dubbo.common.logger.LoggerFactory - using logger: com.alibaba.dubbo.common.logger.log4j.Log4jLoggerAdapter
2018-05-08 00:51:32.239 [main] INFO  com.reger.dubbo.config.DubboAutoConfiguration - dubbo开始扫描: cn.wolfcode.dubbo.service
2018-05-08 00:51:33.226 [main] INFO  o.s.jmx.export.annotation.AnnotationMBeanExporter - Registering beans for JMX exposure on startup
2018-05-08 00:51:33.254 [main] INFO  com.alibaba.dubbo.config.AbstractConfig -  [DUBBO] The service ready on spring started. service: cn.wolfcode.dubbo.service.IUserinfoService, dubbo version: 2.5.8, current host: 127.0.0.1
2018-05-08 00:51:33.393 [main] INFO  com.alibaba.dubbo.config.AbstractConfig -  [DUBBO] Export dubbo service cn.wolfcode.dubbo.service.IUserinfoService to local registry, dubbo version: 2.5.8, current host: 127.0.0.1
2018-05-08 00:51:33.393 [main] INFO  com.alibaba.dubbo.config.AbstractConfig -  [DUBBO] Export dubbo service cn.wolfcode.dubbo.service.IUserinfoService to url dubbo://10.0.2.15:20880/cn.wolfcode.dubbo.service.IUserinfoService?anyhost=true&application=dubbo-demo-server-dev&bind.ip=10.0.2.15&bind.port=20880&default.service.filter=regerProviderFilter&dubbo=2.5.8&generic=false&interface=cn.wolfcode.dubbo.service.IUserinfoService&methods=register&pid=1664&revision=1.0.0&side=provider×tamp=1525711893257, dubbo version: 2.5.8, current host: 127.0.0.1
2018-05-08 00:51:33.729 [main] INFO  c.alibaba.dubbo.remoting.transport.AbstractServer -  [DUBBO] Start NettyServer bind /0.0.0.0:20880, export /10.0.2.15:20880, dubbo version: 2.5.8, current host: 127.0.0.1
2018-05-08 00:51:33.752 [main] INFO  cn.wolfcode.dubbo.main.DubboDemoServer - Started DubboDemoServer in 3.251 seconds (JVM running for 3.746)

# 看到以上输出,你的服务就启动成功啦,当然还是不放心的话你还可以使用以下命令检查
# 查看进程是否存在(dubbo-demo-server 可修改为你自己的服务名)
root@wolfcode>ps -ef | grep dubbo-demo-server

# 使用 telnet 测试能否连接上 dubbo 服务,看到输出 connected 字样后再回车便会出现 dubbo 服务实现的命令行
root@wolfcode>telnet localhost 20880
Trying 127.0.0.1...
Connected to localhost.
Escape character is '^]'.
# 出现以上字样,再次按回车则进入客户端
# 使用 dubbo 实现的 telnet 协议命令便可查看我们所提供的服务
dubbo>ls -l
cn.wolfcode.dubbo.service.IUserinfoService -> dubbo://10.0.2.15:20880/cn.wolfcode.dubbo.service.IUserinfoService?anyhost=true&application=dubbo-demo-server-dev&bind.ip=10.0.2.15&bind.port=20880&default.service.filter=regerProviderFilter&dubbo=2.5.8&generic=false&interface=cn.wolfcode.dubbo.service.IUserinfoService&methods=register&pid=1664&revision=1.0.0&side=provider×tamp=1525711893257
# 到此便表示 dubbo 服务部署成功了,其他命令可以查看 dubbo 官方文档噢
dubbo>exit
V. 小结
到此,dubbo 服务的部署就结束了,完整的项目以及脚本文件等可以戳这里。
本文主要还是使用了 Maven 为我们提供的两个插件,可以让我们很方便的实现对应用打包结构的自定义,从而可以让我们的部署拥有更高的统一性。但当我们的服务多了之后,人为的部署难度则会逐步上升,要解决这个问题,敬请期待我的下一篇文章:Dubbo 服务部署解决方案:使用 Docker + Jenkins 实现自动化部署