导语: 本文介绍Weex的环境搭建,以及如何将Weex接入iOS项目中
一、环境搭建####
1、安装homebrew工具#####
homebrew是mac的套件管理器,这里使用homebrew安装nodejs,已经安装可以跳过。安装代码如下:
/usr/bin/ruby -e "$(curl -fsSL https://raw.githubusercontent.com/Homebrew/install/master/install)"
2、安装nodejs#####
npm是随同Node.js(Node.js的版本要4.0以上)一起安装的包管理工具,执行代码如下:
brew install node
3、安装Weex CLI#####
Weex CLI工具链是基于Node JS的 , 所以你需要先安装Node
npm install -g weex-toolkit
二、集成Weex到iOS项目中
1、通过Cocoapods引入Weex所需要的第三方库#####
在Podfile中添加如下内容
source 'https://github.com/CocoaPods/Specs.git'
platform :ios, '8.0'

def common
     #...
    pod 'WeexSDK', :path=>'./sdk/'   #pod 'WeexSDK'
    pod 'WXDevtool', '0.8.0'
    pod 'SocketRocket', '0.4.2'
    pod 'ATSDK-Weex', '0.0.1'
    #...
end

target 'QSUseWeexDemo' do
    common
end

target 'QSUseWeexDemoUITests' do
    common
end
说明1:WeexSDK引入两种使用方法:
方法一:下载Weex源码,将weex项目的ios/sdk 文件夹复制和Podfile 同目录,在Podfile 中添加 pod 'WeexSDK', :path=>'./sdk/'
方法二:pod 'WeexSDK'
说明2:target -> General -> linked frameworks and libraries需要引入libsqlite3.0.tbd 二进制库 (libsqlite3.0.tbd没有导入的请导入)
2、初始化Weex环境
在AppDelegate的application:didFinishLaunchingWithOptions:方法中初始化
- (BOOL)application:(UIApplication *)application didFinishLaunchingWithOptions:(NSDictionary *)launchOptions {
    // Override point for customization after application launch.
    //..
    [self configWeexEnvironment];
   //...
    return YES;
}

//真正初始化Weex环境
- (void)configWeexEnvironment{

    //业务配置,非必需
    [WXAppConfiguration setAppGroup:@"AliApp"];
    [WXAppConfiguration setAppName:@"QSWeexDemo"]; //QSWeexDemo是我的项目名
    [WXAppConfiguration setAppVersion:@"1.0.0"];

    //初始化SDK环境
    [WXSDKEngine initSDKEnviroment];

    //设置Log输出等级,DEBUG下为WXLogLevelAll,release等其他版本不输出日志
#if DEBUG
    [WXLog setLogLevel:WXLogLevelAll];
#elif
    [WXLog setLogLevel:WXLogLevelOff];
#endif
}
3、Weex页面渲染
1)Weex支持全页面以及页面局部两种不同的渲染模式。在iOS中使用方法很简单,只需要将weex渲染所得的view添加到父容器中即可。
2)项目中使用在iOS的Controller中渲染weex页面。这是通过WXSDKInstance来实现的。
3)WXSDKInstance是weex渲染的实例对象。它提供给开发者诸多跟页面渲染相关的接口,包括renderWithURL、refreshInstance以及destroyInstance等,提供了几个比较重要的回调接口,方便开发者根据不同的业务场景去处理他们的逻辑,如onfailed,还提供了性能监控相关的接口。
//  QSWeexViewController.h
@interface QSWeexViewController : UIViewController
@property (nonatomic, strong) NSURL *url;
@end

//  QSWeexViewController.m
#import "QSWeexViewController.h"
#import

@interface QSWeexViewController ()

@property (nonatomic, strong) WXSDKInstance *instance;
@property (nonatomic, strong) UIView *weexView;

@end

@implementation QSWeexViewController

- (void)viewDidLoad{

    [super viewDidLoad];
    [self setEdgesForExtendedLayout:UIRectEdgeNone];
    // Do any additional setup after loading the view, typically from a nib.
    [self render];
}

- (void)dealloc{
    //销毁
    [_instance destroyInstance];
}

/**
 渲染
 */
- (void)render{

    [_instance destroyInstance];
    _instance = [[WXSDKInstance alloc] init];
    _instance.viewController = self;
    _instance.frame = CGRectMake(0, 0, SCREEN_WIDTH, SCREEN_HEIGHT);

    __weak typeof(self) weakSelf = self;
    _instance.onCreate = ^(UIView *view) {
        [weakSelf.weexView removeFromSuperview];
        weakSelf.weexView = view;
        [weakSelf.view addSubview:weakSelf.weexView];
        UIAccessibilityPostNotification(UIAccessibilityScreenChangedNotification, weakSelf.weexView);
    };
    _instance.onFailed = ^(NSError *error) {
        NSLog(@"failed %@",error);
#if DEBUG
        if ([[error domain] isEqualToString:@"1"]) {
            dispatch_async(dispatch_get_main_queue(), ^{
                NSMutableString *errMsg=[NSMutableString new];
                [errMsg appendFormat:@"ErrorType:%@\n",[error domain]];
                [errMsg appendFormat:@"ErrorCode:%ld\n",(long)[error code]];
                [errMsg appendFormat:@"ErrorInfo:%@\n", [error userInfo]];

                UIAlertView *alertView = [[UIAlertView alloc] initWithTitle:@"render failed" message:errMsg delegate:weakSelf cancelButtonTitle:nil otherButtonTitles:@"ok", nil];
                [alertView show];
            });
        }
#endif
    };

    _instance.renderFinish = ^(UIView *view) {
        NSLog(@"render finish");
        [weakSelf updateInstanceState:WeexInstanceAppear];
    };

    _instance.updateFinish = ^(UIView *view) {
        NSLog(@"update Finish");
    };

    if (!self.url) {
        WXLogError(@"error: render url is nil");
        return;
    }

    [_instance renderWithURL:self.url options:@{@"bundleUrl":[self.url absoluteString]} data:nil];
}

- (void)updateInstanceState:(WXState)state{

    if (_instance && _instance.state != state) {
        _instance.state = state;

        if (state == WeexInstanceAppear) {
            [[WXSDKManager bridgeMgr] fireEvent:_instance.instanceId ref:WX_SDK_ROOT_REF type:@"viewappear" params:nil domChanges:nil];
        }
        else if (state == WeexInstanceDisappear) {
            [[WXSDKManager bridgeMgr] fireEvent:_instance.instanceId ref:WX_SDK_ROOT_REF type:@"viewdisappear" params:nil domChanges:nil];
        }
    }
}

@end
说明1 :instance.viewController = self是为了向instance知会当前的viewController,很多底层操作需要知晓当前所处的viewController对象。
说明2 :instance.frame = CGRectMake(0, 0, SCREEN_WIDTH, SCREEN_HEIGHT)告知instance渲染中最外层body的位置和尺寸。这个frame值的设置,跟最终在回调中获取的view.frame是一致的。在很多场景下,仅需要在一个native页面的局部渲染weex区块。很简单,您只需要将instance.frame设置为目标区块的位置尺寸即可。
说明3 :_instance.onCreate:weex页面最外层body渲染完成后的回调。在此回调中,weex渲染所得的rootView已确定,可以输出并添加到父容器中。
说明4 :_instance.renderFinish:和onCreate不同,renderFinish表示所有weex的页面元素都已渲染完毕,整个渲染过程至此结束。
说明5 :renderWithURL:常用的渲染方式:其一,直接输入URL(可以是file://或 http(s)://);其二,sourceCode,即JavaScript源码。
options参数,表示开发者可以通过WeexSDK向前端透传的参数,如bundleURL。data参数,表示向weex的模板注入的页面数据,它一般来源于native的数据请求,当然也可以在前端逻辑中完成请求后将数据注入。
说明6 :一定要在viewController的销毁的同时,将weex实例一并销毁,否则会出现内存泄露。
4、创建Weex文件,文件名是hello-weex.we, 内容如下:#####
Hello {{target}}
说明:一个Weex文件由三部分组成,分别为template、style和script,其中template类似于HTML,由很多标签构成,style负责控制template中标签的布局和样式,script负责数据和事件交互。
4、weex文件生成js文件#####
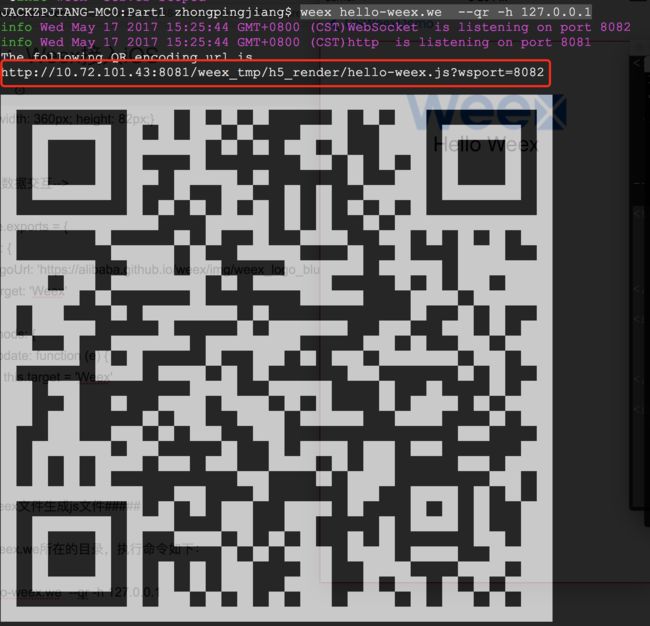
进入hello-weex.we所在的目录,执行命令如下:
weex hello-weex.we --qr -h 127.0.0.1
hello-weex.js文件的访问方式有两个
方法1:直接访问红色框内的url地址,来执行hello-weex.js ;
方法2:下载Weex Playground app 去扫描二维码来运行hello-weex.js(首先要保证你的手机要和这个地址在同一个局域网内)。
5、iOS程序中执行js文件#####
在iOS项目中,使用weex代替实现某些Native页面,这些生成的js文件直接放到项目的资源目录中(当然也可以选择放到服务器上)
在开发单个页面时候,先执行weex xxxxx.we --qr -h 127.0.0.1生成对应的js文件(xxxxx是weex的文件名,不能关闭该终端),然后在iOS程序中访问生成js文件的url地址,为了方便,将局域网中分配的ip地址换成127.0.0.1这个本地的ip地址。
在发布的时候,将js文件打包放到文件的资源目录下。
跳转到执行hello-weex.js文件的页面代码如下:
{
    //...
    QSWeexViewController *vc = [[QSWeexViewController alloc]init];
    vc.url = [self urlWithJSFileName:@"hello-weex"];
    [self.navigationController pushViewController:vc animated:YES];

}

//jsFileName是js文件名
- (NSURL *)urlWithJSFileName:(NSString *)jsFileName{

    NSString *urlString = @"";
#if DEBUG
    urlString = [NSString stringWithFormat:@"http://127.0.0.1:8081/weex_tmp/h5_render/%@.js?wsport=8082",jsFileName];
#elif
    NSString *filePath = [[NSBundle mainBundle]pathForResource:jsFileName ofType:@"js"];
   urlString = [NSString stringWithFormat:@"file://%@",filePath];
#endif
    NSLog(@"urlString = %@",urlString);
    return [NSURL URLWithString:urlString];
}
6、图片下载功能#####
由于Weex SDK没有提供图片下载能力,图片的下载交给Native实现/WXImgLoaderProtocol
1)创建QSWeexImageDownloader类,实现图片下载的协议WXImgLoaderProtocol
//QSWeexImageDownloader.h
@interface QSWeexImageDownloader : NSObject

@end

//QSWeexImageDownloader.m
#import "QSWeexImageDownloader.h"

@implementation QSWeexImageDownloader

- (id)downloadImageWithURL:(NSString *)url
                                      imageFrame:(CGRect)imageFrame
                                        userInfo:(NSDictionary *)options
                                       completed:(void(^)(UIImage *image,  NSError *error, BOOL finished))completedBlock {
  return (id)[[SDWebImageManager sharedManager] downloadImageWithURL:[NSURL URLWithString:url]
                    options:0
                    progress:^(NSInteger receivedSize, NSInteger expectedSize) {  }
                    completed:^(UIImage *image, NSError *error, SDImageCacheType cacheType, BOOL finished, NSURL *imageURL) {
                        if (completedBlock) {
                          completedBlock(image, error, finished);
                        }
          }];
}
@end
2)注册QSWeexImageDownloader类
在AppDelegate中的configWeexEnvironment方法中添加注册代码
//注册图片加载器
[WXSDKEngine registerHandler:[QSWeexImageDownloader new] withProtocol:@protocol(WXImgLoaderProtocol)];
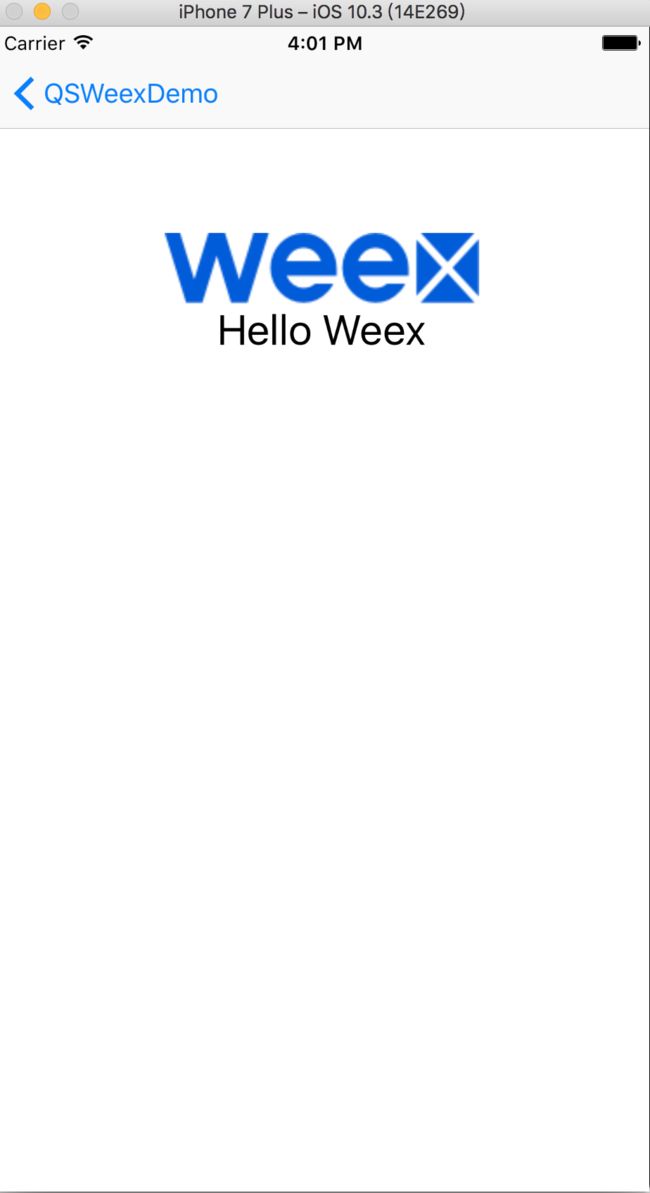
7、iOS中展示hello-weex.js的效果图#####
三、最后####
1、如果只是想简单地尝试下 Weex,最简单的方法是在 dotWe 将本文中介绍的weex的代码跑一遍,看看效果。
2、参考文章
Weex iOS SDK 集成指南
Weex入门与进阶指南
3、源码直通车:QSWeexDemo

