1. 简介
Spring Boot 收发邮件最简便方式是通过 spring-boot-starter-mail。
  org.springframework.boot
  spring-boot-starter-mail
spring-boot-starter-mail 本质上是使用 JavaMail(javax.mail)。如果想对 JavaMail 有进一步了解,可以参考: JavaMail 使用指南
2. API
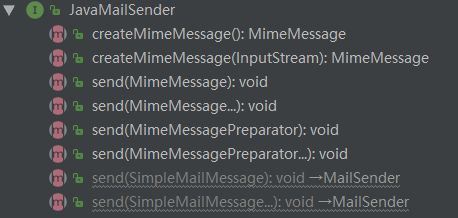
Spring Framework 提供了一个使用 JavaMailSender 接口发送电子邮件的简单抽象,这是发送邮件的核心 API。
JavaMailSender 接口提供的 API 如下:
3. 配置
Spring Boot 为 JavaMailSender 提供了自动配置以及启动器模块。
如果 spring.mail.host 和相关库(由 spring-boot-starter-mail 定义)可用,则 Spring Boot 会创建默认 JavaMailSender(如果不存在)。可以通过 spring.mail 命名空间中的配置项进一步自定义发件人。
特别是,某些默认超时值是无限的,您可能希望更改它以避免线程被无响应的邮件服务器阻塞,如以下示例所示:
spring.mail.properties.mail.smtp.connectiontimeout=5000
spring.mail.properties.mail.smtp.timeout=3000
spring.mail.properties.mail.smtp.writetimeout=5000
也可以使用 JNDI 中的现有会话配置 JavaMailSender:
spring.mail.jndi-name=mail/Session以下为 Spring Boot 关于 Mail 的配置:
有关更多详细信息,请参阅 MailProperties。
# Email (MailProperties)
spring.mail.default-encoding=UTF-8 # Default MimeMessage encoding.
spring.mail.host= # SMTP server host. For instance, `smtp.example.com`.
spring.mail.jndi-name= # Session JNDI name. When set, takes precedence over other Session settings.
spring.mail.password= # Login password of the SMTP server.
spring.mail.port= # SMTP server port.
spring.mail.properties.*= # Additional JavaMail Session properties.
spring.mail.protocol=smtp # Protocol used by the SMTP server.
spring.mail.test-connection=false # Whether to test that the mail server is available on startup.
spring.mail.username= # Login user of the SMTP server.
4. 实战
4.1. 引入依赖
    org.springframework.boot
    spring-boot-starter-mail


    org.springframework.boot
    spring-boot-starter-test
    test


    org.projectlombok
    lombok


    com.github.dozermapper
    dozer-spring-boot-starter
    6.4.0
4.2. 配置邮件属性
在 src/main/resources 目录下添加 application-163.properties 配置文件,内容如下:
spring.mail.host = smtp.163.com
spring.mail.username = xxxxxx
spring.mail.password = xxxxxx
spring.mail.properties.mail.smtp.auth = true
spring.mail.properties.mail.smtp.starttls.enable = true
spring.mail.properties.mail.smtp.starttls.required = true
spring.mail.default-encoding = UTF-8

mail.domain = 163.com
mail.from = ${spring.mail.username}@${mail.domain}
注:需替换有效的 spring.mail.username、spring.mail.password。
application-163.properties 配置文件表示使用 163 邮箱时的配置,为了使之生效,需要通过 spring.profiles.active = 163 来激活它。
在 src/main/resources 目录下添加 application.properties 配置文件,内容如下:
spring.profiles.active = 1634.3. Java 代码
首先,需要读取部分配置属性,方法如下:
import org.springframework.boot.context.properties.ConfigurationProperties;
import org.springframework.stereotype.Component;
import org.springframework.validation.annotation.Validated;

@Validated
@Component
@ConfigurationProperties(prefix = "mail")
public class MailProperties {
    private String domain;
    private String from;

    public String getDomain() {
        return domain;
    }

    public void setDomain(String domain) {
        this.domain = domain;
    }

    public String getFrom() {
        return from;
    }

    public void setFrom(String from) {
        this.from = from;
    }
}
接着,定义一个邮件参数实体类(使用 lombok 简化了 getter、setter):
import lombok.Data;
import java.util.Date;

@Data
public class MailDTO {
    private String from;
    private String replyTo;
    private String[] to;
    private String[] cc;
    private String[] bcc;
    private Date sentDate;
    private String subject;
    private String text;
    private String[] filenames;
}
接着,实现发送邮件的功能接口:
import com.github.dozermapper.core.Mapper;
import org.apache.commons.lang3.StringUtils;
import org.slf4j.Logger;
import org.slf4j.LoggerFactory;
import org.springframework.beans.factory.annotation.Autowired;
import org.springframework.mail.SimpleMailMessage;
import org.springframework.mail.javamail.JavaMailSender;
import org.springframework.mail.javamail.MimeMessageHelper;
import org.springframework.stereotype.Service;

import javax.mail.MessagingException;
import javax.mail.internet.MimeBodyPart;
import javax.mail.internet.MimeMessage;
import javax.mail.internet.MimeMultipart;
import java.io.IOException;

@Service
public class MailService {

    private final Logger log = LoggerFactory.getLogger(this.getClass());

    @Autowired
    private MailProperties mailProperties;

    @Autowired
    private JavaMailSender javaMailSender;

    @Autowired
    private Mapper mapper;

    public void sendSimpleMailMessage(MailDTO mailDTO) {
        SimpleMailMessage simpleMailMessage = mapper.map(mailDTO, SimpleMailMessage.class);
        if (StringUtils.isEmpty(mailDTO.getFrom())) {
            mailDTO.setFrom(mailProperties.getFrom());
        }
        javaMailSender.send(simpleMailMessage);
    }

    public void sendMimeMessage(MailDTO mailDTO) {

        MimeMessage mimeMessage = javaMailSender.createMimeMessage();
        MimeMessageHelper messageHelper;
        try {
            messageHelper = new MimeMessageHelper(mimeMessage, true);

            if (StringUtils.isEmpty(mailDTO.getFrom())) {
                messageHelper.setFrom(mailProperties.getFrom());
            }
            messageHelper.setTo(mailDTO.getTo());
            messageHelper.setSubject(mailDTO.getSubject());

            mimeMessage = messageHelper.getMimeMessage();
            MimeBodyPart mimeBodyPart = new MimeBodyPart();
            mimeBodyPart.setContent(mailDTO.getText(), "text/html;charset=UTF-8");

            // 描述数据关系
            MimeMultipart mm = new MimeMultipart();
            mm.setSubType("related");
            mm.addBodyPart(mimeBodyPart);

            // 添加邮件附件
            for (String filename : mailDTO.getFilenames()) {
                MimeBodyPart attachPart = new MimeBodyPart();
                try {
                    attachPart.attachFile(filename);
                } catch (IOException e) {
                    e.printStackTrace();
                }
                mm.addBodyPart(attachPart);
            }
            mimeMessage.setContent(mm);
            mimeMessage.saveChanges();

        } catch (MessagingException e) {
            e.printStackTrace();
        }

        javaMailSender.send(mimeMessage);
    }
}
5. 示例源码
示例源码:spring-boot-mail
6. 参考资料
- Spring Boot 官方文档之 Sending Email
