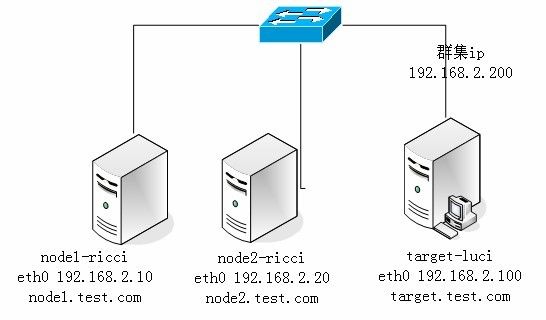
Redhat5.5上实现Linux的rhcs群集
Rhcs红帽的群集套件,通过Conga项目调用luci界面安装软件套件
Rhel 4 提供16+个节点
Rhel 5 提供100+个节点
68-1
Target的配置
# uname -n
target.test.com
# cat /etc/sysconfig/network
HOSTNAME=target.test.com
# cat /etc/hosts
127.0.0.1 localhost.localdomain localhost
::1 localhost6.localdomain6 localhost6
192.168.2.100 target.test.com target
192.168.2.10 node1.test.com node1
192.168.2.20 node2.test.com node2
格式化磁盘
# fdisk -l
# fdisk /dev/sdb
# partprobe /dev/sdb
# more /proc/partitions
安装target
# yum list all |grep scsi
scsi-target-utils.i386 0.0-
6.20091205snap.el5_4.1
# yum install scsi-target* -y
# service tgtd start
# chkconfig tgtd on
# netstat -tunlp |grep 3260
创建控制器和逻辑分区,各服务器时间要保持一致
Ip bind 认证,并把规则写入开机脚本里。
# date
Thu Oct 20 14:38:09 CST 2011
# tgtadm --lld iscsi --op new --mode target --tid=1 --
targetname iqn.2011-10.co
m.test.target:test
# echo "tgtadm --lld iscsi --op new --mode target --tid=1
--targetname iqn.2011
-10.com.test.target:test">>/etc/rc.d/rc.local
# tgtadm --lld iscsi --op new --mode=logicalunit --tid=1 -
-lun=1 --backing-stor
e /dev/sdb1
# echo "tgtadm --lld iscsi --op new --mode=logicalunit --
tid=1 --lun=1 --backin
g-store /dev/sdb1">>/etc/rc.d/rc.local
# tgtadm --lld iscsi --op bind --mode=target --tid=1 --
initiator-address=192.168.2.0/24
# echo "tgtadm --lld iscsi --op bind --mode=target --tid=1
--initiator-address=
192.168.2.0/24">>/etc/rc.d/rc.local
安装luci
# yum list all |grep luci
luci.i386 0.12.2-12.el5
rhel-cluster
# yum install luci -y
Luci初始化需要三步
#luci_admin init
#service luci restart –首次启动需要用restart
#https://localhost:8084/
# chkconfig luci on
Node1的配置
[root@node1 ~]# uname -n
node1.test.com
[root@node1 ~]# cat /etc/hosts
127.0.0.1 localhost.localdomain localhost
::1 localhost6.localdomain6 localhost6
192.168.2.10 node1.test.com node1
192.168.2.20 node2.test.com node2
192.168.2.100 target.test.com target
[root@node1 ~]# cat /etc/sysconfig/network
HOSTNAME=node1.test.com
[root@node1 ~]# yum list all|grep scsi
iscsi-initiator-utils.i386 6.2.0.871-0.16.el5
rhel-server
[root@node1 ~]# yum list all|grep ricci
ricci.i386 0.12.2-12.el5
rhel-cluster
[root@node1 ~]# yum install ricci iscsi* -y
[root@node1 ~]# vim /etc/iscsi/initiatorname.iscsi
InitiatorName=iqn.2011-10.com.test.node1:init1
[root@node1 ~]# service iscsi start
[root@node1 ~]# chkconfig iscsi on
发现target
[root@node1 ~]# iscsiadm --mode discovery --type
sendtargets --portal 192.168.2.100
登陆target
[root@node1 ~]# iscsiadm --mode node --targetname iqn.2011
-10.com.test.target:te
st --portal 192.168.2.100 --login
Node2的配置
[root@node2 ~]# uname -n
node2.test.com
[root@node2 ~]# cat /etc/sysconfig/network
HOSTNAME=node2.test.com
[root@node2 ~]# cat /etc/hosts
127.0.0.1 localhost.localdomain localhost
::1 localhost6.localdomain6 localhost6
192.168.2.10 node1.test.com node1
192.168.2.20 node2.test.com node2
192.168.2.100 target.test.com target
安装ricci和iscsi
[root@node2 ~]# yum list all |grep iscsi
iscsi-initiator-utils.i386 6.2.0.871-0.16.el5
rhel-server
[root@node2 ~]# yum list all |grep ricci
ricci.i386 0.12.2-12.el5
rhel-cluster
[root@node2 ~]# yum install ricci iscsi –y
[root@node2 ~]# vim /etc/iscsi/initiatorname.iscsi
InitiatorName=iqn.2011-10.com.test.node2:init2
[root@node2 ~]# service iscsi start
[root@node2 ~]# chkconfig iscsi on
[root@node2 ~]# iscsiadm --mode discovery --type
sendtargets --portal 192.168.2.100
[root@node2 ~]# iscsiadm --mode node --targetname
iqn.2011-10.com.test.target:test --portal 192.168.2.100 --
login
在target上用show可以查看用户登陆情况
[root@target ~]# tgtadm --lld iscsi --op show --mode target
Target 1: iqn.2011-10.com.test.target:test
System information:
Driver: iscsi
State: ready
I_T nexus information:
I_T nexus: 1
Initiator: iqn.2011-10.com.test.node1:init1
Connection: 0
IP Address: 192.168.2.10
I_T nexus: 2
Initiator: iqn.2011-10.com.test.node2:init2
Connection: 0
IP Address: 192.168.2.20
Luci配置群集
需要关闭防火墙,域名要能解析,并且luci和ricci服务是启动的
启动ricci
[ot@node1 ~]# service ricci start
[root@node1 ~]# chkconfig ricci on
群集会自动挂载共享磁盘,Apache不能本节点启动,它是由群集管
理的。群集会根据规则自动启用
Login只需一次,从新登陆用
#Service iscsi restart
#Check ricci on
[root@node1 ~]# yum install httpd*
[root@node2 ~]# yum install httpd*
群集文件系统
1. 分布锁
2. 推送功能
[root@target ~]# fdisk /dev/sdb
[root@target ~]# partprobe /dev/sdb
[root@target ~]# more /proc/partitions
分区不能太小了,集群可能会报错
[root@node1 ~]# partprobe /dev/sdb
[root@node1 ~]# more /proc/sdb
/proc/sdb: No such file or directory
[root@node1 ~]# more /proc/partitions
[root@node2 ~]# partprobe /dev/sdb
[root@node2 ~]# more /proc/partitions
两个分区都要同步下
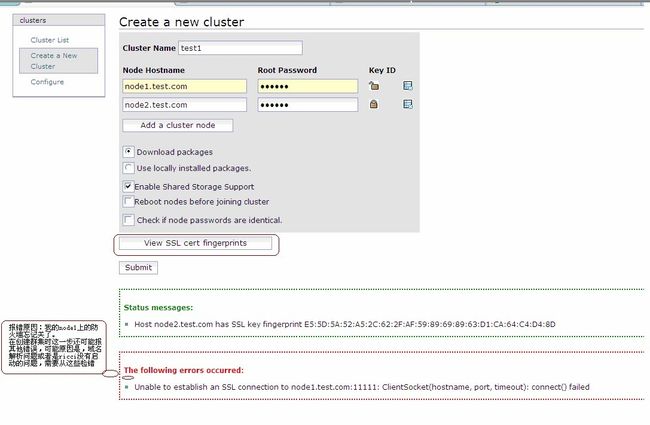
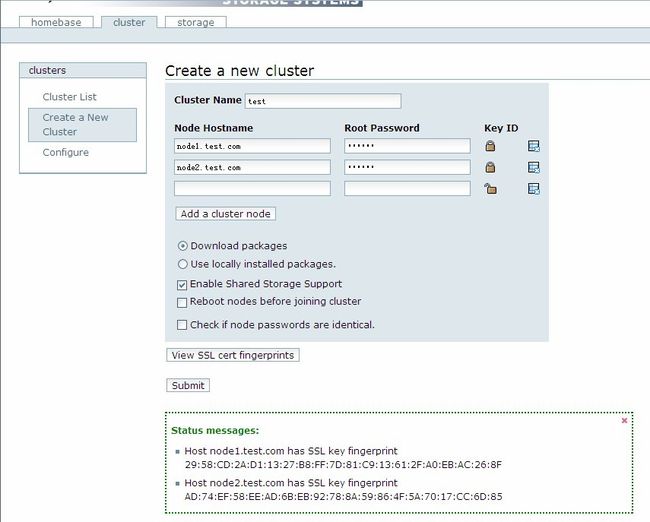
1. 先建立群集
68-2
检验时报错原因:我的node1上的防火墙忘记关了。在创建群集时这
一步还可能报其他错误,可能原因是,域名解析问题或者是ricci没
有启动的问题,需要从这些检错.
68-3
2.然后再建群集逻辑,个节点做群集卷
物理卷
[root@node1 ~]# partprobe /dev/sdb
[root@node1 ~]# more /proc/partitions
[root@node1 ~]# pvcreate /dev/sdb
Physical volume "/dev/sdb" successfully created
卷组
[root@node1 ~]# vgcreate vg01 /dev/sdb
[root@node1 ~]# vgscan
[root@node1 ~]# pvdisplay
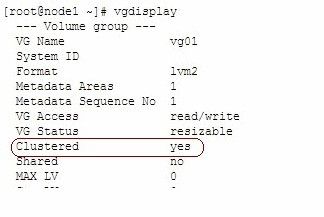
[root@node1 ~]# vgdisplay
--- Volume group ---
Clustered yes
[root@node2 ~]# vgdisplay
--- Volume group ---
Clustered yes
如果其他节点看不到群集逻辑卷
1.看是否同步
2.如果节点的群集逻辑卷不同步各节点启用服务同步下
[root@node1 ~]# service clvmd restart
68-4
创建逻辑卷
[root@node1 ~]# lvcreate -L 1000M -n lv01 vg01
[root@node1 ~]# lvscan
创建gfs文件系统
Lock_dlm分布锁
Nolock 单机锁(系统崩溃时挂载单机锁才能访问文件系统)
[root@node1 ~]# gfs_mkfs -p lock_dlm -t test:lv01 -j 3
/dev/vg01/lv01
//-j 日志功能占的块
创建luci群集管理
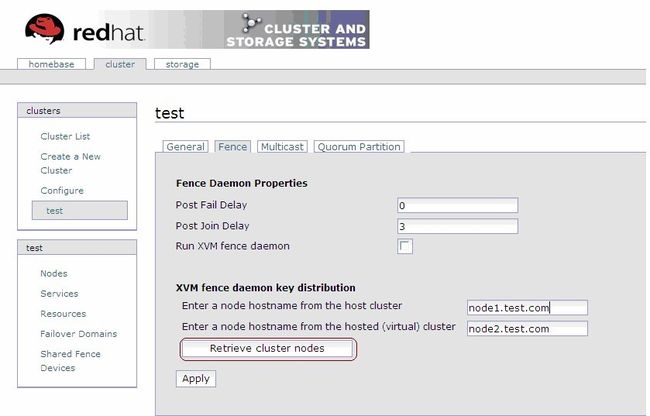
1. 定义fence
68-5
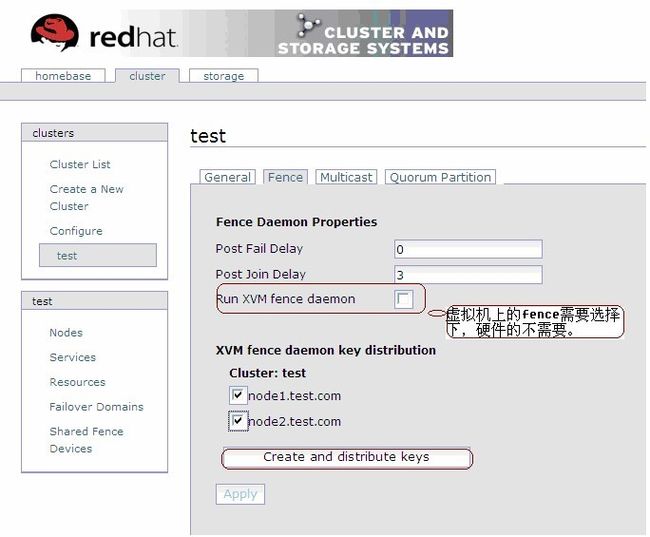
创建分发的钥匙
68-6
创建之后可以在下面的文件里查看fence的配置
[root@node1 ~]# ll /etc/cluster/
total 8
-rw-r----- 1 root root 476 Oct 20 15:58 cluster.conf
-rw------- 1 root root 4096 Oct 20 15:57 fence_xvm.key
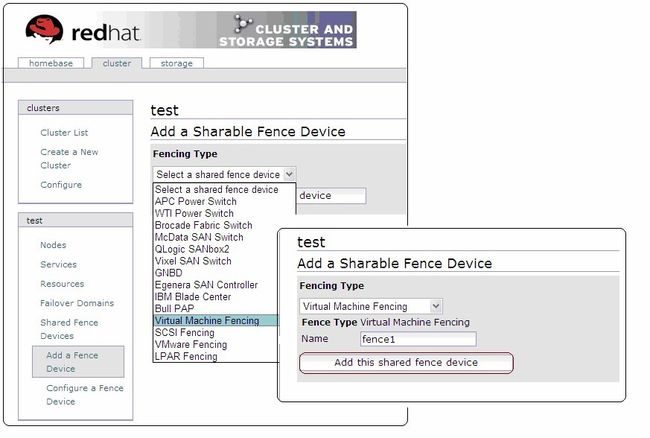
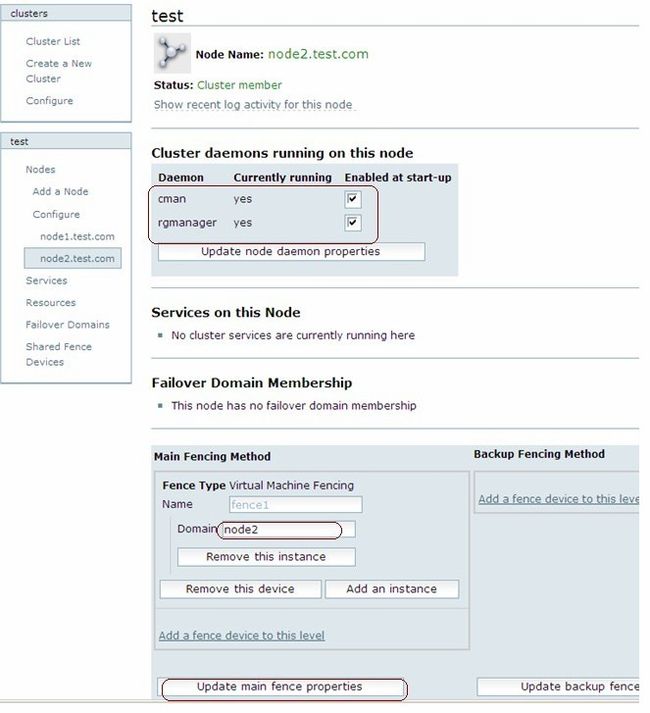
添加fence设备
68-7
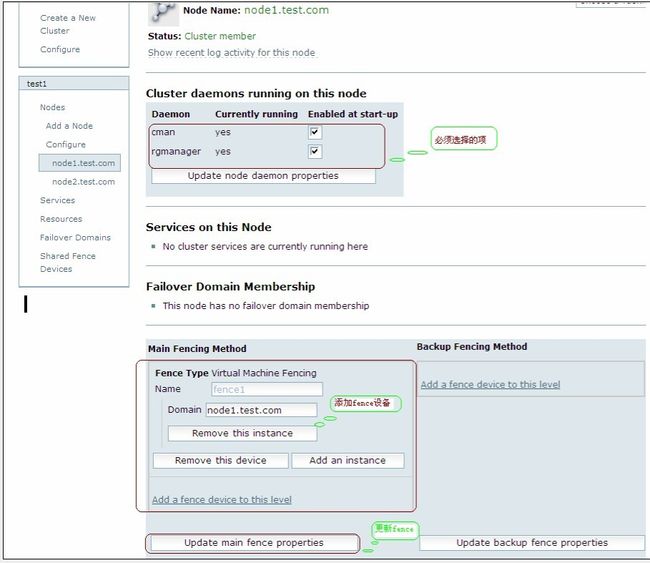
Fence应用到节点
68-8
Node2 同样应用
68-9
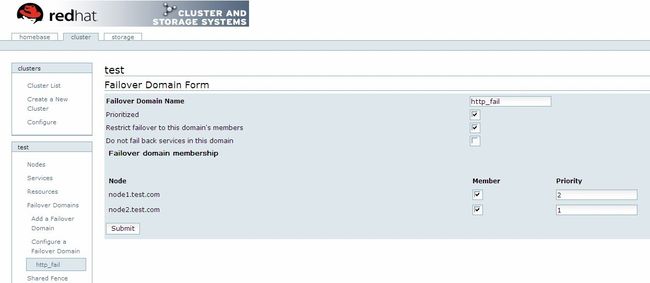
添加故障转移区域
68-10
数据小是优先的,优先级相同,主节点是随机的
添加资源
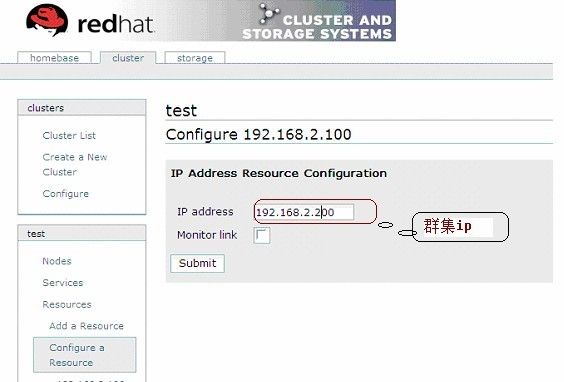
添加群集ip
68-11
添加群集文件系统
68-12
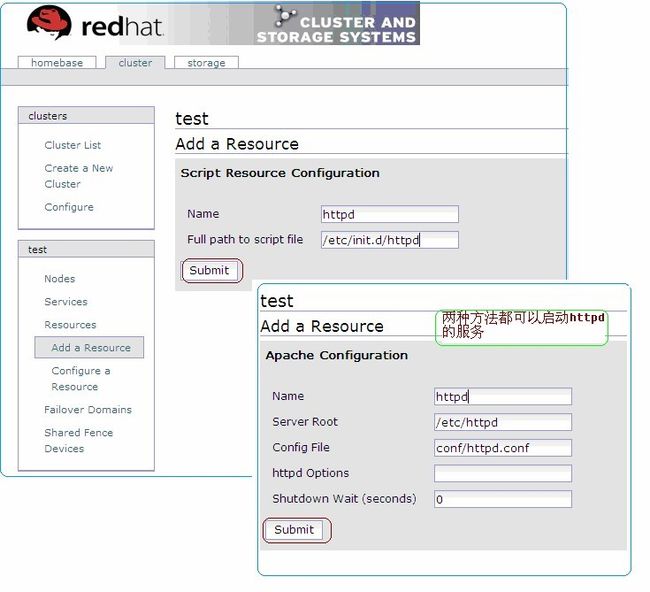
创建脚本资源
68-13
添加服务
68-14
[root@node2 ~]# service httpd status
httpd (pid 11730) is running...
[root@node2 ~]# mount
/dev/mapper/vg01-lv01 on /var/www/html type gfs
(rw,hostdata=jid=0:id=262146:first=1)
[root@node2 ~]# cd /var/www/html/
[root@node2 html]# vim index.html
hello my first cluster test1!
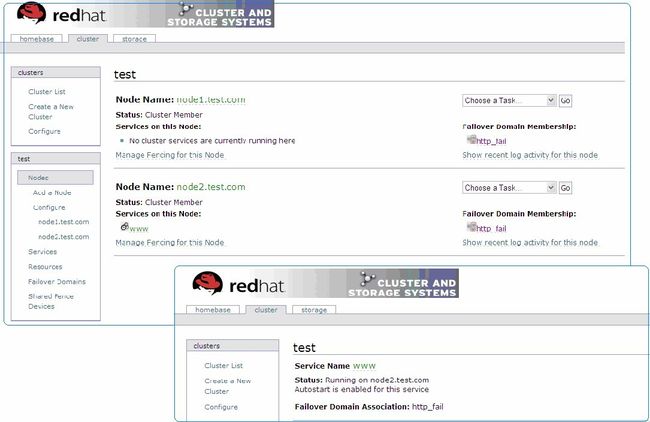
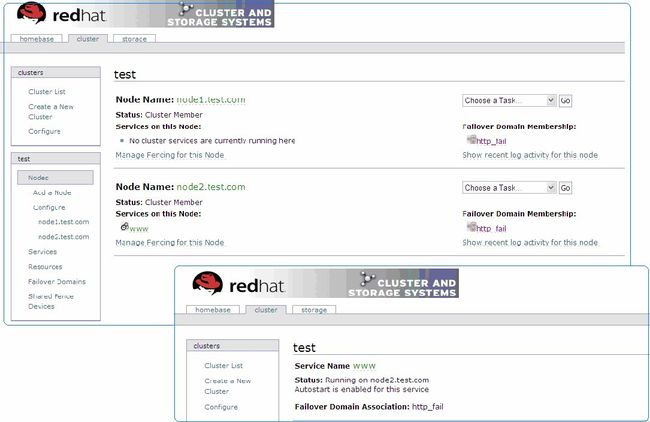
68-15
[root@node2 ~]# service httpd status
httpd (pid 11730) is running...
[root@node2 ~]# mount
/dev/mapper/vg01-lv01 on /var/www/html type gfs
(rw,hostdata=jid=0:id=262146:first=1)
[root@node2 ~]# cd /var/www/html/
[root@node2 html]# vim index.html
hello my first cluster test1!
[root@node2 html]# tail -f /var/log/messages
Oct 20 16:38:11 localhost avahi-daemon[2980]: Registering
new address record for 192.168.2.200 on eth0.
Oct 20 16:38:13 localhost clurgmgrd[5924]:
service:www started
[root@node2 html]# ip addr list
2: eth0:
pfifo_fast qlen 1000
link/ether 00:0c:29:ee:ab:6a brd ff:ff:ff:ff:ff:ff
inet 192.168.2.20/24 brd 192.168.2.255 scope global
eth0
inet 192.168.2.200/24 scope global secondary eth0
68-16
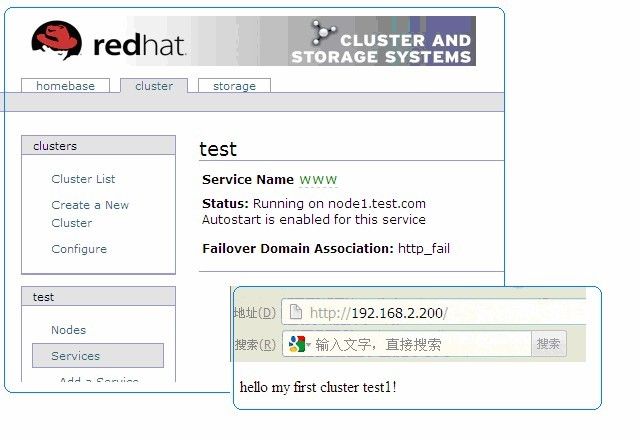
假设node2节点出息故障,查看群集各个节点的状态
[root@node2 ~]# service httpd stop
[root@node1 ~]# service httpd status
httpd is stopped
[root@node1 ~]# tail -f /var/log/messages
Oct 20 17:10:28 localhost avahi-daemon[2980]: Registering
new address record for 192.168.2.200 on eth0.
Oct 20 17:10:29 localhost clurgmgrd[6009]:
service:www started
[root@node1 ~]# service httpd status
httpd (pid 13086) is running...
[root@node1 ~]# ip addr list
2: eth0:
pfifo_fast qlen 1000
link/ether 00:0c:29:b0:cc:45 brd ff:ff:ff:ff:ff:ff
inet 192.168.2.10/24 brd 192.168.2.255 scope global
eth0
inet 192.168.2.200/24 scope global secondary eth0
68-17
查看节点的状态
[root@node1 cluster]# clustat
[root@node1 cluster]# cman_tool status
[root@node1 cluster]# ccs_tool lsnode
[root@node1 cluster]# ccs_tool lsfence
[root@node1 cluster]# service cman status
[root@node1 cluster]# service rgmanager status
[root@node1 ~]# clustat -i 1 ---------1s查看一次
