写在前面
国内的Android开发者跟国外的不一样,发布Apk不是在谷歌应用市场,而是在国内各大大小小的渠道。但是由于想在Apk发布后追踪、分析和统计用户数据,就必须区分每个渠道包。对于聪明的程序员,当然不会一个一个渠道包逐个出,所以就有了多渠道包生成技术。本文意在探索和实践目前比较稳定和常用的几种多渠道包生成的方式。
正文
目前比较流行的多渠道包生成方案有以下三种:
- META-INF目录添加渠道文件
- Apk文件末尾追加渠道注释
- 针对Android7.0 新增的V2签名方案的Apk添加渠道ID-value
下面我们逐一来探索并实践下这三种多渠道包生成方案,找出最适合我们项目的出包方式。
方案一:META-INF目录添加渠道文件
我们都知道,Apk文件的签名信息是保存在META-INF目录下的(关于META-INF如何保存签名信息不是本文讨论的范围,这里不讨论了,有兴趣的童鞋可以看下我之前的文章APK安全性自校验)。
对于使用V1(Jar Signature)方案签名的Apk,校验时是不会对META-INF目录下的文件进行校验的。我们正可以利用这一特性,在Apk META-INF目录下新建一个包含渠道名称或id的空文件,Apk启动时,读取该文件来获取渠道号,从而达到区分各个渠道包的作用。
这种方案简单明了,下面我们来实践下:
1.添加渠道文件
添加渠道文件就非常简单了,因为Apk实际时zip文件,对于Java来说,使用ZipFile、ZipEntry、ZipOutputStream 等类很简单就能操作zip文件,往zip文件添加文件再简单不过:
private static final String META_INF_PATH = "META-INF" + File.separator;
private static final String CHANNEL_PREFIX = "channel_";
private static final String CHANNEL_PATH = META_INF_PATH + CHANNEL_PREFIX;

public static void addChannelFile(ZipOutputStream zos, String channel, String channelId)
            throws IOException {
    // Add Channel file to META-INF
    ZipEntry emptyChannelFile = new ZipEntry(CHANNEL_PATH + channel + "_" + channelId);
    zos.putNextEntry(emptyChannelFile);
    zos.closeEntry();
}
2.读取渠道文件
读文件也同样简单,只需遍历Apk文件,找到我们添加的渠道文件就好:
public static String getChannelByMetaInf(File apkFile) {
    if (apkFile == null || !apkFile.exists()) return "";

    String channel = "";
    try {
        ZipFile zipFile = new ZipFile(apkFile);
        Enumeration entries = zipFile.entries();
        while (entries.hasMoreElements()) {
            ZipEntry entry = entries.nextElement();
            String name = entry.getName();
            if (name == null || name.trim().length() == 0 || !name.startsWith(META_INF_PATH)) {
                continue;
            }
            name = name.replace(META_INF_PATH, "");
            if (name.startsWith(CHANNEL_PREFIX)) {
                channel = name.replace(CHANNEL_PREFIX, "");
                break;
            }
        }
    } catch (IOException e) {
        e.printStackTrace();
    }

    return channel;
}
或者有童鞋会问,读渠道文件是程序在跑时读的,我们手机如何拿到Apk文件,总不能要用户手机都保留一个Apk文件吧?如果有这疑问的童鞋,可能不知道手机上安装的应用都会保留应用的Apk的,并且安卓也提供了Api,只需简单几行代码就能获取,这里不贴代码了,文末的demo有实践,不知道如何获取的童鞋可以看下demo。
3.生成多个渠道包
生成渠道包就简单不过了,写一个脚本,根据渠道配置文件,读取所需的渠道,再复制多个原Apk文件作为渠道包,最后往渠道包添加渠道文件就可以了:
public static void addChannelToApk(ZipFile apkFile) {
    if (apkFile == null) throw new NullPointerException("Apk file can not be null");

    Map channels = getAllChannels();
    Set channelSet = channels.keySet();
    String srcApkName = apkFile.getName().replace(".apk", "");
    srcApkName = srcApkName.substring(srcApkName.lastIndexOf(File.separator));

    for (String channel : channelSet) {
        String channelId = channels.get(channel);
        ZipOutputStream zos = null;
        try {
            File channelFile = new File(BUILD_DIR,
                    srcApkName + "_" +  channel + "_" + channelId + ".apk");
            if (channelFile.exists()) {
                channelFile.delete();
            }
            FileUtils.createNewFile(channelFile);
            zos = new ZipOutputStream(new FileOutputStream(channelFile));
            copyApkFile(apkFile, zos);

            MetaInfProcessor.addChannelFile(zos, channel, channelId);
        } catch (IOException e) {
            e.printStackTrace();
        } finally {
            IOUtils.closeQuietly(zos);
        }
    }
    IOUtils.closeQuietly(apkFile);
}

private static void copyApkFile(ZipFile src, ZipOutputStream zos) throws IOException {
    Enumeration entries = src.entries();
    while (entries.hasMoreElements()) {
        ZipEntry zipEntry = entries.nextElement();
        ZipEntry copyZipEntry = new ZipEntry(zipEntry.getName());
        zos.putNextEntry(copyZipEntry);
        if (!zipEntry.isDirectory()) {
            InputStream in = src.getInputStream(zipEntry);
            int len;
            byte[] buffer = new byte[8 * 1024];
            while ((len = in.read(buffer)) != -1) {
                zos.write(buffer, 0, len);
            }
        }
        zos.closeEntry();
    }
}
就这么简单几十行的代码就能释放我们双手,瞬间自动地打出多个甚至几十个渠道包了!但似乎读取渠道文件时稍稍有点耗时,因为要遍历整个Apk文件,如果文件一大,性能可能就不太理想了,有没更好的方法?答案肯定是有的,我们接下来看看第二种方案。
方案二:Apk文件末尾追加渠道注释
在探索这个方案前,你需要了解zip文件的格式,大家可以参考下文章 ZIP文件格式分析。内容很多,记不住?没关系,该方案你只需关注zip文件的末尾的格式 End of central directory record (EOCD):
| Offset | Bytes | Desctiption |
|---|---|---|
| 0 | 4 | End of central directory signature = 0x06054b50 |
| 4 | 2 | Number of this disk |
| 6 | 2 | Number of the disk with the start of the central directory |
| 8 | 2 | Total number of entries in the central directory on this disk |
| 10 | 2 | Total number of entries in the central directory |
| 12 | 4 | Size of central directory (bytes) |
| 16 | 2 | Offset of start of central directory with respect to the starting disk number |
| 20 | 2 | Comment length(n) |
| 22 | n | Comment |
zip文件末尾的字节 Comment 就是其注释。我们知道,代码的注释是不会影响程序的,它只是为代码添加说明。zip的注释同样如此,它并不会影响zip的结构,在注释了写入字节,对Apk文件不会有任何影响,也即能正常安装。
基于此特性,我们就可以在zip的注释块里动手了,可以在注释里写入我们的渠道信息,来区分每个渠道包。但需要注意的是:Comment Length 所记录的注释长度必须跟实际所写入的注释字节数相等,否则Apk文件安装会失败。
同样的,我们来实践下:
1.追加渠道注释
追加注释很简单,就是在文件末写入数据而已。但我们要有一定的格式,来标识是我们自己写的注释,并且能保证我们能正确地读取渠道号。为了简单起见,我demo里使用的格式也很简单:
| Offset | Bytes | Desctiption |
|---|---|---|
| 0 | n | Json格式的渠道信息 |
| n | 2 | 渠道信息的字节数 |
| n+2 | 3 | 魔数 ”LEO“,标记作用 |
写入注释同样很简单,只要注意要更新 Comment Length 的字节数就可以了:
public static void writeFileComment(File apkFile, String data) {
    if (apkFile == null) throw new NullPointerException("Apk file can not be null");
    if (!apkFile.exists()) throw new IllegalArgumentException("Apk file is not found");

    int length = data.length();
    if (length > Short.MAX_VALUE) throw new IllegalArgumentException("Size out of range: " + length);

    RandomAccessFile accessFile = null;
    try {
        accessFile = new RandomAccessFile(apkFile, "rw");
        long index = accessFile.length();
        index -= 2; // 2 = FCL
        accessFile.seek(index);

        short dataLen = (short) length;
        int tempLength = dataLen + BYTE_DATA_LEN + COMMENT_MAGIC.length();
        if (tempLength > Short.MAX_VALUE) throw new IllegalArgumentException("Size out of range: " + tempLength);

        short fcl = (short) tempLength;
        // Write FCL
        ByteBuffer byteBuffer = ByteBuffer.allocate(Short.BYTES);
        byteBuffer.order(ByteOrder.LITTLE_ENDIAN);
        byteBuffer.putShort(fcl);
        byteBuffer.flip();
        accessFile.write(byteBuffer.array());

        // Write data
        accessFile.write(data.getBytes(CHARSET));

        // Write data len
        byteBuffer = ByteBuffer.allocate(Short.BYTES);
        byteBuffer.order(ByteOrder.LITTLE_ENDIAN);
        byteBuffer.putShort(dataLen);
        byteBuffer.flip();
        accessFile.write(byteBuffer.array());

        // Write flag
        accessFile.write(COMMENT_MAGIC.getBytes(CHARSET));
    } catch (IOException e) {
        e.printStackTrace();
    } finally {
        IOUtils.closeQuietly(accessFile);
    }
}
2.读取渠道注释
因为不用遍历文件,读取渠道注释就比方式一的渠道方式快多了,只要根据我们自己写入文件的注释格式,从文件末逆着读就可以了(嘻嘻,这你知道我们为何在写入注释时需要写入我们渠道信息的长度了吧~)。好,看代码:
public static String readFileComment(File apkFile) {
    if (apkFile == null) throw new NullPointerException("Apk file can not be null");
    if (!apkFile.exists()) throw new IllegalArgumentException("Apk file is not found");

    RandomAccessFile accessFile = null;
    try {
        accessFile = new RandomAccessFile(apkFile, "r");
        FileChannel fileChannel = accessFile.getChannel();
        long index = accessFile.length();

        // Read flag
        index -= COMMENT_MAGIC.length();
        fileChannel.position(index);
        ByteBuffer byteBuffer = ByteBuffer.allocate(COMMENT_MAGIC.length());
        fileChannel.read(byteBuffer);
        byteBuffer.order(ByteOrder.LITTLE_ENDIAN);
        if (!new String(byteBuffer.array(), CHARSET).equals(COMMENT_MAGIC)) {
            return "";
        }

        // Read dataLen
        index -= BYTE_DATA_LEN;
        fileChannel.position(index);
        byteBuffer = ByteBuffer.allocate(Short.BYTES);
        fileChannel.read(byteBuffer);
        byteBuffer.order(ByteOrder.LITTLE_ENDIAN);
        short dataLen = byteBuffer.getShort(0);

        // Read data
        index -= dataLen;
        fileChannel.position(index);
        byteBuffer = ByteBuffer.allocate(dataLen);
        fileChannel.read(byteBuffer);
        byteBuffer.order(ByteOrder.LITTLE_ENDIAN);
        return new String(byteBuffer.array(), CHARSET);
    } catch (IOException e) {
        e.printStackTrace();
    } finally {
        IOUtils.closeQuietly(accessFile);
    }
    return "";
}
3.生成多个渠道包
这部分就跟方式一的差不多了,只是处理的方式不同而已,就不多说了:
public static void addChannelToApk(File apkFile) {
    if (apkFile == null) throw new NullPointerException("Apk file can not be null");

    Map channels = getAllChannels();
    Set channelSet = channels.keySet();
    String srcApkName = apkFile.getName().replace(".apk", "");

    InputStream in = null;
    OutputStream out = null;
    for (String channel : channelSet) {
        String channelId = channels.get(channel);
        String jsonStr = "{" +
                    "\"channel\":" + "\"" + channel + "\"," +
                    "\"channel_id\":" + "\"" + channelId + "\"" +
                "}";
        try {
            File channelFile = new File(BUILD_DIR,
                    srcApkName + "_" +  channel + "_" + channelId + ".apk");
            if (channelFile.exists()) {
                channelFile.delete();
            }
            FileUtils.createNewFile(channelFile);
            in = new FileInputStream(apkFile);
            out = new FileOutputStream(channelFile);
            copyApkFile(in, out);

            FileCommentProcessor.writeFileComment(channelFile, jsonStr);
        } catch (IOException e) {
            e.printStackTrace();
        } finally {
            IOUtils.closeQuietly(in);
            IOUtils.closeQuietly(out);
        }
    }
}

private static void copyApkFile(InputStream in, OutputStream out) throws IOException {
    byte[] buffer = new byte[4 * 1024];
    int len;
    while ((len = in.read(buffer)) != -1) {
        out.write(buffer, 0, len);
    }
}
注意,上面的实例没有考虑Apk原本存在注释的情况,如果要考虑的话,可以根据EOCD的开始标记,值是固定为 0x06054b50,找到这个标记,再相对偏移20的字节就是 Comment Length,这样就能知道原有注释的长度了。
写在最后
等等!开头不是写了三种方案,只介绍了两种啊?抱歉哈,考虑到文章篇幅,我把第三种方案的实践另起文章来写,并且第三种方案是这次实践的重点和难点,我希望能区分开来讲,尽量讲得详细和简单点,所以明天再更了~
难道方案三比方案二更高效吗?其实不然,Android7.0后谷歌推出了V2(Fill APK Signature)签名方案,正如其名,这种签名方案是对整个Apk文件进行签名的,校验时也对整个文件进行校验。因为方案一和方案二是对Apk文件进行修改的,所以导致了在使用了V2签名方案的Apk,方案一和方案二就不适用了!而方案三正是针对V2签名做的处理,所以说,方案三是方案一和方案二的缺陷的补充吧。方案三如何操作就下篇文章讲啦~
方案三已更新:Android多渠道包生成最佳实践(二)
好了,总结下。到目前为止,我们实践了两种方案来生成渠道包,二两种方案都很简单明了,其中方案二即简单又高效,虽然方案一性能也不会很差,但我们当然选性能最好的啦。所以我推荐使用方案二来实现多渠道包的生成。
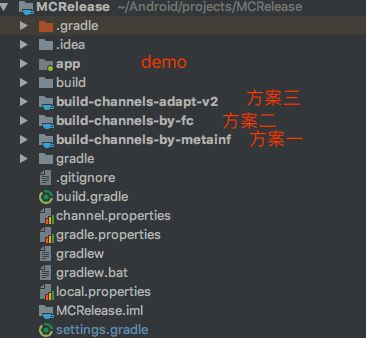
DEMO
MCRelease
