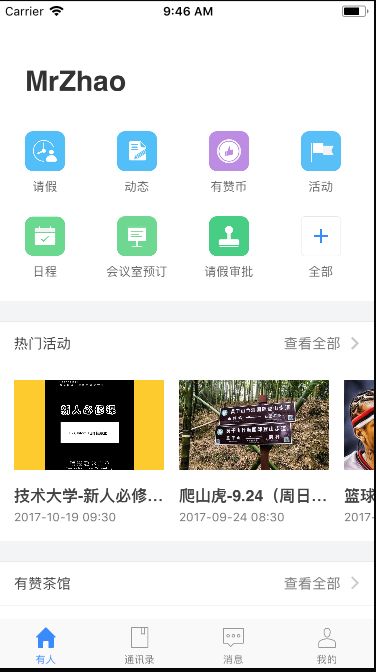
现在很多app功能点都非常多,如果将功能点都放在首页,这样就感觉比较乱,而且功能的主次也不容易区分,用户有些功能点是不需要经常操作的,像支付宝的功能点就非常多,因此支持用户自定义排序就非常有必要,笔者现在的项目功能点也非常之多,因此也支持用户自定义排序,用户可以自己选择在首页展示多少个功能,功能的顺序,用户也可以自己设置。这是项目的效果图:
其中首页只展示7个功能入口,其余的入口用户可以进入去全部里面查看,且所有功能入口可拖拽排序,用户可以根据自己的需要在首页展示自己常用的功能。下面就给出该功能的实现思路。
这种九宫格的东西利用collectionView实现最简单,对于iOS9.0以上系统,collectionView已支持拖拽排序,两个代理方法即可:
func collectionView(_ collectionView: UICollectionView, canMoveItemAt indexPath: IndexPath) -> Bool
func collectionView(_ collectionView: UICollectionView, moveItemAt sourceIndexPath: IndexPath, to destinationIndexPath: IndexPath)
iOS9以下系统的实现思路:
1.给cell添加长按手势
//
//  YRFunctionConfigCollectionViewCell.swift
//  YouRen
//
//  Created by MrZhaoCn on 2017/9/21.
//  Copyright © 2017年 Zhou Shaolin. All rights reserved.
//

import UIKit
protocol YRFunctionConfigCollectionViewCellDelegate:NSObjectProtocol {
    func configButtonClik(view:YRFunctionConfigCollectionViewCell,id:Int32)
    func dragCellGestureAction(gesture:UIGestureRecognizer,id:Int32)
}
class YRFunctionConfigCollectionViewCell: UICollectionViewCell {

    @IBOutlet var configButton: UIButton!
    @IBOutlet var iconImageView: UIImageView!
    @IBOutlet var titleLabel: UILabel!
    @IBAction func configActionButtonClik(_ sender: Any) {
        guard let homeModel = homeModel else {
            return
        }
        delegate?.configButtonClik(view: self, id: homeModel.id)
    }
    weak var delegate:YRFunctionConfigCollectionViewCellDelegate?
    private var homeModel:YRHomeModuleModel?
    override func awakeFromNib() {
        super.awakeFromNib()
        //添加手势
        let longPress = UILongPressGestureRecognizer(target: self, action: #selector(gestureAction(gesture:)))
        self.addGestureRecognizer(longPress)
    }
    func gestureAction(gesture:UIGestureRecognizer) {
        guard let delegate = delegate else {
            return
        }
        guard let homeModel = homeModel else {
            return
        }
        delegate.dragSortCellGestureAction(gesture:gesture,id: homeModel.id)
    }
}
2.长按开始时截取cell视图,并将视图添加到collectionView上,并隐藏该cell
func dragCellGestureAction(gesture: UIGestureRecognizer,id:Int32) {
        //判断是哪个collectionView
        var collectionView:UICollectionView = deleteCollectionView
        for item in deleteHomeModels {
            if item.id == id {
                collectionView = deleteCollectionView
                break
            }
        }
        for item in addHomeModels {
            if item.id == id {
                collectionView = addCollectionView
                break
            }
        }
        let point = gesture.location(in: collectionView)
        switch gesture.state {
        case UIGestureRecognizerState.began:
            dragBegan(gesture:gesture,point: point,collectionView:collectionView)
        case UIGestureRecognizerState.changed:
            drageChang(gesture: gesture,point: point, collectionView: collectionView)
        case UIGestureRecognizerState.ended:
            drageEnd(point: point, collectionView: collectionView)
        default: break
        }
    }
//MARK: - 长按开始
func dragBegan(gesture: UIGestureRecognizer,point: CGPoint,collectionView:UICollectionView) {
        indexPath = collectionView.indexPathForItem(at: point)
        if indexPath == nil {
            return
        }
        let item = collectionView.cellForItem(at: indexPath!) as? YRFunctionConfigCollectionViewCell
       //截取视图
        self.snapItem = item?.snapshotView(afterScreenUpdates: true)
        self.snapItem?.center = (item?.center)!
        collectionView.addSubview(self.snapItem ?? UIView())
       //原cell隐藏
        item?.isHidden = true
        startPoint = gesture.location(in: collectionView)
    }
3.在拖拽过程中,根据手势的位置,不断调整截取视图的位置,交换数据源.
//MARK: - 长按过程
  func drageChang(gesture: UIGestureRecognizer,point: CGPoint,collectionView:UICollectionView) {
        if indexPath == nil {
            return
        }
        let tranX = gesture.location(ofTouch: 0, in: collectionView).x - startPoint.x
        let tranY = gesture.location(ofTouch: 0, in: collectionView).y - startPoint.y
        //设置截图视图位置
        self.snapItem?.center = __CGPointApplyAffineTransform((self.snapItem?.center)!, CGAffineTransform(translationX: tranX, y: tranY))
        startPoint = gesture.location(ofTouch: 0, in: collectionView)
        targetIndexPath = collectionView.indexPathForItem(at: point)
        if targetIndexPath == nil {
            return
        }
        // 更新数据
        if collectionView == deleteCollectionView {
            let obj = deleteHomeModels[indexPath!.item]
            deleteHomeModels.remove(at: indexPath!.item)
            deleteHomeModels.insert(obj, at: targetIndexPath!.item)
        } else {
            let obj = addHomeModels[indexPath!.item]
            addHomeModels.remove(at: indexPath!.item)
            addHomeModels.insert(obj, at: targetIndexPath!.item)
        }
        //交换位置
        collectionView.moveItem(at: indexPath!, to: targetIndexPath!)
        indexPath = targetIndexPath
    }
4.手势结束时获取手势的位置,并移除掉截取的视图即可。
//MARK: - 长按结束
   func drageEnd(point: CGPoint,collectionView:UICollectionView) {
        if indexPath == nil {
            return
        }
        let endCell = collectionView.cellForItem(at: indexPath!)
        UIView.animate(withDuration: 0.25, animations:
            self.snapItem?.center = (endCell?.center)!
        }, completion: {
            (finish) -> () in
            endCell?.isHidden = false
            self.snapItem?.removeFromSuperview()
            self.indexPath = nil
        })
    }
注:笔者的项目要求上面的功能删除完时也要留有固定大小的区域同来添加功能,因此采用两个collectionView实现,但思路是一样的。其中deleteCollectionView为上面已添加的,deleteHomeModels为该数据源。addCollectionView为待添加的,addHomeModels为其数据源。

