一. 认识双向链表

双向链表介绍
单向链表:
我们可以轻松的到达下一个节点, 但是回到钱一个节点是很难的. 但是, 在实际开发中, 经常会遇到需要回到上一个节点的情况
举个例子: 假设一个文本编辑用链表来存储文本. 每一行用一个String对象存储在链表的一个节点中. 当编辑器用户向下移动光标时, 链表直接操作到下一个节点即可. 但是当用于将光标向上移动呢? 这个时候为了回到上一个节点, 我们可能需要从first开始, 依次走到想要的节点上.
只能从头遍历到尾或者从尾遍历到头(一般从头到尾)
也就是链表相连的过程是单向的. 实现的原理是上一个链表中有一个指向下一个的引用.
单向链表有一个比较明显的缺点:
双向链表
每次在插入或删除某个节点时, 需要处理四个节点的引用, 而不是两个. 也就是实现起来要困难一些
并且相当于单向链表, 必然占用内存空间更大一些.
但是这些缺点和我们使用起来的方便程度相比, 是微不足道的.
既可以从头遍历到尾, 又可以从尾遍历到头
也就是链表相连的过程是双向的. 那么它的实现原理, 你能猜到吗?
一个节点既有向前连接的引用, 也有一个向后连接的引用.
双向链表可以有效的解决单向链表中提到的问题.
双向链表有什么缺点呢?
双向连接的图解:

双向链表的创建
我们来创建一个双向链表的类
// 创建双向链表的构造函数
function DoublyLinkedList() {
// 创建节点构造函数
function Node(element) {
this.element = element
this.next = null
this.prev = null // 新添加的
}
// 定义属性
this.length = 0
this.head = null
this.tail = null // 新添加的
// 定义相关操作方法
}
代码解析:
基本思路和单向链表比较相似, 都是创建节点结构函数以及定义一些属性和方法.
只是Node中添加了一个this.prev属性, 该属性用于指向上一个节点.
另外属性中添加了一个this.tail属性, 该属性指向末尾的节点
二. 操作双向链表
双向链表的操作和单向链表的方法都是类似的.
只是在实现的过程中, 需要考虑更多节点之间的关系, 所以变得比单向链表复杂了一些.
尾部追加数据
我们还是先来实现尾部追加数据的方法
// 在尾部追加数据
DoublyLinkedList.prototype.append = function (element) {
// 1.根据元素创建节点
var newNode = new Node(element)
// 2.判断列表是否为空列表
if (this.head == null) {
this.head = newNode
this.tail = newNode
} else {
this.tail.next = newNode
newNode.prev = this.tail
this.tail = newNode
}
// 3.length+1
this.length++
}
代码解析:
因为我们是要将数据默认追加到尾部, 所以这个变得也很简单.
首先tail中的next之前指向的是null. 现在应该指向新的节点newNode: this.tail.next = newNode
因为是双向链表, 新节点的next/tail目前都是null. 但是作为最后一个节点, 需要有一个指向前一个节点的引用. 所以这里我们需要newNode.prev = this.tail
因为目前newNod已经变成了最后的节点, 所以this.tail属性的引用应该指向最后: this.tail = newNode即可
链表中原来如果没有数据, 那么直接让head和tail指向这个新的节点即可.
代码1部分不用多讲, 还是通过元素创建新的节点.
代码2部分相比之前有一些复杂, 但是还是两种情况.
情况一: 链表原来为空
情况二: 链表中已经存在数据
代码3部分不用多做解析, length需要+1
[图片上传失败...(image-f3953a-1534326650415)]
正向反向遍历
链表的遍历
forwardString: 正向遍历转成字符串的方法
reverseString: 反向遍历转成字符串的方法
toString: 正向遍历转成字符串的方法
之前我们在单向链表中实现了一个toString方法, 它是一种正向的遍历.
现在, 为了用户使用方便, 我们实现三个方法
方法的相关实现:
// 正向遍历的方法
DoublyLinkedList.prototype.forwardString = function () {
var current = this.head
var forwardStr = ""
while (current) {
forwardStr += "," + current.element
current = current.next
}
return forwardStr.slice(1)
}
// 反向遍历的方法
DoublyLinkedList.prototype.reverseString = function () {
var current = this.tail
var reverseStr = ""
while (current) {
reverseStr += "," + current.element
current = current.prev
}
return reverseStr.slice(1)
}
// 实现toString方法
DoublyLinkedList.prototype.toString = function () {
return this.forwardString()
}
完成上面的代码后, 测试append方法
// 1.创建双向链表对象
var list = new DoublyLinkedList()
// 2.追加元素
list.append("abc")
list.append("cba")
list.append("nba")
list.append("mba")
// 3.获取所有的遍历结果
alert(list.forwardString()) // abc,cba,nba,mba
alert(list.reverseString()) // mba,nba,cba,abc
alert(list) // abc,cba,nba,mba
任意位置插入
向双向链表的任意位置插入数据会有一些复杂, 考虑的情况也会有一些多.
// 在任意位置插入数据
DoublyLinkedList.prototype.insert = function (position, element) {
// 1.判断越界的问题
if (position < 0 || position > this.length) return false
// 2.创建新的节点
var newNode = new Node(element)
// 3.判断插入的位置
if (position === 0) { // 在第一个位置插入数据
// 判断链表是否为空
if (this.head == null) {
this.head = newNode
this.tail = newNode
} else {
this.head.prev = newNode
newNode.next = this.head
this.head = newNode
}
} else if (position === this.length) { // 插入到最后的情况
// 思考: 这种情况是否需要判断链表为空的情况呢? 答案是不需要, 为什么?
this.tail.next = newNode
newNode.prev = this.tail
this.tail = newNode
} else { // 在中间位置插入数据
// 定义属性
var index = 0
var current = this.head
var previous = null
// 查找正确的位置
while (index++ < position) {
previous = current
current = current.next
}
// 交换节点的指向顺序
newNode.next = current
newNode.prev = previous
current.prev = newNode
previous.next = newNode
}
// 4.length+1
this.length++
return true
}
代码深度解析, 代码比较复杂, 我们分成三种情况:
事实上, 将元素插入到头部是比较简单. 只是它有分成了两种情况.
情况一: 列表为空. 那么直接让head/tail指向newNode即可
情况二: 列表不为空, 这个时候需要修改原来head的prev指向新节点. 新节点的next指向原来的head. 并且head现在要指向newNode
情况一: 将元素插入到头部(position === 0)
情况二: 将元素插入到尾部(position === length)
这种情况比较简答了, 因为我们在append方法中已经处理过了.
注意: 这里不需要判断元素为空的情况, 因为在position === 0的时候, 我们已经处理过了. 所以到这里的时候, 肯定不为空.

情况三: 将元素插入到中间位置
情况三是比较复杂一些的, 但是我们理清楚它的逻辑关系也就比较简单了.
首先, 我们需要找到正确的插入位置. 通过while循环, 这个并不难, 因为我们在单向链表的时候已经找过了.
查找正确的位置后, 需要进行插入操作.
首先, 你的newNode的next/prev必然要指向前后的节点, 也就是current和previous
其次, 而current的prev需要指向newNode, 而previous的next需要指向newNode.
逻辑搞定, 并没有想象中的复杂, 详细看图解.
测试一下该方法
// 4.insert方法测试
list.insert(0, "100")
list.insert(2, "200")
list.insert(6, "300")
alert(list) // 100,abc,200,cba,nba,mba,300
课下思考: 代码性能能否改进一点呢?
如果我们position大于length/2, 是否从尾部开始迭代性能更高一些呢?
对于初学者来说, 可以作为思考. 但是先搞定上面的内容吧.
位置移除数据
我们继续来做下一个功能: 通过下标值删除某个元素
// 根据位置删除对应的元素
DoublyLinkedList.prototype.removeAt = function (position) {
// 1.判断越界的问题
if (position < 0 || position >= this.length) return null
// 2.判断移除的位置
var current = this.head
if (position === 0) {
if (this.length == 1) {
this.head = null
this.tail = null
} else {
this.head = this.head.next
this.head.prev = null
}
} else if (position === this.length -1) {
current = this.tail
this.tail = this.tail.prev
this.tail.next = null
} else {
var index = 0
var previous = null
while (index++ < position) {
previous = current
current = current.next
}
previous.next = current.next
current.next.prev = previous
}
// 3.length-1
this.length--
return current.element
}
代码深度解析, 和插入一样, 可以分成三种情况:
删除头部的元素也分成两种情况.
情况一: 链表只有一个元素, 那么将head/tail直接设置为null即可
情况二: 链表有多个元素, 这个时候删除头部的元素. head = head.next. head.prev = null
情况一: 删除头部的元素
情况二: 删除尾部的元素
删除尾部的元素和删除头部有多个元素的情况比较相似. (也不需要考虑个数为1的情况, 因为上一种情况已经考虑了)
将tail设置为tail的prev. tail的next设置为null即可.

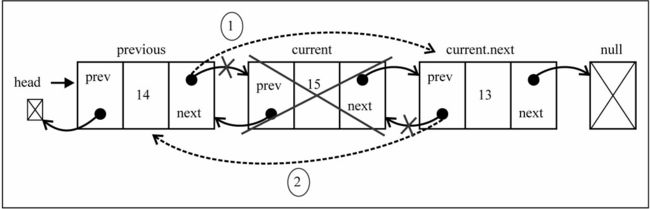
情况三: 删除中间位置的元素
这种情况就需要先找到正确的位置, 还是使用while循环.
将previous的next直接设置成current的next, 将current.next的prev设置成previous即可
测试removeAt方法
// 5.removeAt方法测试
alert(list.removeAt(0)) // 100
alert(list.removeAt(1)) // 200
alert(list.removeAt(4)) // 300
alert(list) // abc,cba,nba,mba
[图片上传失败...(image-fd5b4a-1534326650412)]
获取元素位置
下面完成下一个功能: 根据元素获取再链表中的位置
// 根据元素获取在链表中的位置
DoublyLinkedList.prototype.indexOf = function (element) {
// 1.定义变量保存信息
var current = this.head
var index = 0
// 2.查找正确的信息
while (current) {
if (current.element === element) {
return index
}
index++
current = current.next
}
// 3.来到这个位置, 说明没有找到, 则返回-1
return -1
}
代码解析:
这个代码的实现和单向链表一样, 不再解释.
代码测试:
// 6.indexOf方法测试
alert(list.indexOf("abc")) // 0
alert(list.indexOf("cba")) // 1
alert(list.indexOf("nba")) // 2
alert(list.indexOf("mba")) // 3
[图片上传失败...(image-2d7ad2-1534326650412)]
根据元素删除
有了上面的indexOf方法, 我们可以非常方便实现根据元素来删除信息
// 根据元素删除
DoublyLinkedList.prototype.remove = function (element) {
var index = this.indexOf(element)
return this.removeAt(index)
}
代码解析:
和单向链表一样, 不再解释.
测试代码:
// 7.remove方法测试
alert(list.remove("abc")) // abc
alert(list) // cba,nba,mba
[图片上传失败...(image-d3ee6b-1534326650412)]
其他方法实现
其他四个方法, 放在一起了
// 判断是否为空
DoublyLinkedList.prototype.isEmpty = function () {
return this.length === 0
}
// 获取链表长度
DoublyLinkedList.prototype.size = function () {
return this.length
}
// 获取第一个元素
DoublyLinkedList.prototype.getHead = function () {
return this.head.element
}
// 获取最后一个元素
DoublyLinkedList.prototype.getTail = function () {
return this.tail.element
}
代码解析:
比较简单, 不再给出解释了.
代码测试:
// 8.测试最后四个方法
alert(list.getHead())
alert(list.getTail())
alert(list.isEmpty())
alert(list.size())
[图片上传失败...(image-1fed00-1534326650411)]
三. 完整代码
给出双向链表的完整代码:
// 创建双向链表的构造函数
function DoublyLinkedList() {
// 创建节点构造函数
function Node(element) {
this.element = element
this.next = null
this.prev = null // 新添加的
}
// 定义属性
this.length = 0
this.head = null
this.tail = null // 新添加的
// 定义相关操作方法
// 在尾部追加数据
DoublyLinkedList.prototype.append = function (element) {
// 1.根据元素创建节点
var newNode = new Node(element)
// 2.判断列表是否为空列表
if (this.head == null) {
this.head = newNode
this.tail = newNode
} else {
this.tail.next = newNode
newNode.prev = this.tail
this.tail = newNode
}
// 3.length+1
this.length++
}
// 在任意位置插入数据
DoublyLinkedList.prototype.insert = function (position, element) {
// 1.判断越界的问题
if (position < 0 || position > this.length) return false
// 2.创建新的节点
var newNode = new Node(element)
// 3.判断插入的位置
if (position === 0) { // 在第一个位置插入数据
// 判断链表是否为空
if (this.head == null) {
this.head = newNode
this.tail = newNode
} else {
this.head.prev = newNode
newNode.next = this.head
this.head = newNode
}
} else if (position === this.length) { // 插入到最后的情况
// 思考: 这种情况是否需要判断链表为空的情况呢? 答案是不需要, 为什么?
this.tail.next = newNode
newNode.prev = this.tail
this.tail = newNode
} else { // 在中间位置插入数据
// 定义属性
var index = 0
var current = this.head
var previous = null
// 查找正确的位置
while (index++ < position) {
previous = current
current = current.next
}
// 交换节点的指向顺序
newNode.next = current
newNode.prev = previous
current.prev = newNode
previous.next = newNode
}
// 4.length+1
this.length++
return true
}
// 根据位置删除对应的元素
DoublyLinkedList.prototype.removeAt = function (position) {
// 1.判断越界的问题
if (position < 0 || position >= this.length) return null
// 2.判断移除的位置
var current = this.head
if (position === 0) {
if (this.length == 1) {
this.head = null
this.tail = null
} else {
this.head = this.head.next
this.head.prev = null
}
} else if (position === this.length -1) {
current = this.tail
this.tail = this.tail.prev
this.tail.next = null
} else {
var index = 0
var previous = null
while (index++ < position) {
previous = current
current = current.next
}
previous.next = current.next
current.next.prev = previous
}
// 3.length-1
this.length--
return current.element
}
// 根据元素获取在链表中的位置
DoublyLinkedList.prototype.indexOf = function (element) {
// 1.定义变量保存信息
var current = this.head
var index = 0
// 2.查找正确的信息
while (current) {
if (current.element === element) {
return index
}
index++
current = current.next
}
// 3.来到这个位置, 说明没有找到, 则返回-1
return -1
}
// 根据元素删除
DoublyLinkedList.prototype.remove = function (element) {
var index = this.indexOf(element)
return this.removeAt(index)
}
// 判断是否为空
DoublyLinkedList.prototype.isEmpty = function () {
return this.length === 0
}
// 获取链表长度
DoublyLinkedList.prototype.size = function () {
return this.length
}
// 获取第一个元素
DoublyLinkedList.prototype.getHead = function () {
return this.head.element
}
// 获取最后一个元素
DoublyLinkedList.prototype.getTail = function () {
return this.tail.element
}
// 遍历方法的实现
// 正向遍历的方法
DoublyLinkedList.prototype.forwardString = function () {
var current = this.head
var forwardStr = ""
while (current) {
forwardStr += "," + current.element
current = current.next
}
return forwardStr.slice(1)
}
// 反向遍历的方法
DoublyLinkedList.prototype.reverseString = function () {
var current = this.tail
var reverseStr = ""
while (current) {
reverseStr += "," + current.element
current = current.prev
}
return reverseStr.slice(1)
}
// 实现toString方法
DoublyLinkedList.prototype.toString = function () {
return this.forwardString()
}
}