小米手环iOS开发实战(二):开发Demo让你的手环振动起来
上一节讲了CoreBluetooth的使用,理论知识很枯燥,那么现在先利用上一节讲的内容,做一个简易手环应用,实现连接/断开手环,查看手环UUID、查看电量信息,并让振动的功能。
本节知识默认大家掌握iOS的基础控件,掌握通过storyboard或代码搭建界面UI,能够利用Swift或Objective-C编写程序。文章会尽量详细讲解这些过程,当然如果你是大牛可以放心跳读。
章节目录
- 蓝牙连接所涉及到的类
- 小米手环Demo应用的开发
- 一些功能优化
蓝牙连接所涉及到的类
上一节讲了怎么用CoreBluetooth,本节讲一下所涉及到的类,及常用的成员函数和成员变量,其他方法请见苹果开发文档。
CBCentralManager
此类为中心设备类,用于控制作为中心设备时的行为
-
state:获取当前中心设备状态 -
isScanning:当前中心设备是否在扫描外围设备 -
stopScan():停止扫描外围设备 -
scanForPeripherals(...):扫描外围设备(请确保蓝牙开启) -
connect(...):连接外围设备(需要先扫描到外围设备) -
cancelPeripheralConnection(...):断开外围设备
CBPeripheral
此类为外围设备类,用于对外围设备进行管理
-
name:获取外围设备的名称 -
rssi:获取当前外围设备的信号强度 -
state:获取外围设备的状态(disconnected/connecting/connected) - ★
services:获取外围设备所提供的服务(需要先扫描到服务) -
discoverServices(...):扫描设备所提供的服务 -
discoverCharacteristics(...):扫描特征值(需要先获取服务) -
readValue(...):读取特征值所对应的值(需要先获取到特征值,同时要注意此方法不反回值,要用协议的didUpdateValueFor characteristic方法处理)
是不是已经懵了?在此做一个图大致描述一下流程,其实这些方法的调用还是很有规律的。
CBCharacteristic
外围设备服务的特征值
- ★
Value:获取特征值对应的值
小米手环Demo应用的开发
本Demo是对上一节所讲CoreBluetooth的操作复习,每个方法的实现已经有所解释,故在此不再赘述。如果有疑问,欢迎在评论区提问及讨论。
该Demo所要实现的功能:练习连接设备、断开设备、读取手环信息、让手环振动。具体涉及到的知识点为连接和断开设备、获取设备服务和特征值、获取特征值对应的信息以及对其写入。
- 界面搭建
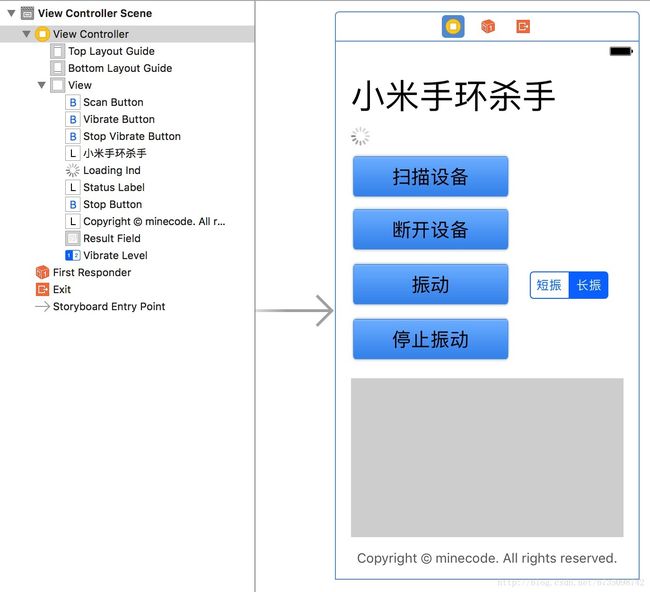
方便起见,该项目直接采用storyboard搭建,如果不会可以看项目Demo
    @IBOutlet weak var scanButton: UIButton!
    @IBOutlet weak var stopButton: UIButton!
    @IBOutlet weak var vibrateButton: UIButton!
    @IBOutlet weak var stopVibrateButton: UIButton!
    @IBOutlet weak var loadingInd: UIActivityIndicatorView!
    @IBOutlet weak var statusLabel: UILabel!
    @IBOutlet weak var resultField: UITextView!
    @IBOutlet weak var vibrateLevel: UISegmentedControl!
- 设置蓝牙操作过程所需对象
涉及到的类在第一讲已经讲解,如果有不明白的,可以查阅前面的讲解。
    var theManager: CBCentralManager!
    var thePerpher: CBPeripheral!
    var theVibrator: CBCharacteristic!
- CoreBluetooth协议方法的实现
本部分内容在第一讲已经涉及,如果有不明白的,可以查阅前面的讲解。
    override func viewDidLoad() {
        super.viewDidLoad()
        // Do any additional setup after loading the view, typically from a nib.
        theManager = CBCentralManager.init(delegate: self as? CBCentralManagerDelegate, queue: nil)
        self.scanButton.isEnabled = false
        statusLabel.text = ""
        loadingInd.isHidden = true
    }

    // 扫描并连接
    @IBAction func startConnectAction(_ sender: UIButton) {
        switch theManager.state {
        case .poweredOn:
            statusLabel.text = "正在扫描…"
            theManager.scanForPeripherals(withServices: nil, options: nil)
            self.loadingInd.startAnimating()
            self.scanButton.isEnabled = false
            self.isDisconnected = false
        default:
            break
        }
    }

    @IBAction func disconnectAction(_ sender: UIButton) {
        if ((thePerpher) != nil) {
            theManager.cancelPeripheralConnection(thePerpher)
            thePerpher = nil
            theVibrator = nil
            statusLabel.text = "设备已断开"
            scanButton.isEnabled = true
            isDisconnected = true
            isVibrating = false
        }
    }

    @IBAction func vibrateAction(_ sender: Any) {
        if ((thePerpher != nil) && (theVibrator != nil)) {
            let data: [UInt8] = [UInt8.init(vibrateLevel.selectedSegmentIndex+1)];
            let theData: Data = Data.init(bytes: data)
            thePerpher.writeValue(theData, for: theVibrator, type: CBCharacteristicWriteType.withoutResponse)
        }
    }

    @IBAction func stopVibrateAction(_ sender: UIButton) {
        if ((thePerpher != nil) && (theVibrator != nil)) {
            let data: [UInt8] = [UInt8.init(0)];
            let theData: Data = Data.init(bytes: data)
            thePerpher.writeValue(theData, for: theVibrator, type: CBCharacteristicWriteType.withoutResponse)
            isVibrating = false
        }
    }


    // 处理当前蓝牙主设备状态
    func centralManagerDidUpdateState(_ central: CBCentralManager) {
        switch central.state {
        case .poweredOn:
            statusLabel.text = "蓝牙已开启"
            self.scanButton.isEnabled = true
        default:
            statusLabel.text = "蓝牙未开启!"
            self.loadingInd.stopAnimating()
        }
    }

    // 扫描到设备
    func centralManager(_ central: CBCentralManager, didDiscover peripheral: CBPeripheral, advertisementData: [String : Any], rssi RSSI: NSNumber) {
        if (peripheral.name?.hasSuffix("MI"))! {
            thePerpher = peripheral
            central.stopScan()
            central.connect(peripheral, options: nil)
            statusLabel.text = "搜索成功,开始连接"

        }
        // 特征值匹配请用 peripheral.identifier.uuidString
        resultField.text = String.init(format: "发现手环\n名称:%@\nUUID:%@\n", peripheral.name!, peripheral.identifier.uuidString)
    }

    // 成功连接到设备
    func centralManager(_ central: CBCentralManager, didConnect peripheral: CBPeripheral) {
        statusLabel.text = "连接成功,正在扫描信息..."
        peripheral.delegate = self
        peripheral.discoverServices(nil)
    }

    // 连接到设备失败
    func centralManager(_ central: CBCentralManager, didFailToConnect peripheral: CBPeripheral, error: Error?) {
        loadingInd.stopAnimating()
        statusLabel.text = "连接设备失败"
        scanButton.isEnabled = true
    }

    // 扫描服务
    func peripheral(_ peripheral: CBPeripheral, didDiscoverServices error: Error?) {
        if ((error) != nil) {
            statusLabel.text = "查找服务失败"
            loadingInd.stopAnimating()
            scanButton.isEnabled = true
            return
        }
        else {
            for service in peripheral.services! {
                peripheral.discoverCharacteristics(nil, for: service)
            }
        }
    }

    // 扫描到特征值
    func peripheral(_ peripheral: CBPeripheral, didDiscoverCharacteristicsFor service: CBService, error: Error?) {
        if ((error) != nil) {
            statusLabel.text = "查找服务失败"
            loadingInd.stopAnimating()
            scanButton.isEnabled = true
            return
        }
        else {
            for characteristic in service.characteristics! {
                peripheral.setNotifyValue(true, for: characteristic)

                if (characteristic.uuid.uuidString == BATTERY) {
                    peripheral.readValue(for: characteristic)
                }
                else if (characteristic.uuid.uuidString == DEVICE) {
                    peripheral.readValue(for: characteristic)
                }
                else if (characteristic.uuid.uuidString == VIBRATE) {
                    theVibrator = characteristic
                }
            }
        }
    }

    // 扫描到具体设备
    func peripheral(_ peripheral: CBPeripheral, didUpdateValueFor characteristic: CBCharacteristic, error: Error?) {
        if ((error) != nil) {
            statusLabel.text = "从设备获取值失败"
            return
        }
        else {
            if(characteristic.uuid.uuidString == BATTERY) {
                var batteryBytes = [UInt8](characteristic.value!)
                var batteryVal:Int = Int.init(batteryBytes[0])
                self.resultField.text = String.init(format: "%@电量:%d%%\n", resultField.text, batteryVal)
            }
            loadingInd.stopAnimating()
            scanButton.isEnabled = true
            statusLabel.text = "信息扫描完成!"
            if (isVibrating) {
                vibrateAction(Any)
            }
        }
    }

    // 与设备断开连接
    func centralManager(_ central: CBCentralManager, didDisconnectPeripheral peripheral: CBPeripheral, error: Error?) {
        statusLabel.text = "设备已断开"
        scanButton.isEnabled = true
        if(!isDisconnected) {
            theManager.scanForPeripherals(withServices: nil, options: nil)
        }
    }
再次重提一下我在解决关于CBCentralManager的State属性遇到的问题:
CBCentralManager的State属性在之前是CBCentralManagerState,但是现在变成了CBManagerState,而后者需要iOS10以上才支持。查了StackoverFlow发现很多人也遇到了同样的问题,也是苹果很矛盾的一个用发。通过测试发现用switch语句对state属性判断可以解决系统版本限制的问题,也是普遍采用的方法。
补充:
小米手环振动的UUID是2A06,0代表不振,1为短振,2为长振。
其他UUID也均有相关文章有写,太多就不一一列举,可以直接Google之。如果需要的人比较多,我可以稍后撰写一份对照表。
接下来,部署->调试即可。功能运行正常。
一些功能改进
前一部分改进已经放到了上述代码中,若后期有改进将更新此处。
至此已经完成了对第一讲知识的复习,接下来我们将讲解对小米手环其他功能的开发。最终截稿时完成仿小米手环APP,并实现各种创意功能。
PS:现在开发小米手环可能都是出于情怀了吧?还有没有必要继续做下去呢。如果想要二次开发的人比较多,可以尝试做一套SDK方便开发。
写文章不易,如果觉得满意,欢迎大家粉一下我的GitHub,以及动动手指Star一下我的项目,持续更新需要你的支持!
本人GitHub:https://github.com/Minecodecraft
本项目链接:https://github.com/Minecodecraft/MiBandDemo
“小米手环iOS开发实战”系列
小米手环iOS开发实战(一):iOS蓝牙框架CoreBluetooth
小米手环iOS开发实战(二):开发Demo让你的手环振动起来

