自定义控件一直是让很多人包括我头疼的地方,难度较高 且学习资料零碎 直到我发现扔物线大神的HenCoder进阶手册.
这篇文章记录一下学习过程,以及途中经过精简的内容.便于日后查阅
1.1 绘制基础
关键词语: onDraw()方法 Canvas 画布 Paint画笔
一切的开始:
绘制圆形:
Paint paint = new Paint();

@Override
protected void onDraw(Canvas canvas) {
    super.onDraw(canvas);
    // 绘制一个圆
    canvas.drawCircle(300, 300, 200, paint);
}
- 1.Canvas 类下的所有 draw- 打头的方法,例如 drawCircle() drawBitmap()。
- 2.Paint 类的几个最常用的方法。具体是:
Paint.setStyle(Style style) 设置绘制模式
Paint.setColor(int color) 设置颜色
Paint.setStrokeWidth(float width) 设置线条宽度
Paint.setTextSize(float textSize) 设置文字大小
Paint.setAntiAlias(boolean aa) 设置抗锯齿开关
Canvas.drawColor(@ColorInt int color) 颜色填充.这是最基本的 drawXXX() 方法:在整个绘制区域统一涂上指定的颜色(可以这么理解: 画布整个染上了某种颜色), 这类颜色填充方法一般用于在绘制之前设置底色,或者在绘制之后为界面设置半透明蒙版。
类似方法(作用一致) : drawRGB(int r, int g, int b) 和 drawARGB(int a, int r, int g, int b)
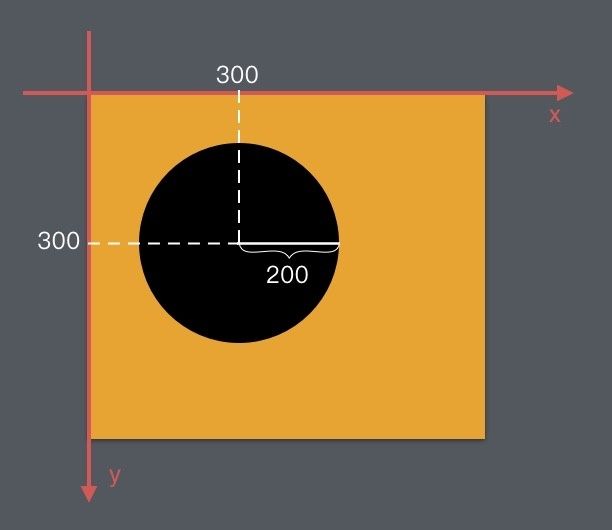
drawCircle(float centerX, float centerY, float radius, Paint paint) 画圆,参数:圆心xy坐标 半径 画笔.原点是View 左上角的那个点;水平方向是 x 轴,右正左负
例:canvas.drawCircle(300, 300, 200, paint) 如下图:
划重点 : 一些独有信息(就是只有它有,别人没有的信息.例如画圆:圆心 半径) 都会直接作为参数写进 drawXXX() 方法里的(比如 drawCircle(centerX, centerY, radius, paint) 的前三个参数)。
而除此之外,其他的都是公有信息。比如图形的颜色、空心实心这些,你不管是画圆还是画方都有可能用到的,这些信息则是统一放在 paint 参数里的
drawRect(float left, float top, float right, float bottom, Paint paint) 画矩形
drawPoint(float x, float y, Paint paint) 画点
drawPoints(float[] pts, int offset, int count, Paint paint) / drawPoints(float[] pts, Paint paint) 画点(批量)
drawOval(float left, float top, float right, float bottom, Paint paint) 画椭圆
drawLine(float startX, float startY, float stopX, float stopY, Paint paint) 画线
drawLines(float[] pts, int offset, int count, Paint paint) / drawLines(float[] pts, Paint paint) 画线(批量)
drawRoundRect(float left, float top, float right, float bottom, float rx, float ry, Paint paint) 画圆角矩形
drawArc(float left, float top, float right, float bottom, float startAngle, float sweepAngle, boolean useCenter, Paint paint) 绘制弧形或扇形
-
drawPath(Path path, Paint paint) 画自定义图形
Path 方法第一类:直接描述路径。
* 第一组 : addXxx() ——添加子图形
eg:addCircle(float x, float y, float radius, Direction dir) 添加圆 还可以添加椭圆 矩形 圆角矩形

* 第二组 : xxxTo() ——画线(直线或曲线)
eg:lineTo(float x, float y) / rLineTo(float x, float y)前缀 r 代表 relatively 「相对地」 画直线.
quadTo(float x1, float y1, float x2, float y2) / rQuadTo(float dx1, float dy1, float dx2, float dy2) 画二次贝塞尔曲线.
moveTo(float x, float y) / rMoveTo(float x, float y) 移动到目标位置
两个特殊的方法: arcTo() 和 addArc()。它们也是用来画线的,但并不使用当前位置作为弧线的起点。
特殊1:arcTo(RectF oval, float startAngle, float sweepAngle, boolean forceMoveTo) / arcTo(float left, float top, float right, float bottom,
float startAngle, float sweepAngle, boolean forceMoveTo) / arcTo(RectF oval, float startAngle, float sweepAngle) 画弧形
特殊2:addArc(float left, float top, float right, float bottom, float startAngle, float sweepAngle) / addArc(RectF oval, float startAngle, float sweepAngle)

close() 封闭当前子图形它的作用是把当前的子图形封闭,即由当前位置向当前子图形的起点绘制一条直线。
Path 方法第二类:辅助的设置或计算(场景比较少,只讲其中一个方法: setFillType(FillType fillType)。)
Path.setFillType(Path.FillType ft) 设置填充方式
FillType 的取值有四个:
EVEN_ODD(原理:奇偶原则)
WINDING (非零环绕数原则)(默认值)
INVERSE_EVEN_ODD
INVERSE_WINDING
drawBitmap(Bitmap bitmap, float left, float top, Paint paint) 画 Bitmap
drawText(String text, float x, float y, Paint paint) 绘制文字(Paint.setTextSize(float textSize)设置文字大小)
总结:1.1绘制基础: Canvas 的 drawXXX() 系列方法和 Paint 的基本使用,就到这里
想看1.1详细原文请戳这里,里面还有练习项目...
1.2 Paint详解
emm....这期的内容,只要做到「知道有这么个东西」,在需要用到的时候能想起来这个功能能不能做、大致用什么做就好,至于具体的实现,到时候拐回来再翻一次就行了。
Paint 的 API 大致可以分为 4 类:
1.颜色
1.1 基本颜色
* 直接设置颜色 : setColor(int color) setARGB(int a, int r, int g, int b)
* 设置着色器 : setShader(Shader shader)
        > LinearGradient 线性渐变
            Shader shader = new LinearGradient(100, 100, 500, 500, Color.parseColor("#E91E63"),Color.parseColor("#2196F3"),Shader.TileMode.CLAMP);
        > RadialGradient 辐射渐变(从中心向周围)
            Shader shader = new RadialGradient(300, 300, 200, Color.parseColor("#E91E63"), Color.parseColor("#2196F3"), Shader.TileMode.CLAMP);
        > SweepGradient 扫描渐变
            Shader shader = new SweepGradient(300, 300, Color.parseColor("#E91E63"),Color.parseColor("#2196F3"));
        > BitmapShader 用 Bitmap 的像素来作为图形或文字的填充
            Bitmap bitmap = BitmapFactory.decodeResource(getResources(), R.drawable.batman);
            Shader shader = new BitmapShader(bitmap, Shader.TileMode.CLAMP, Shader.TileMode.CLAMP);
        > ComposeShader 混合着色器
            // 第一个 Shader:头像的 Bitmap
            Bitmap bitmap1 = BitmapFactory.decodeResource(getResources(), R.drawable.batman);
            Shader shader1 = new BitmapShader(bitmap1, Shader.TileMode.CLAMP, Shader.TileMode.CLAMP);
            // 第二个 Shader:从上到下的线性渐变(由透明到黑色)
            Bitmap bitmap2 = BitmapFactory.decodeResource(getResources(), R.drawable.batman_logo);
            Shader shader2 = new BitmapShader(bitmap2, Shader.TileMode.CLAMP, Shader.TileMode.CLAMP);
            // ComposeShader:结合两个 Shader
            Shader shader = new ComposeShader(shader1, shader2, PorterDuff.Mode.SRC_OVER);

1.2 设置颜色过滤器 setColorFilter(ColorFilter colorFilter)
        > LightingColorFilter 模拟光照效果
            ColorFilter lightingColorFilter = new LightingColorFilter(0x00ffff, 0x000000);
        > PorterDuffColorFilter 使用一个指定的颜色和一种指定的 PorterDuff.Mode 来与绘制对象进行合成
            PorterDuffColorFilter(int color, PorterDuff.Mode mode)
        > ColorMatrixColorFilter 使用一个 ColorMatrix 来对颜色进行处理。 ColorMatrix 这个类,内部是一个 4x5 的矩阵(厉害了)
1.3 setXfermode(Xfermode xfermode)  以绘制的内容作为源图像,以 View 中已有的内容作为目标图像,选取一个  PorterDuff.Mode 作为绘制内容的颜色处理方案
2.效果
2.1 setAntiAlias (boolean aa) 设置抗锯齿
2.2 setStyle(Paint.Style style) 设置填充模式
2.3 线条形状,四个方法:
    >  setStrokeWidth(float width)设置线条宽度。单位为像素,默认值是 0。
    >  setStrokeCap(Paint.Cap cap)设置线头的形状。线头形状有三种:BUTT 平头、ROUND 圆头、SQUARE 方头。默认为 BUTT。
    >  setStrokeJoin(Paint.Join join)设置拐角的形状。有三个值可以选择:MITER 尖角、 BEVEL 平角和 ROUND 圆角。默认为 MITER。
    >  setStrokeMiter(float miter)这个方法是对于 setStrokeJoin() 的一个补充,它用于设置 MITER 型拐角的延长线的最大值。
2.4 色彩优化.Paint 的色彩优化有两个方法: setDither(boolean dither) 和 setFilterBitmap(boolean filter)
    >  setDither(boolean dither)设置图像的抖动。
    >  setFilterBitmap(boolean filter)设置是否使用双线性过滤来绘制 Bitmap 。
2.5 setPathEffect(PathEffect effect)使用 PathEffect 来给图形的轮廓设置效果。
2.6 setShadowLayer(float radius, float dx, float dy, int shadowColor)在之后的绘制内容下面加一层阴影。
2.7 setMaskFilter(MaskFilter maskfilter)为之后的绘制设置 MaskFilter。 有BlurMaskFilter模糊效果 EmbossMaskFilter浮雕效果
2.8 获取绘制的 Path.根据 paint 的设置,计算出绘制 Path 或文字时的实际 Path。
    >  getFillPath(Path src, Path dst) 获取实际path
    >  getTextPath(String text, int start, int end, float x, float y, Path path) / getTextPath(char[] text, int index, int count, float x, float y, Path path)获取文字path
3.drawText() 相关
方法太多,下一节里单独讲;
4.初始化
它们是用来初始化 Paint 对象,或者是批量设置 Paint 的多个属性的方法
4.1 reset() 重置 Paint 的所有属性为默认值。相当于重新 new 一个,不过性能当然高一些啦。
4.2 set(Paint src) 把 src 的所有属性全部复制过来。相当于调用 src 所有的 get 方法,然后调用这个 Paint 的对应的  set 方法来设置它们。
4.3 setFlags(int flags)  批量设置 flags。相当于依次调用它们的 set 方法。例如:
