一、NIO简介
Java NIO (New IO , Non Blocking IO)。NIO是一个基于通道,面向缓冲区的,非阻塞的IO操作。
二、NIO的核心
2.1Buffer
2.1.1Buffer概念
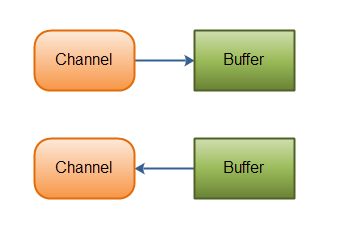
Buffer缓冲区,负责NIO中的数据存储。数据可以从Channel中读到Buffer里,也可以从Buffer读到Channel里。
2.1.2Buffer的用法
使用Buffer读取数据的四个步骤
1)写入数据到buffer
2)调用flip()方法
3)从buffer中读取数据
4)调用clear()或者compact()方法
调用clear()或compact()方法能够清空缓冲区,以便让buffer可以再次被写入。clear()方法会清空整个缓冲区。compact()方法只会清除已经读过的数据。任何未读的数据都被移到缓冲区的起始处,新写入的数据将放到缓冲区未读数据的后面。
@Test
public void bufferTest()throws Exception{
    RandomAccessFile inFile = new RandomAccessFile("D:\\1.html", "rw");
    FileChannel channel = inFile.getChannel();
    //为buffer分配大小
    ByteBuffer byteBuffer = ByteBuffer.allocate(48);
    //将数据从channel中写入buffer
    channel.read(byteBuffer);
    while (channel.read(byteBuffer)!=-1){
        //切换成读模式,准备从buffer中读取数据
        byteBuffer.flip();
        System.out.println(new String(byteBuffer.array(),0,byteBuffer.limit()));
        //清空当前缓冲区,为下次写入做好准备
        byteBuffer.clear();
    }
}
2.1.3 Buffer中几个重要的属性
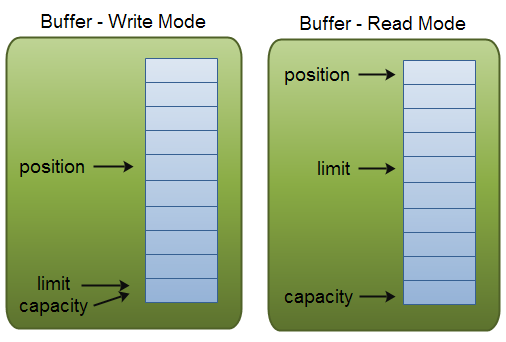
capacity : 表示缓冲区中最大存储数据的容量,一旦声明不能改变。一旦Buffer满了,则不能向其中写入数据,需要通过flip()向外写出数据,或者通过clear()方法清空缓冲区。
-
limit : 缓冲区中可以进行操作的数据大小。(limit后数据不能进行读写)。
读模式下,limit为写入时position的值。可以从filp()方法中的源码得知。public final Buffer flip() { limit = position; position = 0; mark = -1; return this; } -
position : 位置,表示缓冲区中正在操作数据的位置。当你写数据到Buffer中时,position表示当前的位置。初始的position值为0.当一个byte、long等数据写到Buffer后, position会向前移动到下一个可插入数据的Buffer单元。position最大可为capacity – 1。
当读取数据时,也是从某个特定位置读。当将Buffer从写模式切换到读模式,position会被重置为0。当从Buffer的position处读取数据时,position向前移动到下一个可读的位置。
mark : 标记,表示记录当前 position 的位置。可以通过 reset() 恢复到 mark 的位置 0 <= mark <= position <= limit <= capacity
2.1.4 Buffer的种类
- ByteBuffer
- MappedByteBuffer
- CharBuffer
- DoubleBuffer
- FloatBuffer
- IntBuffer
- LongBuffer
- ShortBuffer
Buffer的使用,请自行查阅API.
2.2Channel(通道)
2.2.1Channel简介
- Channel是双向的,即可以从Channel中读取数据,也可以向Channel中写入数据。
- 通过Channel可以实现异步的读写。
- Channel的使用要以Buffer为媒介,通道中的数据总是要先读到一个Buffer,或者总是要从一个Buffer中写入。
2.2.2JAVA NIO中对Channel的实现
- FileChannel:从文件读取数据的( 文件通道总是阻塞式的 )
- DatagramChannel:读写UDP网络协议数据
- SocketChannel:读写TCP网络协议数据
- ServerSocketChannel:可以监听TCP连接
2.2.3获取Channel的方式
- FileChannel : 通过 RandomAccessFile,FileInputStream,FileOutputStream
getChannel()获得。 - DatagramChannel、SocketChannel、ServerScoketChannel可以通过该类提供的静态方法open()获得。
2.2.4 Channel的使用
- FileCahnnel使用在上图Buffer使用的例子中已经有所提及。
-
分散读取和聚集写入 Scatter & Gather
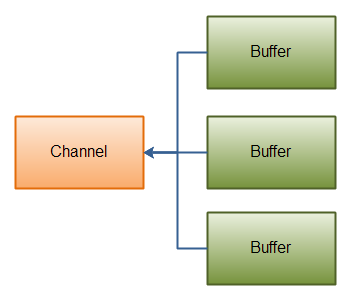
分散读取(Scatter):是指在进行读操作时将一个Channel里的内容分散读入不同的Buffer里。
聚集写入(Gather):是指将分散在各个不同Buffer里的数据聚集写入到一个Channel中。
代码如下:
/*
Scattering Reads 数据从一个Channel读取到多个buffer中
Gatering Writes 数据从多个buffer写入到同一个channel中
 **/
@Test
public void scatterAndGather()  throws Exception{
    /*
    Scattering Reads 最好先知道文件的大小,从而为之分配合适数量的Buffer
     */
    RandomAccessFile inFile = new RandomAccessFile("D:\\1.html", "rw");
    RandomAccessFile outFile = new RandomAccessFile("D:\\2.html", "rw");
    FileChannel inChannel = inFile.getChannel();
    FileChannel outChanner = outFile.getChannel();
    ByteBuffer buf1 = ByteBuffer.allocate(1024);
    ByteBuffer buf2 = ByteBuffer.allocate(1024);
    ByteBuffer buf3 = ByteBuffer.allocate(1024);
    ByteBuffer[] buffArray = {buf1, buf2, buf3};
    while (inChannel.read(buffArray)!= -1){
        buffArray[0].flip();
        buffArray[1].flip();
        buffArray[2].flip();
        while (buffArray[0].hasRemaining() && buffArray[1].hasRemaining()&& buffArray[2].hasRemaining()){
            outChanner.write(buffArray);
        }
        buffArray[0].clear();
        buffArray[1].clear();
        buffArray[2].clear();
    }
    inChannel.read(buffArray);
}
2.2.5通道之间的数据传输
-
TransferFrom
/* FileChannel的transferFrom()方法可以将数据从源通道传输到FileChannel中 */ @Test public void transferFrom()throws Exception{ RandomAccessFile inFile = new RandomAccessFile("E:\\桌面\\desk\\1.jpg","r"); RandomAccessFile outFile = new RandomAccessFile("F:\\1.jpg", "rw"); FileChannel inChanner = inFile.getChannel(); long postion = 0; long count = inChanner.size(); FileChannel outChanner = outFile.getChannel(); outChanner.transferFrom(inChanner,postion,count); outChanner.force(true); } -
TransferTo
/*
transferTo()方法将数据从FileChannel传输到其他的channel中
*/
@Test
public void transferTo()throws Exception{
  RandomAccessFile inFile = new RandomAccessFile("E:\\桌面\\desk\\1.jpg","r");
  RandomAccessFile outFile = new RandomAccessFile("F:\\2.jpg", "rw");
  FileChannel inChanner = inFile.getChannel();
  long postion = 0;
  long count = inChanner.size();
  FileChannel outChanner = outFile.getChannel();
  inChanner.transferTo(postion, count,outChanner);
  outChanner.force(true);
}
2.3 Selector(选择器)
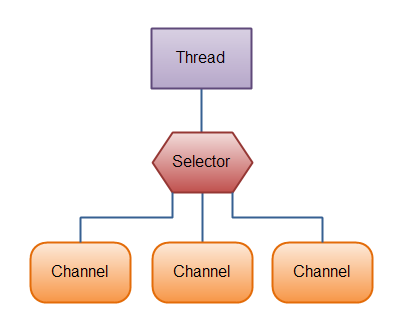
Java NIO中通过Selector(选择器)来监测一到多个NIO通道是否为诸如读写事件做好准备的组件。这样,一个单独的线程可以管理多个channel,从而管理多个网络连接。
2.3.1Selector的使用
1.创建Selector 通过调用Selector.open()方法创建一个Selector.
2.向Selector注册通道。与Selector一起使用时,Channel必须处于非阻塞模式下(register方法中有做限定,阅读源码可知)。这意味着不能将FileChannel与Selector一起使用,因为FileChannel不能切换到非阻塞模式。而套接字通道都可以通过channel.configureBlocking(false)切换成非阻塞模式。
channel.configureBlocking(false);
SelectionKey key = channel.register(selector,  Selectionkey.OP_READ);
register()方法的第二个参数。这是一个“interest集合”,意思是在通过Selector监听Channel时对什么事件感兴趣。可以监听四种不同类型的事件:
 Selectionkey.OP_READ
 Selectionkey.OP_CONNECT
 Selectionkey.OP_ACCEPT
 Selectionkey.OP_WRITE
如果你想要监听多个事件,则可以通过“位或"操作将常量连接起来。如:
int listener = Selectionkey.OP_READ | Selectionkey.OP_CONNECT
注:ServerSocketChannel中只可以注册SelectionKey.OP_ACCEPT事件
3.返回值SelectionKey包含的属性
- interest集合
用“位与”操作interest 集合和给定的SelectionKey常量,可以确定某个确定的   事件是否在interest 集合中。
int interestSet = selectionKey.interes();

boolean isInterestedInAccept  = (interestSet & SelectionKey.OP_ACCEPT) == SelectionKey.OP_ACCEPT;
- ready集合
ready 集合是通道已经准备就绪的操作的集合。在一次选择(Selection)之后,你会首先访问这个ready set。你可以通过以下四个方法来判断channel中什么事件或操作已经就绪。
selectionKey.isAcceptable();
selectionKey.isConnectable();
selectionKey.isReadable();
selectionKey.isWritable();
- Channel
通过SelectionKey来获得Channel
SelectableChannel channel  = selectionKey.channel();
- Selector
通过SelectionKey来获得Selector
Selector selector = selectionKey.selector();
- 附加的对象(可选)
三、Selector与SocketChannel的使用实例
3.1基于TCP协议ServerSocketChannel 服务端的创建
@Test
public void server() throws Exception {
    //获得一个ServerSocketChannel
    ServerSocketChannel channel = ServerSocketChannel.open();
    //将Channel注册成为非阻塞式   与selector一起使用时,channel必须处于非阻塞模式下。
    channel.configureBlocking(false);
    //为Channel绑定一个端口
    channel.bind(new InetSocketAddress(8023));
    //获得选择器
    Selector selector = Selector.open();
    //注册监听事件     因为是服务端,所以只能注册SelectionKey.OP_ACCEPT这个事件
    channel.register(selector, SelectionKey.OP_ACCEPT);
    while (selector.select()>0) {
        Set selectedKeys = selector.selectedKeys();
        Iterator keyIterator = selectedKeys.iterator();
        while (keyIterator.hasNext()) {
            SelectionKey key1 = keyIterator.next();
            if (key1.isAcceptable()) {
                //当一个连接 连接到服务端的时刻获得这个连接的通道
                SocketChannel channel1 = channel.accept();
                channel1.configureBlocking(false);
                //为客户端连接注册读就绪的监听事件
                channel1.register(selector, SelectionKey.OP_READ );
            } else if (key1.isReadable()) {
                //读事件准备就绪时    获得通道   读取客户端发来的消息
                SocketChannel acceptChannel = (SocketChannel)key1.channel();
                //创建缓冲区
                ByteBuffer readBuff = ByteBuffer.allocate(48);
                int len = 0;
                while ((len = acceptChannel.read(readBuff))!= -1){
                     System.out.println(new String(readBuff.array()));
                    //清空缓冲区,为下次数据写入做准备
                    readBuff.clear();
                }
                //关闭连接
                acceptChannel.close();
            }
            //由于selector不会自动移除已经准备就绪的key,所以需手动移除。key下次准备就绪时,会被再次放入SelectionKey中
            keyIterator.remove();
        }
    }
}
3.2基于SocketChannel 客户端的创建
@Test
public void client () throws Exception{
    //获得SocketChannel通道
    SocketChannel channel = SocketChannel.open();
    //将通道设置为非阻塞模式
    channel.configureBlocking(false);  //将通道设置为非阻塞式的时候要通过调用  channel.finishConnect();来完成连接,否则会报NotYetConnectedException异常
    channel.connect(new InetSocketAddress("127.0.0.1",8023));
    channel.finishConnect();
    //获得选择器
    Selector selector = Selector.open();
    //为通道注册连接就绪事件
    channel.register(selector, SelectionKey.OP_CONNECT);
    while (selector.select()>0){
        Set selectionKeys = selector.selectedKeys();
        Iterator iterator = selectionKeys.iterator();
        while (iterator.hasNext()){
            SelectionKey key = iterator.next();
            if(key.isConnectable()){
                //通过key来获得当前的通道
                SocketChannel connectiChannerl = (SocketChannel) key.channel();
                //判断是否是正在连接
                if (connectiChannerl.isConnectionPending()){
                    //如果正在连接,则手动完成连接
                    connectiChannerl.finishConnect();
                }
            }
            iterator.remove();
        }
    }
    //向服务端发送消息
    String str = "Hello ! How  are  you ?";
    ByteBuffer buffer= ByteBuffer.allocate(48);
    buffer.put(str.getBytes());
    //切换模式 调用此方法为一系列通道写入或相对获取 操作做好准备
    buffer.flip();
    channel.write(buffer);
    buffer.clear();
    channel.close();
}


