导航栏图解
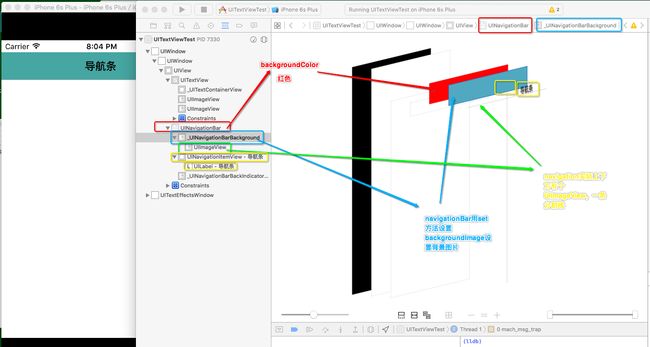
标题
self.navigationItem.title=@"注册账号";
导航背景色
self.navigationController.navigationBar.barTintColor=[UIColor redColor];
导航标题的颜色
[self.navigationController.navigationBar setTitleTextAttributes:[NSDictionary dictionaryWithObjectsAndKeys:[UIColor whiteColor],NSForegroundColorAttributeName,nil]];
隐藏导航返回按钮
self.navigationItem.hidesBackButton=YES;
设置返回文字为白色
self.navigationItem.backBarButtonItem.tintColor=[UIColor whiteColor];
把导航的底部当做屏幕的原点开始计算
if ([[[UIDevice currentDevice] systemVersion] floatValue]>=7.0) {
     self.navigationController.navigationBar.translucent=NO;//透明度
 }
怎么像safari一样滑动的时候隐藏navigationbar?
self.navigationController.hidesBarsOnSwipe = YES;
去掉导航黑线
[self.navigationController.navigationBar setBackgroundImage:[[UIImage alloc] init] forBarMetrics:UIBarMetricsDefault];

self.navigationController.navigationBar.shadowImage = [[UIImage alloc] init];

self.navigationController.navigationBar.tintColor = [UIColor whiteColor];
设置导航模拟全透明导航
[self.navigationController.navigationBar setBackgroundImage:[[UIImage alloc]init] forBarMetrics:UIBarMetricsDefault];self.navigationController.navigationBar.barStyle=UIBarStyleBlackTranslucent;self.navigationController.navigationBar.translucent=YES;
去掉返回按钮上面的文字
[[UIBarButtonItem appearance]setBackButtonTitlePositionAdjustment:UIOffsetMake(0, -60)forBarMetrics:UIBarMetricsDefault];
添加多个导航栏按钮
UIBarButtonItem
*shareItem = [[UIBarButtonItem alloc] initWithBarButtonSystemItem:UIBarButtonSystemItemAction target:self action: nil nil];*
UIBarButtonItemcameraItem = [[UIBarButtonItem alloc] initWithBarButtonSystemItem:UIBarButtonSystemItemCamera target:self action: nil nil];
NSArray *itemsArr = @[shareItem,cameraItem];
self.navigationItem.rightBarButtonItems = itemsArr;
去掉导航下面的一条黑线
self.navigationController.navigationBar.clipsToBounds=YES;
self.automaticallyAdjustsScrollViewInsets=NO;
修改navgationBar的字体的颜色
[self.navigationController.navigationBarsetTitleTextAttributes:[NSDictionarydictionaryWithObjectsAndKeys:[UIColorwhiteColor],NSForegroundColorAttributeName,nil]];
*** 设置背景图***
    [navBar setBackgroundImage:[UIImage imageNamed:@"1"] forBarMetrics:0];
      //或者设置背景颜色(这两种方法,都可以设置navigationBar上面的image)
    navBar.barTintColor=[UIColor yellowColor];
报错为reason: '-[UIButton _setOwningNavigationItem:]
设置自定义导航的时候,或者设置导航上面多个自定义按钮时候,放的对象都必须是UIBarButtonItem。
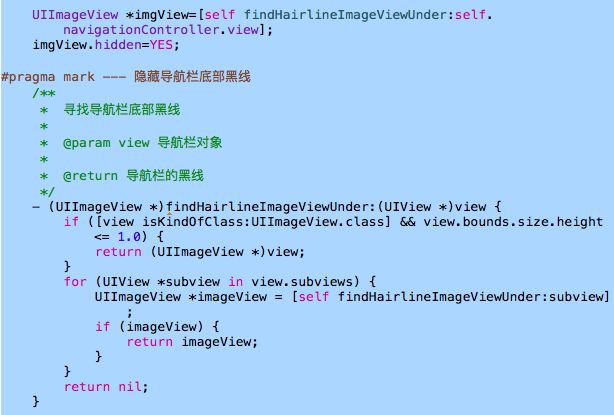
隐藏导航底部黑线
导航栏渐变效果
  //方法一
  - (void)scrollViewDidScroll:(UIScrollView *)scrollView
    {
        CGFloat offsetToShow = 200.0;//滑动多少就完全显示
        CGFloat alpha = 1 - (offsetToShow - scrollView.contentOffset.y) / offsetToShow;
        [[self.navigationController.navigationBar subviews] objectAtIndex:0].alpha = alpha;
    }
//方法二
- (void)scrollViewDidScroll:(UIScrollView *)scrollView
{
    CGFloat offsetToShow = 200.0;
    CGFloat alpha = 1 - (offsetToShow - scrollView.contentOffset.y) / offsetToShow;

    [self.navigationController.navigationBar setShadowImage:[UIImage new]];
    [self.navigationController.navigationBar setBackgroundImage:[self imageWithColor:[[UIColor orangeColor]colorWithAlphaComponent:alpha]] forBarMetrics:UIBarMetricsDefault];
}

//生成一张纯色的图片
- (UIImage *)imageWithColor:(UIColor *)color
{
    CGRect rect = CGRectMake(0.0f, 0.0f, 1.0f, 1.0f);
    UIGraphicsBeginImageContext(rect.size);
    CGContextRef context = UIGraphicsGetCurrentContext();
    CGContextSetFillColorWithColor(context, [color CGColor]);
    CGContextFillRect(context, rect);
    UIImage *theImage = UIGraphicsGetImageFromCurrentImageContext();
    UIGraphicsEndImageContext();

    return theImage;
}
navigationBar变为纯透明
//第一种方法
//导航栏纯透明
//self.navigationController.navigationBar.translucent = YES; 不然该句不起作用(默认为YES)
[self.navigationBar setBackgroundImage:[UIImage new] forBarMetrics:UIBarMetricsDefault];
//去掉导航栏底部的黑线
self.navigationBar.shadowImage = [UIImage new];

//第二种方法
//self.navigationController.navigationBar.translucent = YES; 不然导航变成黑色(默认为YES)
[[self.navigationBar subviews] objectAtIndex:0].alpha = 0;
tabBar变为纯透明
[self.tabBar setBackgroundImage:[UIImage new]];
self.tabBar.shadowImage = [UIImage new];
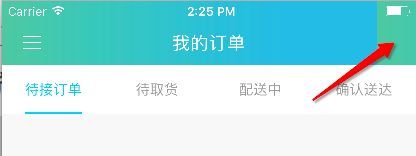
导航左右按钮的位置调整(右按钮为例)
//所需btnItem
    UIButton *button=[UIButton new];//设置内容省略
    UIBarButtonItem *rightItem = [[UIBarButtonItem alloc]initWithCustomView:button];
//间隔btnItem
    UIBarButtonItem *space = [[UIBarButtonItem alloc] initWithBarButtonSystemItem:UIBarButtonSystemItemFixedSpace target:nil action:nil];
    space.width = -10;//正负代表两个方向,自己试下。(左正右负)
    [self.navigationItem setRightBarButtonItems:[NSArray arrayWithObjects:space,rightItem, nil]];
导航添加多个按钮并调整位置(右侧添加两个按钮为例)
//所需btnItem
    UIButton *button1=[UIButton new];//设置内容省略
    UIButton *button2=[UIButton new];//设置内容省略
    UIBarButtonItem *btnItem1 = [[UIBarButtonItem alloc] initWithCustomView:button1];
    UIBarButtonItem *btnItem2 = [[UIBarButtonItem alloc] initWithCustomView:button2];
//间隔btnItem
    UIBarButtonItem *space1 = [[UIBarButtonItem alloc] initWithBarButtonSystemItem:UIBarButtonSystemItemFixedSpace target:nil action:nil];
    space1.width = -10;
    UIBarButtonItem *space2 = [[UIBarButtonItem alloc] initWithBarButtonSystemItem:UIBarButtonSystemItemFixedSpace target:nil action:nil];
    space2.width = -10;
//注意数组中的顺序对应的是导航从右到左的顺序。
    self.navigationItem.rightBarButtonItems  = @[space1,btnItem1,space2,btnItem2];
自定义导航的titleview
//不能使用addSubview
//    [self.navigationItem.titleView addSubview:titlesView];
    self.navigationItem.titleView = titlesView;

//方式一:
//    self.navigationItem.titleView = self.menuScreeningView;
//方式二:(这样添加,离开该界面的时候要手动移除。)
    [self.navigationController.navigationBar addSubview:titlesView];
}


-(void)viewWillAppear:(BOOL)animated
{
    [super viewWillAppear:animated];

    //移除导航上面的下拉列表
    [titlesView removeFromSuperview];

}
设置导航的背景图拉伸
    UIImage * img= [UIImage imageNamed:@"shy_bj"];
    img = [img stretchableImageWithLeftCapWidth:1 topCapHeight:1];

    //导航背景
    [self.navigationController.navigationBar setBackgroundImage:img forBarMetrics:UIBarMetricsDefault];
设置导航的背景图拉伸
导航左边返回按钮点击范围很大的解决方案
    // 左边按钮
    UIButton *leftbut =[UIButton buttonWithType:UIButtonTypeCustom];

    [leftbut setImage:[UIImage imageNamed:@"btn_left"] forState:UIControlStateNormal];

    [leftbut addTarget:self action:@selector(ClicknavleftBut) forControlEvents:UIControlEventTouchUpInside];
    [leftbut sizeToFit];

    //把返回按钮放在一个view上面,然后添加到导航上,不然返回的范围很大。
    UIView *leftView = [UIView new];
    leftView.frame= leftbut.frame;
    [leftView addSubview:leftbut];

    self.navigationItem.leftBarButtonItem =[[UIBarButtonItem alloc] initWithCustomView:leftView];