常见错误锦集: http://www.cnblogs.com/lovesong/p/5679340.html
ListView下拉刷新和上拉加载数据:
http://lib.csdn.net/article/reactnative/40078
http://www.jianshu.com/p/dff750d8c425
http://div.io/topic/1453
热更新:
https://github.com/crazycodeboy/RNStudyNotes/
https://github.com/crazycodeboy/RNStudyNotes/tree/master/React%20Native%E5%BA%94%E7%94%A8%E9%83%A8%E7%BD%B2%E3%80%81%E7%83%AD%E6%9B%B4%E6%96%B0-CodePush%E6%9C%80%E6%96%B0%E9%9B%86%E6%88%90%E6%80%BB%E7%BB%93
http://blog.csdn.net/dongdong230/article/details/52625157
http://blog.csdn.net/goodchangyong/article/details/51323918
icon和启动页图片
http://www.cnblogs.com/allenxieyusheng/p/5804023.html
键盘遮挡输入框问题
http://www.cnblogs.com/pofabs/p/5109021.html
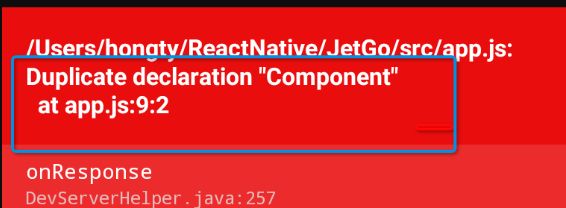
1.ReactNative 导入React包
importReact, {Component}from'react';
import{
AppRegistry,
Platform,//此处不可加Component 会报错
TouchableOpacity,
StyleSheet,
Navigator,
View,
Text
} from'react-native';
import Splashfrom'./Splash';
报错如下:
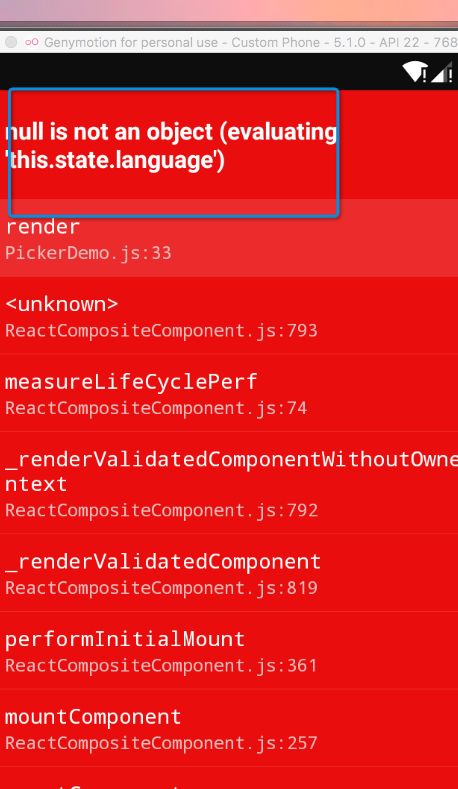
2.初始化state
ES5中,和属性初始化类似
var ES5Syntax = React.createClass({
  getInitialState: function() {
  return {esVersion: `${this.[props.name](http://props.name/)} v1.0`,
  clickCounts: 0,
  };
  },
});
ES6中 ,有两种写法:
export default class ES6Syntax extends Component { state = { esVersion: `${this.[props.name](http://props.name/)} v1.0`, clickCounts: 0, }; });
在构造函数中对state初始化:
export default class ES6Syntax extends Component { constructor(props) { super(props); // Operations usually carried out in componentWillMount go here this.state = { esVersion: `${this.[props.name](http://props.name/)} v1.0`, clickCounts: 0, }; }; };
备注:采用ES5初始化方法会报错,如下:
3.RN图片有时在父元素有绝对定位时,点击事件会失效(具体原因不知),可通过给图片加子元素,然后给子元素绑定点击事件。
4.安卓真机调试(摇晃手机或输入adb shell input keyevent 82)
com.android.ddmlib.InstallException: Unable to upload some APKs
(坑死人啊!!!!)
修改:
com.android.tools.build:gradleversion from1.3.1to1.2.3inbuild.gradlefile.
buildscript{repositories{jcenter()}dependencies{classpath'com.android.tools.build:gradle:1.2.3'}}
5.扫码成功之后回传扫码结果——万年坑
先大致说一下事情的起因,,,
类似微星、支付宝的扫码功能很常见,所以我们当然也不甘落后,人家有的,我们也当然得有;人家没有的,我们最好也有;
a.扫码跳回上一个页面之后,主页面下面有30%左右的黑色区域覆盖,且上一个页面的按钮操作是存在的,只是被覆盖,具体原因不详,估计具体原因应该是摄像机未释放(后来经过多方查找资料,的确是摄像头未释放)。
——解决方案,给BarScanner加样式:backgroundColor:'rgba(0,0,0,.1)'
onBarCodeRead={(e)=> {
this._barcodeReceived(e)
}}
style={{flex:1,backgroundColor:'rgba(0,0,0,.1)'}}
tourchMode={this.state.torchMode}
cameraType={this.state.cameraType}
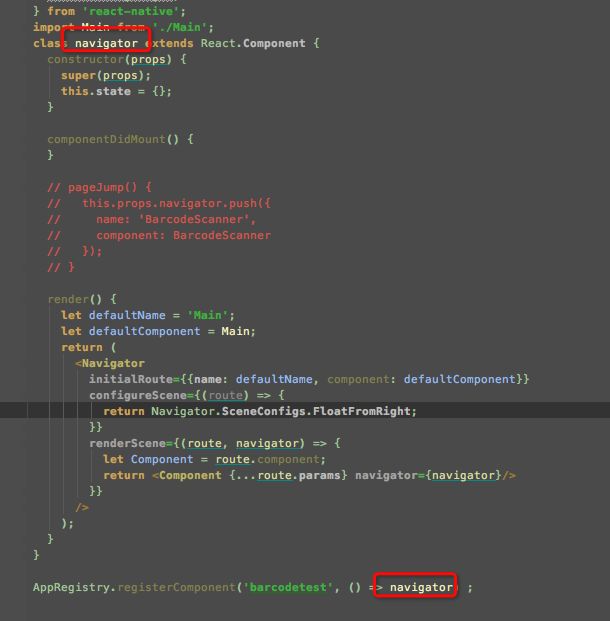
6.导航条控件,注意大小写,大写会报错
7.打包apk时build.gradle文件配置——图片不显示问题
在模拟器时有时运行出错,需要将:
build script {
repositories {
jcenter()
}
dependencies {
classpath 'com.android.tools.build:gradle:1.3.1'
// NOTE: Do not place your application dependencies here; they belong
// in the individual module build.gradle files
}
}
里面的1.3.1改成1.2.3即可。
但是,但是,但是,在打包签名apk时,
一定要将1.2.3改回1.3.1
一定要将1.2.3改回1.3.1
一定要将1.2.3改回1.3.1
因为早期因为版本问题(不知是安卓环境还是RN环境,会导致图片无法打包到apk
里面,但是APP正常运行,只是所有图片都不显示,也不会报错)
备注:要时刻注意RN版本问题,RN官方文档更新较快,经常会发布新的版本。
升级本地RN查看官方文档:http://reactnative.cn/docs/0.39/upgrading.html
安卓打包命令:./gradlew assembleRelease
8.使用React-native run-Android”命令运行android应用时,如果常常出现如下错误:
Starting the app (/home/xxx/soft/sdk//platform-tools/adb shell am start -n xxx/.MainActivity)…
Starting: Intent { cmp=xxx/.MainActivity }
Error type 3
Error: Activity class {xxx/xxx.MainActivity} does not exist.
尽管该应用可以安装到你的安卓设备, 不影响使用,但是看着好碍眼。本着不能规避问题的原则,还是要想办法消掉这个错误。经过本人的一番尝试,总算解决了这个碍眼的bug.在此记录一下解决的步骤。
- 首先是检查这个MainActivity.Java是不是真的存在,且包名和路径无误;
- 如果文件存在,且包名和路径没有问题,那么就打开你项目所在 的/android/app/build.gradle文件,删除defaultConfig下的applicationId,像下面这样:
apply plugin: ‘com.android.application’
android {
compileSdkVersion xxx
buildToolsVersion “xxx”
defaultConfig {
// applicationId “xxx”
}
或者将applicationId的值改成manifest文件里指定的package。
再运行”react-native run-android”,OK了。
出现这个问题的原因是你的package和applicationId不一致。如果你没有在你的 build.gradle 文件中定义 applicationId,这个applicationId 将默认为 AndroidManifest.xml 中所指定的与package相同的值。
注意:现在的Android Gradle编译系统的android项目是以applicationId作为唯一标识应用的包名。
9.安卓禁止屏幕旋转
reactnative控件:https://github.com/yamill/react-native-orientation(我测试不管用)
在一些特殊的情况下,Android开发期间会禁止某些Activity的横竖屏切换.下面介绍一种简单的方法: 只要在AndroidManifest.xml里面配置一下就可以了。 在AndroidManifest.xml的activity(需要禁止转向的activity)配置中加入 android:screenOrientation=”landscape”属性即可(landscape是横向,portrait是纵向)。
例如:
android:name=".DemoActivityt"
android:theme="@android:style/Theme.NoTitleBar"
android:screenOrientation="portrait"
另外,android中每次屏幕方向切换时都会重启Activity,所以应该在Activity销毁前保存当前活动的状态,在Activity再次Create的时候载入配置。要避免在转屏时重启activity,可以通过在androidmanifest.xml文件中重新定义方向(给每个activity加上android:configChanges=”keyboardHidden|orientation”属性),并根据Activity的重写onConfigurationChanged(Configuration newConfig)方法来控制,这样在转屏时就不会重启activity了,而是会去调用onConfigurationChanged(Configuration newConfig)这个方法。
尊重原创:http://www.open-open.com/lib/view/open1328278861750.html
10.Android肯定切换端口
看了网上好多的资料,介绍的都是iOS切换React Native端口,然后就想Android肯定也可以切换端口。仔细看了下源代码,试了下确实可以。源代码就不做详细介绍了,有兴趣的话,自己去下下来看看。
先讲下,这里说的端口8081 是facebook写死的,是打的在线包。离线包就不用通过端口,连接电脑和手机了。
说下切换端口的步骤:
很简单,比如切换8089端口。
代码中在application或者主activity中做如下设置:
@OverridepublicvoidonCreate() {super.onCreate(); mPreferences = PreferenceManager.getDefaultSharedPreferences(getApplicationContext()); mPreferences.edit().putString("debug_http_host","localhost:8089").commit(); }
为什么要在sharepreference中加”debug_http_host” ,看看android的源码就知道了,不细讲了,fb也是这么写的。
然后在项目根目录下执行:
adb reverse tcp:8089 tcp:8089
React-native start –port 8089
好了 运行项目,reload js ,手机就桥接到8089了。
ios切换端口比android简单,修改配置文件就好了,网上一堆,不细讲了。
11.坑死人之安卓二维码扫码——react-native-barcodescanner
安卓二维码扫码之后第二次进入或者手机锁屏或黑屏之后,再次打开二维码扫码出现黑屏情况。
https://github.com/ideacreation/react-native-barcodescanner/pull/61
对比修改CameraManager.java 和CameraPreview.java文件。
12.热更新Pushy,[http://update.reactnative.cn/dashboard/5672/version](http://update.reactnative.cn/dashboard/5672/version)
13.http://www.open-open.com/lib/view/open1452907915823.htm
注意pandroid是p android
react-native bundle --platform android --dev false --entry-file index.android.js --bundle-output android/app/src/main/assets/index.android.bundle --assets-dest android/app/src/main/res/
14.安卓实体返回键[http://www.zhimengzhe.com/Androidkaifa/48187.html]
(http://www.zhimengzhe.com/Androidkaifa/48187.html)
15.安卓启动白屏(1-3秒,根据机型CPU能力而不同)
安卓启动会有两种白屏,一种是RN机制导致的android和IOS都有:
针对RN渲染机制导致的白屏问题,可用如下方式解决,
RN机制导致的用如下方式解决(也可以自己更改原生代码),但我觉得这种方式对于我这种原生开发小白来说更简单:
https://github.com/crazycodeboy/react-native-splash-screen
然而,凡是总会出现意外
按着官方文档配置好之后,还需做如下更改
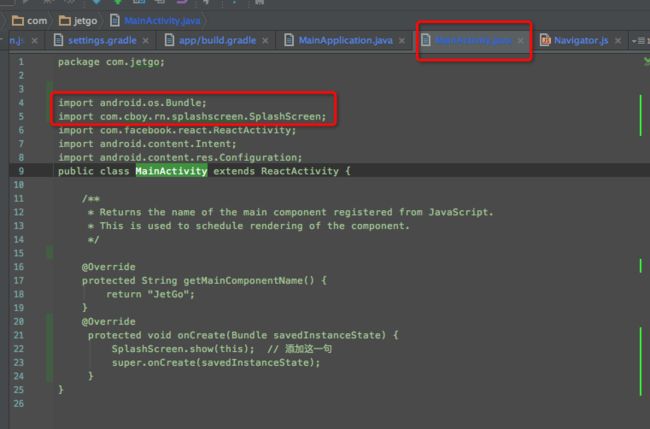
首先,MainActivity要添加如下代码,否则会报错:
import android.os.Bundle;
import com.cboy.rn.splashscreen.SplashScreen;
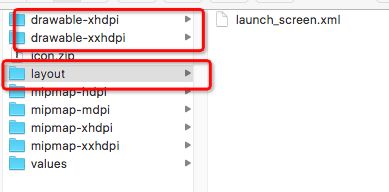
然后,增加如下目录和文件
layout目录用于存放样式配置文件,drawable-xxhdpi用于存放启动页图片:
针对android自身原因导致的白屏可用如下方式解决,参考文章:http://www.jianshu.com/p/6917e536de27
第一步:创建一个透明主题。
第二步:在AndroidManifest.xml中为application应用主题。
使用react-native-maps(0.14.0)时,真机运行总是报错,
Project react-native-maps: provided dependencies can only be jars. com.facebook.react:react-native:aar:0.44.0 is an Android Library.
:react-native-maps:prepareReleaseDependencies FAILED
进入路径:项目 --> node_modules --> react-native-maps -->lib--> android --> build.gradle,修改:
dependencies {
  provided "com.facebook.react:react-native:+"
  ...
}
为:
dependencies {
  compile "com.facebook.react:react-native:+"
  ...
}
参考文章:http://stackoverflow.com/questions/28774667/provided-dependencies-can-only-be-jars

