Volley
Volley 是 Google 推出的 Android 异步网络请求框架和图片加载框架。在 Google I/O 2013 大会上发布,特别适合数据量小,通信频繁的网络操作(Android中大多数网络通信都是这种特点)。
Volley 的主要特点:
1. 扩展性强。Volley 中大多是基于接口的设计,可配置性强。
2. 一定程度符合 Http 规范,包括返回 ResponseCode(2xx、3xx、4xx、5xx)的处理,请求头的处理,缓存机制的支持等。并支持重试及优先级定义。
3. 提供简便的图片加载工具。
Volley基本用法
RequestQueue mQueue = Volley.newRequestQueue(this);
        StringRequest stringRequest = new StringRequest(Request.Method.POST,"https://www.baidu.com",
                new Response.Listener() {
                    @Override
                    public void onResponse(String response) {
                        Log.d("TAG", response);
                    }
                }, new Response.ErrorListener() {
                    @Override
                    public void onErrorResponse(VolleyError error) {

                    }
                }){
            @Override
            protected Map getParams() throws AuthFailureError {
                return super.getParams();
            }
        };
        mQueue.add(stringRequest);
首先,创建一个RequestQueue请求队列对象,不需要为每一次http请求都创建mQueue,其内部设计已经考虑了高并发,重复创建是非常浪费资源的,一般在需要和网络交互的Activity中创建一个RequestQueue对象就可以。
其次创建一个Request对象,这里使用Volley提供的Request的子类StringRequest创建对象,需要传入4个参数,第一个是请求的方法(StringRequest还有一个三个参数的构造方法,第一个参数默认设为Request.Method.GET),第二个参数是http请求的目标服务器的URL地址,第三个参数是服务器响应成功的回调,第四个参数是服务器响应失败的回调。POST方法中需要传入参数,使用getParams()方法传递。
最后将创建好的StringRequest对象添加到RequestQueue中,这样就完成了Volley的基本使用,是不是很简单(不要忘记在你的AndroidManifest中添加网络权限)。
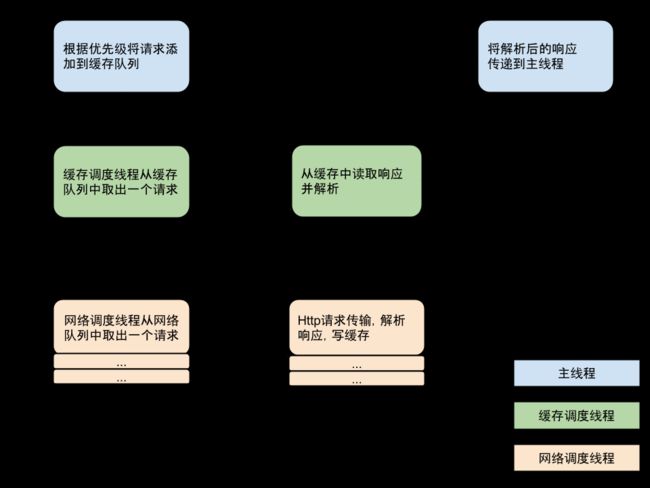
Volley请求架构
图片来源: https://raw.githubusercontent.com/android-cn/android-open-project-analysis/master/tool-lib/network/volley/image/Volley-run-flow-chart.png
图中蓝色框运行在主线程中,绿色框运行在缓存调度线程中,黄色框运行在网络调度线程中。
在上面的基本用法中,将请求添加到请求队列时,首先判断是否应该缓存(默认全部缓存),如果修改默认状态不缓存,则直接加入到网络请求队列中,否则直接加入到缓存请求队列。
RequestQueue会维护一个缓存调度线程
mCacheDispatcher和多个网络调度线程池
networkDispatcher,当一个Request被加到队列中的时候,缓存调度线程会把这个请求进行筛选:如果这个请求的内容可以在缓存中找到,缓存调度线程会亲自解析相应内容,并分发到主线程(UI)。如果缓存中没有,这个
request就会被加入到另一个
NetworkQueue,所有真正准备进行网络通信的
request都在这里,第一个可用的
networkDispatcher线程会从
NetworkQueue中拿出一个
request扔向服务器。当响应数据到的时候,这个
networkDispatcher线程会解析原始响应数据,写入缓存,并把解析后的结果返回给主线程。
Volley源码分析
在使用案例时,我们首先调用了RequestQueue mQueue = Volley.newRequestQueue(this);那就让我们先看看Volley.newRequestQueue(this)方法。
public class Volley {
    private static final String DEFAULT_CACHE_DIR = "volley";
    public static RequestQueue newRequestQueue(Context context, HttpStack stack) {
        File cacheDir = new File(context.getCacheDir(), DEFAULT_CACHE_DIR);
        String userAgent = "volley/0";
        try {
            String packageName = context.getPackageName();
            PackageInfo info = context.getPackageManager().getPackageInfo(packageName, 0);
            userAgent = packageName + "/" + info.versionCode;
        } catch (NameNotFoundException e) {
        }

        if (stack == null) {
            if (Build.VERSION.SDK_INT >= 9) {
                stack = new HurlStack();
            } else {
                // Prior to Gingerbread, HttpUrlConnection was unreliable.
                // See: http://android-developers.blogspot.com/2011/09/androids-http-clients.html
                stack = new HttpClientStack(AndroidHttpClient.newInstance(userAgent));
            }
        }

        Network network = new BasicNetwork(stack);
        RequestQueue queue = new RequestQueue(new DiskBasedCache(cacheDir), network);
        queue.start();

        return queue;
    }
    public static RequestQueue newRequestQueue(Context context) {
        return newRequestQueue(context, null);
    }
}
很简单吧,就是调用了一个两个参数的构造函数,其函数中首先确定了userAgent,该字段是http协议的请求头的字段,表示客户急的信息,看到Volley中默认是包名+版本号的方式。然后,判断第二个参数HttpStack stack是否为空,如果为空则判断当前的Android版本,当前版本在Gingerbread 及之后(即 API Level >= 9)时,采用基于 HttpURLConnection 的 HurlStack,如果小于 9,则采用基于 HttpClient 的 HttpClientStack。原因请参考这篇文章:Android访问网络,使用HttpURLConnection还是HttpClient?之后,创建了BasicNetwork对象,根据传入的HttpStack对象来处理网络请求。最后创建RequestQueue对象,调用其start方法。
我们接着看queue.start();方法:
private static final int DEFAULT_NETWORK_THREAD_POOL_SIZE = 4;
    /**
     * Starts the dispatchers in this queue.
     */
    public void start() {
        stop();  // Make sure any currently running dispatchers are stopped.
        // Create the cache dispatcher and start it.
        mCacheDispatcher = new CacheDispatcher(mCacheQueue, mNetworkQueue, mCache, mDelivery);
        mCacheDispatcher.start();

        // Create network dispatchers (and corresponding threads) up to the pool size.
        for (int i = 0; i < mDispatchers.length; i++) {
            NetworkDispatcher networkDispatcher = new NetworkDispatcher(mNetworkQueue, mNetwork,
                    mCache, mDelivery);
            mDispatchers[i] = networkDispatcher;
            networkDispatcher.start();
        }
    }
start方法中先调用了stop方法,确保当前运行的缓存调度线程mCacheDispatcher和网络调度线程池networkDispatcher是停掉的。然后创建了一个缓存调度线程mCacheDispatcher和四个网络调度线程池networkDispatcher并启动运行在后台。注意创建缓存线程的构造函数中的参数mCacheQueue, mNetworkQueue, mCache, mDelivery以及网络调度线程池的参数mNetworkQueue, mNetwork, mCache, mDelivery。
回到我们的案例中,最后调用了RequestQueue的add方法,让我们来看一下:
   private final PriorityBlockingQueue> mCacheQueue = new PriorityBlockingQueue>();
    private final PriorityBlockingQueue> mNetworkQueue = new PriorityBlockingQueue>();
    private final Map>> mWaitingRequests = new HashMap>>();
    private final Set> mCurrentRequests = new HashSet>();
/**
     * Adds a Request to the dispatch queue.
     * @param request The request to service
     * @return The passed-in request
     */
    public  Request add(Request request) {
        // Tag the request as belonging to this queue and add it to the set of current requests.
        request.setRequestQueue(this);
        synchronized (mCurrentRequests) {
            mCurrentRequests.add(request);
        }

        // Process requests in the order they are added.
        request.setSequence(getSequenceNumber());
        request.addMarker("add-to-queue");

        // If the request is uncacheable, skip the cache queue and go straight to the network.
        if (!request.shouldCache()) {
            mNetworkQueue.add(request);
            return request;
        }

        // Insert request into stage if there's already a request with the same cache key in flight.
        synchronized (mWaitingRequests) {
            String cacheKey = request.getCacheKey();
            if (mWaitingRequests.containsKey(cacheKey)) {
                // There is already a request in flight. Queue up.
                Queue> stagedRequests = mWaitingRequests.get(cacheKey);
                if (stagedRequests == null) {
                    stagedRequests = new LinkedList>();
                }
                stagedRequests.add(request);
                mWaitingRequests.put(cacheKey, stagedRequests);
                if (VolleyLog.DEBUG) {
                    VolleyLog.v("Request for cacheKey=%s is in flight, putting on hold.", cacheKey);
                }
            } else {
                // Insert 'null' queue for this cacheKey, indicating there is now a request in
                // flight.
                mWaitingRequests.put(cacheKey, null);
                mCacheQueue.add(request);
            }
            return request;
        }
    }
RequestQueue 中维护了两个基于优先级的 Request 队列,缓存请求队列mCacheQueue和网络请求队列mNetworkQueue。放在缓存请求队列中的 Request,将通过缓存获取数据;放在网络请求队列中的 Request,将通过网络获取数据;维护了一个正在进行中,尚未完成的请求集合mCurrentRequest;维护了一个等待请求的集合,如果一个请求正在被处理并且可以被缓存,后续的相同 url 的请求,将进入此等待队列mWaitingRequests。
add方法中,先将传入的request设置自身所在的RequestQueue,然后使用mCurrentRequests保存request,设置request在当前队列中的序列号,之后判断,request是否需要缓存,如果不缓存直接添加到网络请求队列,否则的话,先判断这个request是否曾经进入过队列,request.getCacheKey()默认返回的是请求的URL,如果该请求不是第一次处理,在进入mCacheQueue之前,可能回被加入mWaitingRequests(如果有相同url的请求正在处理)。作用是避免重复的请求多次执行,提高请求速度。当请求处理完之后,会检查mWaitingRequests是否有等待的请求,并全部加入缓存队列。
总结
Volley中最核心的是RequestQueue,首先在其start方法中会默认开启一个缓存线程和四个网络线程,开启线程是最主要的参数是RequestQueue维护的mCacheQueue和mNetworkQueue,在add方法中根据一定规则向这两个请求队列添加request请求。以上就是RequestQueue的主要流程,下一次我们将继续分析Volley的网络线程和缓存线程。
