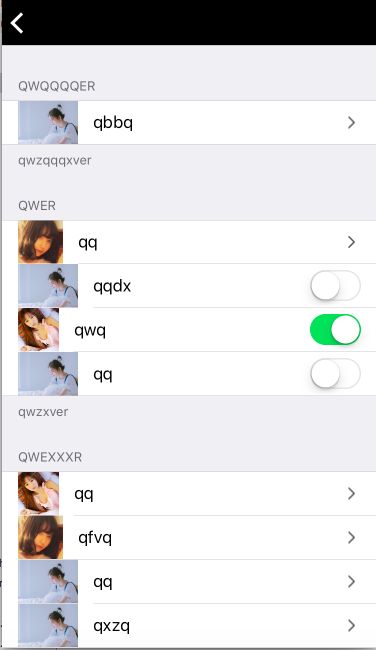
实现效果
如图:
做法
新建一个类继承自UITableViewController。思想:整个TableView所呈现出来的样子(包括多少组,每组多少行,每行的内容,头尾标题)都由数据模型决定。这里,建立了两个数据模型,分别是行模型、组模型,让组模型包含若干行模型。
行模型
- 目的:解决每一行(cell)显示什么内容
- 步骤:
1.新建一个类继承自NSOjbect;
2.在.h中声明cell所要展示的数据,并提供类的快速创建方法
@interface PDsetItems : NSObject

@property(nonatomic,strong) UIImage *icon;    //图片
@property(nonatomic,copy)NSString *title;    //文字
//类方法
+(instancetype)itemsWithIcon:(UIImage *)icon title:(NSString *)title;

@end
3.在.m中实现上面声明的方法
@implementation PDsetItems

+(instancetype)itemsWithIcon:(UIImage *)icon title:(NSString *)title{
    PDsetItems *item = [[self alloc] init];    // 新建对象,因为类方法中不能拿到自身的属性
    item.icon = icon;    //保存外界所给的数据
    item.title = title;

    return item;
}

@end
组模型
- 目的:解决每一组显示什么内容
- 步骤:
1.新建一个类继承自NSOjbect;
2.在.h中声明每组所要展示的数据,并提供类的快速创建方法
@interface PDsetGroup : NSObject

@property(nonatomic,copy)NSString *headTitle;   //头、尾标题
@property(nonatomic,copy)NSString *footTitle;
@property(nonatomic,strong)NSArray *items;   //行模型数组

+(instancetype)groupWithItems:(NSArray *)items;   //类方法

@end
3.在.m中实现上面声明的方法
@implementation PDsetGroup

+(instancetype)groupWithItems:(NSArray *)items{
    PDsetGroup * group = [[PDsetGroup alloc] init];
    group.items = items;     //保存外界所给的数据

    return group;
}

@end
设置数据
- 步骤:
1.在TableViewController中设置TableView的数据,在.m中声明组数组,用于暂时保存组模型对象
@interface PDsetTableViewController ()
@property(nonatomic,strong)NSMutableArray *groups;
 //其中包含多个组模型对象,每个组模型对象由包含头尾标题和多个行模型,于是就保存了整个TableView要展示的数据
@end
2.实现它的懒加载
-(NSMutableArray *)groups{
  if(!_groups){
      _groups = [NSMutableArray array];
  }
  return _groups;
}
3.创建行模型、组模型,并保存起来。下面设置某一组的数据
-(void)setGroup1{
    //设置行模型的数据
    PDsetItems *item11 = [PDsetItems itemsWithIcon:[UIImage imageNamed:@"meizi1"] title:@"qq"];   //创建行模型 对象,一个对象就是一行
    PDsetItems *item12 = [PDsetItems itemsWithIcon:[UIImage imageNamed:@"dare2"] title:@"qqdx"];
    PDsetItems *item13 = [PDsetItems itemsWithIcon:[UIImage imageNamed:@"meizi2"] title:@"qwq"];
    PDsetItems *item14 = [PDsetItems itemsWithIcon:[UIImage imageNamed:@"dare2"] title:@"qq"];

    NSArray *items2 = @[item11,item12,item13,item14];    //将各个行模型对象 放进一个 数组,得到一个组

    //设置组模型的数据
    PDsetGroup *group = [PDsetGroup groupWithItems:items2];   //创建组模型对象(上面的组作为参数),一个对象就是一个组
    group.headTitle = @"qwer";
    group.footTitle = @"qwzxver";

    [self.groups addObject:group];   //把组模型对象 存入组数组中
}
由以上设置好的数据,决定整个TableView的样子
4.告诉TableView有多少组
- (NSInteger)numberOfSectionsInTableView:(UITableView *)tableView {
    return self.groups.count;     //组数
}
5.告诉TableView有多少行
- (NSInteger)tableView:(UITableView *)tableView numberOfRowsInSection:(NSInteger)section {

    PDsetGroup *group = self.groups[section];    //第section组
    return group.items.count;    //行数
}
6.告诉TableView每一行显示的内容
- (UITableViewCell *)tableView:(UITableView *)tableView cellForRowAtIndexPath:(NSIndexPath *)indexPath {
    static NSString *SET = @"cell";

    UITableViewCell *cell = [tableView dequeueReusableCellWithIdentifier:SET];
    if(cell == nil)
        cell = [[UITableViewCell alloc] initWithStyle:UITableViewCellStyleDefault reuseIdentifier:SET];

    //设置数据
    PDsetGroup *group = self.groups[indexPath.section];   //取出组模型
    PDsetItems *item = group.items[indexPath.row];   //取出行模型

    cell.imageView.image = item.icon;    //设置
    cell.textLabel.text = item.title;

    return cell;
}
7.设置tableView的头尾标题
- (NSString *)tableView:(UITableView *)tableView titleForHeaderInSection:(NSInteger)section{
    PDsetGroup * g = self.groups[section];
    return g.headTitle;
}
- (NSString *)tableView:(UITableView *)tableView titleForFooterInSection:(NSInteger)section{
    PDsetGroup * g = self.groups[section];
    return g.footTitle;
}
8.添加右侧视图(箭头、开关)
做法:再新建两个模型PDsetArrowItem、PDsetSwitchItem,分别继承自行模型PDsetItems,然后创建,使用。
- 声明
开关有状态(开/关),所以在PDsetSwitchItem中要增加一个属性,在其.h中
@interface PDsetSwitchItem : PDsetItems

@property(nonatomic,assign,getter=isOn)BOOL on;

@end
- 创建
使用时的区别在于用什么类来创建
     //创建带右侧箭头的
    PDsetItems *item11 = [PDsetArrowItem itemsWithIcon:[UIImage imageNamed:@"meizi1"] title:@"qq"];
    //创建带右侧开关的
    PDsetSwitchItem *item12 = [PDsetSwitchItem itemsWithIcon:[UIImage imageNamed:@"dare2"] title:@"qqdx"];
    item12.on = YES;   //设置开关状态
- 设置数据
  //设置数据
    PDsetGroup *group = self.groups[indexPath.section];    //取出组模型
    PDsetItems *item = group.items[indexPath.row];   //取出行模型

    cell.imageView.image = item.icon;   //设置
    cell.textLabel.text = item.title;

    //设置右侧视图
    if([item isKindOfClass:[PDsetArrowItem class]])
        //  设置箭头图片
        cell.accessoryView = [[UIImageView alloc] initWithImage:[UIImage imageNamed:@"A"]];

    else if([item isKindOfClass:[PDsetSwitchItem class]]){
        //设置开关
        PDsetSwitchItem *swItem = (PDsetSwitchItem *)item;    //先转换类型
        UISwitch *sw = [[UISwitch alloc] init];
        sw.on = swItem.isOn;
        cell.accessoryView = sw;   //添加开关
    }else
        cell.accessoryView = nil;
实现点击cell跳转控制器
思路:只有带箭头的cell才能跳转,为这种cell绑定一个控制器(行模型中添加一个属性-目标控制器),当cell被点击,跳转到这个控制器。
在行模型PDsetArrowItem的.h中增加属性
@interface PDsetArrowItem : PDsetItems

@property(nonatomic,assign)Class desVC;   //绑定的目标控制器

@end
创建完行模型对象后,给它绑定控制器
    PDsetArrowItem *item01 = [PDsetArrowItem itemsWithIcon:[UIImage imageNamed:@"dare2"] title:@"qbbq"];

    item01.desVC = [PDpushVC class];
代理方法,点击cell后跳转
//点击某cell时调用
- (void)tableView:(UITableView *)tableView didSelectRowAtIndexPath:(NSIndexPath *)indexPath{
    //取出组模型
    PDsetGroup *group = self.groups[indexPath.section];
    //取出行模型
    PDsetItems *item = group.items[indexPath.row];

    if([item isKindOfClass:[PDsetArrowItem class]]){
        PDsetArrowItem *itemA = (PDsetArrowItem *)item;

        if(itemA.desVC){     //有绑定VC 才跳转
            UIViewController *VC = [[itemA.desVC alloc] init];
            VC.navigationItem.title = item.title;
            VC.view.backgroundColor = [UIColor magentaColor];
            [self.navigationController pushViewController:VC animated:YES];
        }
    }
}
