WebGL基础(五)

这一节讲一下纹理的知识,上一节已经了解了如何绘制彩色的图形,如何内插出平滑的颜色渐变效果,虽然这种方法很强大,但是更复杂的情况下仍然不够用,所以用到了纹理映射的知识,就是讲一张真实的图片帖到一个图像上。这样图形看上去就是这张图片,这张图像又叫纹理图。下面以一个简单的例子说明。

// TexturedQuad.js (c) 2012 matsuda and kanda
// Vertex shader program
var VSHADER_SOURCE =
  'attribute vec4 a_Position;\n' +
  'attribute vec2 a_TexCoord;\n' +
  'varying vec2 v_TexCoord;\n' +
  'void main() {\n' +
  '  gl_Position = a_Position;\n' +
  '  v_TexCoord = a_TexCoord;\n' +
  '}\n';

// Fragment shader program
var FSHADER_SOURCE =
  '#ifdef GL_ES\n' +
  'precision mediump float;\n' +
  '#endif\n' +
  'uniform sampler2D u_Sampler;\n' +
  'varying vec2 v_TexCoord;\n' +
  'void main() {\n' +
  '  gl_FragColor = texture2D(u_Sampler, v_TexCoord);\n' +
  '}\n';

function main() {
  // Retrieve  element
  var canvas = document.getElementById('webgl');

  // Get the rendering context for WebGL
  var gl = getWebGLContext(canvas);
  if (!gl) {
    console.log('Failed to get the rendering context for WebGL');
    return;
  }

  // Initialize shaders
  if (!initShaders(gl, VSHADER_SOURCE, FSHADER_SOURCE)) {
    console.log('Failed to intialize shaders.');
    return;
  }

  // Set the vertex information
  var n = initVertexBuffers(gl);
  if (n < 0) {
    console.log('Failed to set the vertex information');
    return;
  }

  // Specify the color for clearing 
  gl.clearColor(0.0, 0.0, 0.0, 1.0);

  // 配置纹理
  if (!initTextures(gl, n)) {
    console.log('Failed to intialize the texture.');
    return;
  }
}

function initVertexBuffers(gl) {
  var verticesTexCoords = new Float32Array([
    // 顶点坐标,纹理坐标
    -0.5,  0.5,   0.0, 1.0,
    -0.5, -0.5,   0.0, 0.0,
     0.5,  0.5,   1.0, 1.0,
     0.5, -0.5,   1.0, 0.0,
  ]);
  var n = 4; // The number of vertices

  // Create the buffer object
  var vertexTexCoordBuffer = gl.createBuffer();
  if (!vertexTexCoordBuffer) {
    console.log('Failed to create the buffer object');
    return -1;
  }

  // 将数据写入缓冲区
  gl.bindBuffer(gl.ARRAY_BUFFER, vertexTexCoordBuffer);
  gl.bufferData(gl.ARRAY_BUFFER, verticesTexCoords, gl.STATIC_DRAW);

  var FSIZE = verticesTexCoords.BYTES_PER_ELEMENT;
  //Get the storage location of a_Position, assign and enable buffer
  var a_Position = gl.getAttribLocation(gl.program, 'a_Position');
  if (a_Position < 0) {
    console.log('Failed to get the storage location of a_Position');
    return -1;
  }
  gl.vertexAttribPointer(a_Position, 2, gl.FLOAT, false, FSIZE * 4, 0);
  gl.enableVertexAttribArray(a_Position);  // Enable the assignment of the buffer object

  // Get the storage location of a_TexCoord
  var a_TexCoord = gl.getAttribLocation(gl.program, 'a_TexCoord');
  if (a_TexCoord < 0) {
    console.log('Failed to get the storage location of a_TexCoord');
    return -1;
  }
  // Assign the buffer object to a_TexCoord variable
  gl.vertexAttribPointer(a_TexCoord, 2, gl.FLOAT, false, FSIZE * 4, FSIZE * 2);
  gl.enableVertexAttribArray(a_TexCoord);  // Enable the assignment of the buffer object

  return n;
}

function initTextures(gl, n) {
  var texture = gl.createTexture();   // Create a texture object
  if (!texture) {
    console.log('Failed to create the texture object');
    return false;
  }

  // 创建纹理对象
  var u_Sampler = gl.getUniformLocation(gl.program, 'u_Sampler');
  if (!u_Sampler) {
    console.log('Failed to get the storage location of u_Sampler');
    return false;
  }
  var image = new Image();  // Create the image object
  if (!image) {
    console.log('Failed to create the image object');
    return false;
  }
  // 注册图像加载事件响应函数
  image.onload = function(){ loadTexture(gl, n, texture, u_Sampler, image); };
  // 浏览器加载图像
  image.src = '../resources/sky.jpg';

  return true;
}

function loadTexture(gl, n, texture, u_Sampler, image) {
  gl.pixelStorei(gl.UNPACK_FLIP_Y_WEBGL, 1); //对纹理图像进行y轴翻转
  // 开启0号纹理单元
  gl.activeTexture(gl.TEXTURE0);
  //向target绑定纹理对象
  gl.bindTexture(gl.TEXTURE_2D, texture);

  // 配置纹理参数
  gl.texParameteri(gl.TEXTURE_2D, gl.TEXTURE_MIN_FILTER, gl.LINEAR);
  // 配置纹理图像
  gl.texImage2D(gl.TEXTURE_2D, 0, gl.RGB, gl.RGB, gl.UNSIGNED_BYTE, image);
  
  // 将0号纹理传递给着色器
  gl.uniform1i(u_Sampler, 0);
  
  gl.clear(gl.COLOR_BUFFER_BIT);   // Clear 

  gl.drawArrays(gl.TRIANGLE_STRIP, 0, n); // 绘制矩形
}
WebGL基础(五)_第1张图片
运行结果图

这段程序主要分为五个部分:
1、顶点着色器中接收顶点的纹理坐标,光栅化后传递给片元着色器;
2、片元着色器根据片元的纹理坐标,从纹理图像中抽取出纹理颜色,赋给当前片元
3、设置顶点的纹理坐标;
4、准备待加载的纹理图像,令浏览器读取它;
5、监听纹理图像的加载事件,一旦加载完成,就在WebGL系统中使用纹理(loadTexture())。
下面主要讲一下配置和加载纹理部分:
1、gl.createTexture()


WebGL基础(五)_第2张图片
创建纹理

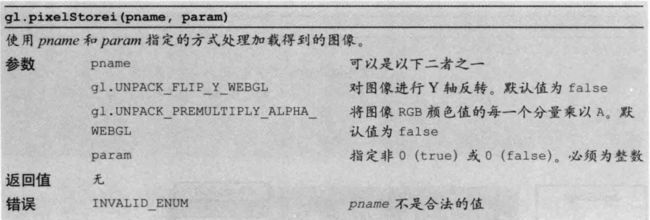
2、 gl.pixelStorei(gl.UNPACK_FLIP_Y_WEBGL, 1); //对纹理图像进行y轴翻转
webGl中的纹理坐标系统是个PNG、BMP、JPG等格式图片的额坐标系统Y轴方向是相反的,所以要先将Y周反转才能使用。

WebGL基础(五)_第3张图片
pixelStorei

3、 gl.activeTexture(gl.TEXTURE0);激活纹理0
WebGL默认至少支持8个纹理单元,要使用它必须先激活它。


WebGL基础(五)_第4张图片
activeTexture

4、 gl.bindTexture(gl.TEXTURE_2D, texture);绑定纹理对象


WebGL基础(五)_第5张图片
bindTexture

本方法主要完成两个任务,开启纹理对象以及将纹理对象绑定到纹理单元上。
5、gl.texParameteri() 配置纹理参数
WebGL基础(五)_第6张图片
texParameteri

其中参数设置如下:
WebGL基础(五)_第7张图片
pname

WebGL基础(五)_第8张图片
效果图

param参数设置如下:


WebGL基础(五)_第9张图片
param

6、 gl.texImage2D()将纹理图像分配给纹理对象
WebGL基础(五)_第10张图片
texImage2D

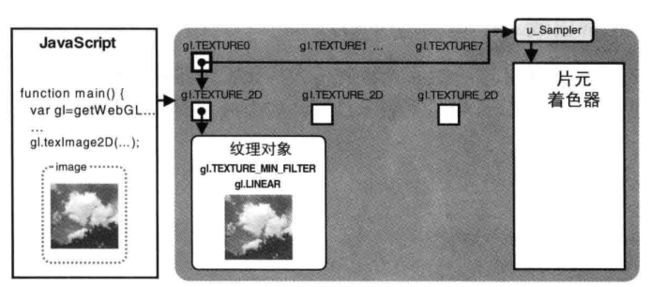
执行这条语句。IMage对象中的图像就从javascript传入WebGL中,并存储在纹理对象中。
WebGL基础(五)_第11张图片

WebGL基础(五)_第12张图片

7、 gl.uniform1i()纹理单元传递给着色器
WebGL基础(五)_第13张图片
纹理单元分配

你可能感兴趣的:(WebGL基础(五))