本篇的目的是要了解:
- es6 静态方法
- es6 default参数
- 常用的几何数据结构:Point/Size/Circle/Rect/Arc
- 了解常用的canvas2d绘图方法
- 为了BLFRender添加clear/drawRect/drawCircle/drawArc方法
1. 添加BLFUtil类,所有的辅助方法以静态方式在该类中实现(es6美丽的static关键字)
将要用到弧度/角度转换的操作,封装在BLFUtil中:
class BLFUtil {
    static toRadian(degree) {
        return degree * Math.PI / 180.0;
    }

    static toDegree(radian) {
        return radian * 180.0 / Math.PI;
    }
}
2. 添加一些几何数据结构
- 用到哪些结构就添加哪些,随着代码增多,几何数据结构会越来越丰富
- 每个几何数据结构的构造函数使用default参数进行default构造(如果用户没有提供参数的话)
- 每个结构的成员方法,根据编写过程逐渐抽象定义出来。目前都是比较简单的纯数据结构。软件的开发就是一个逐步抽象,逐步重构的过程。架构,类,方法,属性等都是随着需求越来越明确,需不断调整。
点数据结构(default[0,0]):
class Point {
    constructor(x = 0, y = 0) {
        this.x = x;
        this.y = y;
    }
}
尺寸数据结构(default[100,100]):
class Size {
    constructor(width = 100, height = 100) {
        this.width = width;
        this.height = height;
    }
}
圆数据结构(圆心+半径定义一个圆,default[0,0,100]):
//圆心+半径确定一个圆
class Circle {
    constructor(x = 0, y = 0, radius = 100) {
        this.x = x;
        this.y = y;
        this.radius = radius;
    }
}
圆弧数据结构:(default情况下以圆心为【0,0】,半径为50px,顺时针方向绘制一个封闭的半圆
class Arc {
    //以角度而非弧度为输入参数
    constructor(x = 0, y = 0, radius = 50, startAngle = 0, endAngle = 180.0, closed = true, ccw = false) {
        this.x = x;
        this.y = y;
        this.radius = radius;
        this.startAngle = startAngle;
        this.endAngle = endAngle;
        this.isClosed = closed; //是否封闭圆弧,default为true
        this.isCCW = ccw; //是否逆时针方向绘制,default为false,使用顺时针方向绘制
    }
}
Arc数据结构相对复杂,具体解释在下面的drawArc方法中
3. BLFRender中增加如下方法:
获取当前绘图表面的尺寸(width/height)
 getCanvasWidth() {
        return (this.context.canvas.width);
 }

 getCanvasHeight() {
        return (this.context.canvas.height);
 }
清屏函数,在动画中经常需要进行重绘,需要清屏操作
clear(rect = new Rect(0, 0, this.getCanvasWidth(), this.getCanvasHeight())) {
        //alert(rect.width);
        //alert(rect.height);
        this.context.clearRect(rect.x, rect.y, rect.width, rect.height);
 }
- render.clear()调用时 default情况下,清除整个屏幕。
- render.clear(new Rect(100,100,50,50))调用时,清除局部脏矩形
- js作为动态语言,其default参数的值可以计算获得,很棒!(default rect.width/rect.height 来自getCanvasWidth/Height函数)
- 清屏使用了canvas2d的clearRect方法.
绘制矩形:
drawRect(rc, style = "red", isFill = true) {

        let ctx = this.context;

        ctx.save(); //当前渲染属性进栈

        //清除掉当前路径中的所有子路径
        ctx.beginPath();

        //填充还是描边绘制
        if (isFill) {
            ctx.fillStyle = style;
            ctx.fillRect(rc.x, rc.y, rc.width, rc.height);
        } else {
            ctx.strokeStyle = style;
            ctx.strokeRect(rc.x, rc.y, rc.width, rc.height);
        }

        ctx.restore(); //当前渲染属性出栈
    }
- 矩形绘制使用canvas2d提供的简便方法:strokeRect/fillRect
- 之所以是简便方法是因为:strokeRect/fillRect这两个方法是canvas2d rect/fill/stroke 这些方法的简写形式。
测试效果:
绘制圆:
drawCircle(circle, style = "red", isFill = true) {

        let ctx = this.context;

        ctx.save();

        ctx.beginPath(); //清除当前路径列表中的所有子路径

        //圆弧绘制【0,2PI】形成一个圆
        ctx.arc(circle.x, circle.y, circle.radius, 0.0, Math.PI * 2.0, true);

        //设置样式
        if (isFill) {
            ctx.fillStyle = style;
            ctx.fill();
        } else {
            ctx.strokeStyle = style;
            ctx.stroke();
        }

        ctx.restore();
    }
测试效果:
绘制圆弧:
drawArc(arc, style = "red", isFill = true) {

        let ctx = this.context;

        ctx.save();

        ctx.beginPath(); //清除当前路径列表中的所有子路径

        ctx.arc(arc.x, arc.y, arc.radius, BLFUtil.toRadian(arc.startAngle), BLFUtil.toRadian(arc.endAngle), arc.isCCW);
        if (arc.isClosed)
            ctx.closePath();

        //设置样式
        if (isFill) {
            ctx.fillStyle = style;
            ctx.fill();
        } else {
            ctx.strokeStyle = style;
            ctx.stroke();
        }

        ctx.restore();
    }
我们规定了使用角度表示起始和结束角度,需要调用BLFUtil.toRadian方法进行角度转弧度
如果不使用isClosed = true,则圆弧不会自动封闭的(除非是【0,360】绘制圆弧)。要自动封闭圆弧路径,指定isClosed=true,则代码会调用context.closePath方法进行路径自动封闭操作
现在重点来说一下Arc的起始角和结束角以及角度方向问题:
- canvas2d中,x轴向右,y轴向下
- 坐标系总是如图表示,和我们初中数学中的象限表示有出入
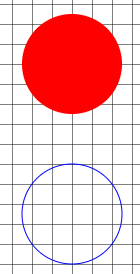
- 看一下如下代码及效果,就可以知道Arc如何使用:
红色为isCCW = false,蓝色为isCCW=true。
相同的圆心,半径,起始角,结束角,不同的绘制方向,形成了一个封闭的圆!
方向的不同导致绘制效果不同,请大家深入体会一下!
还有很多细节没有深入探讨,以后有的是时间,会慢慢道来。
让我们深度的掌握canvas2d吧。
掌握了canvas2d,其他类库其实都差不多的。


