玩转贝塞尔曲线
- 历史:由法国雷诺汽车的工程师皮诺尔·贝塞尔发明,应用于雷诺汽车设计
- 原理铺垫:给定
n+1个数据点,生产一条曲线,使得该曲线与这些点所连接的折线相近。第一个demo
- 以
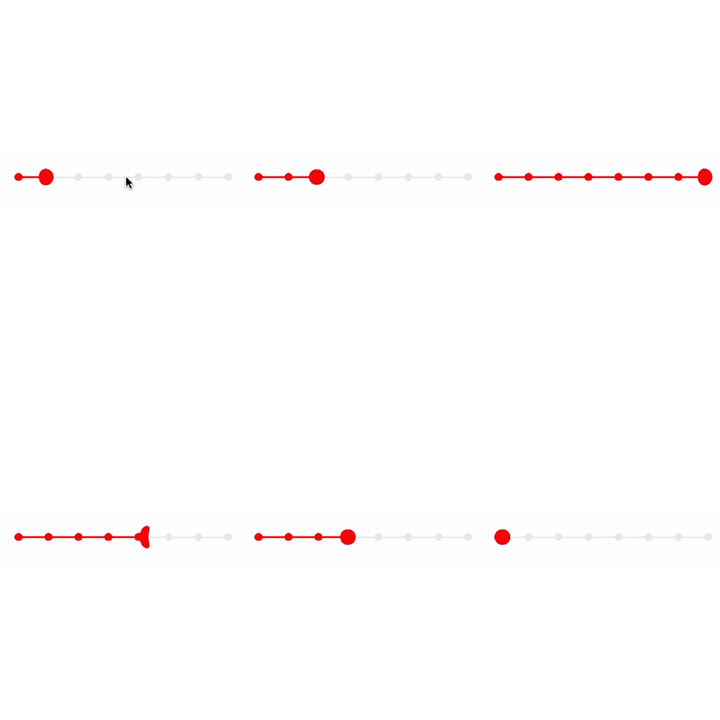
KYAnimatedPageControl(粘性小球) 为例- 谈谈iOS中粘性动画以及果冻效果的实现
- 粘性小球会根据移动距离的大小拥有不同的弹性程度。移动距离越大,弹性效果越明显。
代码
思路:一个小球用四条贝塞尔曲线平分拼成,链接完成之后向内填充颜色。然后,再单独控制每条贝塞尔曲线的形状,实时调用
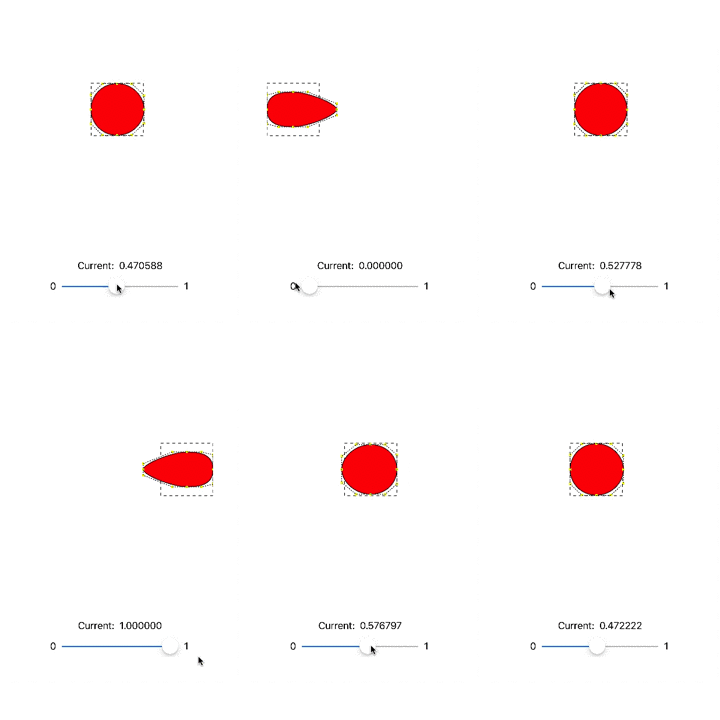
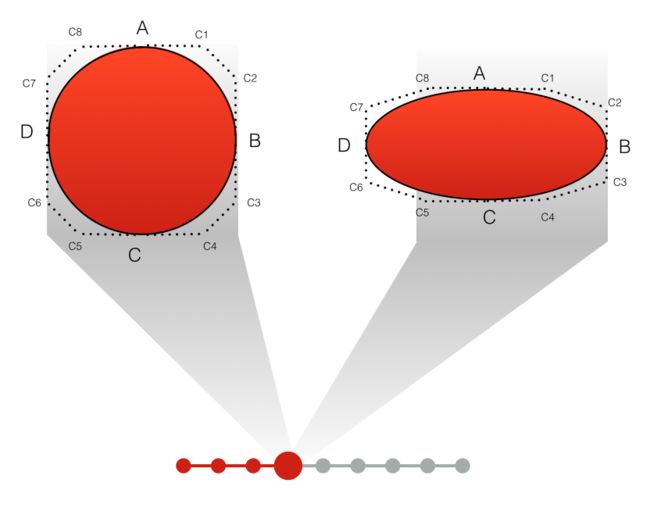
layer的[self setNeedsDisplay]以重绘- (void)drawInContext:(CGContextRef)ctx方法。其中每条弧线都有两个控制点(学过的应该有印象)。为了方便传达理念,已以下形式展示这一思路。
- 代码
小球是由弧AB、弧BC、弧CD、弧DA 四段组成,其中每段弧都绑定两个控制点:弧AB 绑定的是 C1 、 C2;弧BC 绑定的是 C3 、 C4...
问题:这些点应该以什么样的规律运动?
- 为了方便计算各个点的坐标,引入外接矩形(图中虚线)
首先计算出这个外接矩形的位置:根据中心点的
(x,y)分别减去矩形(宽,高)的1/2获得。//outsideRectSize 是外接矩形边长 // 外接矩形 x CGFloat origin_x = self.position.x - outsideRectSize/2 + (pro gress - 0.5) * (self.frame.size.width - outsideRectSize); // 外接矩形 y CGFloat origin_y = self.position.y - outsideRectSize/2; // 设置外接矩形的frame self.outsideRect = CGRectMake(origin_x, origin_y, outsideRect Size, outsideRectSize);
- 个人理解:代码里的
progress代表着上面视图中滑块0~1的值。计算外接矩形 X值时,...+ (pro gress - 0.5) * (self.frame.size.width - outsideRectSize)这个部分代码,代表着矩形在向左右移动的过程中,向左移B点,向右移D点,这两点在移动过程中的缓冲区。其次还需要判断当前是向左移还是右移,左移的时候B动D不动;右移的时候D动B不动。(动:指的是需不需要有缓冲区)
//只要外接矩形在左侧,则改变B点;在右边,改变D点
  if (progress <= 0.5) {
       self.movePoint = POINT_B;//用枚举代表 B, D 点
       NSLog(@"B点动");
   }else{
       self.movePoint = POINT_D;
       NSLog(@"D点动");
   }
有了矩形的位置,接下来计算关键点的坐标
- (void)drawInContext:(CGContextRef)ctx{
   //A-C1、B-C2... 的距离,当设置为正方形边长的1/3.6倍时,画出来的圆弧完美贴合圆形
   CGFloat offset = self.outsideRect.size.width / 3.6;
   //A.B.C.D实际需要移动的距离.系数为滑块偏离中点0.5的绝对值再乘以2.当滑到两端的时候,movedDistance为最大值:「外接矩形宽度的1/5」.
   CGFloat movedDistance = (self.outsideRect.size.width * 1 / 6) * fabs(self.progress-0.5)*2;
   //方便下方计算各点坐标,先算出外接矩形的中心点坐标
   CGPoint rectCenter = CGPointMake(self.outsideRect.origin.x + self.outsideRect.size.width/2 , self.outsideRect.origin.y + self.outsideRect.size.height/2);
   CGPoint pointA = CGPointMake(rectCenter.x ,self.outsideRect.origin.y + movedDistance);
   CGPoint pointB = CGPointMake(self.movePoint == POINT_D ? rectCenter.x + self.outsideRect.size.width/2 : rectCenter.x + self.outsideRect.size.width/2 + movedDistance*2 ,rectCenter.y);
   CGPoint pointC = CGPointMake(rectCenter.x ,rectCenter.y + self.outsideRect.size.height/2 - movedDistance);
   CGPoint pointD = CGPointMake(self.movePoint == POINT_D ? self.outsideRect.origin.x - movedDistance*2 : self.outsideRect.origin.x, rectCenter.y);
   CGPoint c1 = CGPointMake(pointA.x + offset, pointA.y);
   CGPoint c2 = CGPointMake(pointB.x, self.movePoint == POINT_D ? pointB.y - offset : pointB.y - offset + movedDistance);
    CGPoint c3 = CGPointMake(pointB.x, self.movePoint == POINT_D ? pointB.y + offset : pointB.y + offset - movedDistance);
   CGPoint c4 = CGPointMake(pointC.x + offset, pointC.y);
   CGPoint c5 = CGPointMake(pointC.x - offset, pointC.y);
  CGPoint c6 = CGPointMake(pointD.x, self.movePoint == POINT_D ? pointD.y + offset - movedDistance : pointD.y + offset);
    CGPoint c7 = CGPointMake(pointD.x, self.movePoint == POINT_D ? pointD.y - offset + movedDistance : pointD.y - offset);
  CGPoint c8 = CGPointMake(pointA.x - offset, pointA.y);
  //外接虚线矩形
   UIBezierPath *rectPath = [UIBezierPath bezierPathWithRect:self.outsideRect];
   CGContextAddPath(ctx, rectPath.CGPath);
  CGContextSetStrokeColorWithColor(ctx, [UIColor blackColor].CGColor);
   CGContextSetLineWidth(ctx, 1.0);
   CGFloat dash[] = {5.0, 5.0};
   CGContextSetLineDash(ctx, 0.0, dash, 2); //1
   CGContextStrokePath(ctx); //给线条填充颜色
   //圆的边界
   UIBezierPath* ovalPath = [UIBezierPath bezierPath];
   [ovalPath moveToPoint: pointA];
   [ovalPath addCurveToPoint:pointB controlPoint1:c1 controlPoint2:c2];
   [ovalPath addCurveToPoint:pointC controlPoint1:c3 controlPoint2:c4];
   [ovalPath addCurveToPoint:pointD controlPoint1:c5 controlPoint2:c6];
   [ovalPath addCurveToPoint:pointA controlPoint1:c7 controlPoint2:c8];
   [ovalPath closePath];
    CGContextAddPath(ctx, ovalPath.CGPath);
  CGContextSetStrokeColorWithColor(ctx, [UIColor blackColor].CGColor);
   CGContextSetFillColorWithColor(ctx, [UIColor redColor].CGColor);
   CGContextSetLineDash(ctx, 0, NULL, 0); //2
   CGContextDrawPath(ctx, kCGPathFillStroke); //同时给线条和线条包围的内部区域填充颜色
   //--------------  注:以下代码均为辅助观察  -------------------
  //标记出每个点并连线,方便观察,给所有关键点染色 -- 白色,辅助线颜色 -- 白色
   //语法糖:字典@{},数组@[],基本数据类型封装成对象@234,@12.0,@YES,@(234+12.0)
   CGContextSetFillColorWithColor(ctx, [UIColor yellowColor].CGColor);
   CGContextSetStrokeColorWithColor(ctx, [UIColor blackColor].CGColor);
   NSArray *points = @[[NSValue valueWithCGPoint:pointA],> >[NSValue valueWithCGPoint:pointB],[NSValue valueWithCGPoint:pointC],[NSValue valueWithCGPoint:pointD],[NSValue valueWithCGPoint:c1],[NSValue valueWithCGPoint:c2],[NSValue valueWithCGPoint:c3],[NSValue valueWithCGPoint:c4],[NSValue valueWithCGPoint:c5],[NSValue valueWithCGPoint:c6],[NSValue valueWithCGPoint:c7],[NSValue valueWithCGPoint:c8]];
[self drawPoint:points withContext:ctx];
//连接辅助线
UIBezierPath *helperline = [UIBezierPath bezierPath];
[helperline moveToPoint:pointA];
[helperline addLineToPoint:c1];
[helperline addLineToPoint:c2];
[helperline addLineToPoint:pointB];
[helperline addLineToPoint:c3];
[helperline addLineToPoint:c4];
[helperline addLineToPoint:pointC];
[helperline addLineToPoint:c5];
[helperline addLineToPoint:c6];
[helperline addLineToPoint:pointD];
[helperline addLineToPoint:c7];
[helperline addLineToPoint:c8];
[helperline closePath];
CGContextAddPath(ctx, helperline.CGPath);
CGFloat dash2[] = {2.0, 2.0};
CGContextSetLineDash(ctx, 0.0, dash2, 2);
CGContextStrokePath(ctx); //给辅助线条填充颜色
}
//在某个point位置画一个点,方便观察运动情况
- (void)drawPoint:(NSArray *)points withContext:(CGContextRef)ctx{
for (NSValue *pointValue in points) {
CGPoint point = [pointValue CGPointValue];
CGContextFillRect(ctx, CGRectMake(point.x - 2,point.y - 2,4,4));
}
}
代码中`ctx`字面意思是上下文,你可以理解为一块全局的画布。也就是说,一旦在某个地方改了画布的一些属性,其他任何使用画布的属性的时候都是改了之后的。比如上面在 `//1` 中把线条样式改成了虚线,那么在下文 `//2` 中如果不恢复成连续的直线,那么画出来的依然是`//1`中的虚线样式。

>* **个人理解:**
>
>* **结合上面后两张图片分析**:假设向左移动,发现外接矩形以相同的速度向左移动,随着移动,发现`c7,c6`两控制点在`y`轴并不会改变;`c8,c5`在`x`轴不变的情况下,`y`轴向内移动,`c1,c4`控制点与其保持平行,同时`x`轴相对不变;`c2,c3`以相同的比例向内靠近。**猜测**该向内靠近的多少与缓冲区有关连。向右移动同理。
相关阅读
- 谈谈iOS中粘性动画以及果冻效果的实现
- QQ中未读气泡拖拽消失的实现分析
- CADisplayLink结合UIBezierPath的神奇妙用
注意:该笔记内容暂且待定,我觉得有必要加深一下内功,务实基础。先读读《iOS核心动画高级技巧》。


