1. 准备
1.1 学习契机:
近日学习如何写JS插件,难点一是功能,二是语法。在实践中发现对于原型链的理解有些遗忘,于是重新学习一遍。
1.2 学习教程:原型继承——廖雪峰的官方网站
2. 学习内容:
原型链继承:如何将链1改造为链2
链1:new PrimaryStudent() ----> PrimaryStudent.prototype ----> Object.prototype ----> null
链2:new PrimaryStudent() ----> PrimaryStudent.prototype ----> Student.prototype ----> Object.prototype ----> null
在实践中用到的两个类:
// 基类的声明

// 1. 构造函数方法,创建类的属性
function Student(props) {
    this.name = props.name || 'Unnamed';
}
// 2. 原型模式,定义共享方法
Student.prototype.hello = function () {
    alert('Hello, ' + this.name + '!');
}
// 继承类的声明

// 使用构造函数方法,在Student类的基础上,添加了一个自有属性grade
function PrimaryStudent(props) {
    // 调用Student构造函数,绑定this变量
    // 仅仅传递构造函数内的属性与方法,不传递在原型对象上定义的方法
    Student.call(this, props);
    this.grade = props.grade || 1;
}
在以上的声明步骤中,仅仅是使PrimaryStudent类获得了与Student类相同的属性,两者在原型链上还是毫无关系的。
接下来就是要绑定原型链了。
目标是从【原型链一】变成【原型链二】
3. 学习过程
我们分几种情况来讨论:
第一种,最简单粗暴而且错误的方法:
PrimaryStudent.prototype = Student.prototype;
乍一看好像真的没有问题哇,试试看就知道问题出在哪里了。
log = console.log.bind(console);

function Student(props) {
    this.name = props && props.name || 'Unnamed';
}

// 给Student类加一个公共方法 hello
Student.prototype.hello = function () {
    log('Hello, ' + this.name + '!');
}

// 给PrimaryStudent类加一个公共方法 bye
PrimaryStudent.prototype.bye = function () {
    log('bye, ' + this.name + '!');
}

function PrimaryStudent(props) {
    // 调用Student构造函数,绑定this变量:
    Student.call(this, props);   // 此处无法实现原型链的绑定
    this.grade = props.grade || 1;
}

// (1)
PrimaryStudent.prototype = Student.prototype;

var xm = new PrimaryStudent({name:'xiaoMing'});
var sm = new Student({name: 'siMin'})
xm.bye();         // bye, xiaoMing!
sm.bye();         // bye, siMin!
出现问题:
明明只想给子类PrimaryStudent添加一个bye的方法,结果Student也有了。
原因分析:
语句(1)看似生成单向指向→ (PrimaryStudent的原型 → Student的原型),但实际形成了双向绑定。这就导致了primaryStudent与Student共享一个原型对象,primaryStudent类不能添加自己私有的新方法。primaryStudent原型添加新方法时,会同时修改Student的原型。
错误总结:
原型链的重要作用就是,保证单向的传递(从父类到子类),不能反向修改(子类修改父类)。
第二种,过桥函数:
根据上一种方法,我们可以得出,要实现原型链的正确拼接,意味着要切断双向传递,并且保证单向传递的动态性,即父类的变化可以体现在子类中但子类的变化与父类无关。
使用一个过桥空函数F,完成原型链的拼接。
//  首先创建空构造函数F
function F() {}

// (2)
F.prototype = Student.prototype;    // 双向指向

// (3)   new 操作是单向绑定的,从F的原型对象传递给PrimaryStudent的原型对象
// PrimaryStudent.prototype = new F();  // 单向指向
在这个实践中,F函数起到的作用是,通过“语句(2)双向绑定”+“语句(3)单向传递”,实现了我们的目标效果“父类到子类的单向传递”。
我们来测试一下看看会不会有什么问题。
// 两个类,实例化
var xm = new PrimaryStudent({name:'xiaoMing'});
var sm = new Student({name: 'siMin'})

// 首先,测试父类到子类的流向,是通路吗
// 我们为父类student添加新方法 helloAgain
Student.prototype.helloAgain = function () {
    log('hello again!' + this.name + '!')
}
xm.hello();      // Hello, xiaoMing!
sm.hello();      // Hello, siMin!
sm.helloAgain();      // hello again!siMin!
xm.helloAgain();        // hello again!xiaoMing!
// 测试通过,子类可执行父类的新原型方法
// 可执行意味着子类的原型对象具有这个方法,或它所在的原型链上游的原型对象具有此方法

// 接下来,试一下primaryStudent到Student通路是否被切断
// 我们为子类PrimaryStudent添加新方法 bye
PrimaryStudent.prototype.bye = function () {
    log('bye, ' + this.name + '!');
}
xm.bye();        // bye, xiaoMing!
sm.bye();        // Uncaught TypeError: sm.bye is not a function

// 父类实例sm没有bye方法,子类实例xm有bye方法
// 测试通过,子类不可改变父类的原型对象
原因分析:
- 在利用空函数F的这个过程中,究竟发生了什么?
语句(2)F.prototype = Student.prototype;,与方法一本质相同,双向绑定了F与Student两个类,即指向了同一个原型对象,建立了PrimaryStudent与Student间的双向绑定。
语句(3)PrimaryStudent.prototype = new F();,通过new关键字,实现了F类原型对象向PrimaryStudent类原型对象的单向传递,也就是这一关键步骤,切断了PrimaryStudent与F之间的双向绑定,间接切断了PrimaryStudent与Student之间的双向绑定。 - 那么new关键字,究竟做了什么,实现了单向传递呢?
以new Foo()为例:
Step 1,创建新的对象obj,继承自Foo.prototype
obj = new Object();
obj.__proto__ = Foo.prototype;
利用对象实例的proto属性,实现单向传递
Step 2,把传入构造函数的参数绑定到新对象obj中;绑定this
Step 3,返回对象obj
参考资料:new 操作符 —— MDN
When the code new Foo(...) is executed, the following things happen:
- A new object is created, inheriting from Foo.prototype.
- The constructor function Foo is called with the specified arguments, and with this bound to the newly created object. new Foo is equivalent to new Foo(), i.e. if no argument list is specified, Foo is called without arguments.
- The object returned by the constructor function becomes the result of the whole new expression. If the constructor function doesn't explicitly return an object, the object created in step 1 is used instead. (Normally constructors don't return a value, but they can choose to do so if they want to override the normal object creation process.)
方法封装:
过桥函数F所起的作用,是可以被封装起来的。
function inherits(Child, Parent) {
    var F = function () {};
    F.prototype = Parent.prototype;
    Child.prototype = new F();
    Child.prototype.constructor = Child;
}

// 实现原型继承链:
inherits(PrimaryStudent, Student);
第三种方法:
在实践验证第二种方法的过程中,发现new操作符的神奇作用,于是有一个新想法:既然new可以单向,那么用new来单向连接sutdent会发生什么?
PrimaryStudent.prototype = new Student();
检验一下
var ss1 = new PrimaryStudent({name: 'ss1'})
var ss2 = new PrimaryStudent({name: 'ss2'})

// 验证:实例共享同一个原型对象
log(ss1.__proto__ == ss2.__proto__)      // true
// 验证:实例可调用父类的方法,说明原型链已成功链接
ss1.hello();                       // Hello, ss1!
ss2.hello();                       // Hello, ss2!

var xm = new PrimaryStudent({name:'xiaoMing'});
var sm = new Student({name: 'siMin'})
// 验证:子类添加原型方法,不影响父类的原型对象
PrimaryStudent.prototype.bye = function () {
    log('bye, ' + this.name + '!');
}
xm.bye()         // bye, xiaoMing!
sm.bye();         // Uncaught TypeError: sm.bye is not a function
// 验证通过,父类的原型对象不变

// 验证:父类新增原型方法,子类可使用
Student.prototype.helloAgain = function () {
    log('hello again!' + this.name + '!')
}
sm.helloAgain();      //  hello again!siMin!
xm.helloAgain();      //  hello again!xiaoMing!
// 验证通过
出现问题:
: ) 这就相当尴尬了,这条PrimaryStudent.prototype = new Student();语句的实现效果与利用过桥函数F的效果是相同的。所以空函数F的用与不用,有什么不同呢?
问题总结:
看了原教程下面的讨论区,大家一致的意见都是,两种方法都可以实现目标效果,但是使用过桥函数F,可以清空构造函数里的属性,避免污染,造成原型对象的膨胀
第四种方法:方法二与方法三的结合:
在方法二中,我们使用空函数F,获得了一个干净的原型对象;
在方法三中,我们便利地实现了原型链绑定;
有没有什么办法可以取两者优点?
操作如下:
PrimaryStudent.prototype = Object.create(Student.prototype);
原因分析:
Object.create(Student.prototype),创建了一个干净的原型对象,其包含了Student原型对象的属性与方法,但并不通过构造函数去调用它,因此可以省去构造函数执行时的属性赋值(污染)。
这一方法也就是class语法糖的原理。
方法改进:
通过上述操作,当前的PrimaryStudent.prototype.constructor === Student;这个属性并不会影响我们的实际使用。
但是在大部分的情况下,我们还是有必要修正一下PrimaryStudent.prototype.constructor属性,使PrimaryStudent.prototype.constructor === PrimaryStudent。
出现问题:
那么修正constructor属性的意义在于什么?,这是我当时比较困惑的一点,在偶然间看见一篇博客,解答了我的困惑:为什么要做A.prototype.constructor=A这样的修正?
一般情况,我们都通过new Foo()来实例化对象,它实际调用的是Foo构造函数本身,而不是Foo.prototype.constructor,因此constructor属性的指向不会造成影响。
但是当我们显式调用Foo.prototype.constructor来实例化对象时,情况就不同了。而对于constructor属性的修正,也正是为了避免这一情况下的出错。
4. 内容总结
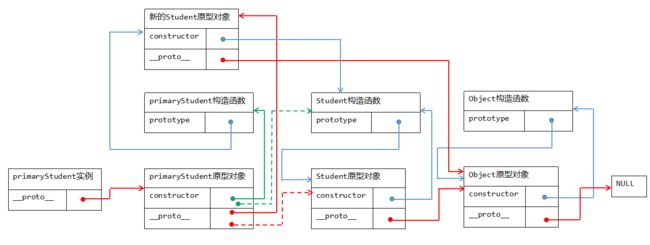
个人比较喜欢看图学习,为了方便理解,对于学习过程中出现的几个结果,进行画图分析,其中红色箭头流代表原型链。绘图结构,参考了高程三中的继承章节。
-
初始声明阶段,对象结构如下:
使用方法一,
PrimaryStudent.prototype = Student.prototype;的错误结果,对象结构如下:
- 使用方法二,过桥空函数F的结果,对象结构如下:
- 使用方法三,
PrimaryStudent.prototype = new Student();的结果,对象结构如下:
- 使用方法四,
PrimaryStudent.prototype = Object.create(Student.prototype);PrimaryStudent.prototype.constructor === PrimaryStudent的结果,对象结构如下:
红色虚线到实现的变化表示执行object.create语句的重新指向;
绿色虚线到实线的变化表示constructor的修正;
4. 个人小结
大概是学习原型链的第三次了,感觉自己是个理解能力十分菜的人,看不懂与学了就忘两种情况贯穿于每一次的学习过程,最近又进入了准备面试的阶段,去年没有好好把握秋招,一点准备都没有地乱投简历,今年寒假要好好储备一下,争取春招时候卖个好人家QAQ 一定要提前做好准备拒绝拖延
距离上一次的技术文档已经过去了三个月,相当不自觉(!)最近的规划是学习高程三,目标是多输出多输出多输出,一定要多写笔记。
以上文章均为基于他人技术文档的个人理解,欢迎指正,欢迎交流!


