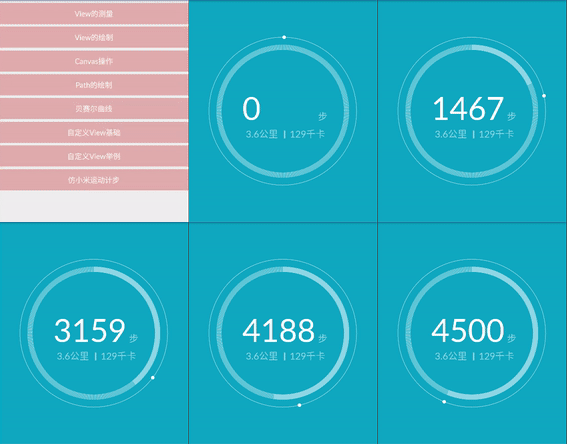
前面主要说了自定义View的一些知识,这篇文章主要是利用自定义View做一个仿小米运动计步功能的控件,如下图所示:
分析一下思路:
1.画背景
2.画一个最外部的圆
3.画圆上的小圆点
4.画竖线,环绕一周
5.画圆环
6.画文字
7.添加动画
为了可以自定义各个控件的显示效果,自定义View的属性还是必要的。
自定义属性
自定义属性主要是自定义了各个部件的颜色,format是该属性的取值类型。
这里要注意的是,自定义属性的name定义成了XiaoMiStep,那么自定义View的名字也要是XiaoMiStep,保持一致。
然后就是在布局文件中申明我们的自定义view。
这样,自定义View XiaoMiStep在xml布局文件里引用的时候,代码如下:
记得最后要引入我们的命名空间
xmlns:custom="http://schemas.android.com/apk/res-auto" 引入我们自定义的属性
获得atts.xml定义的属性值
自定义View一般需要实现一下三个构造方法,这三个构造方法是一层调用一层的,属于递进关系。因此,我们只需要在最后一个构造方法中来获得View的属性了。
- 通过theme.obtainStyledAttributes()方法获得自定义控件的主题样式数组
- 就是遍历每个属性来获得对应属性的值,也就是我们在xml布局文件中写的属性值
- 就是在循环结束之后记得调用array.recycle()来回收资源
public XiaoMiStep(Context context) {
        this(context, null);
    }

public XiaoMiStep(Context context, AttributeSet attrs) {
        this(context, attrs, 0);
    }
public XiaoMiStep(Context context, AttributeSet attrs, int defStyleAttr) {
        super(context, attrs, defStyleAttr);
        //获得atts.xml定义的属性值,存储在TypedArray中
        TypedArray ta = context.getTheme().obtainStyledAttributes(attrs, R.styleable.XiaoMiStep, defStyleAttr, 0);
        int n = ta.getIndexCount();
        for (int i = 0; i < n; i++) {
            int attr = ta.getIndex(i);
            switch (attr) {
                case R.styleable.XiaoMiStep_backGroundColor: //背景颜色
                    background_color = ta.getColor(attr, Color.WHITE); //默认为白色
                    break;
                case R.styleable.XiaoMiStep_outerCircleColor: //最外侧圆
                    outer_circle_color = ta.getColor(attr, Color.WHITE);
                    break;
                case R.styleable.XiaoMiStep_outerDotColor: //最外侧圆上的小圆点
                    outer_dot_color = ta.getColor(attr, Color.WHITE);
                    break;
                case R.styleable.XiaoMiStep_lineColor:  //最外侧线的颜色
                    line_color = ta.getColor(attr, Color.WHITE);
                    break;
                case R.styleable.XiaoMiStep_ringColor: //圆环的颜色
                    ring_color = ta.getColor(attr, Color.WHITE);
                    break;
                case R.styleable.XiaoMiStep_stepNumColor: //步数的颜色
                    step_num_color = ta.getColor(attr, Color.WHITE);
                    break;
                case R.styleable.XiaoMiStep_othetTextColor: //其他文字颜色
                    othet_text_color = ta.getColor(attr, Color.WHITE);
                    break;
            }
        }
        ta.recycle();
        init();
    }
初始化画笔
 private void init() {
        mPaint = new Paint(); //画笔
        mPaint.setAntiAlias(true);
        arcPaint = new Paint();  //圆环画笔
        arcPaint.setAntiAlias(true);
        textPaint = new Paint();  //文字画笔
        textPaint.setAntiAlias(true);
        pointPaint = new Paint(); //点
        pointPaint.setAntiAlias(true);
        animSet = new AnimatorSet(); //动画组合
    }
重写onMesure方法确定view大小
当你没有重写onMeasure方法时候,系统调用默认的onMeasure方法:
@OverrideprotectedvoidonMeasure(int widthMeasureSpec, int heightMeasureSpec) {
super.onMeasure(widthMeasureSpec, heightMeasureSpec);
}
这个方法的作用是:测量控件的大小。其实Android系统在加载布局的时候是由系统测量各子View的大小来告诉父View我需要占多大空间,然后父View会根据自己的大小来决定分配多大空间给子View。MeasureSpec的specMode模式一共有三种:
MeasureSpec.EXACTLY:父视图希望子视图的大小是specSize中指定的大小;一般是设置了明确的值或者是MATCH_PARENT
MeasureSpec.AT_MOST:子视图的大小最多是specSize中的大小;表示子布局限制在一个最大值内,一般为WARP_CONTENT
MeasureSpec.UNSPECIFIED:父视图不对子视图施加任何限制,子视图可以得到任意想要的大小;表示子布局想要多大就多大,很少使用。
想要设置WARP_CONTENT,只要重写onMeasure方法
另外,在onMeasure()方法里实现了动画效果。
 @Override
    protected void onMeasure(int widthMeasureSpec, int heightMeasureSpec) {
        // super.onMeasure(widthMeasureSpec, heightMeasureSpec);
        int width;
        int height;
        int widthMode = MeasureSpec.getMode(widthMeasureSpec);  //宽度的测量模式
        int widthSize = MeasureSpec.getSize(widthMeasureSpec);  //宽度的测量值
        int heightMode = MeasureSpec.getMode(heightMeasureSpec);  //高度的测量模式
        int heightSize = MeasureSpec.getSize(heightMeasureSpec); //高度的测量值
        //如果布局里面设置的是固定值,这里取布局里面的固定值;如果设置的是match_parent,则取父布局的大小
        if (widthMode == MeasureSpec.EXACTLY) {
            width = widthSize;
        } else {
            //如果布局里面没有设置固定值,这里取布局的宽度的1/2
            width = widthSize * 1 / 2;
        }

        if (heightMode == MeasureSpec.EXACTLY) {
            height = heightSize;
        } else {
            //如果布局里面没有设置固定值,这里取布局的高度的3/4
            height = heightSize * 3 / 4;
        }
        widthBg = width;
        heightBg = height;
        ra_out_circle = heightBg * 3 / 9;
        ra_inner_circle = heightBg * 3 / 10;
        line_length = 30;
        setMeasuredDimension(width, height);
        startAnim();
    }
重写onDraw方法进行绘画
代码已经很详细了。
 @Override
    protected void onDraw(Canvas canvas) {
        super.onDraw(canvas);
        //绘制底层背景
        mPaint.setColor(background_color);
        mPaint.setStyle(Paint.Style.FILL);
        RectF rectF_back = new RectF(0, 0, widthBg, heightBg);
        canvas.drawRect(rectF_back, mPaint);
        //绘制最外层的圆
        mPaint.setColor(outer_circle_color);
        mPaint.setStyle(Paint.Style.STROKE);
        mPaint.setStrokeWidth(3);
        canvas.drawCircle(widthBg / 2, heightBg / 2, ra_out_circle, mPaint);
        //绘制圆上的小圆点
        pointPaint.setColor(outer_dot_color);
        pointPaint.setStrokeWidth(10);
        canvas.drawCircle((float) (widthBg / 2 + ra_out_circle * Math.cos(angle * 3.14 / 180)), (float) (heightBg / 2 + ra_out_circle * Math.sin(angle * 3.14 / 180)), 10, pointPaint);
        //画line
        drawLines(canvas);
        //画圆弧
        arcPaint.setStyle(Paint.Style.STROKE);
        arcPaint.setStrokeWidth(30);
        arcPaint.setColor(ring_color);
        RectF arcRect = new RectF((widthBg / 2 - ra_inner_circle + line_length / 2), (heightBg / 2 - ra_inner_circle + line_length / 2), (widthBg / 2 + ra_inner_circle - line_length / 2), (heightBg / 2 + ra_inner_circle - line_length / 2));
        canvas.drawArc(arcRect, -90, currentFootNumPre, false, arcPaint);

        //绘制步数
        textPaint.setColor(step_num_color);
        textPaint.setStrokeWidth(25);
        textPaint.setTextSize(widthBg / 6);
        canvas.drawText(String.valueOf(currentFootNum), (widthBg / 3 - 50), heightBg / 2 + 50, textPaint);
        textPaint.setStrokeWidth(10);
        textPaint.setColor(othet_text_color);
        textPaint.setTextSize(widthBg / 20);
        canvas.drawText("步", (widthBg / 2 + 200), heightBg / 2 + 50, textPaint);
        //绘制公里
        currentDistance = (float) (myFootNum * 6.4 / 8000);
        //小数点后一位
        java.text.DecimalFormat df = new java.text.DecimalFormat("#.0");
        String currentDis = df.format(currentDistance);
        canvas.drawText(currentDis + "公里", (widthBg / 3 - 30), heightBg / 2 + 150, textPaint);
        //中间竖线
        mPaint.setStrokeWidth(8);
        canvas.drawLine(widthBg / 2 + 10, heightBg / 2 + 110, widthBg / 2 + 10, heightBg / 2 + 155, mPaint);
        //绘制卡路里
        currentCal = myFootNum * 230 / 8000;
        canvas.drawText(String.valueOf(currentCal) + "千卡", (widthBg / 2 + 40), heightBg / 2 + 150, textPaint);


    }

    private void drawLines(Canvas canvas) {
        mPaint.setColor(line_color);
        mPaint.setStrokeWidth(4);
        for (int i = 0; i < 360; i++) {
            canvas.drawLine(widthBg / 2, (heightBg / 2 - ra_inner_circle), widthBg / 2, (heightBg / 2 - ra_inner_circle + line_length), mPaint);
            canvas.rotate(1, widthBg / 2, heightBg / 2);
        }
    }
默认一圈代表8000步,6.4公里,230千卡,初始步数根据以下代码设置。
@Override
    protected void onCreate(Bundle savedInstanceState) {
        super.onCreate(savedInstanceState);
        setContentView(R.layout.activity_xiao_mi_setp);
        ButterKnife.bind(this);

        mXiaoMiStep.setMyFootNum(4500);
    }
  public void setMyFootNum(int myFootNum) {
        this.myFootNum = myFootNum;
    }
实现动画
主要是
外圆上的小圆点动画,是根据角度确定。
步数动画在 0-myFootNum之间
画圆弧的动画在 0-myFootNum * 360 / 8000
  private void startAnim() {
        //小圆点动画
        final ValueAnimator dotAnimator =ValueAnimator.ofInt(-90, (myFootNum*360/8000-90));

        dotAnimator.addUpdateListener(new ValueAnimator.AnimatorUpdateListener() {
            @Override
            public void onAnimationUpdate(ValueAnimator animation) {
                angle = (int) dotAnimator.getAnimatedValue();
                postInvalidate();
            }
        });
        dotAnimator.setInterpolator(new LinearInterpolator());


        //步数动画实现
        final ValueAnimator walkAnimator = ValueAnimator.ofInt(0, myFootNum);
        walkAnimator.addUpdateListener(new ValueAnimator.AnimatorUpdateListener() {
            @Override
            public void onAnimationUpdate(ValueAnimator animation) {
                currentFootNum = (int) walkAnimator.getAnimatedValue();
                postInvalidate();
            }
        });


        //画弧动画的实现
        final ValueAnimator arcAnimator = ValueAnimator.ofInt(0, (myFootNum * 360 / 8000));
        arcAnimator.addUpdateListener(new ValueAnimator.AnimatorUpdateListener() {
            @Override
            public void onAnimationUpdate(ValueAnimator animation) {
                currentFootNumPre = (int) arcAnimator.getAnimatedValue();
                postInvalidate();
            }
        });
        animSet.setDuration(3000);
        animSet.playTogether(walkAnimator, arcAnimator, dotAnimator);
        animSet.start();
    }
效果图如下所示,当然,你也可以通过改变xml布局的custom选项,来改变各个部分的颜色。
代码下载 https://github.com/baojie0327/ViewAndGroup

