5.ProgressBar
//水平进度条
5.1 ProgressBar的几个常用属性和方法
android:max="200" 滚动条最大值
android:progress="0" 滚动条当前值
android:visibility="visible" 滚动条是否可见
setProgress(int) 设置当前值
android:secondaryProgress 这个值是为了缓存准备的。
5.2 ProgressBar的样式
ProgressBar的样式设定其实有两种方式,在API文档中说明的方式如下:
Widget.ProgressBar.Horizontal
Widget.ProgressBar.Small
Widget.ProgressBar.Large
Widget.ProgressBar.Inverse
Widget.ProgressBar.Small.Inverse
Widget.ProgressBar.Large.Inverse
使用的时候可以这样:style="@android:style/Widget.ProgressBar.Small",另外还有一种方式就是使用系统的attr,下面的方式是系统的style:
style="?android:attr/progressBarStyle"
style="?android:attr/progressBarStyleHorizontal"
style="?android:attr/progressBarStyleInverse"
style="?android:attr/progressBarStyleLarge"
style="?android:attr/progressBarStyleLargeInverse"
style="?android:attr/progressBarStyleSmall"
style="?android:attr/progressBarStyleSmallInverse"
style="?android:attr/progressBarStyleSmallTitle"
也可以自己定义 。
在 style="@android:style/Widget.ProgressBar.Large" 这个属性就相当于 attr.xml。点开源码是这样的:
下面使用步骤:
1.在drawable文件下新建一个progressbar_horizontal_1.xml。代码中的progress和secondprogress中src的资源便是我自定义的,注意这三个之间的叠放顺序,background是最底层,中间的是progress最上层是second。
-
-
-
2.在style中新建一个自定义的style
3.组件引用
//水平进度条
6.RadioGroup,RadioButton
6.1类结构
java.lang.Object
↳ android.view.View
↳ android.view.ViewGroup
↳ android.widget.LinearLayout
↳ android.widget.RadioGroup
java.lang.Object
↳ android.view.View
↳ android.widget.TextView
↳ android.widget.Button
↳ android.widget.CompoundButton
↳ android.widget.RadioButton
RadioButton继承于Button,所以具有普通按钮的各种属性,但是与普通按钮不同的是,RadioButton提供了可选中的功能。在使用RadioButton的时候,要使用RadioGroup来包围起这些RadioButton。
【备注:】RadioGroup是LinearLayout的子类,所以RadioGroup本质上是一个存放RadioButton的布局容器。
需要记住的是:默认的LinearLayout布局的Orientation属性是水平的,而默认的RadioGroup的Orientation属性是垂直的。
6.2 RadioGroup 和RadioButton 的使用
1.系统自带的原点不好看怎么办?android :button ="@null" 这样就会没有了
2.默认选中 android:checked="true"
3.替换系统自带的icon,android:drawableleft="@mipmap/ic_lanuch"
  RadioGroup  radiogroup= (RadioGroup) findViewById(R.id.radiogroup);
        radiogroup.setOnCheckedChangeListener(new RadioGroup.OnCheckedChangeListener() {
            @Override
            public void onCheckedChanged(RadioGroup group, @IdRes int checkedId) {
                RadioButton radioButton = (RadioButton) findViewById(checkedId);
                String result = radioButton.getText().toString();
                Toast.makeText(MainActivity.this, "您选择了:" + result,
                        Toast.LENGTH_LONG).show();
            }
        });
7.CheckBox
CheckBox继承于Button,所以具有普通按钮的各种属性,但是与普通按钮不同的是, CheckBox 提供了可选中的功能。
【备注:】CheckBox有一个父类是CompoundButton,所以在使用监听器的时候要注意跟单选项进行区别。
public class MainActivity extends AppCompatActivity {
    private CheckBox checkBox_main_hobby1;
    private CheckBox checkBox_main_hobby2;
    private CheckBox checkBox_main_hobby3;
    private CheckBox checkBox_main_hobby4;
    private CheckBox checkBox_main_selectall;
    private Button button_main_submit;

    @Override
    protected void onCreate(Bundle savedInstanceState) {
        super.onCreate(savedInstanceState);
        setContentView(R.layout.checkbox);
        checkBox_main_hobby1 = (CheckBox) findViewById(R.id.checkBox_main_hobby1);
        checkBox_main_hobby2 = (CheckBox) findViewById(R.id.checkBox_main_hobby2);
        checkBox_main_hobby3 = (CheckBox) findViewById(R.id.checkBox_main_hobby3);
        checkBox_main_hobby4 = (CheckBox) findViewById(R.id.checkBox_main_hobby4);
        checkBox_main_selectall = (CheckBox) findViewById(R.id.checkBox_main_selectall);
        button_main_submit = (Button) findViewById(R.id.button_main_submit);
        button_main_submit.setOnClickListener(new View.OnClickListener() {
            @Override
            public void onClick(View v) {
                Toast.makeText(MainActivity.this, "您选择了:" + getResult(),
                        Toast.LENGTH_SHORT).show();
            }
        });

        checkBox_main_hobby1.setOnCheckedChangeListener(listener);
        checkBox_main_hobby2.setOnCheckedChangeListener(listener);
        checkBox_main_hobby3.setOnCheckedChangeListener(listener);
        checkBox_main_hobby4.setOnCheckedChangeListener(listener);

// 给全选checkbox设置单击监听事件
        checkBox_main_selectall.setOnClickListener(new View.OnClickListener() {
            @Override
            public void onClick(View v) {
                boolean flag = checkBox_main_selectall.isChecked();
                checkBox_main_hobby1.setChecked(flag);
                checkBox_main_hobby2.setChecked(flag);
                checkBox_main_hobby3.setChecked(flag);
                checkBox_main_hobby4.setChecked(flag);
            }
        });
    }

    // 定义一个有名字的监听器类。之所以不用匿名内部类形式,是因为有多个控件都要使用这同一个监听器
    CompoundButton.OnCheckedChangeListener listener = new CompoundButton.OnCheckedChangeListener() {
        @Override
        public void onCheckedChanged(CompoundButton buttonView,
                                     boolean isChecked) {
            if (!buttonView.isChecked()) {
                checkBox_main_selectall.setChecked(false);
            }
            if (checkBox_main_hobby1.isChecked()
                    && checkBox_main_hobby2.isChecked()
                    && checkBox_main_hobby3.isChecked()
                    && checkBox_main_hobby4.isChecked()) {
                checkBox_main_selectall.setChecked(true);
            }
            Toast.makeText(MainActivity.this, "您选择了:" + getResult(),
                    Toast.LENGTH_SHORT).show();
        }
    };

    // 获取多选项中被勾选的结果。利用isChecked()方法来判断哪个选项被勾选
    private String getResult() {
        StringBuilder sb = new StringBuilder();
        if (checkBox_main_hobby1.isChecked()) {
            sb.append(checkBox_main_hobby1.getText());
        }
        if (checkBox_main_hobby2.isChecked()) {
            sb.append(checkBox_main_hobby2.getText());
        }
        if (checkBox_main_hobby3.isChecked()) {
            sb.append(checkBox_main_hobby3.getText());
        }
        if (checkBox_main_hobby4.isChecked()) {
            sb.append(checkBox_main_hobby4.getText());
        }
        return sb.toString();
  }
}
8.Switch,RatingBar.
Switch是在4.0以后推出的,所以要注意开发时的minsdk设置,google在API 21后也推出support v7 包下的SwitchCompa的Material Design
开关控件,对低版本的有了更好的的支持。其实switch的应用场景和ToggleButton类似,多应用于两种状态的切换。
8.1 Switch 的常用属性
android:typeface="normal":设置字体类型
android:track="":设置开关的轨迹图片
android:textOff="开":设置开关checked的文字
android:textOn="关":设置开关关闭时的文字
android:thumb="":设置开关的图片
android:switchMinWidth="":开关最小宽度
android:switchPadding="":设置开关 与文字的空白距离
android:switchTextAppearance="":设置文本的风格
android:checked="":设置初始选中状态
android:splitTrack="true":是否设置一个间隙,让滑块与底部图片分隔(API 21及以上)
android:showText="true":设置是否显示开关上的文字(API 21及以上)
8.2 Switch的使用
1.layout 布局
2.页面代码
public class MainActivity extends AppCompatActivity implements CompoundButton.OnCheckedChangeListener{

    private Switch aSwitch;
    private SwitchCompat aSwitchCompat;
    private TextView text1,text2,switchText,switchCompatText;
    @Override
    protected void onCreate(Bundle savedInstanceState) {
        super.onCreate(savedInstanceState);
        setContentView(R.layout.activity_main);
        //实例化
        aSwitch = (Switch) findViewById(R.id.switch1);
        aSwitchCompat = (SwitchCompat) findViewById(R.id.switch_compat);
        text1 = (TextView) findViewById(R.id.text);
        text2 = (TextView) findViewById(R.id.text1);
        //设置Switch事件监听
        aSwitch.setOnCheckedChangeListener(this);
        aSwitchCompat.setOnCheckedChangeListener(this);
    }

    /*
    继承监听器的接口并实现onCheckedChanged方法
    * */
    @Override
    public void onCheckedChanged(CompoundButton buttonView, boolean isChecked) {
        switch (buttonView.getId()){
            case R.id.switch1:
                if(isChecked){
                    text1.setText("开");
                }else {
                    text1.setText("关");
                }
                break;
            case R.id.switch_compat:
                if(isChecked){
                    text2.setText("开");
                }else {
                    text2.setText("关");
                }
                break;
            default:
                break;
        }
    }
}
8.3 Switch的拓展
1.自定义样式,在values/style文件中自定义样式
2.然后添加到布局文件中
3.页面显示效果
4.还可以将图片替换开关按钮
1.导入资源图片thumb.png ,thumb_on.png ,track_nomal.png ,track_on.png ,track_press.png
2.实现thumb_selector.xml
3.实现track_selector.xml
4.布局文件
5.代码文件
public class SecondActivity extends AppCompatActivity implements CompoundButton.OnCheckedChangeListener{

    private SwitchCompat customSwitchCompat;
    private TextView custom_result,CustomSwitchCompat_tv;
    @Override
    protected void onCreate(Bundle savedInstanceState) {
        super.onCreate(savedInstanceState);
        setContentView(R.layout.activity_second);
        //实例化
        customSwitchCompat = (SwitchCompat) findViewById(R.id.CustomSwitchCompat);
        custom_result = (TextView) findViewById(R.id.custom_result);
        //设置自定义的thumb和track
       customSwitchCompat.setThumbResource(R.drawable.thumb_selector);
        customSwitchCompat.setTrackResource(R.drawable.track_selector);
        //设置Switch事件监听
        customSwitchCompat.setOnCheckedChangeListener(this);
    }

    /*
    继承监听器的接口并实现onCheckedChanged方法
    * */
    @Override
    public void onCheckedChanged(CompoundButton buttonView, boolean isChecked) {
                if(isChecked){
                    custom_result.setText("开");
                }else {
                    custom_result.setText("关");
                }
    }
}
7.AlertDialog
在实际开发过程中,可能会碰到各种各样的弹窗。提示信息。二话不说直接一波图。
7.1分析创建对话框的步骤:
1.创建一个dialog对象
AlertDialog.Builder builder=new AlertDialog.Builder(this);
2.创建对象之后,通过调用 create()方法构造对话框,并通过show()方法展示出来
 AlertDialog alertDialog = builder.create();
 alertDialog.show();
3.通过setXXX()方法,设置你所需要的各种属性
    alertDialogBuilder.setTitle();//设置标题
    alertDialogBuilder.setIcon();//设置图表

    /*设置下方按钮*/
    alertDialogBuilder.setPositiveButton();
    alertDialogBuilder.setNegativeButton();
    alertDialogBuilder.setNeutralButton();

    /*对话框内容区域的设置提供了多种方法*/
    setMessage();//设置显示文本
    setItems();//设置对话框内容为简单列表项
    setSingleChoiceItems();//设置对话框内容为单选列表项
    setMultiChoiceItems();//设置对话框内容为多选列表项
    setAdapter();//设置对话框内容为自定义列表项
    setView();//设置对话框内容为自定义View

    //设置对话框是否可取消
    setCancelable(booleab cancelable);
    setCancelListener(onCancelListener);
还有这样一种方式创建dialog
    new AlertDialog.Builder(this)
    .setTitle("确认")
    .setMessage("确定吗?")
    .setPositiveButton("是", ew DialogInterface.OnClickListener() {
            @Override
            public void onClick(DialogInterface dialogInterface, int i) {
                Toast.makeText(getApplicationContext(),"您点击了确定内容",Toast.LENGTH_SHORT).show();
            }
        })
    .setNegativeButton("取消", new DialogInterface.OnClickListener() {
            @Override
            public void onClick(DialogInterface dialogInterface, int i) {
                Toast.makeText(getApplicationContext(), "取消", Toast.LENGTH_SHORT).show();
            }
        })
    .show();
7.2 创建对话框的步骤
1.创建layout文件
2.创建Activity
public class MyAlertDiaologActivity  extends AppCompatActivity implements View.OnClickListener{
    //对应各个button
    private Button simpleDiaog;
    private Button simpleListDiaog;
    private Button singleChoiceDiaog;
    private Button multiChoiceDiaog;
    private Button customAdateprDiaog;
    private Button customViewDiaog;
    //声明一个AlertDialog构造器
    private AlertDialog.Builder builder;

    @Override
    protected void onCreate(Bundle savedInstanceState) {
        super.onCreate(savedInstanceState);
        setContentView(R.layout.activity_dialog);

        //实例化控件
        simpleDiaog= (Button) findViewById(R.id.btn_simple_dialog);
        simpleListDiaog= (Button) findViewById(R.id.btn_simple_list_dialog);
        singleChoiceDiaog= (Button) findViewById(R.id.btn_single_choice_dialog);
        multiChoiceDiaog= (Button) findViewById(R.id.btn_multi_choice_dialog);
        customAdateprDiaog= (Button) findViewById(R.id.btn_custom_adapter_dialog);
        customViewDiaog= (Button) findViewById(R.id.btn_custom_view_dialog);


        //监听点击事件
        simpleDiaog.setOnClickListener(this);
        simpleListDiaog.setOnClickListener(this);
        singleChoiceDiaog.setOnClickListener(this);
        multiChoiceDiaog.setOnClickListener(this);
        customAdateprDiaog.setOnClickListener(this);
        customViewDiaog.setOnClickListener(this);
    }

    /**
     *
     * 每个button点击后弹出对应对话框,为了方便,各写一个showXXDialog()方法
     */
    @Override
    public void onClick(View view) {
        switch (view.getId()){
            case R.id.btn_simple_dialog:
                showSimpleDialog(view);
                break;
            case R.id.btn_simple_list_dialog:
                showSimpleListDialog(view);
                break;
            case R.id.btn_single_choice_dialog:
                showSingleChoiceDialog(view);
                break;
            case R.id.btn_multi_choice_dialog:
                showMultiChoiceDialog(view);
                break;
            case R.id.btn_custom_adapter_dialog:
                showCustomAdapterDialog(view);
                break;
            case R.id.btn_custom_view_dialog:
                showCustomViewDialog(view);
                break;
        }

    }

}
3.展示基本对话框
 //展示基本对话框
    //显示基本Dialog
    private void showSimpleDialog(View view) {
        builder=new AlertDialog.Builder(this);
        builder.setIcon(R.mipmap.ic_launcher);
        builder.setTitle("简单对话框");
        builder.setMessage("展示简单的对话框的内容");

        //监听下方button点击事件
        builder.setPositiveButton("确定", new DialogInterface.OnClickListener() {
            @Override
            public void onClick(DialogInterface dialogInterface, int i) {
                Toast.makeText(getApplicationContext(),"您点击了确定内容",Toast.LENGTH_SHORT).show();
            }
        });
        builder.setNegativeButton("取消", new DialogInterface.OnClickListener() {
            @Override
            public void onClick(DialogInterface dialogInterface, int i) {
                Toast.makeText(getApplicationContext(), "取消", Toast.LENGTH_SHORT).show();
            }
        });

        //设置对话框是可取消的
        builder.setCancelable(true);
        AlertDialog dialog=builder.create();
        dialog.show();
    }
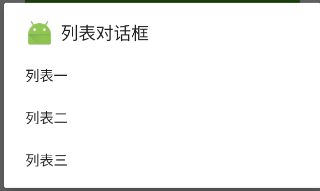
4.列表对话框
 //展示列表对话框
    private void showSimpleListDialog(View view) {
        builder=new AlertDialog.Builder(this);
        builder.setIcon(R.mipmap.ic_launcher);
        builder.setTitle("列表对话框");

        /**
         * 设置内容区域为简单列表项
         */
        final String[] Items={"列表一","列表二","列表三"};
        builder.setItems(Items, new DialogInterface.OnClickListener() {
            @Override
            public void onClick(DialogInterface dialogInterface, int i) {
                Toast.makeText(getApplicationContext(), "You clicked "+Items[i], Toast.LENGTH_SHORT).show();
            }
        });
        builder.setCancelable(true);
        AlertDialog dialog=builder.create();
        dialog.show();
    }
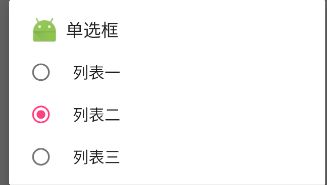
5.单选框
  //单选框
    private void showSingleChoiceDialog(View view) {
        builder=new AlertDialog.Builder(this);
        builder.setIcon(R.mipmap.ic_launcher);
        builder.setTitle("单选框");

        /**
         * 设置内容区域为单选列表项
         */
        final String[] items={"列表一","列表二","列表三"};
        builder.setSingleChoiceItems(items, 1, new DialogInterface.OnClickListener() {
            @Override
            public void onClick(DialogInterface dialogInterface, int i) {
                Toast.makeText(getApplicationContext(), "You clicked "+items[i], Toast.LENGTH_SHORT).show();
            }
        });

        builder.setCancelable(true);
        AlertDialog dialog=builder.create();
        dialog.show();
    }
6.多选框
  builder=new AlertDialog.Builder(this);
        builder.setIcon(R.mipmap.ic_launcher);
        builder.setTitle(R.string.simple_list_dialog);

        /**
         * 设置内容区域为多选列表项
         */
        final String[] items={"Items_one","Items_two","Items_three"};
        builder.setMultiChoiceItems(items, new boolean[]{true, false, true}, new DialogInterface.OnMultiChoiceClickListener() {
            @Override
            public void onClick(DialogInterface dialogInterface, int i, boolean b) {
                Toast.makeText(getApplicationContext(),"You clicked "+items[i]+" "+b,Toast.LENGTH_SHORT).show();
            }
        });


        builder.setCancelable(true);
        AlertDialog dialog=builder.create();
        dialog.show();
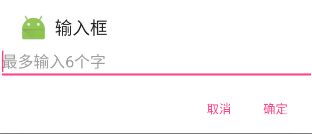
7.输入框
//输入框
    private void showCustomAdapterDialog(View view) {
        final EditText editText = new EditText(this);
        editText.setHint("最多输入6个字");
       builder=new AlertDialog.Builder(this);
        builder.setTitle("输入框");
        builder.setIcon(R.mipmap.ic_launcher);
        builder.setView(editText);
        builder.setPositiveButton("确定", new DialogInterface.OnClickListener() {
            @Override
            public void onClick(DialogInterface dialogInterface, int i) {
                Toast.makeText(getApplicationContext(),"您点击了确定内容",Toast.LENGTH_SHORT).show();
            }
        });
        builder.setNegativeButton("取消", new DialogInterface.OnClickListener() {
            @Override
            public void onClick(DialogInterface dialogInterface, int i) {
                Toast.makeText(getApplicationContext(), "取消", Toast.LENGTH_SHORT).show();
            }
        });

        builder.setCancelable(true);
        AlertDialog dialog=builder.create();
        dialog.show();
    }
8.自定义框
    //自定义输入框
    private void showCustomViewDialog(View view) {
        ImageView img = new ImageView(this);
        img.setImageResource(R.mipmap.ic_launcher);
        builder=new AlertDialog.Builder(this);
        builder.setIcon(R.mipmap.ic_launcher);
        builder.setTitle("自定义对话框");
        builder.setView(img);

        //监听下方button点击事件
        builder.setPositiveButton("确定", new DialogInterface.OnClickListener() {
            @Override
            public void onClick(DialogInterface dialogInterface, int i) {
                Toast.makeText(getApplicationContext(),"您点击了确定内容",Toast.LENGTH_SHORT).show();
            }
        });
        builder.setNegativeButton("取消", new DialogInterface.OnClickListener() {
            @Override
            public void onClick(DialogInterface dialogInterface, int i) {
                Toast.makeText(getApplicationContext(), "取消", Toast.LENGTH_SHORT).show();
            }
        });

        //设置对话框是可取消的
        builder.setCancelable(true);
        AlertDialog dialog=builder.create();
        dialog.show();
    }
自定义一般就是自定义一个view,然后展示这个view的内容
layout文件上面有。
完整代码:
import android.content.DialogInterface;
import android.graphics.Bitmap;
import android.os.Bundle;
import android.support.annotation.Nullable;
import android.support.v7.app.AlertDialog;
import android.support.v7.app.AppCompatActivity;
import android.view.View;
import android.widget.Button;
import android.widget.EditText;
import android.widget.ImageView;
import android.widget.Toast;

/**
 * Created by ${momoThree} on 2017/9/11.
 * Title:
 */

public class MyAlertDiaologActivity  extends AppCompatActivity implements View.OnClickListener{
    //对应各个button
    private Button simpleDiaog;
    private Button simpleListDiaog;
    private Button singleChoiceDiaog;
    private Button multiChoiceDiaog;
    private Button customAdateprDiaog;
    private Button customViewDiaog;
    //声明一个AlertDialog构造器
    private AlertDialog.Builder builder;

    @Override
    protected void onCreate(Bundle savedInstanceState) {
        super.onCreate(savedInstanceState);
        setContentView(R.layout.activity_dialog);

        //实例化控件
        simpleDiaog= (Button) findViewById(R.id.btn_simple_dialog);
        simpleListDiaog= (Button) findViewById(R.id.btn_simple_list_dialog);
        singleChoiceDiaog= (Button) findViewById(R.id.btn_single_choice_dialog);
        multiChoiceDiaog= (Button) findViewById(R.id.btn_multi_choice_dialog);
        customAdateprDiaog= (Button) findViewById(R.id.btn_custom_adapter_dialog);
        customViewDiaog= (Button) findViewById(R.id.btn_custom_view_dialog);


        //监听点击事件
        simpleDiaog.setOnClickListener(this);
        simpleListDiaog.setOnClickListener(this);
        singleChoiceDiaog.setOnClickListener(this);
        multiChoiceDiaog.setOnClickListener(this);
        customAdateprDiaog.setOnClickListener(this);
        customViewDiaog.setOnClickListener(this);
    }

    /**
     *
     * 每个button点击后弹出对应对话框,为了方便,各写一个showXXDialog()方法
     */
    @Override
    public void onClick(View view) {
        switch (view.getId()){
            case R.id.btn_simple_dialog:
                showSimpleDialog(view);
                break;
            case R.id.btn_simple_list_dialog:
                showSimpleListDialog(view);
                break;
            case R.id.btn_single_choice_dialog:
                showSingleChoiceDialog(view);
                break;
            case R.id.btn_multi_choice_dialog:
                showMultiChoiceDialog(view);
                break;
            case R.id.btn_custom_adapter_dialog:
                showCustomAdapterDialog(view);
                break;
            case R.id.btn_custom_view_dialog:
                showCustomViewDialog(view);
                break;
        }

    }

    //自定义输入框
    private void showCustomViewDialog(View view) {
        ImageView img = new ImageView(this);
        img.setImageResource(R.mipmap.ic_launcher);
        builder=new AlertDialog.Builder(this);
        builder.setIcon(R.mipmap.ic_launcher);
        builder.setTitle("自定义对话框");
        builder.setView(img);

        //监听下方button点击事件
        builder.setPositiveButton("确定", new DialogInterface.OnClickListener() {
            @Override
            public void onClick(DialogInterface dialogInterface, int i) {
                Toast.makeText(getApplicationContext(),"您点击了确定内容",Toast.LENGTH_SHORT).show();
            }
        });
        builder.setNegativeButton("取消", new DialogInterface.OnClickListener() {
            @Override
            public void onClick(DialogInterface dialogInterface, int i) {
                Toast.makeText(getApplicationContext(), "取消", Toast.LENGTH_SHORT).show();
            }
        });

        //设置对话框是可取消的
        builder.setCancelable(true);
        AlertDialog dialog=builder.create();
        dialog.show();
    }

    //输入框
    private void showCustomAdapterDialog(View view) {
        final EditText editText = new EditText(this);
        editText.setHint("最多输入6个字");
       builder=new AlertDialog.Builder(this);
        builder.setTitle("输入框");
        builder.setIcon(R.mipmap.ic_launcher);
        builder.setView(editText);
        builder.setPositiveButton("确定", new DialogInterface.OnClickListener() {
            @Override
            public void onClick(DialogInterface dialogInterface, int i) {
                Toast.makeText(getApplicationContext(),"您点击了确定内容",Toast.LENGTH_SHORT).show();
            }
        });
        builder.setNegativeButton("取消", new DialogInterface.OnClickListener() {
            @Override
            public void onClick(DialogInterface dialogInterface, int i) {
                Toast.makeText(getApplicationContext(), "取消", Toast.LENGTH_SHORT).show();
            }
        });

        builder.setCancelable(true);
        AlertDialog dialog=builder.create();
        dialog.show();
    }

    //多选框
    private void showMultiChoiceDialog(View view) {
        builder=new AlertDialog.Builder(this);
        builder.setIcon(R.mipmap.ic_launcher);
        builder.setTitle("多选框");

        /**
         * 设置内容区域为多选列表项
         */
        final String[] items={"列表一","列表二","列表三"};
        builder.setMultiChoiceItems(items, new boolean[]{true, false, true}, new DialogInterface.OnMultiChoiceClickListener() {
            @Override
            public void onClick(DialogInterface dialogInterface, int i, boolean b) {
                Toast.makeText(getApplicationContext(),"You clicked "+items[i]+" "+b,Toast.LENGTH_SHORT).show();
            }
        });


        builder.setCancelable(true);
        AlertDialog dialog=builder.create();
        dialog.show();
    }

    //单选框
    private void showSingleChoiceDialog(View view) {
        builder=new AlertDialog.Builder(this);
        builder.setIcon(R.mipmap.ic_launcher);
        builder.setTitle("单选框");

        /**
         * 设置内容区域为单选列表项
         */
        final String[] items={"列表一","列表二","列表三"};
        builder.setSingleChoiceItems(items, 1, new DialogInterface.OnClickListener() {
            @Override
            public void onClick(DialogInterface dialogInterface, int i) {
                Toast.makeText(getApplicationContext(), "You clicked "+items[i], Toast.LENGTH_SHORT).show();
            }
        });

        builder.setCancelable(true);
        AlertDialog dialog=builder.create();
        dialog.show();
    }

    //展示列表对话框
    private void showSimpleListDialog(View view) {
        builder=new AlertDialog.Builder(this);
        builder.setIcon(R.mipmap.ic_launcher);
        builder.setTitle("列表对话框");

        /**
         * 设置内容区域为简单列表项
         */
        final String[] Items={"列表一","列表二","列表三"};
        builder.setItems(Items, new DialogInterface.OnClickListener() {
            @Override
            public void onClick(DialogInterface dialogInterface, int i) {
                Toast.makeText(getApplicationContext(), "You clicked "+Items[i], Toast.LENGTH_SHORT).show();
            }
        });
        builder.setCancelable(true);
        AlertDialog dialog=builder.create();
        dialog.show();
    }

    //展示基本对话框
    //显示基本Dialog
    private void showSimpleDialog(View view) {
        builder=new AlertDialog.Builder(this);
        builder.setIcon(R.mipmap.ic_launcher);
        builder.setTitle("简单对话框");
        builder.setMessage("展示简单的对话框的内容");

        //监听下方button点击事件
        builder.setPositiveButton("确定", new DialogInterface.OnClickListener() {
            @Override
            public void onClick(DialogInterface dialogInterface, int i) {
                Toast.makeText(getApplicationContext(),"您点击了确定内容",Toast.LENGTH_SHORT).show();
            }
        });
        builder.setNegativeButton("取消", new DialogInterface.OnClickListener() {
            @Override
            public void onClick(DialogInterface dialogInterface, int i) {
                Toast.makeText(getApplicationContext(), "取消", Toast.LENGTH_SHORT).show();
            }
        });

        //设置对话框是可取消的
        builder.setCancelable(true);
        AlertDialog dialog=builder.create();
        dialog.show();
    }
}
8.ProgressDialog
8.1 Progressdialog 类结构
java.lang.Object
↳android.app.Dialog
↳android.app.AlertDialog
↳android.app.ProgressDialog
8.2 ProgressDialog 的分析
ProgressDialog从上面的类结构就可以看出他是继承dailog的。所以作为弹窗式的进度条。它应该有亮着的特征。
1.在Activity中作为一个窗体弹出
2.拥有进度的统计和样式(圆形和水平)
8.3 ProgressDialog的使用
1.创建ProgressDialog
//方式一:
  final ProgressDialog dialog = new ProgressDialog(this);
  dialog.show();
//方式二 这种进度条只能是圆形条,设置title和Message提示内容
 ProgressDialog dialog2 = ProgressDialog.show(this, "提示", "正在登陆中");
//方式三   这种进度条只能是圆形条,这里最后一个参数boolean indeterminate设置是否是不明确的状态
 ProgressDialog dialog3 = ProgressDialog .show(this, "提示", "正在登陆中", false);
//方式四 这种进度条只能是圆形条,这里最后一个参数boolean cancelable 设置是否进度条是可以取消的
 ProgressDialog dialog4 = ProgressDialog.show(this, "提示", "正在登陆中",  false, true);
//方式五 使用静态方式创建并显示,这种进度条只能是圆形条,这里最后一个参数 DialogInterface.OnCancelListener
// cancelListener用于监听进度条被取消
ProgressDialog dialog5 = ProgressDialog.show(this, "提示", "正在登陆中", true,  true, cancelListener);

private OnCancelListener cancelListener = new OnCancelListener() {
    @Override
    public void onCancel(DialogInterface dialog) {
        // TODO Auto-generated method stub
        Toast.makeText(MainActivity.this, "进度条被取消", Toast.LENGTH_LONG)
                .show();
    }
};
2.ProgressDialog的样式有两种,一种是圆形不明确状态,一种是水平进度条状态
1.水平进度条
  final ProgressDialog dialog = new ProgressDialog(this);
    dialog.setProgressStyle(ProgressDialog.STYLE_HORIZONTAL);// 设置水平进度条
    dialog.setCancelable(true);// 设置是否可以通过点击Back键取消
    dialog.setCanceledOnTouchOutside(false);// 设置在点击Dialog外是否取消Dialog进度条
    dialog.setIcon(R.drawable.ic_launcher);// 设置提示的title的图标,默认是没有的
    dialog.setTitle("提示");
    dialog.setMax(100);
    dialog.setButton(DialogInterface.BUTTON_POSITIVE, "确定",
            new DialogInterface.OnClickListener() {

                @Override
                public void onClick(DialogInterface dialog, int which) {
                    // TODO Auto-generated method stub

                }
            });
    dialog.setButton(DialogInterface.BUTTON_NEGATIVE, "取消",
            new DialogInterface.OnClickListener() {

                @Override
                public void onClick(DialogInterface dialog, int which) {
                    // TODO Auto-generated method stub

                }
            });
    dialog.setMessage("这是一个水平进度条");
    dialog.show();

    new Thread(new Runnable() {
        @Override
        public void run() {
            // TODO Auto-generated method stub
            int i = 0;
            while (i < 100) {
                try {
                    Thread.sleep(200);
                    // 更新进度条的进度,可以在子线程中更新进度条进度
                    dialog.incrementProgressBy(1);
                    // dialog.incrementSecondaryProgressBy(10)//二级进度条更新方式
                    i++;

                } catch (Exception e) {
                    // TODO: handle exception
                }
            }
            // 在进度条走完时删除Dialog
            dialog.dismiss();
        }
    }).start();
2.圆形进度条
final ProgressDialog dialog = new ProgressDialog(this);
        dialog.setProgressStyle(ProgressDialog.STYLE_SPINNER);// 设置进度条的形式为圆形转动的进度条
        dialog.setCancelable(true);// 设置是否可以通过点击Back键取消
        dialog.setCanceledOnTouchOutside(false);// 设置在点击Dialog外是否取消Dialog进度条
        dialog.setIcon(R.drawable.ic_launcher);//
        // 设置提示的title的图标,默认是没有的,如果没有设置title的话只设置Icon是不会显示图标的
        dialog.setTitle("提示");
        // dismiss监听
        dialog.setOnDismissListener(new DialogInterface.OnDismissListener() {

            @Override
            public void onDismiss(DialogInterface dialog) {
                // TODO Auto-generated method stub

            }
        });
        // 监听Key事件被传递给dialog
        dialog.setOnKeyListener(new DialogInterface.OnKeyListener() {

            @Override
            public boolean onKey(DialogInterface dialog, int keyCode,
                    KeyEvent event) {
                // TODO Auto-generated method stub
                return false;
            }
        });
        // 监听cancel事件
        dialog.setOnCancelListener(new DialogInterface.OnCancelListener() {

            @Override
            public void onCancel(DialogInterface dialog) {
                // TODO Auto-generated method stub

            }
        });
        //设置可点击的按钮,最多有三个(默认情况下)
        dialog.setButton(DialogInterface.BUTTON_POSITIVE, "确定",
                new DialogInterface.OnClickListener() {

                    @Override
                    public void onClick(DialogInterface dialog, int which) {
                        // TODO Auto-generated method stub

                    }
                });
        dialog.setButton(DialogInterface.BUTTON_NEGATIVE, "取消",
                new DialogInterface.OnClickListener() {

                    @Override
                    public void onClick(DialogInterface dialog, int which) {
                        // TODO Auto-generated method stub

                    }
                });
        dialog.setButton(DialogInterface.BUTTON_NEUTRAL, "中立",
                new DialogInterface.OnClickListener() {

                    @Override
                    public void onClick(DialogInterface dialog, int which) {
                        // TODO Auto-generated method stub

                    }
                });
        dialog.setMessage("这是一个圆形进度条");
        dialog.show();
        new Thread(new Runnable() {

            @Override
            public void run() {
                // TODO Auto-generated method stub
                try {
                    Thread.sleep(5000);
                    // cancel和dismiss方法本质都是一样的,都是从屏幕中删除Dialog,唯一的区别是
                    // 调用cancel方法会回调DialogInterface.OnCancelListener如果注册的话,dismiss方法不会回掉
                    dialog.cancel();
                    // dialog.dismiss();
                } catch (InterruptedException e) {
                    // TODO Auto-generated catch block
                    e.printStackTrace();
                }
            }
        }).start();


