1.引入
对于很多app,使用UITableView控件时都会对图形进行圆角处理,这样显得app美观不少,常用的圆角处理,通过layer.cornerRadius和layer.maskToBounds设置即可。
// macOs 10.12, XCode 8 , iOS 10.0
    func tableView(_ tableView: UITableView, cellForRowAt indexPath: IndexPath) -> UITableViewCell {
        var cell = tableView.dequeueReusableCell(withIdentifier: "tableViewCell");
        if cell == nil {
            cell = UITableViewCell.init(style: .default, reuseIdentifier: "tableViewCell");
            cell?.imageView?.layer.masksToBounds = true;
            cell?.imageView?.layer.cornerRadius = RowHeight / 2;
            cell?.imageView?.backgroundColor = UIColor.white;
            cell?.backgroundColor = UIColor.white;
        }

        let cacheIndex = indexPath.row % 20;
        let nameString = "siberian\(cacheIndex)";
        let image = UIImage.init(named: nameString);
        cell?.imageView?.image = image;
        return cell!;
    }
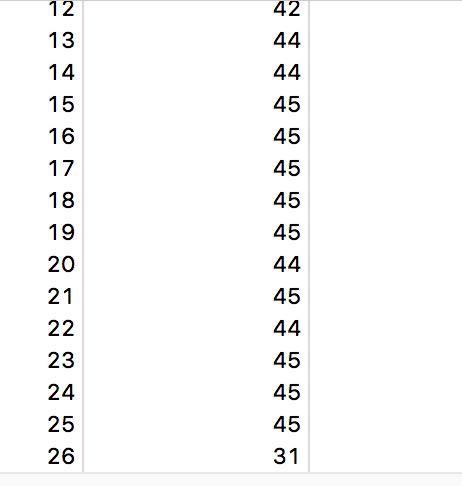
有离屏渲染,当一页图片展示只有10张左右时,数量56FPS,看起来还是可以的,当一页设置有20张左右时,就只有45FPS了.
测试机为:iPhone 5s/iOS 8.3
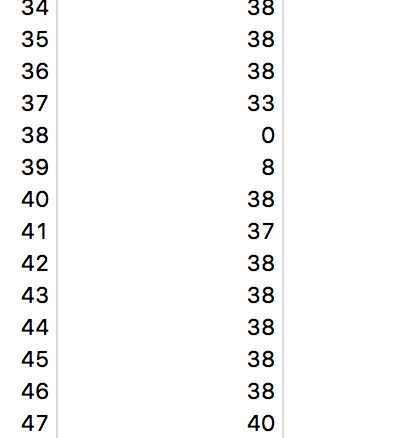
测试机:iPad Air 2/iOS 10.0
38~40FPS
2.优化
1.离屏渲染处理
圆角是离屏渲染的一大杀手,所以必须处理好,采用Core Graphic在后台进行对图片进行clip处理,这样就能很好的处理离屏渲染的问题。
//  绘制圆角图片,没有离屏渲染,但是有图层混合。
            DispatchQueue.global(qos: .background).async(execute: {
                let rect = CGRect.init(x: 0, y: 0, width: RowHeight, height: RowHeight);
                UIGraphicsBeginImageContextWithOptions(rect.size, false, UIScreen.main.scale);
                let path = UIBezierPath.init(roundedRect: rect, cornerRadius: rect.height / 2.0);
                path.addClip();
                image?.draw(in: rect);
                let lastImage = UIGraphicsGetImageFromCurrentImageContext();
                UIGraphicsEndImageContext();
                self.cache.setObject(_ :lastImage!, forKey: String(cacheIndex) as AnyObject, cost:Int((lastImage?.size.width)!) * Int((lastImage?.size.height)!) * Int(UIScreen.main.scale));
                DispatchQueue.main.async(execute: {
                    cell.imageView?.image = lastImage;
                });
            });
2.缓存处理好的图片
以上图片是经过处理后得到的,可以将其缓存,等到需要使用时,可以直接从本地缓存拉取。
let cacheImage = cache.object(forKey: String(cacheIndex) as AnyObject);
        if let lastCacheImage = cacheImage {
            cell.imageView?.image = lastCacheImage as? UIImage;
        }
3.优化图片获取的顺序
当用户滑动界面时,调用顺序为:
graph LR
scrollViewWillBeginDragging-->scrollViewDidScroll
scrollViewDidScroll-->scrollViewWillEndDragging
scrollViewWillEndDragging-->scrollViewDidEndDragging
scrollViewDidEndDragging-->scrollViewWillBeginDecelerating
scrollViewWillBeginDecelerating-->scrollViewDidScroll
scrollViewDidScroll-->scrollViewDidEndDecelerating
我们可以在滑动时,可以直接设置cell,但不去绘图,只在停止时调用refreshTableView()方法,方法如下:
    // 当滑动结束时调用
    func scrollViewDidEndDecelerating(_ scrollView: UIScrollView) {
        refreshTableView();
        print(#function);
    }

    // 当拖拽停止时调用
    func scrollViewDidEndDragging(_ scrollView: UIScrollView, willDecelerate decelerate: Bool) {
        refreshTableView();
        print(#function);
    }

    func refreshTableView() {
        let arr:[IndexPath]? = self.tbView.indexPathsForVisibleRows;
        if let visibleIndexArr = arr {
            visibleIndexArr.forEach({ (indexPath) in
                let cell = self.tbView.cellForRow(at: indexPath);
                getImage(indexPath: indexPath, forCell: cell!);
            });
        }
    }
4.优化后的图片
3.结语
通过上面后台绘制圆角,缓存处理过的图片,选择适当时机进行图片加载,使得帧率保持在56~58FPS左右。
Demo地址


