上一篇我们学习了anko库的使用,到这里我们来做一个简单的小项目吧!
那使用什么架构来写呢,这里我们使用Kotlin+dagger2+retrofit+MVP架构来撸码
下面分享一下大牛写的不错的文章以及自己在开发时候用到的开源接口
dagger2 http://www.jianshu.com/p/39d1df6c877d
retrofit http://www.jianshu.com/p/308f3c54abdd
API http://gank.io/api
正文
因为项目中用的Dagger2比较多,这里来讲解一下项目中用到的几个注解,更多的详情可以看上面的地址
Component:组件、管理器、注入器
功能就是将类中使用@Inject标记的属性和在对应属性类中使用@Inject标记的构造方法,然后将它们关联起来。
而如果构造方法需要参数,或者我们没法再需要注入的对象的构造方法加入@Inject注解的时候就需要使用Module
该注解里面的参数有两个,一个是设置modules所关联的Module类,第二个是dependency所依赖的Component

Module:提供者、依赖对象工厂
功能是与被@Inject标记的构造方法一样提供生成依赖的对象
因为对于第三方库我们没有办法将它的构造方法加入@Inject标记,这时候我们需要使用Module生成,并提供@provide注解,Component会去查找Module类中@provide的方法获取到对象并通过component返回目标类需要的对象并注入到目标类
Qualifier:限定符
功能是在同一纬度下存在多个依赖对象的提供方式(多个构造方法),则会迷失。这时,可以使用Qualifier
提供依赖对象有两种方式
(1)通过使用Inject注解标注的构造函数来创建
(2)通过工厂模式的Module来创建
如果一个依赖对象以上两种方式都能够提供,它会优先使用Module。Qualifier有一个@Named 指定相同的参数和自定义Qualifier注解一样的效果
@Qualifier
@Documented
@Retention(RUNTIME)
public @interface Named {

    /** The name. */
    String value() default "";
}
Scope:作用域
管理创建的类实例的生命周期。
可以通过Scope来限定通过Module和Inject方式创建的类的实例的生命周期能够与目标类的生命周期相同。
Scope本身没有制定生命周期的能力,它的存在一是为了可读性,二是更好的管理Component和Module的关系
如果你想了解Dagger2具体调用的流程可以查看
接下来我们开始看一下要做的小项目的效果图
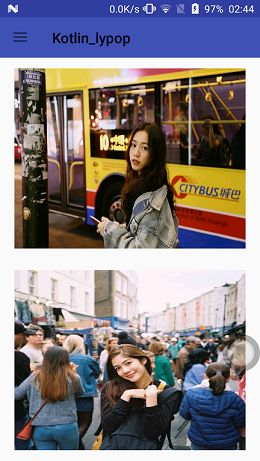
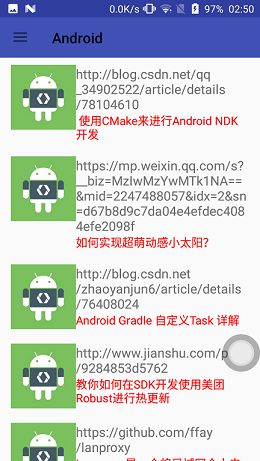
ok,项目比较low,废话不多说,开始我们撸代码时间
我是这样分包的
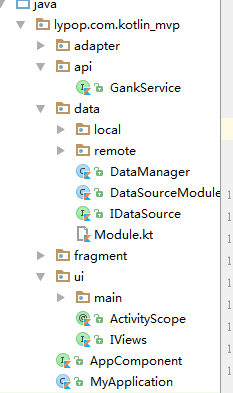
在项目中我定义了一个全局的Component类
@Singleton
@Component(modules = arrayOf(DataSourceModule::class)) //注入器对象提供工厂
interface AppComponent{
    /**
     * 全局注入器能够提供的对象
     */
    fun dataManager(): DataManager
}
这个类为DataSourceModule用来提供DataManager对象的生成,使用DataManager来对网络请求
会去查询DataSourceModule类中去找生成DataManager对象的方法
@Module
class DataSourceModule {

    @Singleton
    @Provides
    fun provideGankService(): GankService {
        return Retrofit.Builder().addConverterFactory(GsonConverterFactory.create())
                .addCallAdapterFactory(RxJava2CallAdapterFactory.create())
                .baseUrl(BASE_URL).build().create(GankService::class.java)
    }

    @Singleton
    @Local
    @Provides
    fun provideLocal(): IDataSource{
        return LocalDataSource()
    }

    @Singleton
    @Remote
    @Provides
    fun provideRemote(service: GankService): IDataSource {
        return RemoteDataSource(service)
    }

    @Singleton
    @Provides
    fun provideDataManager(@Remote remote: IDataSource, @Local local: IDataSource): DataManager {
        return DataManager(remote,local)
    }
}
这里推荐使用provide开头,在方法参数里面我有定义两个注解Remote和Local用来区分对应哪个一个IDataSource
@Qualifier
annotation class Remote
provideGankService方法里面的写法使用了Gson转换用于将json转化为对象、Rxjava回调用来对网络请求的结果做不同的处理
然后我们在来看一下DataManager类
fun getWelfareList(page: Int): Flowable {
    return remote.getWelfareList(page).onErrorResumeNext(local.getWelfareList(page))
}
主要是定义相应的规则,先在网络请求获取,当失败的时候获取本地的数据
ok,前期的工作准备完毕,为了更好去使用APPComponent,我们在Application自定一个单例
class MyApplication: Application(){

    /**
     * 提供全局注入器的获得
     */
    lateinit private var appComponent: AppComponent

    companion object {
        lateinit var app: MyApplication
        fun getApplication(): MyApplication{
            return app
        }
    }

    override fun onCreate() {
        super.onCreate()
        app = this
        appComponent = DaggerAppComponent.builder().dataSourceModule(DataSourceModule()).build()
    }

    fun getAppComponent(): AppComponent = appComponent
}
开始我们的主界面,当然这个项目也就一个Activity,既然是MVP就少不了Persenter
@Inject
lateinit var presenter: MainPersenter
使用Inject注解来自动去创建MainPersenter对象,然后定义MainAppComponent
@ActivityScope
@Component(modules = arrayOf(MainActivityModule::class),dependencies = arrayOf(AppComponent::class))
interface MainAppComponent{
    fun inject(activity: MainActivity)
}
这里对APPComponent进行了依赖,因为在MainPersenter类里面使用到了DataManager的对象
@Module
class MainActivityModule(val view: MainActivity){

    @ActivityScope
    @Provides
    fun provide1Presenter(dataManager: DataManager): MainPersenter{
        return MainPersenter(view,dataManager)
    }

}
然后我们在来看一下MainPersenter
class MainPersenter(val view: MainViews, val dataManager: DataManager) {
    //福利
    fun getWelfarmList(page: Int) {
        dataManager.getWelfareList(page)
                .subscribeOn(Schedulers.io())
                .observeOn(AndroidSchedulers.mainThread())
                .doOnSubscribe { view.startLoading() }
                .doOnError { view.stopLoading() }
                .subscribe {
                    view.stopLoading()
                    view.showWefareList(it.results)
                }
}
在这个类中主要是使用DataManager的对象用来获取数据并针对获取成功和失败调用View层的方法
最后我们需要初始化Dagger2注入器
//初始化Dagger2注入器
DaggerMainAppComponent.builder()
        .appComponent(MyApplication.getApplication().getAppComponent())
        .mainActivityModule(MainActivityModule(this))
        .build().inject(this)
另外在写生成ItemView的时候写了两种方式,这里也一并贴出来和大家一起分享
第一种使用with表达式
val view = with(context){
verticalLayout {
    gravity = Gravity.CENTER_HORIZONTAL
    imageView {
        id = R.id.welfare_item_iv
        imageResource = R.mipmap.ic_launcher
        scaleType = ImageView.ScaleType.FIT_XY
        lparams {
            height = dip(250)
            width = matchParent
            leftMargin = dip(20)
            rightMargin = dip(20)
            topMargin = dip(15)
            bottomMargin = dip(15)
             }
        }
    }
}
当然这样写感觉代码太多了,我们需要将生成布局的代码单独使用一个类,我们可以定义一个类来继承AnkoComponent来写独立的一个布局,如果安装插件还可以预览界面的效果
class RecyclerUI: AnkoComponent{
override fun createView(ui: AnkoContext): View = with(ui){
    verticalLayout {
        orientation = LinearLayout.HORIZONTAL
        lparams {
            topMargin = dip(10)
            leftMargin = dip(15)
            rightMargin = dip(15)
            bottomMargin = dip(10)
        }
        imageView {
            id = R.id.android_item_iv
            imageResource = R.mipmap.android_icon
            lparams {
                width = dip(90)
                height = dip(90)
            }
        }
        verticalLayout {
            textView {
                id = R.id.android_item_tv1
                textSize = 18.toFloat()

            }

            textView {
                id = R.id.android_item_tv2
                textSize = 16.toFloat()
                textColor = Color.RED
                }
            }
        }
    }
}
至此,小项目的讲解就结束了。
坚持总会有结果,总会有收获的