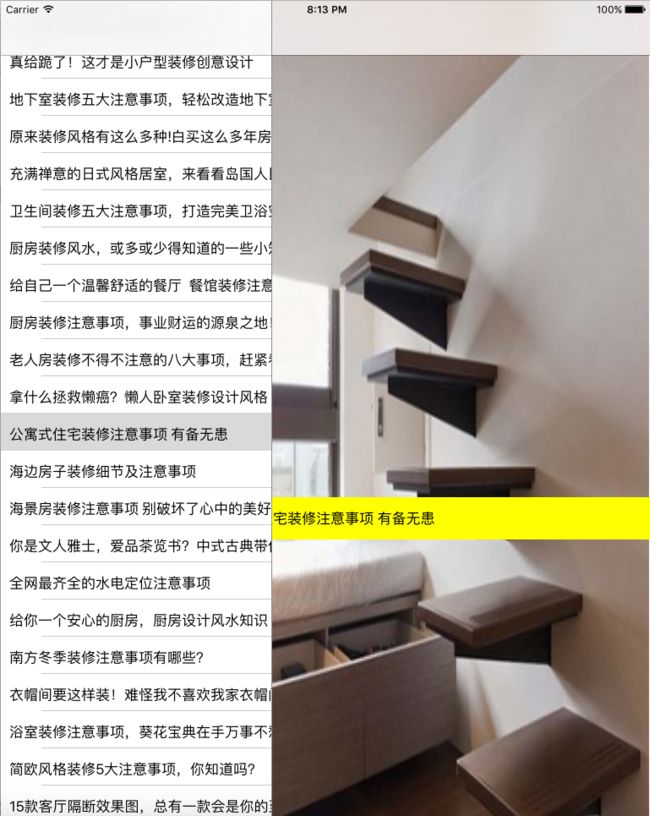
这种控制器只能用于iPad,它可以在iPad屏幕中显示两个不同的场景:在横向模式下,左边显示一个表,供用户选择;用户选择表中的元素后,详细视图将显示该元素的详细信息。如果iPad被旋转到纵向模式,表将消失,而详细视图将填满整个屏幕;要进行导航,用户可触摸一个工具栏按钮,这将显示一个包含表的弹出框。
默认情况下,UISplitViewController的一端连接到一个受导航控制器(UINavigationController)管理的表视图(UITableViewController),这代表主场景;另一端连接到一个普通视图控制器(UIViewController),这代表详细场景。
可以将主场景和详细场景替换为新的控制器,只需要删除默认的控制器,然后按住Control键,并从分割视图控制器对象拖曳到新的主场景或详细场景,再在Xcode提示时选择Relationship - masterViewController或Relationship - detailViewController。
主场景和详细场景可以通过分割视图控制器互相访问,属性splitViewController包含一个名为viewControllers的数组。通过使用NSArray的方法lastObject,可获取该数组的最后一个元素(详细信息视图)。通过调用方法objectAtIndex,并将索引0传递给它,可获取该数组的第一个元素(主视图)。这样,两个视图控制器就可交换信息了。

1, 在AppDelegate.h 中声明两个属性 代码如下 ,分别为UISplitViewController 和 右视图的Controller 其中 self.splitViewController.viewControllers = @[masterNavi,detilleNavi]; 数组中两个NavigationController 分别为左右视图
#import#import "detilleViewController.h"@interface AppDelegate : UIResponder@property (strong, nonatomic) UIWindow *window;
@property(nonatomic,strong)UISplitViewController * splitViewController;
@property(nonatomic,strong)detilleViewController * detille;
@end
2,AppDelegate.m 中启动方法中代码如下所示
- (BOOL)application:(UIApplication *)application didFinishLaunchingWithOptions:(NSDictionary *)launchOptions {
// Override point for customization after application launch.
self.window = [[UIWindow alloc]initWithFrame:[UIScreen mainScreen].bounds];
ViewController * masterVC = [[ViewController alloc]init];
UINavigationController * masterNavi = [[UINavigationController alloc]initWithRootViewController:masterVC];
self.detille= [[detilleViewController alloc]init];
UINavigationController * detilleNavi = [[UINavigationController alloc]initWithRootViewController:self.detille];
self.splitViewController = [[UISplitViewController alloc]init];
[self.splitViewController setPresentsWithGesture:YES];
self.splitViewController.viewControllers = @[masterNavi,detilleNavi];
self.splitViewController.delegate = self.detille;
self.window.rootViewController =self.splitViewController;
[self.window makeKeyAndVisible];
return YES;
}
3,以下代码为左视图tableView的构建,需要注意的是, 在tableViewCell 的didSelect方法中,不能去创建右边视图的Controller,右视图Controller 已经在AppDelegate中创建好了, 所以在这里我们只需获取到右视图的Controller即可
#import "ViewController.h"#import "normalTableViewCell.h"#import "XWAFNetworkTool.h"#import "XWMain.h"#import "detilleViewController.h"#import "AppDelegate.h"@interface ViewController ()@property(nonatomic,strong)UITableView * tableView;
@property(nonatomic,strong)NSMutableArray * cellArray;
@property(nonatomic,strong)detilleViewController * detille;
@end
@implementation ViewController
-(void)handleData
{
self.cellArray = [NSMutableArray array];
[XWAFNetworkTool getUrl:@"http://api.guju.com.cn/v2/strategy/strategyList?userId=&count=50&start=0&" body:nil response:XWJSON requestHeadFile:nil success:^(NSURLSessionDataTask *task, id resposeObject) {
NSArray * array = [resposeObject objectForKey:@"strategyList"];
for (NSDictionary * dic in array) {
XWMain * model = [[XWMain alloc]init];
[model setValuesForKeysWithDictionary:dic];
[self.cellArray addObject:model];
}
[self.tableView reloadData];
} failure:^(NSURLSessionDataTask *task, NSError *error) {
NSLog(@"%@",error);
}];
}
-(void)createTableView
{
self.tableView = [[UITableView alloc]initWithFrame:CGRectMake(0, 0, self.view.frame.size.width, self.view.frame.size.height) style:UITableViewStylePlain];
self.tableView.delegate =self;
self.tableView.dataSource =self;
[self.view addSubview:self.tableView];
[self.tableView registerClass:[normalTableViewCell class] forCellReuseIdentifier:@"reuse"];
}
- (void)viewDidLoad {
[super viewDidLoad];
[self createTableView];
[self handleData];
// Do any additional setup after loading the view, typically from a nib.
}
-(NSInteger)tableView:(UITableView *)tableView numberOfRowsInSection:(NSInteger)section
{
return self.cellArray.count;
}
-(UITableViewCell*)tableView:(UITableView *)tableView cellForRowAtIndexPath:(NSIndexPath *)indexPath
{
XWMain * main = self.cellArray[indexPath.row];
normalTableViewCell * cell = [tableView dequeueReusableCellWithIdentifier:@"reuse"];
cell.normal = main;
return cell;
}
-(void)tableView:(UITableView *)tableView didSelectRowAtIndexPath:(NSIndexPath *)indexPath
{
XWMain * main = self.cellArray[indexPath.row];
AppDelegate * app =[UIApplication sharedApplication].delegate;
detilleViewController * detille = app.detille;
[detille setObject:main];
}
4,右视图中代码详见如下 其中 -(BOOL)splitViewController:(UISplitViewController *)svc shouldHideViewController:(UIViewController *)vc inOrientation:(UIInterfaceOrientation)orientation 为协议方法用来设置横屏是否支持分屏
#import "XWMain.h"
#import "UIImageView+WebCache.h"
@interface detilleViewController ()
@property(nonatomic,strong)UILabel * titleLabel;
@property(nonatomic,strong)UIImageView * imageV;
@end
@implementation detilleViewController
-(void)setObject:(id)object
{
_object = object;
[self loadDetilleView];
}
-(void)createSubView
{
self.titleLabel = [[UILabel alloc]init];
self.titleLabel.frame = CGRectMake(0, 0, self.view.frame.size.width , 50);
self.titleLabel.center = CGPointMake(self.view.frame.size.width/2, self.view.frame.size.height/2+100);
self.titleLabel.backgroundColor = [UIColor yellowColor];
self.titleLabel.textAlignment = NSTextAlignmentCenter;
self.imageV = [[UIImageView alloc]initWithFrame:CGRectMake(0, 0, self.view.frame.size.width, self.view.frame.size.height)];
[self.view addSubview:self.imageV];
[self.view addSubview:self.titleLabel];
}
-(void)loadDetilleView
{
if (!self.titleLabel) {
[self createSubView];
}
if (self.object) {
XWMain * main = self.object;
NSLog(@" !!!%@",main.title);
self.titleLabel.text = main.title;
self.titleLabel.textColor = [UIColor blackColor];
NSRange range = NSMakeRange(0, 3);
NSString * imageUrl = [NSString stringWithFormat:@"http://image.gooju.cn/images/%@/9/%@_0_9-.jpg",[main.covorPhotoId.description substringWithRange:range],main.covorPhotoId.description];
[self.imageV sd_setImageWithURL:[NSURL URLWithString:imageUrl]];
NSLog(@"***!!!%@",self.titleLabel.text);
}
}
-(BOOL)splitViewController:(UISplitViewController *)svc shouldHideViewController:(UIViewController *)vc inOrientation:(UIInterfaceOrientation)orientation
{
return YES;
}
- (void)viewDidLoad {
[super viewDidLoad];
[self loadDetilleView];
// Do any additional setup after loading the view.
}