不知道大家是不是注册了github,结果大部分的时间是在star项目,最多需要的时候百度个使用指南,代码复制粘贴,然后直接用一下开源项目。
有个智者说过:不看源码的程序员不是个好程序员
如果说有Android的开源框架是非分析不可的,那肯定就是Universal Image Loader (后面简称UIL)。因为无数人推荐过需要看看它的源码,所以我也就开始我的源码计划。
按照惯例,需要把github地址给上>>>>Universal Image Loader <<<<狂戳左边的这个链接。
1. 项目简介
1.1 UIL简介
UIL是一个什么开源项目?按照Github上面的解释
UIL是一个功能强大、灵活的、可以高度自定义化的组件,它可以实现图片加载,图片缓存和图片显示。
简单来说,它就是可以实现我们异步和同步加载图片,同时能够做到图片的三级缓存。至于哪三级(不是你想的三级啊!),后面一一解密。
1.2 项目结构
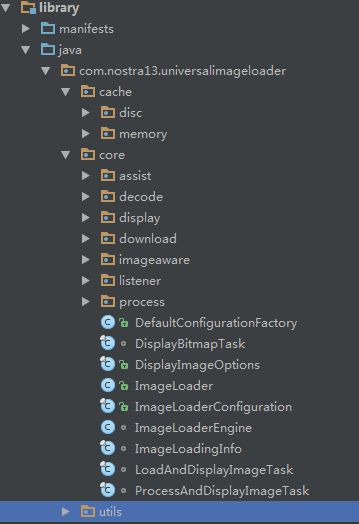
首先我们从这个项目的分包开始看起。参照上图,我们看到UIL主要分了三个包
- cache 缓存模块:包含内存缓存、磁盘缓存
- core 核心功能模块:包含图片解码、图片下载、图片显示、图片处理、图片操作任务以及一些配置模块等
- utils 工具模块:日志、图片大小等一些工具类
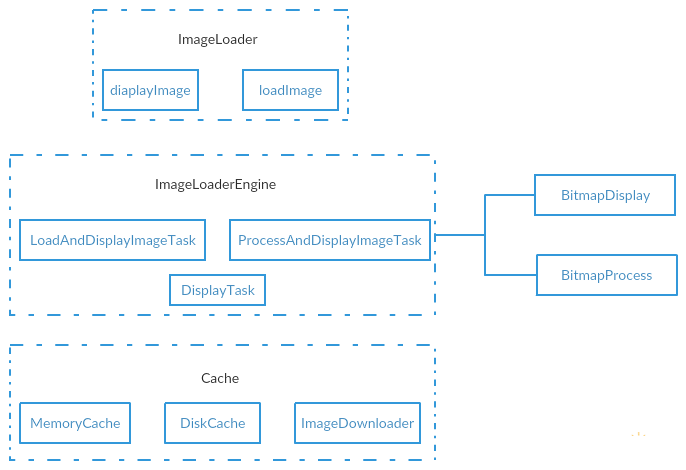
主要的几大模块就是上面这个图所展示的,我们从我们最熟悉的ImageLoader类开始分析一下。
1.3 UIL 简单使用步骤
ImageLoader使用方法,最简单的就是以下几个步骤
- getInstance 获得ImageLoader的单例对象
- init 初始化它的配置信息
- displayImage / loadImage 输入图片路径和对应控件
// 1. 先获取一个单例
ImageLoader imageLoader = ImageLoader.getInstance();

// 2. 给它配置它的多个参数(以下代码来自于UIL 自带的Sample)
ImageLoaderConfiguration.Builder config = new ImageLoaderConfiguration.Builder(context);
config.threadPriority(Thread.NORM_PRIORITY - 2);
config.denyCacheImageMultipleSizesInMemory();
config.diskCacheFileNameGenerator(new Md5FileNameGenerator());
config.diskCacheSize(50 * 1024 * 1024); // 50 MiBconfig.tasksProcessingOrder(QueueProcessingType.LIFO);
config.writeDebugLogs(); // Remove for release app
imageLoader.init(config.build());
显示的方式有三种,大家看下面的代码
// 3. 显示指定的Imageurl在相应ImageView上
imageLoader.displayImage(imageUri, imageView);

// 3. 也可以使用loadImage 方法,使用回调函数进行图片异步处理
imageLoader.loadImage(imageUri, new SimpleImageLoadingListener(){
  @Override
  public void onLoadingComplete(String imageUri, View view, Bitmap loadedImage) {
    // Do whatever you want with Bitmap
  }
});

// 3. 同步加载
Bitmap bmp = imageLoader.loadImageSync(imageUri);
在这三个步骤结束后,你就不需要管图片的加载问题,UIL就会自动跟你加载的对应地址处的图片。
那我们的模块分析就从ImageLoader这几个初始化步骤开始吧。
2 模块分析
2.1 ImageLoader模块
前两个步骤,getInstance就是获取一个单例,没什么好特别讲的。init也就是将Config对象赋值给内部的变量。我们从displayImage方法开始研究。
2.1.1 displayImage方法
loadImage和displayImage最后都会使用displayImage
我们来看displayImage最终的方法的实现(为了我们专注主要功能,我刨去了一些检测null的代码,只留下主要功能!)
    public void displayImage(String uri, ImageAware imageAware, DisplayImageOptions options,
            ImageSize targetSize, ImageLoadingListener listener, ImageLoadingProgressListener progressListener) {
        ......
        // 判断一下各项参数是不是空
        // 如果Uri是空,那么就直接完成加载过程。

        String memoryCacheKey = MemoryCacheUtils.generateKey(uri, targetSize);
        engine.prepareDisplayTaskFor(imageAware, memoryCacheKey);

        listener.onLoadingStarted(uri, imageAware.getWrappedView());

        Bitmap bmp = configuration.memoryCache.get(memoryCacheKey);
        if (bmp != null && !bmp.isRecycled()) {
            if (options.shouldPostProcess()) {
                ImageLoadingInfo imageLoadingInfo = new ImageLoadingInfo(uri, imageAware, targetSize, memoryCacheKey,
                        options, listener, progressListener, engine.getLockForUri(uri));
                ProcessAndDisplayImageTask displayTask = new ProcessAndDisplayImageTask(engine, bmp, imageLoadingInfo,
                        defineHandler(options));
                if (options.isSyncLoading()) {
                    displayTask.run();
                } else {
                    engine.submit(displayTask);
                }
            } else {
                options.getDisplayer().display(bmp, imageAware, LoadedFrom.MEMORY_CACHE);
                listener.onLoadingComplete(uri, imageAware.getWrappedView(), bmp);
            }
        } else {
            ...

            ImageLoadingInfo imageLoadingInfo = new ImageLoadingInfo(uri, imageAware, targetSize, memoryCacheKey,
                    options, listener, progressListener, engine.getLockForUri(uri));
            LoadAndDisplayImageTask displayTask = new LoadAndDisplayImageTask(engine, imageLoadingInfo,
                    defineHandler(options));
            if (options.isSyncLoading()) {
                displayTask.run();
            } else {
                engine.submit(displayTask);
            }
        }
    }
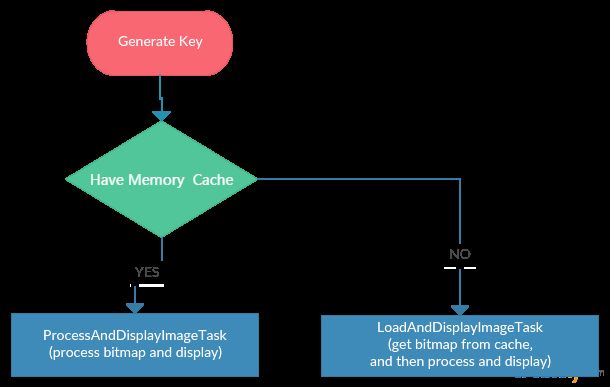
总的来说这个流程为以下几个步骤:
- 生成指定的Key,将其与控件ImageAware一一对应
- 从内存缓存中获取指定Key的Bitmap
- 如果内存中没有Bitmap就通过engine启动LoadAndDisplayImageTask(这是个Runnable)
- 如果内存中有Bitmap那么就通过engine启动ProcessAndDisplayImageTask(这也是个Runnable)
下面我们来看一下这两个Task具体做些什么。
2.1.2 ProcessAndDisplayImageTask
这个Task的注释解释道,这是个处理并且显示图片的任务,显示任务的工作交给DisplayImageTask去做。因为这是一个Runnable对象。所以让我们来看一下它的run方法。
    public void run() {
        BitmapProcessor processor = imageLoadingInfo.options.getPostProcessor();
        Bitmap processedBitmap = processor.process(bitmap);
        DisplayBitmapTask displayBitmapTask = new DisplayBitmapTask(processedBitmap, imageLoadingInfo, engine,
                LoadedFrom.MEMORY_CACHE);
        LoadAndDisplayImageTask.runTask(displayBitmapTask, imageLoadingInfo.options.isSyncLoading(), handler, engine);
    }
简单的来说,这个ProcessAndDisplayImageTask做的工作是以下四步:
- 从ImageLoadingInfo的DisplayImageOption拿到BitmapProcess,
getPostProcessor这个方法是取得一个在显示Display之前,在保存到MemoryCache之后的BitmapProcessor - 从BitmapProcess中调用process方法处理Bitmap
- 新建一个DisplayBitmapTask,然后丢进静态方法runTask中去执行。
runTask实现的工作,主要是Handler.post(Runnable),具体的细节看源码
总结来说ProcessAndDisplayImageTask主要是起到一个联合的过程,负责将BitmapProcessor和DisplayBitmapTask的按照顺序连接到一起。
2.1.3 LoadAndDisplayImageTask
前者ProcessAndDisplayImageTask主要是在内存缓存中有的时候执行的Task,那么在内存缓存中没有对应Bitmap的时候,LoadAndDisplayImageTask所执行的事务就会相对复杂一些。
让我们也从run方法开始看起。
    @Override
    public void run() {
        if (waitIfPaused()) return;
        if (delayIfNeed()) return;

        ReentrantLock loadFromUriLock = imageLoadingInfo.loadFromUriLock;
        ...
        loadFromUriLock.lock();
        Bitmap bmp;
        try {
            ...
            bmp = configuration.memoryCache.get(memoryCacheKey);
            if (bmp == null || bmp.isRecycled()) {
                bmp = tryLoadBitmap();
                if (bmp == null) return; // listener callback already was fired
                ...

                if (options.shouldPreProcess()) {
                    bmp = options.getPreProcessor().process(bmp);
                    ...
                }

                if (bmp != null && options.isCacheInMemory()) {
                    configuration.memoryCache.put(memoryCacheKey, bmp);
                }
            } else {
                loadedFrom = LoadedFrom.MEMORY_CACHE;
            }

            if (bmp != null && options.shouldPostProcess()) {
                bmp = options.getPostProcessor().process(bmp);
                ...
            }
            ...
        } catch (TaskCancelledException e) {
            fireCancelEvent();
            return;
        } finally {
            loadFromUriLock.unlock();
        }

        DisplayBitmapTask displayBitmapTask = new DisplayBitmapTask(bmp, imageLoadingInfo, engine, loadedFrom);
        runTask(displayBitmapTask, syncLoading, handler, engine);
    }
这个函数的执行过程有点长,我们一步一步来
- 这个线程的执行会判断是否需要等待,或者是否需要延迟对应时间。具体细节我们后面再分析。
if (waitIfPaused()) return;
if (delayIfNeed()) return;
通过重入锁ReentrantLock 进行图片加载过程的锁定
先从内存缓存中获取对应Key值的Bitmap
bmp = configuration.memoryCache.get(memoryCacheKey);
如果内存中没有读取到,那么就调用tryLoadBitmap继续从其他地方读取Bitmap,如果tryLoadBitmap没有能读取到Bitmap,那么就结束这次Task。如果读取到就继续下一步(tryLoadBitmap的过程我们后面再说)
对于不是从内存获取到的Bitmap对象,我们需要做两步,首先获取一个PreProcessor,也就是在Bitmap对象存入缓存前的BitmapProcessor(跟之前的PostProcessor类似),将图片进行一个预处理。
如果读取到了Bitmap,那么我们就将其他方式读取的Bitmap重新放入内存缓存中,这样方便下次进行这个图片获取时,能更加高效。因为图片的读取,首先是从内存中获取的。
if (options.shouldPreProcess()) {
        bmp = options.getPreProcessor().process(bmp);
        ...
}
if (bmp != null && options.isCacheInMemory()) {
       configuration.memoryCache.put(memoryCacheKey, bmp);
}
最后将bmp 也就是不管是从内存中读取的,还是通过tryLoadBitmap方法读取的,进行一个PostProcess的处理,也就是显示预处理。
最后执行DisplayBitmapTask,控件对应的Bitmap显示到控件上去。
-tryLoadBitmap
之前说到了UIL的缓存机制是采用了三级缓存机制。之前我们在LoadAndDisplayImageTask中,首先会从memoryCache中加载
这个就是三级缓存机制中的第一级——内存。
第二级和第三极就是在tryLoadBitmap中实现的。让我们进代码中看一下
private Bitmap tryLoadBitmap() throws TaskCancelledException {
        Bitmap bitmap = null;

        File imageFile = configuration.diskCache.get(uri);
        if (imageFile != null && imageFile.exists() && imageFile.length() > 0) {
            loadedFrom = LoadedFrom.DISC_CACHE;
            ...
            bitmap = decodeImage(Scheme.FILE.wrap(imageFile.getAbsolutePath()));
        }
        if (bitmap == null || bitmap.getWidth() <= 0 || bitmap.getHeight() <= 0) {
            ...
            loadedFrom = LoadedFrom.NETWORK;

            String imageUriForDecoding = uri;
            if (options.isCacheOnDisk() && tryCacheImageOnDisk()) {
                imageFile = configuration.diskCache.get(uri);
                if (imageFile != null) {
                    imageUriForDecoding = Scheme.FILE.wrap(imageFile.getAbsolutePath());
                }
            }
            ...
            bitmap = decodeImage(imageUriForDecoding);

            if (bitmap == null || bitmap.getWidth() <= 0 || bitmap.getHeight() <= 0) {
                fireFailEvent(FailType.DECODING_ERROR, null);
            }
        }
        return bitmap;
    }
我们看到会调用Configuration的diskCache.get(uri)方法,获取磁盘缓存中的获取对应的File,
这个就是三级缓存机制中的第二级——磁盘。
继续往下分析,由于磁盘缓存是用File对象进行映射的,这里需要调用decodeImage方法将File对应的图片解码成Bitmap对象。当磁盘中还是没有这个图片,那么显然需要去网络上下载。
通过tryCacheImageOnDisk方法将网络上的资源,缓存到磁盘中。然后再从DiskCache中去取出File对象,继续解码成Bitmap对象。最后成功就返回。
-tryCacheImageOnDisk 缓存图片到Disk中
在磁盘中没有读取到,UIL就需要从网络上去请求资源了。
这就是UIL的三级缓存机制中的第三级——网络请求
我们看代码:
private boolean tryCacheImageOnDisk() throws TaskCancelledException {
    ...
    boolean loaded;
    ...
    loaded = downloadImage();
    if (loaded) {
        int width = configuration.maxImageWidthForDiskCache;
        int height = configuration.maxImageHeightForDiskCache;
        if (width > 0 || height > 0) {
            ...
            resizeAndSaveImage(width, height); // TODO : process boolean result
        }
    }
    ...
    return loaded;
}
调用downloadImage方法下载图片,然后对图片进行长宽的处理,设置为缓存中的最大值再存入磁盘缓存DiskCache中。
而downloadImage主要就是调用ImageDownloader进行数据的下载,然后保存到DiskCache中。这个ImageDownloader具体细节我们后面具体分析。这里我们只要知道它是一个下载器的接口,可以自行实现将Uri网络请求得到图片流。
2.1.4 小结
到这里我们对ImageLoader的一个基本流程大概介绍完了,我们来小结一下。
UIL的整个处理逻辑从ImageLoader这个类的displayImage方法开始, 它主要工作就是在内存中获取对应Key值的Bitmap,然后通过获取结果,丢给ImageLoaderEngine线程池内去执行不同类型的任务,其中主要两个任务就是ProcessAndDisplayImageTask和LoadAndDisplayImageTask。
前者是内存有就Bitmap就直接通过BitmapProcessor处理然后丢给DisplayTask任务去显示。后者是没有内存的时候就需要开启三级缓存机制,进行逐级的加载。
三级缓存指的是:内存、磁盘、网络
分别通过MemoryCache、DiskCache和ImageDownloader三个去实现了。
总结
第一次写源码的分析,有什么不足请批评指正。
后面还会继续跟进分析一下UIL的缓存的实现方式,个人觉得这个模块还是蛮有意思的。
同时我觉得源码嘛,还是要自己对着代码看,光看这个文章还是会一头雾水的。而且不要陷于代码的细节,执着于某个细节是怎么实现的,忽略了主干的分析,最后看得会很头大的。
这里安利之前看到的介绍代码阅读的文章,《代码阅读的姿势》
纸上得来终觉浅,绝知此事要躬行
参考文章:
- Android Universal Image Loader 源码分析
- Android Universal Image Loader Github readme
尊重原创,转载请注明出处


