项目中如果需要由多个数据源,比如3个,一个主两个从。主库主要是写操作,两个从库做读操作。
那么在spring boot中怎么使用AOP判断程序是读还是写,并且分配到不同的数据源中呢?
本文重要是 的代码是使用 spring boot 、druid、mybatis、mybatis plus等技术做支持的。
逻辑步骤
大概的逻辑为,
1、引入durid
2、配置三个数据源,1个写,2个读,两个从库实现简单的负载功能。
3、配置mybatis
4、配置mybatis plus
5、配置aop
6、定义却点 读(select)的方法操作,使用读库的数据源,其他的 update、delete、insert等使用写库的数据源
7、给写库配置spring 的事务,出现异常的时候回滚。
引入jar
这里不累赘写 mysql 、druid等jar包的引入。
            org.springframework.boot
            spring-boot-starter-aop
配置Druid
@Configuration
public class DruidConfig {
    /**
     * 注册DruidServlet
     * http://localhost:8080/druid/datasource.html查看监控信息
     * @return
     */
    @Bean
    public ServletRegistrationBean druidServletRegistrationBean() {
        ServletRegistrationBean servletRegistrationBean = new ServletRegistrationBean();
        servletRegistrationBean.setServlet(new StatViewServlet());
        servletRegistrationBean.addUrlMappings("/druid/*");
        return servletRegistrationBean;
    }

    /**
     * 注册DruidFilter拦截
     *
     * @return
     */
    @Bean
    public FilterRegistrationBean duridFilterRegistrationBean() {
        FilterRegistrationBean filterRegistrationBean = new FilterRegistrationBean();
        filterRegistrationBean.setFilter(new WebStatFilter());
        Map initParams = new HashMap();
        //设置忽略请求
        initParams.put("exclusions", "*.js,*.gif,*.jpg,*.bmp,*.png,*.css,*.ico,/monitor/druid/*");
        filterRegistrationBean.setInitParameters(initParams);
        filterRegistrationBean.addUrlPatterns("/*");
        return filterRegistrationBean;
    }
}
配置yml
writedatasource:
  url: jdbc:mysql://xx.x.x.x:3306/slife?useUnicode=true&characterEncoding=utf8&useSSL=false
  driverClass: com.mysql.jdbc.Driver
  username: xx
  password: cdd
  initialSize: 1
  minIdle: 1
  maxActive: 20
  testOnBorrow: true
  timeBetweenEvictionRunsMillis: 60000
  minEvictableIdleTimeMillis: 300000
  validationQuery: SELECT 1 FROM DUAL
  testWhileIdle: true
  testOnReturn: false
  poolPreparedStatements: true
  maxPoolPreparedStatementPerConnectionSize: 20
  filters: stat,wall,logback
  #connectionProperties: druid.stat.mergeSql=true;druid.stat.slowSqlMillis=5000
  useGlobalDataSourceStat: true


mybatis:
  mapper-locations: classpath:mapper/*.xml
  type-aliases-package: com.slife.entity


readdatasource01:
  url: jdbc:mysql://xx.x.x.x:3306/slife?useUnicode=true&characterEncoding=utf8&useSSL=false
  driverClass: com.mysql.jdbc.Driver
  username: xx
  password: cdd
  initialSize: 1
  minIdle: 1
  maxActive: 20
  testOnBorrow: true
  timeBetweenEvictionRunsMillis: 60000
  minEvictableIdleTimeMillis: 300000
  validationQuery: SELECT 1 FROM DUAL
  testWhileIdle: true
  testOnReturn: false
  poolPreparedStatements: true
  maxPoolPreparedStatementPerConnectionSize: 20
  filters: stat,wall,logback
  #connectionProperties: druid.stat.mergeSql=true;druid.stat.slowSqlMillis=5000
  useGlobalDataSourceStat: true


readdatasource02:
  url: jdbc:mysql://xx.x.x.x:3306/slife?useUnicode=true&characterEncoding=utf8&useSSL=false
  driverClass: com.mysql.jdbc.Driver
  username: xx
  password: cdd
  initialSize: 1
  minIdle: 1
  maxActive: 20
  testOnBorrow: true
  timeBetweenEvictionRunsMillis: 60000
  minEvictableIdleTimeMillis: 300000
  validationQuery: SELECT 1 FROM DUAL
  testWhileIdle: true
  testOnReturn: false
  poolPreparedStatements: true
  maxPoolPreparedStatementPerConnectionSize: 20
  filters: stat,wall,logback
  #connectionProperties: druid.stat.mergeSql=true;druid.stat.slowSqlMillis=5000
  useGlobalDataSourceStat: true
加载配置文件数据
/**
 * 只提供了常用的属性,如果有需要,自己添加
 *
 */
@Component
@ConfigurationProperties(prefix = "writedatasource")
public class WriteProperties extends DataProperties{

}


/**
 * 只提供了常用的属性,如果有需要,自己添加
 *
 */
@Component
@ConfigurationProperties(prefix = "readdatasource02")
public class ReadProperties2 extends DataProperties{

}

@ConfigurationProperties(prefix = "druid")
public class DruidProperties {
    private String url;
    private String username;
    private String password;
    private String driverClass;

    private int maxActive;
    private int minIdle;
    private int initialSize;
    private boolean testOnBorrow;
    private String filters;
    。
    。
    。
    。
get  set  省略
3、定义数据源
public enum DataSourceType {
    read("read", "从库"),
    write("write", "主库");

    private String type;

    private String name;

    DataSourceType(String type, String name) {
        this.type = type;
        this.name = name;
    }

    public String getType() {
        return type;
    }

    public void setType(String type) {
        this.type = type;
    }

    public String getName() {
        return name;
    }

    public void setName(String name) {
        this.name = name;
    }
}
简单的负载均衡配置
public class BlifeAbstractRoutingDataSource extends AbstractRoutingDataSource {
    private  int dataSourceNumber;
    private AtomicInteger count = new AtomicInteger(0);

    public BlifeAbstractRoutingDataSource(int dataSourceNumber) {
        this.dataSourceNumber = dataSourceNumber;
    }

    @Override
    protected Object determineCurrentLookupKey() {
        String typeKey = DataSourceContextHolder.getJdbcType();
        if (DataSourceType.write.getType().equals(typeKey)){
            return DataSourceType.write.getType();
        }
        // 读 简单负载均衡
        int number = count.getAndAdd(1);
        int lookupKey = number % dataSourceNumber;
        return new Integer(lookupKey);
    }
}
把数据源加ThreadLocal中
public class DataSourceContextHolder {
    private static final ThreadLocal LOCAL = new ThreadLocal();

    private static Logger logger = LoggerFactory.getLogger(DataSourceContextHolder.class);

    public static ThreadLocal getLocal() {
        return LOCAL;
    }

    /**
     * 读可能是多个库
     */
    public static void read() {

        LOCAL.set(DataSourceType.read.getType());
    }

    /**
     * 写只有一个库
     */
    public static void write() {
        logger.debug("writewritewrite");
        LOCAL.set(DataSourceType.write.getType());
    }

    public static String getJdbcType() {
        return LOCAL.get();
    }
}
配置写库的事物
读库 一般没配置事物的需求,当然配置了只读会有更好的效果。
@Configuration
@EnableTransactionManagement
public class DataSourceTransactionManager extends DataSourceTransactionManagerAutoConfiguration {

    private Logger logger= LoggerFactory.getLogger(getClass());

    /**
     * 自定义事务
     * MyBatis自动参与到spring事务管理中,无需额外配置,
     * 只要org.mybatis.spring.SqlSessionFactoryBean引用的数据源与
     * DataSourceTransactionManager引用的数据源一致即可,否则事务管理会不起作用。
     * @return
     */
    @Resource(name = "writeDataSource1")
    private DataSource dataSource;

    @Bean(name = "transactionManager")
    public org.springframework.jdbc.datasource.DataSourceTransactionManager transactionManagers() {
        logger.info("-------------------- transactionManager init ---------------------");
        return new org.springframework.jdbc.datasource.DataSourceTransactionManager(dataSource);
    }
}
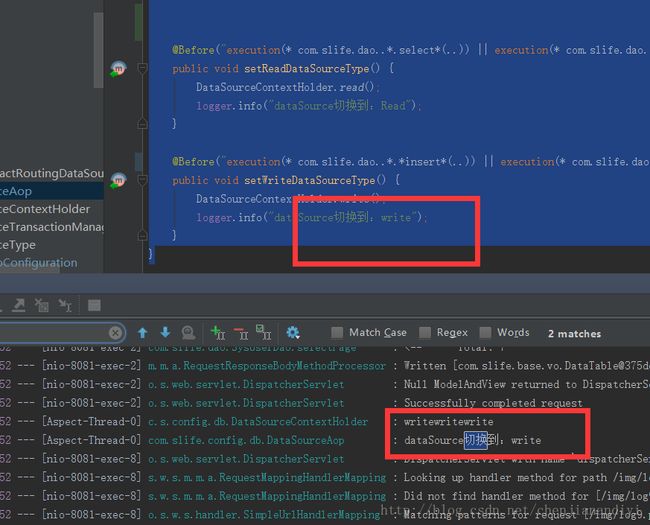
约定方法,读写动态切换
@Aspect
@Component
@Order(-100)// 保证该AOP在@Transactional之前执行
public class DataSourceAop {
    private  Logger logger = LoggerFactory.getLogger(getClass());


    @Before("execution(* com.slife.dao..*.select*(..)) || execution(* com.slife.dao..*.get*(..))")
    public void setReadDataSourceType() {
        DataSourceContextHolder.read();
        logger.info("dataSource切换到:Read");
    }

    @Before("execution(* com.slife.dao..*.*insert*(..)) || execution(* com.slife.dao..*.*update*(..))")
    public void setWriteDataSourceType() {
        DataSourceContextHolder.write();
        logger.info("dataSource切换到:write");
    }
}
运行项目,执行结果
点击获取阿里云优惠券
我的官网
我的官网http://guan2ye.com
我的CSDN地址http://blog.csdn.net/chenjianandiyi
我的地址http://www.jianshu.com/u/9b5d1921ce34
我的githubhttps://github.com/javanan
我的码云地址https://gitee.com/jamen/
阿里云优惠券https://promotion.aliyun.com/ntms/act/ambassador/sharetouser.html?userCode=vf2b5zld&utm_source=vf2b5zld


