参考链接:http://codingpy.com/article/vim-and-python-match-in-heaven/
首先给大家推荐一个技术网站,里面的文章我个人认为写的很好(编程派)。
在编程工具方面,我用过nodepad++,sublime, pycharm等等,现在主要使用pycharm,毕竟IDE集成方便,省了不少烦恼。换了在OS 工作之后,总是需要用vim操作,因为很多操作、快捷键什么的,都不懂用起来很笨拙。但是vim的配置确实是初学者有点头疼,所以,今天特意整理一下,仅供参考,具体的大家可以去原作者那里看看。
一、vim的基本操作
普通模式下:
(1)、^符号可以回到行首,$可以回到行尾
(2)、G可以回到文章末尾,gg可以回到文章首部
(3)、D可以删除单个字符,dd可以删除整行
(4)HJKL分别表示左下上右
其他的,请读者自行google,看看youtube上的教学视频,学的更快
二、修改配置文件
1、查看是否已安装vim
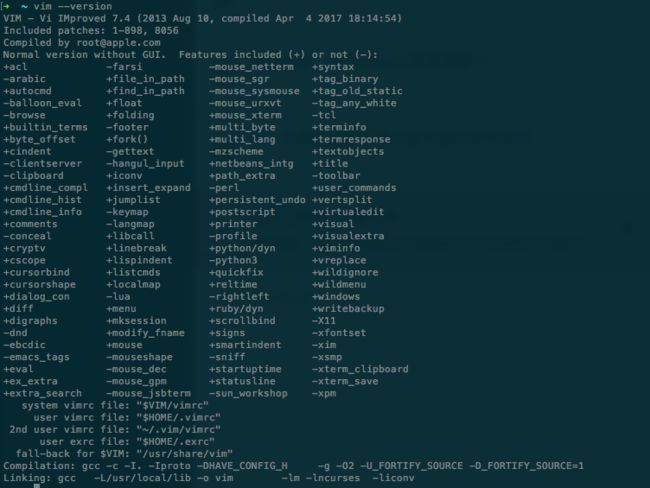
vim --version
如果已经安装,会出现如下的情况:
在这一步,需要保证下面两点要求:
(1)、vim编辑版本应该大于7.3
(2)、支持python语言,你可以搜索一下,确保有python
2、OSX上面vim的安装,首先保证你已经安装了homebrew
brew update
brew install vim
其他系统,请自行google
3、vim的扩展
vim可以通过扩展使vim获得现代集成开发环境的特性,而vim的扩展通常也被成为bundle或者插件
vundle
vim有多个扩展管理器,但是文章推荐vundle。可以把它想象成vim的pip。有了它,安装和更新包就很容易了,安装命令,前面是git地址,后面是本机文件夹
git clone https://github.com/gmarik/Vundle.vim.git ~/.vim/bundle/Vundle.vim
该命令将下载vundle插件管理器,并将它放置在你的vim编辑器bundles文件夹中。然后我们就可以通过.vimrc(~/.vimrc)管理我们的扩展了。然后把下面的vundle配置添加到.vimrc中
set nocompatible " required
filetype off " required
" set the runtime path to include Vundle and initialize
set rtp+=~/.vim/bundle/Vundle.vim
call vundle#begin()
" alternatively, pass a path where Vundle should install plugins
"call vundle#begin('~/some/path/here')
" let Vundle manage Vundle, required
Plugin 'gmarik/Vundle.vim'
" Add all your plugins here (note older versions of Vundle used Bundle instead of Plugin)
" All of your Plugins must be added before the following line
call vundle#end() " required
filetype plugin indent on " required
这样就完成了vundle前的设置。之后,就可以在配置文件中添加希望安装的插件,然后通过vim命令打开Vim编辑器,运行下面的命令:
:PluginInstall
这个命令告诉vundle自动下载所有的插件,并为你进行安装和更新
三、打造IDE
1、代码折叠
在.vimrc中添加下面的代码
" Enable folding
set foldmethod=indent
set foldlevel=99
这样,手动输入za来折叠(和取消折叠)。不过,使用空格键会是更好的选择。所以可以在配置文件中加上下面的话
" Enable folding with the spacebar
nnoremap za
折叠有专门的插件,加上下面的代码
Plugin 'tmhedberg/SimpylFold'
⚠️:记得执行:PluginInstall
2、代码缩进
我们希望vim中的缩进能做到下面两点:
》首先,缩进要符合PEP8标准
》其次,更好地处理自动缩进
要支持pep8,需要在配置文件里面加上如下的配置:
au BufNewFile,BufRead *.py
\ set tabstop=4
\ set softtabstop=4
\ set shiftwidth=4
\ set textwidth=79
\ set expandtab
\ set autoindent
\ set fileformat=unix
这些配置将让vim中的tab键就相当于4个标准的空格符,确保每行代码长度不超过80个字符,并且会以unix格式储存文件。
另外,对于全栈开发,可以设置针对每种文件类型设置au命令:
au BufNewFile,BufRead *.js, *.html, *.css
\ set tabstop=2
\ set softtabstop=2
\ set shiftwidth=2
3、自动缩进
Plugin 'vim-scripts/indentpython.vim'
4、标示不必要的空白字符
au BufRead,BufNewFile *.py,*.pyw,*.c,*.h match BadWhitespace /\s\+$/
这会将多余的空白字符标示出来,很可能会将他们变成红色突出
4、支持UTF-8
set encoding=utf-8
5、自动不全
支持python自动补全的最好的插件是YouCompleteMe。使用vundle安装:
Bundle 'Valloric/YouCompleteMe'
YouCompleteMe插件其实底层使用了一些不同的自动补全组件。另外要安装一些C库才能正常工作,插件官方文档提供了很好的安装指南,请读者按步骤安装。
安装完成后,还需要一些调整:
let g:ycm_autoclose_preview_window_after_completion=1
map g :YcmCompleter GoToDefinitionElseDeclaration
6、支持virtualenv虚拟环境
"python with virtualenv support
py << EOF
import os
import sys
if 'VIRTUAL_ENV' in os.environ:
project_base_dir = os.environ['VIRTUAL_ENV']
activate_this = os.path.join(project_base_dir, 'bin/activate_this.py')
execfile(activate_this, dict(__file__=activate_this))
EOF
7、语法高亮/检查
Plugin 'scrooloose/syntastic'
Plugin 'nvie/vim-flake8'
let python_highlight_all=1
syntax on
8、配色方案
Plugin 'jnurmine/Zenburn'
Plugin 'altercation/vim-colors-solarized'
if has('gui_running')
set background=dark
colorscheme solarized
else
colorscheme Zenburn
endif
上面安装的solarized方案同时提供了暗色调和轻色调两种主题,可以设置F5作为切换按钮
call togglebg#map("F5")
9、文件浏览
如果想要一个不错的文件树形结构,可以使用NERDTree
Plugin 'scrooloose/nerdtree'
Plugin 'jistr/vim-nerdtree-tabs'
let NERDTreeIgnore=['\.pyc$', '\~$'] "ignore files in NERDTree
10、超级搜索
想要在vim中搜索任何文件,可以使用ctrlP插件,使用ctrl+P就可以搜索
Plugin 'kien/ctrlp.vim'
开启显示行号:
set nu
11、要在vim中执行基本的git 命令,可以使用vim-fugitive插件
Plugin 'tpope/vim-fugitive'
11、Powerline状态栏
powerline是一个状态栏插件,可以显示当前的虚拟环境、git分支、正在编辑的文件等信息
Plugin 'Lokaltog/powerline', {'rtp': 'powerline/bindings/vim/'}
12、系统剪切板
可以通过下面的代码访问你的系统剪切板
set clipboard=unnamed
13、shell开启vim编辑模式
可以在~/.inputrc中添加下面的代码
set editing-mode vi
