1. Your own todo app
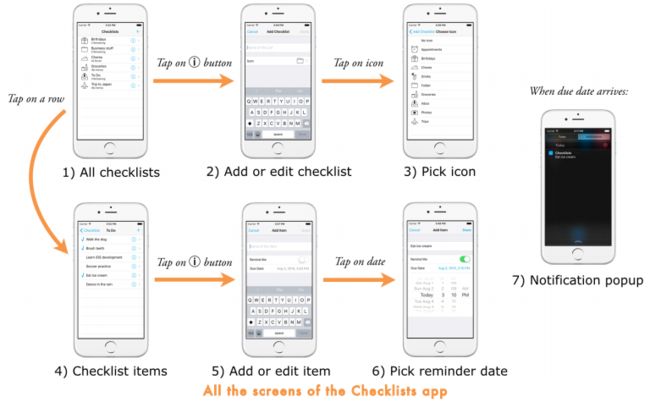
1.1. 最终效果图
1.2. TableViews 和 NavigationControllers
- TableView :显示list用,是iOS开始中最有用的组件。
- NavigationControllers:显示在界面顶端的导航条,用来迁移界面。
- 示例图如下:
上面两个组件是iOS开发中最重要的两个,也是本系列的重点,另外我们也将学习如何在界面之间传递数据,这个问题很是困扰初学者。
1.3. Checklist app的设计,界面以及界面迁移的设计
2. Playing with table views
本周todo:
- 将一个table view放到app
- 将数据放入table view
- 用户点击table 中的行,能够on/off
2.1 创建 Single View Application
参考文档创建,注意将朝向设置为肖像模式。
Upside down
iphone中支持这种模式,但是一般不用,如果来电话时,可能听筒和话筒反了给用户造成困扰。
但是ipad是可以用这种模式的。
2.2 编辑storyboard
- 删除既有的View Controller.(因为我们要使用特定的view Controller-TableViewController)
- 在swift 文件中,修改代码
- 修改前:
class ViewController: UIViewController - 修改后:
class ChecklistViewController: UITableViewController
- 修改swift 文件名为 ChecklistViewController.swift
- 将一个TableViewController拖到storyBoard中,选中TableViewController,将其customeClass的class type 选为 ChecklistViewController .
Controller: The whole screen
Table view: The object that actually draws the list
- 将 TableViewController 设置为Is Initial View Controller,既将该画面设置为起始画面,如果不设置的话,iOS不知道load那个viewController,就会显示黑画面。
2.3 深入TableView
TableView:用于显示list,有两种状态,plain(每行显示相同的内容) 和 grouped(每行显示的内容不同)
Table通过cell显示数据,一个cell关联到一个row,如上图。一个屏幕能显示6个cell,但是能够有100行的数据。
- 选择prototype cell,拖动一个label到cell上.
- 再次选择tableViewCell, 在AI(Attribute Inspector)中,将accessory设置为check mark。(是tableViewCell的一个属性)
- 将Table View Cell的Identifier设置为ChecklistItem,为TableViewCell设置reuse Identifier。(cell是row的可视化表现,而不是实际数据的, 还需要将数据添加到table中)
2.4 源数据
// Tableview发送消息请求数据条数,row的数目
override func tableView(tableView:
UITableView,numberOfRowsInSection section: Int)
-> Int {
return 1
}

// table view想要描绘一个row时,请求一个cell
override func tableView(tableView:
UITableView,cellForRowAtIndexPath indexPath: NSIndexPath)
-> UITableViewCell {
let cell = tableView.dequeueReusableCellWithIdentifier
("ChecklistItem", forIndexPath: indexPath)
return cell
}
上面两个特定的方法,是TableView的data source protocol。
data source是联系data和table view的纽带,一般来说view controller充当data source的角色并执行这些特定的方法。
TableView需要知道数据有几行和应该显示什么数据,如下图
TableView中有几种方式去生成cells,之前的方式是最简单的,总结如下
- 在storyBoard中为TableView添加一个prototype cell
- 为prototype cell添加一个reuse identifier
- 调用dequeueReusableCellWithIdentifier,生成prototype cell的copy或是回收不再使用的cell。
Index paths,NSIndexpath是table中一个指向特定row的对象,有row number 和 section number。section number是用于分组的,这里暂时用不上。另外,以NS开头命名的类,属于Foundation framework,NS表示NextStep。
2.5 将row数据放入cells中
- 将label的tag设置为1000,tag是一个便于日后检索的数字标识符
- 将tableview(cellForRowAtIndexPath)修改为如下
    override func tableView(tableView: UITableView,
        cellForRowAtIndexPath indexPath: NSIndexPath)->UITableViewCell{

        //创建一个新的或是回收一个不用的cell,存入本地常量
        let cell = tableView.dequeueReusableCellWithIdentifier(
                            "ChecklistItem",forIndexPath: indexPath)
        // 获取一个刚才标识为1000的Label
        let label = cell.viewWithTag(1000) as! UILabel
        if indexPath.row%5 == 0{
            label.text = "1.Walk the dog"
        }else if indexPath.row%5 == 1 {
            label.text = "2.Brush my teeth"
        }
        else if indexPath.row%5 == 2 {
            label.text = "3.Learn ios dev"
        }
        else if indexPath.row%5 == 3 {
            label.text = "4.Soccer practice"
        }
        else if indexPath.row%5 == 4 {
            label.text = "5.Eat ice cream"
        }
        return cell
    }
用数据标识符获取一个UI element的引用,而不是用IBOutlet是一个比较好的小技巧。为什么这里不用IBOutlet来关联UI element和变量呢,因为一个table中有很多cell,每个cell都有它的label,label不是属于view controller而是属于cell的。
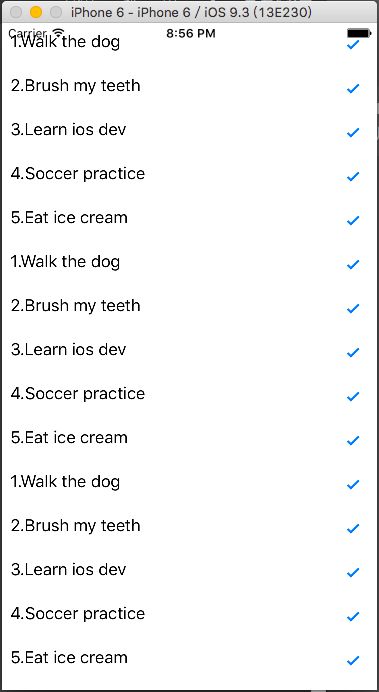
运行后效果图如下
有100个rows,有13个看得到的cell,如果最下面的cell出来一半,最上面的出来一半,那么需要14个cell,如果滚动很快的话,需要更多的临时cell。
- rows - 实际数据,可以有很多个,本例子中100个
- cells - 数据在屏幕上的呈现,有限个
2.6 点击rows
添加如下代码
override func tableView(tableView: UITableView,
                            didSelectRowAtIndexPath indexPath: NSIndexPath) {

        if let cell = tableView.cellForRowAtIndexPath(indexPath) {
            if cell.accessoryType == .None {
            cell.accessoryType = .Checkmark
            } else {
            cell.accessoryType = .None }
        }
        tableView.deselectRowAtIndexPath(indexPath, animated: true)
    }
checkmark是cell的accessory属性,所以第一步应该找到对应的cell。 注意第一个语句 只有存在cell的时候才继续执行。
- override func tableView(tableView: UITableView,cellForRowAtIndexPath indexPath: NSIndexPath)
- if let cell = tableView.cellForRowAtIndexPath(indexPath)
上述两者除了名字类似以外,其实两个不同对象的不同方法,执行不同的任务。第一个data source方法,如果一个row要出现在屏幕上,则将一个新的或是回收的cell交给table。而第二个也是返回cell,但是是返回一个已经在显示的cell,不会生成新的cell。
上述程序中有bug,比如在一个cell,取消了checkmark,然后将这个cell移动到不可见,然后又将其可见,这个cell的checkmark又会被勾选,另外如果其他row回收了这个cell,这个row(cell)的checkmark是会被取消的。
因为在这里checkmark被设置为cell的属性,而cell是循环利用的,所以依赖cell去设置checkmark是不对的,应该是设置在row上。
方法1的第一个参数是UITableView对象,是这些方法被触发的对象,这样写的话,就不需要像第一个系列中用IBOutlet去将message送给tableview了。
方法1的第二个参数是个sectionNumber,方法2和方法3的是index-path。
方法1在其他的语言中,可以用如下方式去描述
Int numberOfRowsInSection(UITableView tableView, Int section) { ...}
在上面的示例中,第二个参数有两个名称,第一个如numberofRowsSection是一个外部名称,当调用方法的时候使用,第二个名称是内部名称,在方法内部使用。
在swift语言中这种方式很普遍,第一个参数只有一个名称,其他参数有多个名称。
为什么这里三个函数名称完全一样,都叫tableview(),其实参数也是方法名的一部分,实际的命名应该是如下
tableView(numberOfRowsInSection)
tableView(cellForRowAtIndexPath)
tableView(didSelectRowAtIndexPath)
2.7 代理 delegate
在ios中,代理的概念很常用,一个对象经常依赖其他对象去完成特定的任务,这种分离使得系统更简洁,因为每个对象做它擅长的部分。
比如TableView并不关心谁是data source,也不关心app要处理的数据,它只需要发送一个cellForRowAtIndexPath获取cell既可。同样,TableView知道何时row的按下被触发了,发送一个消息后让代理来处理。TableView使用了两个代理,UITableViewDataSource用来将rows放到table,UITableViewDelegate用来处理row上的点击。
说得挺玄乎,感觉代理就是让各自做自己擅长的事情,根据功能来定义不同的类,比如我A今天要买票去北京,让代理B去确认票价和剩余票数,并把结果告诉A。代码实现如下
- 创建一个协议,在协议中构建两个方法,分别返回票价和剩余票数 。
#import
@protocol TicketDelegate
 //返回票价
- (double)price;
 //返回剩余票数
- (int)remainTicketNumber;
 @end
- 代理遵守协议并实现协议中的方法
#import
#import "TicketDelegate.h"
 @interface Agent : NSObject
 @end
/**
  * 代理实现协议中的方法
 */
#import "Agent.h"
 @implementation Agent

 //返回票价
- (double)price
{
   return 100;
}

 //返回剩余票数
- (int)remainTicketNumber
{
    return 10;
}
 @end
- A中创建一个遵守协议的代理
#import
#import "TicketDelegate.h"
@interface Person : NSObject
 @property (nonatomic,strong) id  delegate;
 - (void)buyTicket;
 @end

#import "Person.h"
@implementation Person

 - (void)buyTicket
{
    // 叫代理去帮自己买票(询问一下票价、询问一下票的剩余张数)
    double price1 = [_delegate price];
    int number = [_delegate remainTicketNumber];
    NSLog(@"票价是%f,还剩余%d张",price1,number);

}
 @end


