记得前年 听某某技术大会,就已经有几家大公司在使用consul来替代 zookeeper
年轻的架构师喜欢尝试新的技术,比如架构师越年轻越推崇使用golang来做后端,
等九零后开始了,要用julia haskell rust做后端
consul 做服务发现 其实蛮不错的,自己功能还是很丰富的
首先 consul 学习曲线 还是挺曲折的,门槛不低,
给大家推荐 一些学习资料
http://consul.la/intro/getting-started/join
https://github.com/smarkm/consuldocs_zh/blob/a93ed5a2b75cbbde2fff4740891df8ae4b87148b/docs/agent/basics.md
http://www.liangxiansen.cn/2017/04/06/consul/
https://blog.csdn.net/scdxmoe/article/details/73866905
这些资料学会了 consul 基本就可以在测试生产中使用了
先下载 consul
https://releases.hashicorp.com/consul/1.2.3/consul_1.2.3_linux_amd64.zip
在 centos7上
使用root 用户
unzip consul_1.2.3_linux_amd64.zip  -d /usr/local
ln -s /usr/local/consul /usr/local/bin/consul
consul -version
consul 基本上就可以使用了
如果要搭建集群,要确保集群中的机器 防火墙是关闭的,至少 8300 8500 tcp udp 等都是好用的
另外最好是 ssh 免密码登陆的
单机模式
直接
consul agent -dev
这个是开发模式 的,只是让你测试用的,
然后可以通过 web ui 8500端口查看
另外你也可以通过
consul members

Node   Address         Status  Type    Build  Protocol  DC    Segment
delpc  127.0.0.1:8301  alive   server  1.2.3  2         sz-1
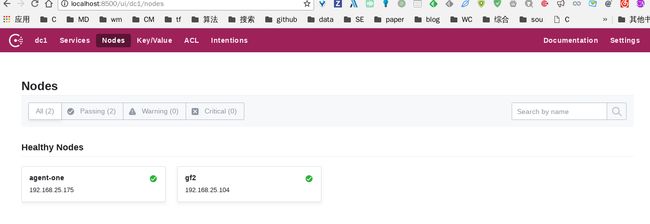
之后我们尝试使用consul 的集群,限于自己当前只有两台电脑,我就搭建了一个server 一个client 的集群
node1 192.168.25.175
node2 192.168.25.104
以 node1为server node2 为client
首先在 node1上
建议加上 -client ,不然 ui web在其他机器访问不到,注意关闭防火墙
consul agent -server -bootstrap-expect=1 -data-dir=/tmp/consul -node=agent-one -ui -bind=192.168.25.175 -client=0.0.0.0
这样 node1 上 server 就启动了
之后在 node2上
consul agent -data-dir /tmp/consu -node gf2 -ui -bind 192.168.25.104
这样 node2 上client 就启动了
之后node2 要投入到 node1的怀抱中,就是要join 到node1 的怀抱
然后在node2上执行
consul join 192.168.25.175
如果console 提示
Successful joined cluster by contacting 1 nodes
说明真的加入了,需要 提示一下,node2 必须先启动client 服务,不要直接就 join ,肯定是join 不上的
最简单的集群就ok了
另外如果 node1 server 挂掉了,node2 也就处于阻塞中,当node1 重启后,node2会主动加入进来,另外好像consul 支持 多个server 模式同存,这样有一个server挂掉了,另一个server 还可以继续提供服务
consul agent -server -bootstrap-expect=1 -data-dir=/tmp/consul -node=idch9 -ui -bind=192.168.25.175
./consul agent -server -server-port=8501 -bootstrap-expect=1 -data-dir=/tmp/consul -node=consul-39 -ui -bind=10.10.16.39 -client=0.0.0.0
nohup ./consul agent -server -server-port=8501 -bootstrap-expect=1 -data-dir=/tmp/consul -node=consul-39 -ui -bind=10.10.16.39 -client=0.0.0.0 -log-file=./consul.log &
https://blog.csdn.net/achenyuan/article/details/80389410
https://releases.hashicorp.com/consul/1.2.3/consul_1.2.3_linux_amd64.zip
https://blog.csdn.net/zhengpeitao/article/details/54691563
https://blog.csdn.net/llianlianpay/article/details/79028916
server.port=8999
spring.application.name=ksk
spring.cloud.consul.host=localhost
spring.cloud.consul.port=8500
spring.cloud.consul.discovery.enabled=true
spring.cloud.consul.discovery.service-name=rms_tlin
spring.cloud.consul.discovery.health-check-interval=10s
spring.cloud.consul.discovery.register=true
spring.cloud.consul.discovery.health-check-path=/health
spring.cloud.consul.discovery.tags=rms
spring.http.encoding.charset=utf-8
spring.http.encoding.enabled=true
spring.cloud.consul.discovery.instance-id=rms_23
server:
port: 17004
application:
name: spring-boot-consul-client
spring:
http:
encoding:

  charset: utf-8

  enabled: true
cloud:
consul:

  host: 127.0.0.1

  port: 8500

  discovery:

    enabled: true

    service-name: ${server.application.name}

    health-check-interval: 10s

    register: true

    tags: foo=bar, baz

    health-check-path: /health

    health-check-path: /health

    health-check-path: /health
hostname: 127.0.0.1
server:
port: 17003
application:
name: spring-boot-consul-service
spring:
http:
encoding:

  charset: utf-8

  enabled: true
cloud:
consul:

  host: 127.0.0.1

  port: 8500

  discovery:

    enabled: true

    service-name: ${server.application.name}

    health-check-interval: 10s

    tags: foo=bar, baz
可以设置自定义健康监测接口
health-check-path: /health
自定义脚本监测配置false
register: false
register: true
 org.springframework.cloud
 spring-cloud-starter-consul-discovery
