前言
上一篇我们分析了Activity的setContentView()和AppCompatActivity的setContentView()执行过程,只是将Activity显示的视图加载到了DecorView中,DecorView还没有和Window进行关联,下面我们详细分析一下
ActivityThread.java
DecorView添加到Window是在Activity的启动过程中完成的,Activity的启动过程最终会执行handleLaunchActivity()方法,在这个方法里先后执行以下方法,我们依次分析
- WindowManagerGlobal.initialize(); // Initialize before creating the activity`
- Activity a = performLaunchActivity(r, customIntent);
- handleResumeActivity()
首先在Activity创建之前WindowManager会获取到WindowManagerService(wms)进行一系列的初始化,在这里我们先不分析wms(咳咳。。其实我还没有深入分析呢!),我们继续看下performLaunchActivity(),
ActivityThread.java中performLaunchActivity()
private Activity performLaunchActivity(ActivityClientRecord r, Intent customIntent) {
        ActivityInfo aInfo = r.activityInfo;
        if (r.packageInfo == null) {   //获得包的信息
            r.packageInfo = getPackageInfo(aInfo.applicationInfo, r.compatInfo,
                    Context.CONTEXT_INCLUDE_CODE);
        }
        ComponentName component = r.intent.getComponent();
        if (component == null) {
            component = r.intent.resolveActivity(
                mInitialApplication.getPackageManager());   //获得PMS
            r.intent.setComponent(component);
        }

        if (r.activityInfo.targetActivity != null) {
            component = new ComponentName(r.activityInfo.packageName,
                    r.activityInfo.targetActivity);
        }

        Activity activity = null;
        try {
            java.lang.ClassLoader cl = r.packageInfo.getClassLoader();
            activity = mInstrumentation.newActivity(
                    cl, component.getClassName(), r.intent);
            StrictMode.incrementExpectedActivityCount(activity.getClass());
            r.intent.setExtrasClassLoader(cl);
            r.intent.prepareToEnterProcess();
            if (r.state != null) {
                r.state.setClassLoader(cl);
            }
        ...
      activity.attach(appContext, this, getInstrumentation(), r.token,
                            r.ident, app, r.intent, r.activityInfo, title, r.parent,
                            r.embeddedID, r.lastNonConfigurationInstances, config,
                            r.referrer, r.voiceInteractor, window);
        return activity;
    }
我只贴了关键代码,在创建Activity之前会获得包的信息,然后通过类加载起来实例化我的要创建的Activity,然后执行了attach()方法,继续撸。。。
Activity.java中的attach()
   final void attach(Context context, ActivityThread aThread,
            Instrumentation instr, IBinder token, int ident,
            Application application, Intent intent, ActivityInfo info,
            CharSequence title, Activity parent, String id,
            NonConfigurationInstances lastNonConfigurationInstances,
            Configuration config, String referrer, IVoiceInteractor voiceInteractor,
            Window window) {
        ...
        mWindow = new PhoneWindow(this, window);     //创建PhoneWindow()
        mWindow.setWindowControllerCallback(this);
        mWindow.setCallback(this);
        mWindow.setOnWindowDismissedCallback(this);
        mWindow.getLayoutInflater().setPrivateFactory(this);
        if (info.softInputMode != WindowManager.LayoutParams.SOFT_INPUT_STATE_UNSPECIFIED) {
            mWindow.setSoftInputMode(info.softInputMode);
        }
        if (info.uiOptions != 0) {
            mWindow.setUiOptions(info.uiOptions);
        }
        mUiThread = Thread.currentThread();

        mMainThread = aThread;
        mInstrumentation = instr;
        mToken = token;
        mIdent = ident;
        mApplication = application;
        mIntent = intent;
        mReferrer = referrer;
        mComponent = intent.getComponent();
        mActivityInfo = info;
        mTitle = title;
        mParent = parent;
        mEmbeddedID = id;
        mLastNonConfigurationInstances = lastNonConfigurationInstances;
        if (voiceInteractor != null) {
            if (lastNonConfigurationInstances != null) {
                mVoiceInteractor = lastNonConfigurationInstances.voiceInteractor;
            } else {
                mVoiceInteractor = new VoiceInteractor(voiceInteractor, this, this,
                        Looper.myLooper());
            }
        }

        mWindow.setWindowManager(
                (WindowManager)context.getSystemService(Context.WINDOW_SERVICE),
                mToken, mComponent.flattenToString(),
                (info.flags & ActivityInfo.FLAG_HARDWARE_ACCELERATED) != 0);
        if (mParent != null) {
            mWindow.setContainer(mParent.getWindow());
        }
        mWindowManager = mWindow.getWindowManager();
        mCurrentConfig = config;
    }
在Activity的attach()方法中,首先初始化我们的PhoneWindow,PhoneWindow是Window的唯一实现类,然后进行一系列的赋值,也就是说初始化的过程是在attach()中发起调用的,初始化attach()完成之后,我们再回到ActivityThread的performLaunchActivity()方法,还没有分析完
ActivityThread.java中performLaunchActivity()
               activity.attach(); //初始化完成
               activity.mCalled = false;
                if (r.isPersistable()) {    //isPersistable先前持久化的状态(或null)
                    mInstrumentation.callActivityOnCreate(activity, r.state, r.persistentState);
                } else {
                    mInstrumentation.callActivityOnCreate(activity, r.state);
                }
                r.activity = activity;
                r.stopped = true;
                if (!r.activity.mFinished) {
                    activity.performStart();
                    r.stopped = false;
                }
                if (!r.activity.mFinished) {
                    if (r.isPersistable()) {
                        if (r.state != null || r.persistentState != null) {
                            mInstrumentation.callActivityOnRestoreInstanceState(activity, r.state,
                                    r.persistentState);
                        }
                    } else if (r.state != null) {
                        mInstrumentation.callActivityOnRestoreInstanceState(activity, r.state);
                    }
                }
              ...
            }
            r.paused = true;

            mActivities.put(r.token, r);
在这里我们看到了熟悉的字眼ActivityOnCreate(),没错就是在这个方法里我们的Activity的生命周期开始执行了,再往下调用了callActivityOnRestoreInstanceState(),也就是我们现场状态的还原,ActivityThread中的performLaunchActivity()执行完后我们再看下handleResumeActivity()
ActivityThread.java中handleResumeActivity()
    final void handleResumeActivity(IBinder token,
            boolean clearHide, boolean isForward, boolean reallyResume, int seq, String reason) {
        ActivityClientRecord r = mActivities.get(token);
        ...
        // TODO Push resumeArgs into the activity for consideration
        r = performResumeActivity(token, clearHide, reason);
        ...
            if (r.window == null && !a.mFinished && willBeVisible) {
                r.window = r.activity.getWindow();
                View decor = r.window.getDecorView();
                decor.setVisibility(View.INVISIBLE);
                ViewManager wm = a.getWindowManager();
                WindowManager.LayoutParams l = r.window.getAttributes();
                a.mDecor = decor;
                l.type = WindowManager.LayoutParams.TYPE_BASE_APPLICATION;
                l.softInputMode |= forwardBit;
                if (r.mPreserveWindow) {
                    a.mWindowAdded = true;
                    r.mPreserveWindow = false;
                    // Normally the ViewRoot sets up callbacks with the Activity
                    // in addView->ViewRootImpl#setView. If we are instead reusing
                    // the decor view we have to notify the view root that the
                    // callbacks may have changed.
                    ViewRootImpl impl = decor.getViewRootImpl();
                    if (impl != null) {
                        impl.notifyChildRebuilt();
                    }
                }
                if (a.mVisibleFromClient && !a.mWindowAdded) {
                    a.mWindowAdded = true;
                    wm.addView(decor, l);
                }
              ...
    }
这个方法主要都做了哪些事情呢,首先执行performResumeActivity(),也就是里面会执行Activity的OnResume(),然后获得Window,也就是PhoneWindow,在获得DecorView和WindowManager,我们发现WindowManager是一个接口继承ViewManager,我们又要找到它的实现类,它的实现类是
public interface WindowManager extends ViewManager
public final class WindowManagerImpl implements WindowManager
在handleResumeActivity()中调用addView(decor,l)将DecorView作为参数传进来,看下addView()
     private final WindowManagerGlobal mGlobal = WindowManagerGlobal.getInstance();
    @Override
    public void addView(@NonNull View view, @NonNull ViewGroup.LayoutParams params) {
        applyDefaultToken(params);
        mGlobal.addView(view, params, mContext.getDisplay(), mParentWindow);
    }
我们发现实际是获得WindowManagerGlobal的实例,然后调用的是WindowManagerGlobal的addView()
WindowManagerGlobal.java的addView()
    public void addView(View view, ViewGroup.LayoutParams params,
            Display display, Window parentWindow) {
        ...
        final WindowManager.LayoutParams wparams = (WindowManager.LayoutParams) params;
        ...
        ViewRootImpl root;
        View panelParentView = null;
        ...
            root = new ViewRootImpl(view.getContext(), display);
            view.setLayoutParams(wparams);
            mViews.add(view);
            mRoots.add(root);
            mParams.add(wparams);
        }
        // do this last because it fires off messages to start doing things
        root.setView(view, wparams, panelParentView);
        ...
我们会看到ViewRootImpl,这个类相信大家平时都会看到,这个类主要是做哪些事情呢,其实我们UI的绘制流程都是在这个类里完成的,UI的绘制我们先不分析,接着看上面代码,会创建一个ViewRootImpl,然后将view也就是传过来的DecorView,和创建的ViewRootImpl实例root还有对应的mParams保存到
WindowManagerGlobal中,也就是说我们的WindowManagerGlobal是来管理ViewRootImpl和DecorView的,再继续会调用ViewRootImpl的setView()的方法,并且将DecorView和params传过去,关键的地方
ViewRootImpl.java的setView()
    public void setView(View view, WindowManager.LayoutParams attrs, View panelParentView) {
            if (mView == null) {
                mView = view;
               ...
                // Schedule the first layout -before- adding to the window
                // manager, to make sure we do the relayout before receiving
                // any other events from the system.
                requestLayout();
                ...
                addToDisplay();
               ...
               view.assignParent(this);

    }
-
requestLayout()从方法名字可以知道,“请求布局”,那就是说,如果调用了这个方法,那么对于一个子View来说,应该会重新进行布局流程。但是,真实情况略有不同,如果子View调用了这个方法,其实会从View树重新进行一次测量、布局、绘制这三个流程,最终就会显示子View的最终情况。 -
addToDisplay();其实这个方法里就是采用aidl将DecorView添加显示出来啦。看到这里我们是不是很清晰Activity启动流程过程中怎么样把我们这个PhoneWindow生成出来,把我的DecorView显示出来到UI绘制有了一定的了解了。
我们再看下requestLayout()里面都做了哪些事
    @Override
    public void requestLayout() {
        if (!mHandlingLayoutInLayoutRequest) {
            checkThread();
            mLayoutRequested = true;
            scheduleTraversals();
        }
    }
requestLayout()中调用了scheduleTraversals();方法,scheduleTraversals();代码如下
    void scheduleTraversals() {
            mChoreographer.postCallback(
                    Choreographer.CALLBACK_TRAVERSAL, mTraversalRunnable, null);
    }
这里启动一个 TraversalRunnable,
    final class TraversalRunnable implements Runnable {
        @Override
        public void run() {
            doTraversal();
        }
    }
    final TraversalRunnable mTraversalRunnable = new TraversalRunnable();
在一个新的线程中有执行doTraversal()方法,doTraversal()方法
    void doTraversal() {
            ...
            performTraversals();
            ...
        }
    }
doTraversal()里有执行performTraversals(),这个performTraversals()里面就进行的我们UI的绘制,也就是说performTraversals()就是UI绘制的入口,
private void performTraversals() {
        // Ask host how big it wants to be
        performMeasure(childWidthMeasureSpec, childHeightMeasureSpec);
        performLayout(lp, mWidth, mHeight);
        performDraw();
}
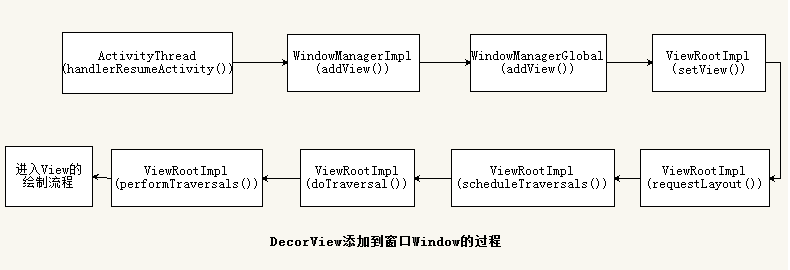
下面看下流程图
总结
至此,我们已经掌握了DecorView添加到Window的过程,首先在Activity启动的过程中,执行performLaunchActivity(),这里面在Activity的attach()中创建了PhoneWindow,在handleResumeActivity()过程中拿到WindowManager和DecorView,然后创建一个WindowManagerGlobal的addView()方法中创建ViewRootImpl并对ViewRootImpl和DecorView进行管理,最后调用ViewRootImpl的setView()来添加显示,并且找到了UI绘制的起始点。下一篇我们来分析UI的绘制流程
推荐
Activity的setContentView()源码分析
AppCompatActivity的setContentView()源码分析
