添加新的API组
现在假设我要在jhipster 中的代码中新建一个名为noauthapigroup的组,要通过swagger 显示。添加一个swagger的配置类,代码如下
package com.mycompany.myapp.config;

import com.google.common.base.Predicates;
import org.springframework.context.annotation.Bean;
import org.springframework.context.annotation.Configuration;
import springfox.documentation.builders.PathSelectors;
import springfox.documentation.builders.RequestHandlerSelectors;
import springfox.documentation.service.ApiInfo;
import springfox.documentation.service.Contact;
import springfox.documentation.spi.DocumentationType;
import springfox.documentation.spring.web.plugins.Docket;
import springfox.documentation.swagger2.annotations.EnableSwagger2;

import java.util.*;

@EnableSwagger2
@Configuration
public class CustomizeSwaggerConfig {


    public static final Contact DEFAULT_CONTACT = new Contact(
        "chen sir", "http://www.chensir.com", "[email protected]");


    private static final Set DEFAULT_PRODUCES_AND_CONSUMES =
        new HashSet(Arrays.asList("application/json",
            "application/xml","text/html"));


    private static final Set DEFAULT_PROTOCOLS =
        new HashSet(Arrays.asList("http",
            "https"));

    @Bean
    public Docket api() {

        return new Docket(DocumentationType.SWAGGER_2)
            .forCodeGeneration(Boolean.TRUE)
            .groupName("noauthapigroup")
            .select()
            .apis(RequestHandlerSelectors.basePackage("com.mycompany.myapp.web.rest.controllers"))
            .paths(PathSelectors.any())
            .paths(Predicates.not(PathSelectors.regex("/logout.*")))
            .build()
            .apiInfo(apiInfo())
            .consumes(DEFAULT_PRODUCES_AND_CONSUMES) //设置请求的content-type的地方 这两个可能搞反,挤不太清楚
            .produces(DEFAULT_PRODUCES_AND_CONSUMES) //设置返回的content-type的地方
            .protocols(DEFAULT_PROTOCOLS);   //这里必须设置,swagger-ui 默认使用https 进行访问,一般来说开发环境都是http的如果不设置,所有的API 都别想调通
    }

    private ApiInfo apiInfo() {

        return new ApiInfo(
            "REST API",
            "REST description of API.",
            "API TOS",
            "Terms of service",
            new Contact("chensir", "http://www.linkedin.com/chensir/", "[email protected]"),
            "License of API", "API license URL", Collections.emptyList());
    }
}
修改 jhipster 自身的swagger 配置。在application.yaml 中间中,对应的源码是JHipsterProperties.java 这个类
hipster:
    async:
        core-pool-size: 2
        max-pool-size: 50
        queue-capacity: 10000
    # By default CORS is disabled. Uncomment to enable.
    #cors:
        #allowed-origins: "*"
        #allowed-methods: "*"
        #allowed-headers: "*"
        #exposed-headers: "Authorization,Link,X-Total-Count"
        #allow-credentials: true
        #max-age: 1800
    mail:
        from: gateway@localhost
    swagger:
        default-include-pattern: /api/.*
        title: gateway API
        description: gateway API documentation
        version: 0.0.1
        terms-of-service-url:
        contact-name:
        contact-url:
        contact-email:
        license:
        license-url:
        protocols: #重点是这里,添加两个protocol 不然没有http 请求的选项
            - http
            - https
添加之后swagger 可以看到有http 选项出来了
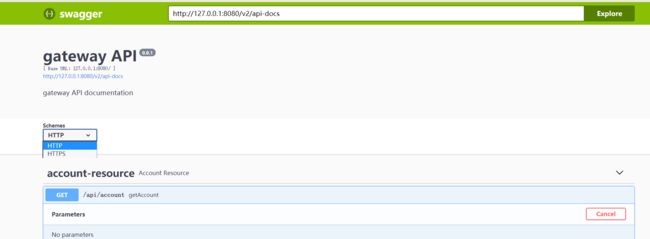
image.png
docket 生成的meta 元数据如下,schema 对应的就是 protocols的设置
{
    "swagger": "2.0",
    "info": {
        "description": "REST description of API.",
        "version": "API TOS",
        "title": "REST API",
        "termsOfService": "Terms of service",
        "contact": {
            "name": "chensir",
            "url": "http://www.linkedin.com/chensir/",
            "email": "[email protected]"
        },
        "license": {
            "name": "License of API",
            "url": "API license URL"
        }
    },
    "host": "localhost:8080",
    "basePath": "/",
    "tags": [{
        "name": "my-controller",
        "description": "My Controller"
    }],
    "schemes": ["http", "https"],
    "consumes": ["application/xml", "text/html", "application/json"],
    "produces": ["application/xml", "text/html", "application/json"],
    "paths": {
        "/noauth/hello": {
            "get": {
                "tags": ["my-controller"],
                "summary": "sayHello",
                "operationId": "sayHelloUsingGET",
                "responses": {
                    "200": {
                        "description": "OK",
                        "schema": {
                            "type": "string"
                        }
                    },
                    "401": {
                        "description": "Unauthorized"
                    },
                    "403": {
                        "description": "Forbidden"
                    },
                    "404": {
                        "description": "Not Found"
                    }
                },
                "deprecated": false
            }
        }
    }
}
jhipster 中分组是通过group 参数来实现的。浏览器中输入下面的连接,可以看到新组的meta 数据
http://localhost:8080/v2/api-docs?group=noauthapigroup
启动swagger
git clone https://github.com/swagger-api/swagger-ui.git
cd swagger-ui
npm install -g http-server
http-server
然后访问
http://127.0.0.1:8081/dist 就可以看到swager的界面了
有个重要接口 SwaggerCustomizer 用来做jhipster swagger 的客户化,需要在实现类上标注@component
package com.mycompany.myapp.config;

import io.github.jhipster.config.apidoc.customizer.SwaggerCustomizer;
import io.swagger.models.auth.In;
import org.springframework.core.Ordered;
import org.springframework.http.HttpHeaders;
import org.springframework.stereotype.Component;
import springfox.documentation.service.ApiKey;
import springfox.documentation.spring.web.plugins.Docket;

import java.util.Arrays;


//refernce to swaggerautoconfiguration JHipsterSwaggerCustomizer example

@Component
public class JwtSwaggerCustomzier implements SwaggerCustomizer, Ordered {

    @Override
    public void customize(Docket docket) {
//        add seucurity sechemae
        docket.securitySchemes(Arrays.asList(new ApiKey("Token Access", HttpHeaders.AUTHORIZATION, In.HEADER.name())));
    }

    @Override
    public int getOrder() {
        return 0;
    }
}
SwaggerAutoConfiguration 是 jhipster 的核心配置类