要搭建本地yum仓库首先需要明确的是都有哪些必备的步骤:
服务端
1. 需要将需要制作成仓库的软件的rpm包保存在本地
2. 需要通过createrepo软件制作仓库索引菜单
3. 需要通过ftp或http协议进行传输
客户端
1. 制作本地yum仓库的yum源文件
本地保存rpm包
有两种办法
其一:开启yum本地缓存
开启yum本地缓存后,所有通过yum安装的软件包,yum都会把rpm包保存到本地相应目录下
[root@yumcangku etc]# vim /etc/yum.conf
[main]
cachedir=/var/cache/yum/$basearch/$releasever
keepcache=0    #这里的参数是设置是否开启本地缓存,0代表不开启,1代表开启
debuglevel=2
logfile=/var/log/yum.log
exactarch=1
obsoletes=1
gpgcheck=1
plugins=1
installonly_limit=5
bugtracker_url=http://bugs.centos.org/set_project.php?project_id=23&ref=http://bugs.centos.org/bug_report_page.php?category=yum
distroverpkg=centos-release
这里是yum本地缓存rpm包的路径
[root@yumcangku etc]# cd /var/cache/yum/x86_64/7/
[root@yumcangku 7]# ls
base  extras             mysql-connectors-community  nginx       timedhosts.txt  webtatic
epel  mysql57-community  mysql-tools-community       timedhosts  updates
其二:通过yum命令只下载不安装
yum install  --downloadonly --downloaddir=/local-basic/ mysql-community-server

--downloadonly  只下载不安装
--downloaddir   指定rpm包的下载路径
安装createrepo
createrepo用于生成repomd.xml。repomd.cml简单来说就是存放本地仓库rpm包的索引信息,我们的yum源就是根据这个文件来知道具体包的存放位置的
yum install createrepo -y
参数
-u  --baseurl  指定Base URL的地址
-o --outputdir  指定元数据的输出位置
-x --excludes  指定在形成元数据时需要排除的包
-i --pkglist  指定一个文件,该文件内的包信息将被包含在即将生成的元数据中,格式为每个包信息独占一行,不含通配符、正则,以及范围表达式。
-n --includepkg 通过命令行指定要纳入本地库中的包信息,需要提供URL或本地路径。
-q --quiet 安静模式执行操作,不输出任何信息。
-g --groupfile  指定本地软件仓库的组划分,范例如下:
createrepo -g comps.xml /path/to/rpms注意:组文件需要和rpm包放置于同一路径下。
-v --verbose  输出详细信息。
-c --cachedir 指定一个目录,用作存放软件仓库中软件包的校验和信息。当createrepo在未发生明显改变的相同仓库文件上持续多次运行时,指定cachedir会明显提高其性能。
--update  如果元数据已经存在,且软件仓库中只有部分软件发生了改变或增减,则可用update参数直接对原有元数据进行升级,效率比重新分析rpm包依赖并生成新的元数据要高很多。
-p --pretty   以整洁的格式输出xml文件。
-d --database  该选项指定使用SQLite来存储生成的元数据,默认项。
生成rpm仓库索引
[root@yumcangku /]# createrepo /local-basic/
Spawning worker 0 with 95 pkgs
Workers Finished
Saving Primary metadata
Saving file lists metadata
Saving other metadata
Generating sqlite DBs
Sqlite DBs complete
每次加入新的rpm包,更新yum仓库
createrepo --update /local-basic/
rsync同步公网yum源
rsync -a rsync://mirrors.yun-idc.com/
rsync -a rsync://rsync.mirrors.ustc.edu.cn/centos/
rsync -a rsync://mirrors.ustc.edu.cn/centos/
rsync -a rsync://mirrors.ustc.edu.cn/epel/
rsync://mirrors.ustc.edu.cn/epel/
rsync://mirrors.ustc.edu.cn/epel/6/
rsync://mirrors.ustc.edu.cn/centos/
rsync://mirrors.ustc.edu.cn/centos/6/
rsync -a rsync://mirrors.kernel.org/centos/
rsync -a rsync://mirrors.kernel.org/fedora-epel
rsync+nginx实现公网yum源
rsync+nginx实现公网yum源

整个过程分3步:
1:nginx提供目录浏览功能
nginx直接yum安装,不废话,直接贴配置文件
[root@oldboyedu ~]# cat /etc/nginx/nginx.conf
worker_processes auto;
events {
worker_connections 1024;
}
http {
include mime.types;
charset utf-8;
default_type application/octet-stream;
sendfile on;
autoindex on; #开启目录浏览功能
keepalive_timeout 65;
server {
listen 80;
listen [::]:80;
server_name localhost;
location / {
root html;
index index.html index.htm;
}
}
}

2:从上游yum源同步yum源到本地
直接贴定时任务
# rsync centos6 repos
30 21 * * * /usr/bin/rsync -zaP --exclude-from /usr/share/nginx/html/rsync_exclude2.txt rsync://rsync.mirrors.ustc.edu.cn/centos/7.4.1708 /usr/share/nginx/html/centos
00 22 * * * /usr/bin/rsync -zaP --exclude-from /usr/share/nginx/html/rsync_exclude.txt rsync://rsync.mirrors.ustc.edu.cn/centos/6.9 /usr/share/nginx/html/centos
00 21 * * * /usr/bin/rsync -zaP --exclude-from /usr/share/nginx/html/rsync_exclude.txt rsync://rsync.mirrors.ustc.edu.cn/epel/7/x86_64 /usr/share/nginx/html/epel/7/
30 20 * * * /usr/bin/rsync -zaP --exclude-from /usr/share/nginx/html/rsync_exclude.txt rsync://rsync.mirrors.ustc.edu.cn/epel/6/x86_64 /usr/share/nginx/html/epel/6/
从定时任务的配置,可以看出,我同步了centos6、7基础源和epel源,有的同学担心,这样会特别占用空间!是的,如果不启用过滤,全部同步,确实很占用空间!

下面我把rsync里面的--exclude-from文件贴出来,centos6和7稍微不同
centos6
[root@oldboyedu ~]# cat /usr/share/nginx/html/rsync_exclude.txt
centosplus/
cloud/
contrib/
cr/
fasttrack/
isos/
sclo/
storage/
virt/
i386/
debug/
drpms/

centos7
[root@oldboyedu ~]# cat /usr/share/nginx/html/rsync_exclude2.txt
atomic/
centosplus/
cloud/
configmanagement/
cr/
dotnet/
fasttrack/
isos/
nfv/
opstools/
paas/
rt/
sclo/
storage/
virt/
debug/
drpms/

最终4个源全部同步完,并且可用只占了60G左右
到这里已经能提供yum服务了,但是无法为下游提供同步服务,于是有了第三步

3:开启rsync --daemon模式
[root@oldboyedu ~]# cat /etc/rsyncd.conf
#rsync server
uid = nginx
gid = nginx
use chroot = no
max connections = 2000
timeout = 600
pid file = /var/run/rsyncd.pid
lock file = /var/run/rsync.lock
log file = /var/log/rsyncd.log
ignore errors
read only = true #只提供同步,只读足够
list = true             #允许查看列表,认证的什么的不需要配置
hosts allow = 0.0.0.0/0
#####################################
[centos]
path = /usr/share/nginx/html/centos
[epel]
path = /usr/share/nginx/html/epel
到这里,一个公网yum该有的功能都有了!
os
https://mirrors.aliyun.com/centos/7/os/x86_64/
http://mirrors.aliyun.com/centos/$releasever/os/$basearch/
extras
https://mirrors.aliyun.com/centos/7/extras/x86_64/
updates
https://mirrors.aliyun.com/centos/7/updates/x86_64/

/usr/bin/rsync -av --exclude=debug rsync://mirrors.ustc.edu.cn/epel/7/x86_64/ /data/yum_data/epel/7/x86_64/
/usr/bin/rsync -az --bwlimit=1000 rsync://mirrors.ustc.edu.cn/centos/7/os/x86_64/  /data/yum_data/centos/6/os/x86_64/
/usr/bin/rsync -az --bwlimit=1000 rsync://mirrors.ustc.edu.cn/epel/7/x86_64/ /data/yum_data/epel/7/x86_64/
服务端配置仓库局域网访问路径
通过http协议访问
[root@yumcangku /]# yum install nginx -y
[root@yumcangku /]# cd /etc/nginx/conf.d/
[root@yumcangku /]# vim local-basic.conf
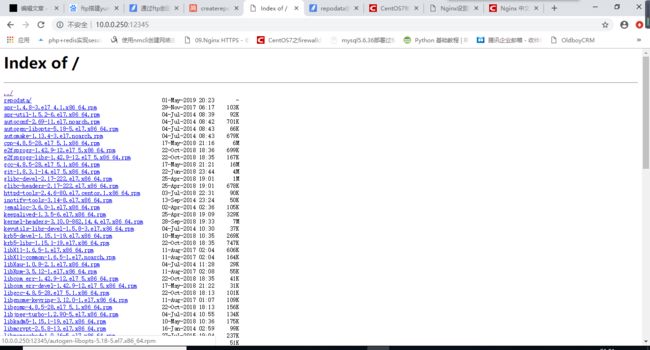
server {
        listen 12345;
        server_name 10.0.0.250;
        root /local-basic;
        index index.html;

        location / {
            root /local-basic;
            autoindex on;
            autoindex_localtime on;
            autoindex_exact_size off;
    }
}
通过网页访问效果
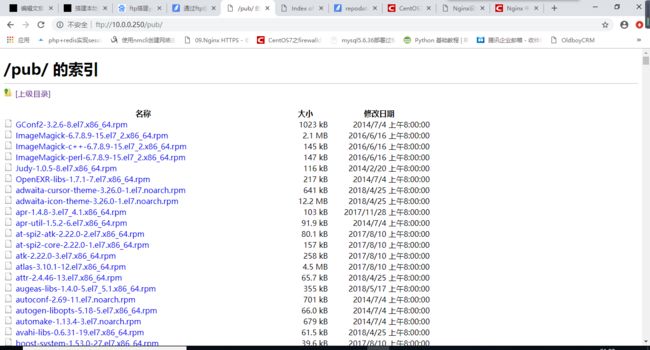
通过ftp协议访问
[root@yumcangku /]# yum install vsftpd -y
[root@yumcangku conf.d]# systemctl start vsftpd
yum客户端配置
yum客户端配置文件
http协议文件
cat local-base-http.repo

[local-base]
name=Server
baseurl=http://10.0.0.250:12345/
enable=1
gpgcheck=0
ftp协议yum源配置文件
cat local-base-ftp.repo
[local-base]
name=Server
baseurl=ftp://10.0.0.250/pub/
enable=1
gpgcheck=0
清yum缓存
yum clean all
查看yum源
[root@yumcangku /]# yum repolist
已加载插件:fastestmirror, security
Loading mirror speeds from cached hostfile
仓库标识                                                                 仓库名称                                                               状态
local-base
repo_rpm包制作
cat /etc/yum.repos.d/my-base.repo
[my-base]

name=Server

baseurl=http://10.0.0.61

enable=1

gpgcheck=0

cat /server/scripts/my-base.sh

#!/bin/sh

mkdir /etc/yum.repos.d/bak -p

mv /etc/yum.repos.d/*.repo /etc/yum.repos.d/bak/

cat /server/scripts/my-base_post.sh

#!/bin/sh

yum clean all

yum repolist

fpm -s dir -t rpm -n my-base_repo -v 1.0 --pre-install /server/scripts/my-base.sh --post-install /server/scripts/my-base_post.sh -f /etc/yum.repos.d/my-base.repo
yum 安装指定的mysql
yum --enablerepo=my-base install mysql-5.5.32 -y
yum 安装 指定的 nginx
yum --enablerepo=my-base install nginx-1.6.3 -y
yum-config-manager
yum install yum-utils
添加repo
yum-config-manager --add-repo file:///mnt/
yum-config-manager --add-repo http://mirrors.aliyun.com/docker-ce/linux/centos/docker-ce.repo

[root@m01 ~]# cat /etc/yum.repos.d/mnt_.repo

[mnt_]
name=added from: file:///mnt/
baseurl=file:///mnt/
enabled=1
禁用repo
yum-config-manager --disable "mnt_"
启用repo
yum-config-manager --enable "mnt_"
yum源优先级
yum install yum-plugin-priorities.noarch
2.启用插件
cat /etc/yum/pluginconf.d/priorities.conf

[main]
enabled = 1
3.修改本地Yum源优先使用
cat CentOS-Media.repo

[c7-media]
name=CentOS-$releasever - Media
baseurl=file:///media/cdrom/
gpgcheck=0
enabled=1
priority=1        #yum源优先级参数

CentOS-Base.repo

[base]
name=CentOS-$releasever - Base
mirrorlist=http://mirrorlist.centos.org/?release=$releasever&arch=$basearch&repo=os&infra=$infra
#baseurl=http://mirror.centos.org/centos/$releasever/os/$basearch/
gpgcheck=1
gpgkey=file:///etc/pki/rpm-gpg/RPM-GPG-KEY-CentOS-6
priority=2           #yum源优先级参数
#released updates
[updates]
name=CentOS-$releasever - Updates
mirrorlist=http://mirrorlist.centos.org/?release=$releasever&arch=$basearch&repo=updates&infra=$infra
#baseurl=http://mirror.centos.org/centos/$releasever/updates/$basearch/
gpgcheck=1
gpgkey=file:///etc/pki/rpm-gpg/RPM-GPG-KEY-CentOS-6
priority=2           #yum源优先级参数
#additional packages that may be useful
[extras]
name=CentOS-$releasever - Extras
mirrorlist=http://mirrorlist.centos.org/?release=$releasever&arch=$basearch&repo=extras&infra=$infra
#baseurl=http://mirror.centos.org/centos/$releasever/extras/$basearch/
gpgcheck=1
gpgkey=file:///etc/pki/rpm-gpg/RPM-GPG-KEY-CentOS-6
priority=2           #yum源优先级参数
#additional packages that extend functionality of existing packages
[centosplus]
name=CentOS-$releasever - Plus
mirrorlist=http://mirrorlist.centos.org/?release=$releasever&arch=$basearch&repo=centosplus&infra=$infra
#baseurl=http://mirror.centos.org/centos/$releasever/centosplus/$basearch/
gpgcheck=1
enabled=0
gpgkey=file:///etc/pki/rpm-gpg/RPM-GPG-KEY-CentOS-6
priority=2           #yum源优先级参数
#contrib - packages by Centos Users
[contrib]
name=CentOS-$releasever - Contrib
mirrorlist=http://mirrorlist.centos.org/?release=$releasever&arch=$basearch&repo=contrib&infra=$infra
#baseurl=http://mirror.centos.org/centos/$releasever/contrib/$basearch/
gpgcheck=1
enabled=0
gpgkey=file:///etc/pki/rpm-gpg/RPM-GPG-KEY-CentOS-6
priority=2             #yum源优先级参数
priority 数字越小优先级越高


