一、MongoDB数据库基础
1.什么是MongoDB数据库
MongoDB 是由C ++语言编写的,是一个基于分布式文件存储的开源数据库系统。在高负载的情况下,添加更多的节点,可以保证服务器性能。MongoDB 旨在为WEB应用提供可扩展的高性能数据存储解决方案。
MongoDB将数据存储为一个文档,数据结构由键值(key => value)对组成.MongoDB文档类似于JSON对象。字段值可以包含其他文档,数组及文档数组。
- MongoDB与传统数据库之间的区别
① 传统型数据库: 结构化数据, 定好了表结构后,每一行的内容,必是符合表结构的,就是说--列的个数,类型都一样.
② mongo文档型数据库: 表下的每篇文档,都可以有自己独特的结构(json对象都可以有自己独特的属性和值)
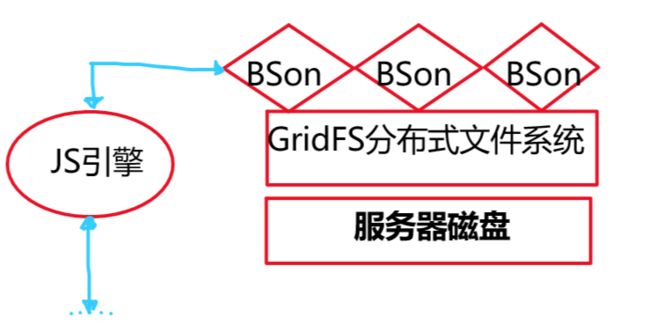
MongoDB是文档类型的数据库。存储类型是文档(BSon)[即json的二进制化]
2.主要特点
MongoDB 是一个面向文档存储的数据库,操作起来比较简单和容易。
你可以在MongoDB记录中设置任何属性的索引(如:FirstName="Sameer",Address="8 Gandhi Road")来实现更快的排序。
你可以通过本地或者网络创建数据镜像,这使得MongoDB有更强的扩展性。
如果负载的增加(需要更多的存储空间和更强的处理能力) ,它可以分布在计算机网络中的其他节点上这就是所谓的分片。
Mongo支持丰富的查询表达式。查询指令使用JSON形式的标记,可轻易查询文档中内嵌的对象及数组。
MongoDb 使用update()命令可以实现替换完成的文档(数据)或者一些指定的数据字段。
Mongodb中的Map/reduce主要是用来对数据进行批量处理和聚合操作。
GridFS是MongoDB中的一个内置功能,可以用于存放大量小文件。
MongoDB允许在服务端执行脚本,可以用Javascript编写某个函数,直接在服务端执行,也可以把函数的定义存储在服务端,下次直接调用即可。
MongoDB支持各种编程语言:RUBY,PYTHON,JAVA,C++,PHP,C#等多种语言。
二、Linux环境下部署MongoDB
打开官网下载地址:分别对应4个平台,windows、Linux、OSX和Solaris
https://docs.mongodb.com/manual/tutorial/install-mongodb-on-red-hat/
1.官方仓库软件包介绍
| 包名字 | 描述 |
|---|---|
| mongodb-org | 一个元数据包,将自动安装下面列出的四个组件软件包 |
| mongodb-org-server | 包含mongod守护进程和相关的配置以及init脚本 |
| mongodb-org-mongos | 包含mongos守护进程 |
| mongodb-org-shell | 包含mongo shell 命令行解释器 |
| mongodb-org-tools | 其他工具 |
mongodb-org-server软件包提供了一个mongod以/etc/mongod.conf 配置文件为参照的初始化脚本。
默认的配置文件中默认 bind_ip 设置为127.0.0.1 这是个默认监听地址。
2.配置包管理系统
2.1mongodb3.6版本
创建一个/etc/yum.repos.d/mongodb-org-3.6.repo文件,以便您可以直接使用安装MongoDB yum。
[root@izuf6fuxiq5o2qj8wsqvr3z ~]# vim /etc/yum.repos.d/mongodb-org-3.6.repo
[mongodb-org-3.6]
name=MongoDB Repository
baseurl=https://repo.mongodb.org/yum/redhat/$releasever/mongodb-org/3.6/x86_64/
gpgcheck=1
enabled=1
gpgkey=https://www.mongodb.org/static/pgp/server-3.6.asc
2.2mongodb3.4版本
假如你想安装 3.4 版本,那么创建 3.4 的仓库文件
# cat /etc/yum.repos.d/mongodb-org-3.4.repo
[mongodb-org-3.4]
name=MongoDB 3.4 Repository
baseurl=https://repo.mongodb.org/yum/redhat/$releasever/mongodb-org/3.4/x86_64/
gpgcheck=0
enabled=1
3.安装MongoDB软件包。
sudo yum install -y mongodb-org
- 要安装特定版本的MongoDB,请分别指定每个组件包并将版本号附加到包名称,如下例所示:
sudo yum install -y mongodb-org-3.6.3 mongodb-org-server-3.6.3 mongodb-org-shell-3.6.3 mongodb-org-mongos-3.6.3 mongodb-org-tools-3.6.3
4.设置防止意外升级项
您可以指定任何可用的MongoDB版本。但是yum ,当更新的版本可用时,将升级软件包。
为防止意外升级,将以下exclude指令添加到您的/etc/yum.conf文件中:
exclude = mongodb-org,mongodb-org-server,mongodb-org-shell,mongodb-org-mongos,mongodb-org-tools
5.启动/按关闭服务
# systemctl start mongod
# systemctl enable mongod
# ss -ntal
State      Recv-Q Send-Q Local Address:Port               Peer Address:Port
LISTEN     0      128          *:22                       *:*
LISTEN     0      1      127.0.0.1:32000                    *:*
LISTEN     0      128    127.0.0.1:27017                    *:*
# systemctl stop mongod
三、MongoDB数据库简单操作
1.MongoDB入门命令
mongo                       //进入当前数据库
show  dbs                   //查看mongodb内数据库
use   databaseName          //选库
show  tables/collections    //查看当前数据库下的表格
1.1 创建数据库
Mongodb的库是隐式创建,通过use 一个不存在的库然后在该库下创建collection,即可创建库。
use shop                     //数据库默认直接使用
db.createCollection('user'); //创建关系表
show collection;            //查看数据库内表
1.2添加表内数据
db.user.insert({name:'yy',age:18});
db.user.insert({_id:2 , name:"uni" ,male:"mam"});    //添加内容指定id
db.user.insert({_id:3,name:'yuydddu',hobby:['swiming','runing'],intro:{'title':'my name is yutao'}});
//添加非内键值,可以不匹配

---------------------------------------
 db.user.find()      //查询命令
{ "_id" : ObjectId("5c83b9e369b62226da1a2810"), "name" : "yy", "age" : 18 }
{ "_id" : 2, "name" : "uni", "male" : "mam" }
{ "_id" : 3, "name" : "yuydddu", "hobby" : [ "swiming", "runing" ], "intro" : { "title" : "my name is yutao" } }
> db.user.insert({name:'yy',age:18});
- 除此之外collection也是可以隐式创建
db.root.insert({_id:88 , 'name':'yyysii', 'hobby':['like','nnbb'], 'intro':{'title':'mu is  like' ,'cotrm':'sss'}});          //隐式创建collection

 db.root.find()             //查看数据库内容
{ "_id" : 88, "name" : "yyysii", "hobby" : [ "like", "nnbb" ], "intro" : { "title" : "mu is  like", "cotrm" : "sss" } }
1.3删除数据库/表
use   该数据库xxx
db.dropDatabase();        //删除该数据库
db.表名xxx.drop();       //删除数据库内表信息
2.MongoDB--增删改查
MongoDB存储的是文档格式,文档是json格式的对象。无论是增删改查都需要通过json格式进行传递。
2.1 增操作(insert)
在MongoDB中可以增加单篇、多篇文档。
db.stu.insert({name:'yy' , num:'92929'});

db,stu.insert({_id:3 ,name:'ydnu' ,num:'egr'});    //指定id

db.stu.insert({name:{x:'li' , ming:'shimin'}, ji:['war','kill']});               //复杂的单文档格式。

db.stu.insert([{_id:5 ,name:'yy',hobby:'swim'},{_id:9,num:'99', nem:'df'},{name:'yy'}]);    //同时写多篇文档
2.2删操作 (remove)
db.stu.remove({name:'dd'});           //后加查询表达式:选项
db.shenji.remove({male:'n'},true);    //每次只删除一条信息

db.stu.remove()                      //删除表内所有信息
注意
1: 查询表达式依然是个json对象
2: 查询表达式匹配的行,将被删掉.
3: 如果不写查询表达式,collections中的所有文档将被删掉.
2.3改操作 (update)
db.shenji.update({name:'ff'},{name:'ffy'});
db.shenji.update({name:'ffc'}, {$set:{name:'yy'}});

================ result =============
> db.shenji.find()
{ "_id" : ObjectId("5ca72ff39ff46db4a72f5745"), "name" : "ffy" }
{ "_id" : ObjectId("5ca72ff39ff46db4a72f5746"), "name" : "yy", "male" : "m" }
修改时的赋值表达式
:$set 修改某列的值
$unset 删除某个列
$rename 重命名某个列
$inc 增长某个列 必须是数字型
典型实例
//原数据内容
> db.xuyou.insert({
... name:'wukong',
... jinggu:'ture',
... sex:'m',
... age:500
... })

//修改数据
> db.xuyou.update({name:'wukong'}, {
... $set:{name:'dzsf'},
...$unset:{jinggu:1},
...$rename:{sex:'gender'},
...$inc:{age:16}
...})

===============result=============
{ "_id" : ObjectId("5ca737a79ff46db4a72f574a"), "name" : "wukong", "jinggu" : "ture", "sex" : "m", "age" : "500" }

{ "_id" : ObjectId("5ca756699ff46db4a72f574b"), "name" : "dzsf", "age" : 516, "gender" : "m" }
对于update而言,如果不加入匹配参数,每次只能修改一行。故我们需要引进新的参数。
- multi: 是指修改多行(即使查询表达式命中多行,默认也只改1行,如果想改多行,可以用此选项)
> db.biao.update({gender:'n'}, {$set:{gender:'woman'}},{multi:1});

> db.biao.find()

{ "_id" : ObjectId("5ca75baee0fef6d9022eef1a"), "name" : "yhy", "gender" : "m" }
{ "_id" : ObjectId("5ca75baee0fef6d9022eef1b"), "name" : "syy", "gender" : "woman" }
{ "_id" : ObjectId("5ca75baee0fef6d9022eef1c"), "name" : "yhhhy", "gender" : "woman" }
- Upsert是指没有匹配的行,则直接插入该行.(和mysql中的replace一样)
 db.biao.update({name:'yhhy'}, {$set:{name:'junshiwuyong'}}, {upsert:1});
> db.biao.update({name:'yjy'}, {$set:{name:'wusongdahu'},$setOnInsert:{gender:'man'}},{upsert:1});

============= result =================
{ "_id" : ObjectId("5ca779ec3eab4669f488b85c"), "name" : "junshiwuyong" }
{ "_id" : ObjectId("5ca77bd53eab4669f488b864"), "name" : "wusongdahu", "gender" : "man" }
2.4查操作(find)
db.stu.find()                   //查询所有文档 所有内容

db.stu.find({},{gendre:1})      //查询所有文档,的gender属性 (_id属性默认总是查出来)

db.stu.find({},{gender:1, _id:0})   //查询所有文档的gender属性,且不查询_id属性

db.stu.find({gender:’male’},{name:1,_id:0});   //查询所有gender属性值为male的文档中的name属性
3.MongoDB查询表达式
3.1使用比较运算符查询
[图片上传失败...(image-ea676-1554555623323)]
3.1.1主键为32的商品
> db.goods.find({goods_id:32})
3.1.2不属于第三栏的所有商品($ne)
> db.goods.find({cat_id:{$ne:3}},{goods_id:1, cat_id:1,_id:0})
3.1.3价格高于3000的商品($gt)
> db.goods.find({shop_price:{$gt:3000}}, {goods_name:1,shop_price:1,_id:0})
3.1.4价格小于等于100的商品 ($lte)
> db.goods.find({shop_price:{$lte:100}},{goods_name:1,shop_price:1,_id:0})
3.1.5取出第4栏或者第11栏的商品($in)
db.goods.find({cat_id:{$in:[4,11]}},{goods_name:1,shop_price:1,_id:0,cat_id:1})
3.1.6筛选有共同项的成员信息($all)
> db.xuyou.find({hobby:{$all:['c']}})
3.2使用逻辑运算符查询
3.2.1价格在100-500之间的商品($and)
> db.goods.find({$and:[{shop_price:{$gte:100}} ,{shop_price:{$lte:500}}]}, {shop_price:1,goods_name:1,_id:0})
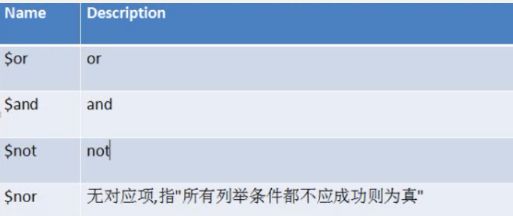
3.2.2取出不属于第3栏且不属于第11栏的商品(nin, $nor)
//方法一:and
> db.goods.find({$and:[{cat_id:{$ne:3}}, {cat_id:{$ne:11}}]},{cat_id:1,goods_name:1,_id:0});
//方法二:nin
> db.goods.find({cat_id:{$nin:[3,11]}},{cat_id:1,goods_name:1,_id:0})
//方法三:nor
> db.goods.find({$nor:[{cat_id:3} ,{cat_id:11}]}, {cat_id:1,goods_name:1,_id:0})
3.3使用元素运算符查询
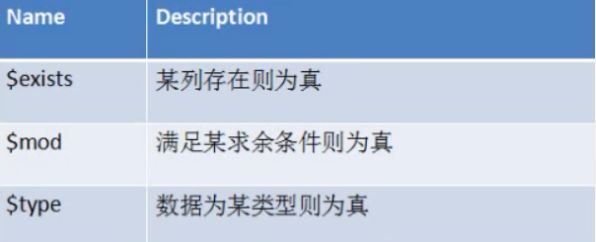
3.3.1取出goods_id以5为倍数的商品 ($mod)
> db.goods.find({goods_id:{$mod:[5,0]}},{goods_id:1,goods_name:1,_id:0})
3.3.2找出xuyou表中唯一存在age的信息($exists)
> db.xuyou.find({age:{$exists:1}})
3.3.3查询age字段不同类型的信息($type)
//对于age来说,可以编写成age:‘22’,同时也可以是是age:22
db.biao.find({age:{$type:1}})    //浮点型
db.biao.find({age:{$type:1}})    //字符串类型
3.4使用JS运算符查询
3.4.1条件查询商品信息($where)
> db.goods.find({$where:'this.shop_price>5000'},{shop_price_id:1,goods_name:1,_id:0})

> db.goods.find({$where:'this.shop_price>200 && this.shop_price<500 || this.shop_price>300 && this.price<5000'}, {shop_price:1,goods_name:1,_id:0})
//&& 并且  ||或者
3.4.2条件查询匹配商品开头信息($regex)
db.goods.find({goods_name:{$regex:"诺基亚"}},{_id:0,goods_name:1})
4.MongoDB--游标操作
4.1循环生成1000条数据
> for(var i=0; i<100000; i++) {
... db.data.insert({_id:i+1,title:'hello word',content:'aaa'+i});
... };
4.2游标的使用
- 游标:通俗的说:游标不是查询结果,而是查询的返回资源或者接口。通过这个接口,你可以逐条读取数据。
4.2.1声明游标
> var mycusor = db.data.find({_id:{$lte:4}})   //定义游标数量
>  print(mycusor.next())         //第一次查询,返回bson格式
[object BSON]

> printjson(mycusor.next())        //第二次查询,游标从2开始计数
{ "_id" : 2, "title" : "hello word", "content" : "aaa1" }
4.2.2判断游标是否到达尽头
> printjson(mycusor.hasNext())
false

> var mycusor = db.data.find({_id:{$lte:4}})
> printjson(mycusor.hasNext())
true
4.2.3循环/(迭代)函数调用显示游标内容
> var mycursor = db.data.find({_id:{$lte:5}})
//方式一:利用while循环实现
> while(mycursor.hasNext()) {
... printjson(mycursor.next());
... }

//方式二:利用for循环实现
> for(var mycursor=db.data.find({_id:{$lte:5}}) ; mycursor.hasNext();) {
... printjson(mycursor.next())
... }

//方式三:利用forEach函数实现
> mycusor.forEach(function(key){printjson(key)});

{ "_id" : 1, "title" : "hello word", "content" : "aaa0" }
{ "_id" : 2, "title" : "hello word", "content" : "aaa1" }
{ "_id" : 3, "title" : "hello word", "content" : "aaa2" }
{ "_id" : 4, "title" : "hello word", "content" : "aaa3" }
{ "_id" : 5, "title" : "hello word", "content" : "aaa4" }

> var mycusor = db.data.find({_id:{$lte:5}})
> mycusor.forEach(function(key){print('you id is '+key._id)});
you id is 1
you id is 2
you id is 3
you id is 4
you id is 5
4.2.4游标在分页中的应用
比如查询1000行(跳过100页取10行),一般我们假设每页有N行,当前是page页就需要跳过前(page-1)*N行,在MongoDB中使用skip()和limit()函数来实现
> var mycursor = db.data.find().skip(99995);
> mycursor.forEach(function(key) {printjson(key)});
{ "_id" : 99996, "title" : "hello word", "content" : "aaa99995" }
{ "_id" : 99997, "title" : "hello word", "content" : "aaa99996" }
{ "_id" : 99998, "title" : "hello word", "content" : "aaa99997" }
{ "_id" : 99999, "title" : "hello word", "content" : "aaa99998" }
{ "_id" : 100000, "title" : "hello word", "content" : "aaa99999" }
查询第901页,每页10条
> var mycursor = db.data.find().skip(9985).limit(10)
> mycursor.forEach(function(key) {printjson(key)});
{ "_id" : 9986, "title" : "hello word", "content" : "aaa9985" }
{ "_id" : 9987, "title" : "hello word", "content" : "aaa9986" }
{ "_id" : 9988, "title" : "hello word", "content" : "aaa9987" }
{ "_id" : 9989, "title" : "hello word", "content" : "aaa9988" }
{ "_id" : 9990, "title" : "hello word", "content" : "aaa9989" }
{ "_id" : 9991, "title" : "hello word", "content" : "aaa9990" }
{ "_id" : 9992, "title" : "hello word", "content" : "aaa9991" }
{ "_id" : 9993, "title" : "hello word", "content" : "aaa9992" }
{ "_id" : 9994, "title" : "hello word", "content" : "aaa9993" }
{ "_id" : 9995, "title" : "hello word", "content" : "aaa9994" }
4.2.5 显示数组 toArray的使用
- 不要随意使用toArray()。因为:此函数会把所有的行立即以对象的形式组织在内存里。可以在取出少数几行时候用此功能。
> var mycursor = db.data.find().skip(99995).limit(5)
> mycursor.toArray();
[
        {
                "_id" : 99996,
                "title" : "hello word",
                "content" : "aaa99995"
        },
        {
                "_id" : 99997,
                "title" : "hello word",
                "content" : "aaa99996"
        },
        {
                "_id" : 99998,
                "title" : "hello word",
                "content" : "aaa99997"
        },
        {
                "_id" : 99999,
                "title" : "hello word",
                "content" : "aaa99998"
        },
        {
                "_id" : 100000,
                "title" : "hello word",
                "content" : "aaa99999"
        }
]

//调取一行数据
> printjson(mycursor.toArray()[3])

{ "_id" : 99999, "title" : "hello word", "content" : "aaa99998" }
4.MongoDB--索引
- 索引提高查询速度,降低读入速度,权衡常用的字段查询,不必在太多列上建立索引
- 在MongoBD中索引可以按字段升序/降序来创建,便于排序
- 默认是用btree来组织索引文件,同时也允许建立hash索引
| 索引作用类型 | 索引性质 |
|---|---|
| 单列索引 | 唯一索引 |
| 多列索引 | 稀疏索引 |
| 子文档索引 | 哈希索引 |
4.1创建一个MongoDB数据文件
> for(var i=1;i<=1000;i++) {
... db.stu.insert({sn:i,name:'student'+i})
... }
4.2索引作用类型
4.2.1创建/ 查询/ 删除单列索引
//创建索引的两种方式
> db.stu.ensureIndex({name:-1})     //-1 倒序
> db.stu.createIndex({sn:1})        //1  正序
{
        "createdCollectionAutomatically" : false,
        "numIndexesBefore" : 1,
        "numIndexesAfter" : 2,
        "ok" : 1
}

//查询索引
> db.stu.getIndexes()
[
        {
                "v" : 2,
                "key" : {
                        "_id" : 1
                },
                "name" : "_id_",
                "ns" : "dd.stu"
        },
        {
                "v" : 2,
                "key" : {
                        "sn" : 1
                },
                "name" : "sn_1",
                "ns" : "dd.stu"
        }
]

//删除索引
> db.stu.dropIndex({name:-1})          //删除单个索引
{ "nIndexesWas" : 3, "ok" : 1 }

> db.stu.dropIndexes()                 //删除所有索引
{
        "nIndexesWas" : 3,
        "msg" : "non-_id indexes dropped for collection",
        "ok" : 1
}
4.2.2添加多列索引
> db.stu.ensureIndex({sn:1,name:1})
{
        "createdCollectionAutomatically" : false,
        "numIndexesBefore" : 1,
        "numIndexesAfter" : 2,
        "ok" : 1
}
4.2.3 子文档索引
> db.shop.insert({name:'Nokia',spc:{weight:120,area:'taiwan'}})

> db.shop.insert({name:'sanxing',spc:{weight:100,area:'hangzhou'}})

> db.shop.find({'spc.area':'taiwan'})      //查询子文档索引
{ "_id" : ObjectId("5ca9780c9d13524750104f1e"), "name" : "Nokia", "spc" : { "weight" : 120, "area" : "taiwan" } }


//创建子文档索引
> db.shop.ensureIndex({'spc.area':1})
{
        "createdCollectionAutomatically" : false,
        "numIndexesBefore" : 1,
        "numIndexesAfter" : 2,
        "ok" : 1
4.3索引性质
4.3.1唯一索引
> db.stu.insert({email:'[email protected]'})

> db.stu.insert({email:'[email protected]'})

//创建唯一索引:如果加[email protected]有且只能加入一个
> db.stu.createIndex({email:1},{unique:true})
{
        "createdCollectionAutomatically" : false,
        "numIndexesBefore" : 1,
        "numIndexesAfter" : 2,
        "ok" : 1
}
4.3.2稀疏索引
稀疏索引的特点:如果针对field做索引,对于不含filed列的文档将不建立索引。与之相对,普通索引:会把该文档的field列的值认为是null并建立索引
> db.stu.find()
{ "_id" : ObjectId("5cab2e2b1fa81e696a0cc1f7"), "email" : "[email protected]" }
{ "_id" : ObjectId("5cab2e321fa81e696a0cc1f8"), "email" : "[email protected]" }
{ "_id" : ObjectId("5cab2fa81fa81e696a0cc1f9"), "email" : "[email protected]" }
{ "_id" : ObjectId("5cab31021fa81e696a0cc1fc") }
> db.stu.ensureIndex({email:1},{sparse:1})
{
        "createdCollectionAutomatically" : false,
        "numIndexesBefore" : 1,
        "numIndexesAfter" : 2,
        "ok" : 1
}
> db.tea.find({email:null})
4.3.3 哈希索引
> db.foo.insert([{title:'hello'},{title:'word'}])

> db.foo.ensureIndex({title:'hashed'})
{
        "createdCollectionAutomatically" : false,
        "numIndexesBefore" : 1,
        "numIndexesAfter" : 2,
        "ok" : 1
}
四、MongoBD数据库管理
1.MongoBD用户管理
1.1修改配置文件
在 /etc/mongo.conf中添加配置内容
security:
   # 启用或禁用基于角色的访问控制(RBAC)来控制每个用户对数据库资源和操作的访问
   # disabled | enabled
    authorization: enabled   //此行前必须有两个空格
Mongo 安装好后,默认是 disabled 的,要想启用认证,必须先创建一个用户管理员账号。这个账号专门用于创建用户,包括给这些用户赋予不同的角色,并且可以针对不同的数据库赋予不同的角色。
1.2 创建用户
1.2.1创建管理用户
> use admin

> db.createUser(
...   {
...     user: "dba",
...     pwd: "dba",
...     roles: [ { role: "userAdminAnyDatabase", db: "admin" } ]
...   }
... )

//退出重新认证即可
[root@localhost ~]# mongo
> use admin
switched to db admin
> db.auth('dba','dba')
1
> show dbs
admin   0.000GB
config  0.000GB
local   0.000GB
在创建用户时最重要的就是权限的选择问题
- user:用户名
- pwd:密码
- roles:指定用户的角色,可以用一个空数组给新用户设定空角色;在roles字段,可以指定内置角色和用户定义的角色。
1.数据库用户角色:read、readWrite;
- 数据库管理角色:dbAdmin、dbOwner、userAdmin;
- 集群管理角色:clusterAdmin、clusterManager、clusterMonitor、hostManager;
- 备份恢复角色:backup、restore;
- 所有数据库角色:readAnyDatabase、readWriteAnyDatabase、userAdminAnyDatabase、dbAdminAnyDatabase
- 超级用户角色:root
// 这里还有几个角色间接或直接提供了系统超级用户的访问(dbOwner 、userAdmin、userAdminAnyDatabase)- 内部角色:__system
其中的具体角色问题
Read:允许用户读取指定数据库
readWrite:允许用户读写指定数据库
dbAdmin:允许用户在指定数据库中执行管理函数,如索引创建、删除,查看统计或访问system.profile
userAdmin:允许用户向system.users集合写入,可以找指定数据库里创建、删除和管理用户
clusterAdmin:只在admin数据库中可用,赋予用户所有分片和复制集相关函数的管理权限。
readAnyDatabase:只在admin数据库中可用,赋予用户所有数据库的读权限
readWriteAnyDatabase:只在admin数据库中可用,赋予用户所有数据库的读写权限
userAdminAnyDatabase:只在admin数据库中可用,赋予用户所有数据库的userAdmin权限
dbAdminAnyDatabase:只在admin数据库中可用,赋予用户所有数据库的dbAdmin权限。
root:只在admin数据库中可用。超级账号,超级权限
1.2.2创建root超级用户
> use admin
switched to db admin
> db.auth("dba","dba")
1
> db.createUser({
... user:"wudi",
... pwd:"1",
... roles:[{role:"root",db:"admin"}]
... })

> use admin
switched to db admin
> db.auth("wudi","1")
1
> show dbs
admin   0.000GB
config  0.000GB
local   0.000GB
stu     0.000GB
> use stu
switched to db stu
> show tables
foo
1.2.3创建单数据库读写用户
> use stu
switched to db stu
> db.createUser({
... user:"yy",
... pwd:"1",
... roles:[{role:"readWrite",db:"stu"}]
... })

//退出数据库后重新登录
[root@localhost ~]# mongo
MongoDB shell version v3.6.12
connecting to: mongodb://127.0.0.1:27017/?gssapiServiceName=mongodb
Implicit session: session { "id" : UUID("7bb6702e-9398-4449-a9a8-279b95362845") }
MongoDB server version: 3.6.12
> use stu
switched to db stu
> db.auth('yy','1')
1
> show tables
> db.foo.insert({name:'effcf',age:19})
WriteResult({ "nInserted" : 1 })
> db.foo.insert({name:'rgfv',age:22})
WriteResult({ "nInserted" : 1 })
> db.foo.find()
{ "_id" : ObjectId("5c839f9d5cdcf23c553fe98a"), "name" : "effcf", "age" : 19 }
{ "_id" : ObjectId("5c839fa65cdcf23c553fe98b"), "name" : "rgfv", "age" : 22 }
1.2.4创建单数据库只读用户
> use admin
switched to db admin
> db.auth('dba','dba')
1
> use stu
>  db.createUser({
...  user:"yt",
...  pwd:"1",
... roles:[{role:"read",db:"stu"}]
... })

[root@localhost ~]# mongo
MongoDB shell version v3.6.12
connecting to: mongodb://127.0.0.1:27017/?gssapiServiceName=mongodb
Implicit session: session { "id" : UUID("a48cb5be-b7fa-453d-92e7-6cf8cabc98c3") }
MongoDB server version: 3.6.12
> use stu
switched to db stu
> db.auth("yt","1")
1
> show tables
foo
> db.foo.find()
{ "_id" : ObjectId("5c839f9d5cdcf23c553fe98a"), "name" : "effcf", "age" : 19 }
{ "_id" : ObjectId("5c839fa65cdcf23c553fe98b"), "name" : "rgfv", "age" : 22 }
> db.foo.insert({name:'dd',age:88})
WriteResult({
        "writeError" : {
                "code" : 13,
                "errmsg" : "not authorized on stu to execute command { insert: \"foo\", ordered: true, lsid: { id: UUID(\"a48cb5be-b7fa-453d-92e7-6cf8cabc98c3\") }, $db: \"stu\" }"
        }
})
1.3管理用户
> use admin
switched to db admin
> db.auth('dba','dba')
1

> db.system.users.find().pretty()
{
        "_id" : "admin.dba",
        "user" : "dba",
        "db" : "admin",
        "credentials" : {
                "SCRAM-SHA-1" : {
                        "iterationCount" : 10000,
                        "salt" : "KEmJdox7dvQzfUGRWuTVXQ==",
                        "storedKey" : "ONHWxuh4wU1RZFR8Al/oX6Z1VWw=",
                        "serverKey" : "Pw8n1yYG71zihd+5MyZ4JWYR+Yg="
                }
        },
        "roles" : [
                {
                        "role" : "userAdminAnyDatabase",
                        "db" : "admin"
                }
        ]
}
{
        "_id" : "stu.yy",
        "user" : "yy",
        "db" : "stu",
        "credentials" : {
                "SCRAM-SHA-1" : {
                        "iterationCount" : 10000,
                        "salt" : "W0Di3xc3oehmnIyg4Sm7JA==",
                        "storedKey" : "9NovDOeoMUdY5d6UW8a8Jm7iKW0=",
                        "serverKey" : "8bAt6hWPHMa2FPbnsoRiBFUdKSI="
                }
        },
        "roles" : [
                {
                        "role" : "readWrite",
                        "db" : "stu"
                }
        ]
}
{
        "_id" : "stu.yt",
        "user" : "yt",
        "db" : "stu",
        "credentials" : {
                "SCRAM-SHA-1" : {
                        "iterationCount" : 10000,
                        "salt" : "Js4z7J4b+vRPvzYRGYqEOg==",
                        "storedKey" : "/vpk/EuyBfMCiKqDWoqZvOCKprU=",
                        "serverKey" : "Z7riO2r2MBQXvvJbBAxWW6mxbjs="
                }
        },
        "roles" : [
                {
                        "role" : "read",
                        "db" : "stu"
                }
        ]
}
{
        "_id" : "admin.wudi",
        "user" : "wudi",
        "db" : "admin",
        "credentials" : {
                "SCRAM-SHA-1" : {
                        "iterationCount" : 10000,
                        "salt" : "yexzX4oxSWEoynisD7MDFg==",
                        "storedKey" : "RgZGju6pUtX1ompTS7b9sXpMM6M=",
                        "serverKey" : "bbLRcO61HTl2j/l+5ZVqjHXoT4A="
                }
        },
        "roles" : [
                {
                        "role" : "root",
                        "db" : "admin"
                }
        ]
}
2. MongoD数据库的备份与还原
2.1 MongoDB数据导出(mongoexport)
-
mongoexport遭遇Authentication failed:
需要添加 --authenticationDatabase=admin ,即可导出成功
查询工具的各个参数
general options:
--help print usage
--version print the tool version and exitverbosity options:
-v, --verbose more detailed log output (include multiple times for
more verbosity, e.g. -vvvvv)
--quiet hide all log outputconnection options:
-h, --host= mongodb host to connect to (setname/host1,host2 for
replica sets)
--port= server port (can also use --host hostname:port)ssl options:
--ssl connect to a mongod or mongos that has ssl enabled
--sslCAFile= the .pem file containing the root certificate chain from
the certificate authority
--sslPEMKeyFile= the .pem file containing the certificate and key
--sslPEMKeyPassword= the password to decrypt the sslPEMKeyFile, if necessary
--sslCRLFile= the .pem file containing the certificate revocation list
--sslAllowInvalidCertificates bypass the validation for server certificates
--sslAllowInvalidHostnames bypass the validation for server name
--sslFIPSMode use FIPS mode of the installed openssl libraryauthentication options:
-u, --username= username for authentication
-p, --password= password for authentication
--authenticationDatabase= database that holds the user's credentials
--authenticationMechanism= authentication mechanism to usenamespace options:
-d, --db= database to use
-c, --collection= collection to useoutput options:
-f, --fields= comma separated list of field names (required for
exporting CSV) e.g. -f "name,age"
--fieldFile= file with field names - 1 per line
--type= the output format, either json or csv (defaults to
'json')
-o, --out= output file; if not specified, stdout is used
--jsonArray output to a JSON array rather than one object per line
--pretty output JSON formatted to be human-readablequerying options:
-q, --query= query filter, as a JSON string, e.g., '{x:{snapshot)
--skip= number of documents to skip
--limit= limit the number of documents to export--sort= sort order, as a JSON string, e.g. '{x:1}'
//导出全部数据
[root@localhost tmp]# mongoexport -u wudi -p 1 -d stu -c foo  -o /tmp/sky.stu.json --authenticationDatabase=admin

2019-03-09T23:54:16.480+0800    connected to: localhost
2019-03-09T23:54:16.480+0800    exported 2 records


//导出数据中选定内容
[root@localhost tmp]# mongoexport -u wudi -p 1 -d biao -c stu -f "sn,name" -q '{sn:{$lte:1000}}' -o /tmp/test.ss.json --authenticationDatabase=admin

2019-03-09T23:43:54.067+0800    connected to: localhost
2019-03-09T23:43:54.121+0800    exported 1000 records

//导出CSV格式数据内容(CSV格式便于和传统数据库交换数据)
[root@localhost tmp]# mongoexport -u wudi -p 1 -d biao -c stu -f "sn,name" -q '{sn:{$lte:1000}}' --csv -o /tmp/test.ss.csv --authenticationDatabase=admin
2019-04-12T11:07:26.420+0800    csv flag is deprecated; please use --type=csv instead

2019-04-12T11:07:26.425+0800    connected to: localhost
2019-04-12T11:07:26.462+0800    exported 1000 records
2.2 MongoDB数据导入(mongoimport)
//导入json格式数据
[root@localhost tmp]# mongoimport -u wudi -p 1 -d people -c age --type json --file /tmp/test.ss.json --authenticationDatabase=admin

2019-04-12T11:26:25.030+0800    connected to: localhost
2019-04-12T11:26:25.279+0800    imported 1000 documents

//导入csv格式数据(1)
[root@localhost tmp]# mongoimport -u wudi -p 1 -d people -c name --type csv -f "sn,name" --file /tmp/te.ceshi.csv --authenticationDatabase=admin

2019-04-12T11:33:24.289+0800    connected to: localhost
2019-04-12T11:33:24.329+0800    imported 11 documents

经过观察看出导入时将标题修改为第一行数据
> db.auth("wudi","1")
1
> use people
switched to db people
> db.name.find()
{ "_id" : ObjectId("5cb0070422a89db7a5941f4c"), "sn" : "sn", "name" : "name" }
{ "_id" : ObjectId("5cb0070422a89db7a5941f4d"), "sn" : 1, "name" : "student1" }
{ "_id" : ObjectId("5cb0070422a89db7a5941f4e"), "sn" : 2, "name" : "student2" }
{ "_id" : ObjectId("5cb0070422a89db7a5941f4f"), "sn" : 3, "name" : "student3" }
{ "_id" : ObjectId("5cb0070422a89db7a5941f50"), "sn" : 5, "name" : "student5" }
{ "_id" : ObjectId("5cb0070422a89db7a5941f51"), "sn" : 6, "name" : "student6" }
{ "_id" : ObjectId("5cb0070422a89db7a5941f52"), "sn" : 7, "name" : "student7" }
{ "_id" : ObjectId("5cb0070422a89db7a5941f53"), "sn" : 8, "name" : "student8" }
{ "_id" : ObjectId("5cb0070422a89db7a5941f54"), "sn" : 4, "name" : "student4" }
{ "_id" : ObjectId("5cb0070422a89db7a5941f55"), "sn" : 10, "name" : "student10" }
{ "_id" : ObjectId("5cb0070422a89db7a5941f56"), "sn" : 9, "name" : "student9" }

//导入CSV数据格式(2)
[root@localhost tmp]# mongoimport -u wudi -p 1 -d people -c hobby --headerline --type csv --file /tmp/te.ceshi.csv --authenticationDatabase=admin

2019-04-12T14:20:08.711+0800    connected to: localhost
2019-04-12T14:20:08.743+0800    imported 10 documents
2.3 MongoDB数据导入(mongodump)
mongodump 导出二进制bson结构的数据及其索引信息。
规律:
导出的文件放在database命名的目录文件下
每个表导出2个文件,分别是bson结构的数据文件,json的索引信息
如果不声明表名。导出所有表信息
//导出坤库内全部信息
[root@localhost dump]# mongodump -u wudi -p 1 -d people --authenticationDatabase=admin
2019-04-12T14:34:36.805+0800    writing people.age to
2019-04-12T14:34:36.805+0800    writing people.name to
2019-04-12T14:34:36.805+0800    writing people.hobby to
2019-04-12T14:34:36.807+0800    done dumping people.name (11 documents)
2019-04-12T14:34:36.810+0800    done dumping people.age (1000 documents)
2019-04-12T14:34:36.815+0800    done dumping people.hobby (10 documents)

//导出指定表信息
[root@localhost dump]# mongodump -u wudi -p 1 -d people -c age --authenticationDatabase=admin
2.4 MongoDB数据导出(mongorestore)
[root@localhost people]# mongorestore -u wudi -p 1   --authenticationDatabase=admin  -d people /tmp/dump/dump/people


2019-04-12T14:48:25.223+0800    the --db and --collection args should only be used when restoring from a BSON file. Other uses are deprecated and will not exist in the future; use --nsInclude instead
2019-04-12T14:48:25.223+0800    building a list of collections to restore from /tmp/dump/dump/people dir
2019-04-12T14:48:25.224+0800    reading metadata for people.age from /tmp/dump/dump/people/age.metadata.json
2019-04-12T14:48:25.430+0800    restoring people.age from /tmp/dump/dump/people/age.bson
2019-04-12T14:48:25.484+0800    reading metadata for people.name from /tmp/dump/dump/people/name.metadata.json
2019-04-12T14:48:25.484+0800    reading metadata for people.hobby from /tmp/dump/dump/people/hobby.metadata.json
2019-04-12T14:48:25.504+0800    restoring people.name from /tmp/dump/dump/people/name.bson
2019-04-12T14:48:25.530+0800    no indexes to restore
2019-04-12T14:48:25.530+0800    finished restoring people.name (11 documents)
2019-04-12T14:48:25.530+0800    restoring people.hobby from /tmp/dump/dump/people/hobby.bson
2019-04-12T14:48:25.559+0800    no indexes to restore
2019-04-12T14:48:25.559+0800    finished restoring people.age (1000 documents)
2019-04-12T14:48:25.578+0800    no indexes to restore
2019-04-12T14:48:25.578+0800    finished restoring people.hobby (10 documents)
2019-04-12T14:48:25.578+0800    done

[root@localhost people]# mongo
MongoDB shell version v3.6.12
connecting to: mongodb://127.0.0.1:27017/?gssapiServiceName=mongodb
Implicit session: session { "id" : UUID("177a96e5-5bc4-43ce-be78-9a924d5ae568") }
MongoDB server version: 3.6.12
> use admin
switched to db admin
> db.auth("wudi","1")
1
> use people
switched to db people
> show tables
age
hobby
name
3. MongoDB数据库 - 复制集(replication )
含义:多台服务器维护相同的数据副本,提高服务器的可用性。


