继承Bean配置
- Spring允许继承bean的配置,被继承的bean称为父bean,继承这个父bean的bean称为子bean。通过设置
parent来实现继承。 - 子bean从父bean中继承配置,包括bean的属性配置。
- 子bean可以覆盖从父bean继承过来的配置。
- 父bean可以作为配置模板,也可以作为bean实例,若只想把父bean作为模板,可以设置
abstract属性为true,这样Spring将不会实例化这个bean。 - 并不是
- 可以忽略父bean的class属性,让子bean指定自己的类,而共享相同的属性配置,但是此时
abstract必须设为true。
我们此时有两个 address类型的bean,如下:
两个bean之间有很多相同的属性比如class和city,因此我们如果让第二个bean继承第一个bean,再把不同的属性加以覆盖,就可以使该配置文件简易许多:
如果想把第一个bean不被实例化,只作为其他bean的模板bean,则可以将其设置为抽象bean:
此时要切记抽象bean不能被实例化。
依赖bean配置
- Spring允许用户通过depend-on属性设定bean前置依赖的bean,前置依赖的bean会在本bean实例化之前创建好。
- 如果前置依赖于多个bean,则可以通过逗号,空格等方式配置bean的名称。
bean的作用域
使用scope属性来配置bean的作用域:
-
singleton:默认值。在IOC容器初始化时创建bean实例,在整个容器的生命周期内只创建这一个bean,是单例的。 -
prototype:原型的。IOC容器初始化时不创建bean的实例,而在每次请求时都创建一个新的bean实例,并返回。
例如:
使用外部属性文件
在配置文件里配置bean时,有时需要在bean的配置里混入系统部署的细节信息(例如:文件路径,数据源配置信息等),而这些部署细节实际上需要和bean配置相分离。
Spring提供了一个PropertyPlaceholderConfigurer的BeanFactory后置处理器,这个处理器允许用户将bean配置的部分内容外移到属性文件中,可以在bean配置文件里使用形式为${var}的变量,PropertyPlaceholderConfigurer从属性文件里加载属性,并使用这些属性来替换变量。
Spring还允许在属性文件中使用${propName}以实现属性之间的相互引用。
示例:
如果我们不使用外部属性文件的话,在beans-properties.xml配置DataSource类型的一个bean如下:
这样也能配置,但是就显得不大灵活了,当我们需要更改这些数据库属性参数时还得进该配置文件来更改。
如果我们使用外部资源文件来进行配置,步骤如下:
我们定义一个外部的资源文件db.properties,里面存放数据库的属性配置:
user=root
password=root
driverClass=com.mysql.jdbc.Driver
jdbcUrl=jdbc:mysql:///my_test_mysql
bean配置文件beans-properties.xml,里面配置了DataSource类型的bean:
通过工厂方法配置bean
静态工厂方法
调用静态工厂方法创建bean是将对象创建的过程封装到静态方法中,当客户端需要对象时,只需要简单地调用静态方法,而不用关心创建对象的细节。
要声明通过静态方法创建的bean,需要在bean的class属性里指定拥有该工厂的方法的类,同时在配置文件中进行配置,具体属性如下:
-
class属性:指向静态工厂方法的全类名 -
factory-method:指向静态工厂方法的名字 -
construtor-arg:如果工厂方法需要传入参数,则使用construtor-arg来配置参数
示例:
- 创建bean类:
package com.spring.factory;

public class Car {
    private String brand;
    private double price;

    public Car(String brand, double price) {
        this.brand = brand;
        this.price = price;
    }

    public Car() {
    }

    public String getBrand() {
        return brand;
    }

    public void setBrand(String brand) {
        this.brand = brand;
    }

    public double getPrice() {
        return price;
    }

    public void setPrice(double price) {
        this.price = price;
    }

    @Override
    public String toString() {
        return "Car{" +
                "brand='" + brand + '\'' +
                ", price=" + price +
                '}';
    }
}
- 创建静态工厂类:
package com.spring.factory;

import java.util.HashMap;
import java.util.Map;

/**
 * 静态工厂方法:直接调用某一个类的静态方法就可以返回bean实例
 */
public class StaticCarFactory {
    private static Map cars = new HashMap ();

    static {
        cars.put("audi",new Car("audi",100000));
        cars.put("ford",new Car("ford",200000));
    }

    //静态工厂方法
    public static Car getCar(String carName) {
        return cars.get(carName);
    }
}
在beans-factory.xml配置文件中进行配置:
实例工厂方法
将对象的创建过程封装到另外一个对象实例的方法里,当客户端需要请求对象时,只需要简单的调用该实例方法而不需要关心对象的创建细节。
要声明通过实例工厂方法创建的bean,需要如下步骤:
-
factory-bean:指定拥有该工厂方法的bean -
factory-method:指向静态工厂方法的名字 -
constructor-arg:如果工厂方法需要传入参数,则使用construtor-arg来配置参数
实例:
bean类我们使用静态工厂方法时创建的bean类,因此我们不需要创建新的bean类。
- 创建实例工厂方法类:
package com.spring.factory;

import java.util.HashMap;
import java.util.Map;

/**
 * 实例工厂方法:实例工厂的方法,即先要创建工厂本身,再调用工厂的实例工厂来返回bean的实例
 *
 */
public class InstanceCarFactory {
    private Map cars = null;

    public InstanceCarFactory(){
        cars = new HashMap ();
        cars.put("audi",new Car("audi",1000000));
        cars.put("ford",new Car("ford",2000000));

    }

    public Car getCar(String brand){
        return cars.get(brand);
    }
}
- 在
beans-factory.xml配置文件中进行配置如下:
通过FactoryBean配置bean
通过factoryBean来配置bean的实例
class:指向FactoryBean的全类名
property:配置FactoryBean的属性
但实际返回的实例却是FactoryBean的getObject()返回的实例。
package com.spring.factoryBean;

import org.springframework.beans.factory.FactoryBean;

public class CarFactoryBean implements FactoryBean {

    private String brand;

    public void setBrand(String brand) {
        this.brand = brand;
    }

    //返回bean的对象
    @Override
    public Car getObject() throws Exception {
        return new Car(brand,10000);
    }

    //返回bean的类型
    @Override
    public Class < ? > getObjectType() {
        return Car.class;
    }

    //返回是否是单实例
    @Override
    public boolean isSingleton() {
        return false;
    }
}
通过注解配置bean(一):基于注解配置bean
我们首先要先引入一个扫描组件的概念。
在classpath中扫描组件
Spring能够从classpath下自动扫描,侦测和实例化具有特定注解的组件,我们称为组件扫描。
特定组件包括:
-
@Component:基本注解,标识了一个受Spring管理的组件 -
@Respository:标识持久层组件 -
@Service:标识服务层(业务层)组件 -
@Controller:标识表现层组件
对于扫描到的组件,Spring有默认的命名策略:使用非限定类名,第一个字母小写,也可以在注解中通过value属性值标识组件的名称。
当在组件类上使用了特定的注解之后,还需要在Spring的配置文件中声明
base-package属性指定一个需要扫描的基类包,Spring容器将会扫描这个基类包里及其子包中的所有类。- 当需要扫描多个包时,可以使用逗号分隔。
- 如果仅仅希望扫描特定的类而非基包下的所有类,可使用
resource-pattern属性过滤特定的类,示例:
-
context:component-scan节点中use-default-filters配合使用(设置为false) -
-
-
| 类别 | 示例 | 说明 |
|---|---|---|
| annotation | com.cerr.XxxAcnotaion | 所有标注了XXXAnnotation的类。该类型采用目标类是否标注了某个注解进行过滤 |
| assinable | com.cerr.XxxService | 所有继承或扩展XXXService的类。该类型采用目标类是否继承或扩展某个特定类进行过滤。 |
配置示例:
通过注解配置bean(二)
如果多个bean之间有关联,比如我们定义一个接口UserRepository如下:
package com.spring.annotation.repository;

public interface UserRepository {
    void save();
}
其有一个实现类UserRepositoryImpl:
package com.spring.annotation.repository;

import org.springframework.stereotype.Repository;

@Repository("userRepository")
public class UserRepositoryImpl implements UserRepository{

    @Override
    public void save() {
        System.out.println("UserRepository Save..");
    }
}
有一个UserService类有该接口类型的成员变量:
package com.spring.annotation.service;

import com.spring.annotation.repository.UserRepository;
import org.springframework.beans.factory.annotation.Autowired;
import org.springframework.stereotype.Service;

@Service
public class UserService {

    private UserRepository userRepository;
    public void add(){
        System.out.println("UserService add..");
        userRepository.save();
    }
}
然后还有一个UserController类也有一个UserService类型的变量。
package com.spring.annotation.controller;

import com.spring.annotation.service.UserService;
import org.springframework.beans.factory.annotation.Autowired;
import org.springframework.stereotype.Controller;

@Controller
public class UserController {

    private UserService userService;

    public void execute(){

        System.out.println("UserController execute...");
        userService.add();
    }
}
这三个类之间就存在了关联关系,然后我们在beans-annotation.xml文件中配置如下:
我们在主方法中获取UserController的bean对象并且调用其execute():
package com.spring.annotation;

import com.spring.annotation.controller.UserController;
import com.spring.annotation.repository.UserRepository;
import com.spring.annotation.repository.UserRepositoryImpl;
import com.spring.annotation.service.UserService;
import org.omg.PortableInterceptor.SYSTEM_EXCEPTION;
import org.springframework.context.ApplicationContext;
import org.springframework.context.support.ClassPathXmlApplicationContext;

public class Main {
    public static void main(String[] args) {
        ApplicationContext ctx = new ClassPathXmlApplicationContext("beans-annotation.xml");
        System.out.println(userController);
        userController.execute();
    }
}
运行代码会发现出现异常,因为UserController的bean对象的方法中有使用到UserService的bean对象,而在UserService对象的方法中也使用到了UserRepository接口,而此时他们都未装配,因此就出现了异常。
对于上述的异常,我们可以使用@Autowired进行自动装配,即在要使用到的成员类进行注解或者注解其setter方法也可。
元素还会自动注册AutowiredAnnotationBeanPostProcessor实例,该实例可以自动装配具有@Autowired和@Resource、@Inject注解的属性。
使用@Autowired自动装配bean
@Autowired注解可以自动装配具有兼容类型的单个bean属性:
- 构造器,普通字段(即使是非public),一切具有参数的方法都可以应用
@Autowired注解。 - 默认情况下,所有使用
@Autowired注解的属性都需要被设置,当Spring找不到匹配的bean装配属性时,会抛出异常,即我们要在配置文件中配置它,**若某一属性允许不被设置,可以设置@Autowired注解的request属性为false,例如@Autowired(request=false)。
对于上面错误的例子,我们对其加了注解后的代码如下:
package com.spring.annotation.controller;

import com.spring.annotation.service.UserService;
import org.springframework.beans.factory.annotation.Autowired;
import org.springframework.stereotype.Controller;

@Controller
public class UserController {
    //加了注解
    @Autowired
    private UserService userService;

    public void execute(){

        System.out.println("UserController execute...");
        userService.add();
    }
}
package com.spring.annotation.service;

import com.spring.annotation.repository.UserRepository;
import org.springframework.beans.factory.annotation.Autowired;
import org.springframework.stereotype.Service;

@Service
public class UserService {
    //加了注解
    @Autowired
    private UserRepository userRepository;
    public void add(){
        System.out.println("UserService add..");
        userRepository.save();
    }
}
- 默认情况下,当IOC容器里存在多个类型兼容的bean时,通过类型的自动装配将无法工作,此时可以在
@Qualifier注解里提供bean的名称,Spring允许对方法的入参标注@Qualifiter已指定注入的bean的名称。
例如我们此时多定义一个UserRepository的实现类UserJdbcRepository类
package com.spring.annotation.repository;
import org.springframework.stereotype.Repository;
@Repository
public class UserJdbcRepository implements UserRepository{
    @Override
    public void save() {

    }
}
我们再把UserRepositoryImpl中的@Repository("userRepository")的命名去掉,变为@Repository。此时我们有了两个UserRepository接口的实现类,而此时通过@AutoWired注解的是UserRepository接口,因此允许代码会出现异常。
我们此时有两种解决方法,可以在UserRepositoryImpl中的@Repository中加上我们注解的userRepository。另一种方法使用@Qualifiter注解提供bean的名称。
注解后的UserService如下所示:
package com.spring.annotation.service;

import com.spring.annotation.repository.UserRepository;
import org.springframework.beans.factory.annotation.Autowired;
import org.springframework.beans.factory.annotation.Qualifier;
import org.springframework.stereotype.Service;

@Service
public class UserService {
    @Autowired
    @Qualifier("userRepositoryImpl")
    private UserRepository userRepository;
    public void add(){
        System.out.println("UserService add..");
        userRepository.save();
    }
}
-
@Autowired注解也可以应用在数组类型的属性上,此时Spring将会把所有匹配的bean进行自动装配。 -
@Autowired注解也可以应用在集合属性上,此时Spring读取该集合的类型信息,然后自动装配所有与之兼容的bean。 -
@Autowired注解用在java.util.Map上时,若该Map的键值是String,那么Spring将自动装配与之Map值类型兼容的bean,此时bean的名称作为键值。
使用@Resource或@Inject自动装配bean
这两者与@Autowired注解的功能类似。
@Resource注解要求提供一个bean名称的属性,若该属性为空,则自动采用标注处的变量或方法名作为bean的名称。
@Inject和@Autowired注解一样也是按类型匹配注入的bean,但没有required属性。我们建议使用@Autowired注解。
泛型依赖注入(Spring4的新特性)
Spring 4中可以为子类注入子类对应的泛型类型的成员变量的引用。
即父类泛型类型之间建立了关联关系,而对应的子类之间没有建立关联关系,Spring会为其对应的子类建立关联关系。
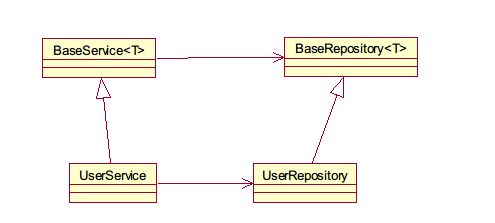
我们以下图所示的uml图来举例:
我们现在有两个泛型父类BaseService和BaseRepository< T >,BaseRepository是BaseService的成员变量,代码如下:
package com.spring.generic.di;

import org.springframework.beans.factory.annotation.Autowired;

public class BaseService {

    @Autowired
    protected  BaseRepository repository;

    public void add(){
        System.out.println("add");
        System.out.println(repository);
    }
}
package com.spring.generic.di;

public class BaseRepository< T > {
}
有一个User类如下:
package com.spring.generic.di;

public class User {
}
上述两个泛型基类的两个子类UserService和UserRepository代码如下(这两个子类之间没有建立关联关系):
package com.spring.generic.di;

import org.springframework.stereotype.Service;

@Service
public class UserService extends BaseService {
}
package com.spring.generic.di;

import org.springframework.stereotype.Repository;

@Repository
public class UserRepository extends BaseRepository {
}
在配置文件beans-generic-di.xml中配置:
主方法:
package com.spring.generic.di;

import org.springframework.context.ApplicationContext;
import org.springframework.context.support.ClassPathXmlApplicationContext;

public class Main {
    public static void main(String[] args) {
        ApplicationContext ctx = new ClassPathXmlApplicationContext("beans-generic-di.xml");

        UserService userService = (UserService) ctx.getBean("userService");
        userService.add();
    }
}
运行后控制台打印如下:
add
com.spring.generic.di.UserRepository@6d3af739
我们发现其子类之间也自动的建立了关联关系,自动初始化了UserRepository类。
