一、前言
以前写过一篇关于CoreData,Realm,SQLite的文章(文章链接),里面大概就是介绍了一下它们的用法和推荐的三方库,建议再看这篇文章之前可以浏览一下之前的那篇文章。今天在这里我就来说一下关于它们的数据库迁移问题,数据库的迁移都是非嵌套的迁移方式,这样就可以避免有的用户没有及时更新带来的隐患。
二、CoreData
CoreData需要迁移的时候需要在
- (nullable __kindof NSPersistentStore *)addPersistentStoreWithType:(NSString *)storeType configuration:(nullable NSString *)configuration URL:(nullable NSURL *)storeURL options:(nullable NSDictionary *)options error:(NSError **)error
这个方法里面的options参数添加两个key-value
NSDictionary *options = @{NSMigratePersistentStoresAutomaticallyOption:@(YES), NSInferMappingModelAutomaticallyOption:@(YES)};
NSMigratePersistentStoresAutomaticallyOption = YES,那么Core Data会试着把之前低版本的出现不兼容的持久化存储区迁移到新的模型中,这里的例子里,Core Data就能识别出是新表
NSInferMappingModelAutomaticallyOption = YES,这个参数的意义是Core Data会根据自己认为最合理的方式去尝试MappingModel,从源模型实体的某个属性,映射到目标模型实体的某个属性。
CoreData的迁移方式分为三种:
- 轻量级的迁移
- 默认的迁移方式
- 迁移管理器
2.1.轻量级迁移方式过程
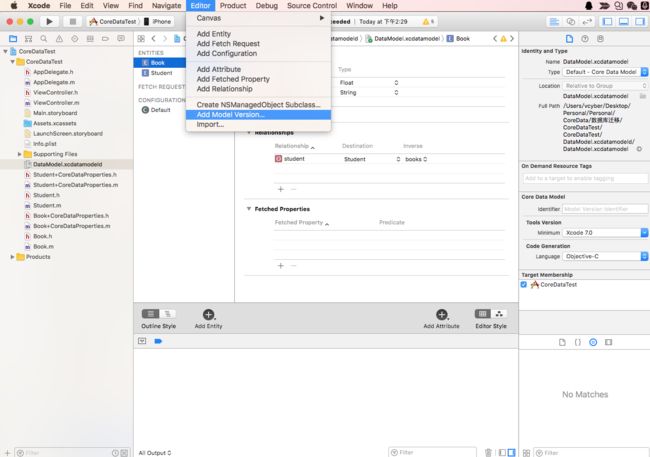
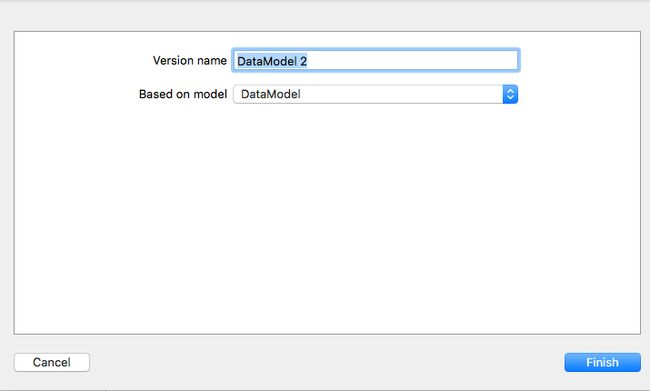
1.选中.xcdatamodeld文件,然后选择Editor-->add Model Version
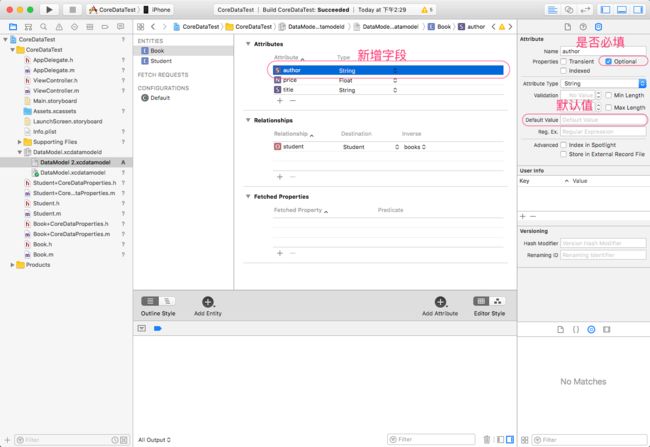
2.在新的.xcdatamodel中新增一个字段,author字段
3.然后选择.xcdatamodeld 选择Model Version
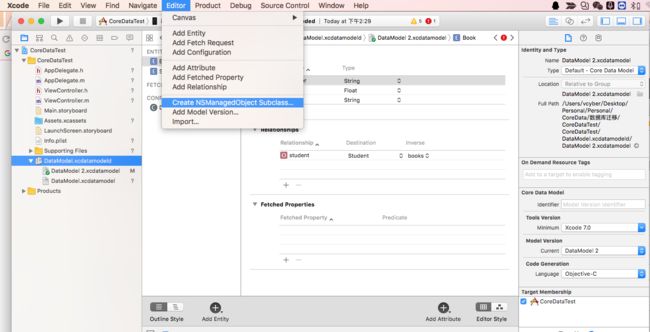
4.现在我们还需要将原来Book的表结构生成的Book.h、 Book.m、Book+CoreDataProperties.h、Book+CoreDataProperties.m替换成新的,Student同样。 将原来的这四个文件直接删除,然后再创建新的就可以了
xcode8 创建的以后的文件格式会变成这样,把原先的Book.h变成了Book+CoreDataClass.h文件,原先使用的Book.h现在全部改成Book+CoreDataClass.h。
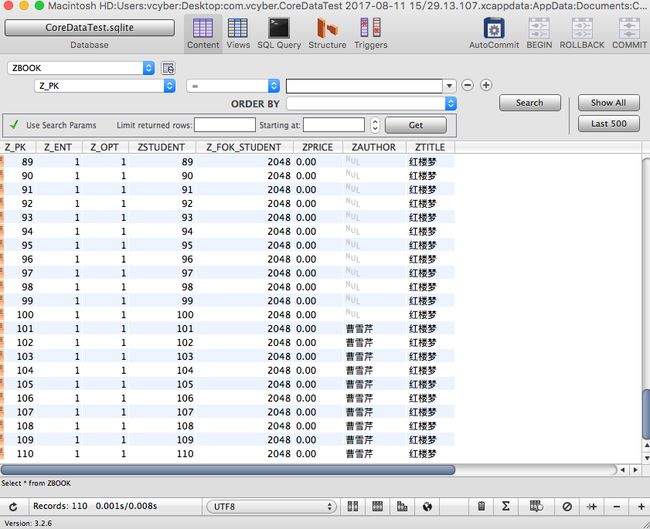
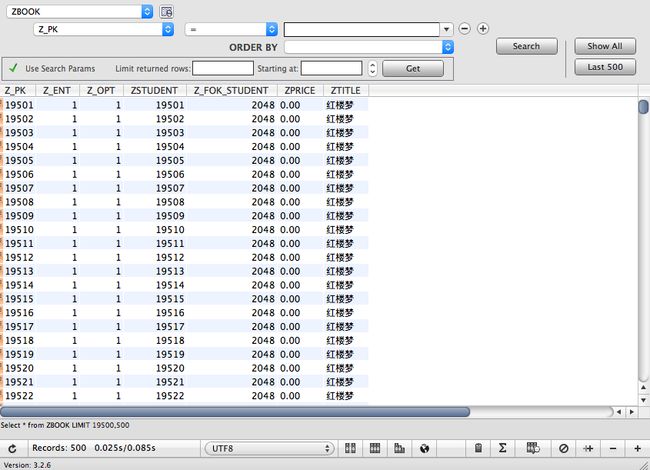
我在原来的基础上有插入100个数据,插入代码:
NSManagedObjectContext *context = self.appDelegate.managedObjectContext;
    NSLog(@"save start");
    for (int i = 0; i < 100; i++) {
        NSEntityDescription *entity = [NSEntityDescription entityForName:@"Student" inManagedObjectContext:context];
        //创建学生对象
        Student *stu = [[Student alloc] initWithEntity:entity insertIntoManagedObjectContext:context];
        stu.name = [NSString stringWithFormat:@"张三%d", i];
        NSEntityDescription *bEntity = [NSEntityDescription entityForName:@"Book" inManagedObjectContext:context];
        //创建Book对象
        Book *book = [[Book alloc] initWithEntity:bEntity insertIntoManagedObjectContext:context];
        book.title = @"红楼梦";
        book.author = @"曹雪芹";
        //添加Book对象
        [stu addBooksObject:book];

        //保存Student对象
        [_appDelegate saveContext];
    }
    NSLog(@"save end");
5.前后数据库对比
2.2默认迁移
涉及表映射到另外一张表(实体)使用默认迁移
1.同轻量级迁移步骤1
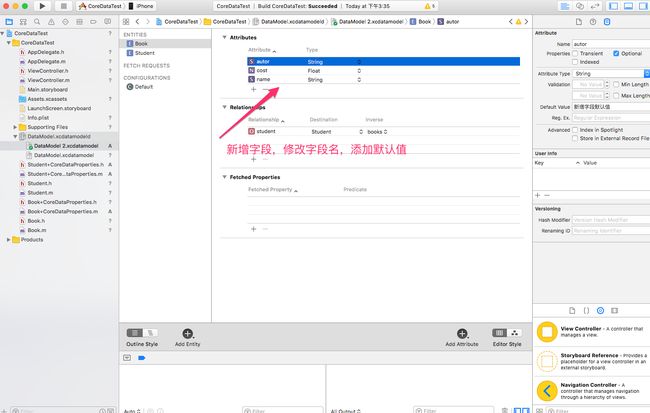
2.在新的.xcdatamodel中将Book实体,修改两个属性名,增删属性
3.同轻量级迁移步骤3
4.同轻量级迁移步骤4
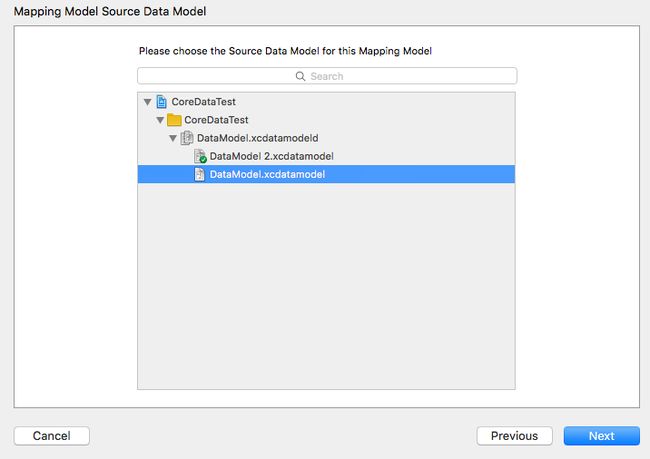
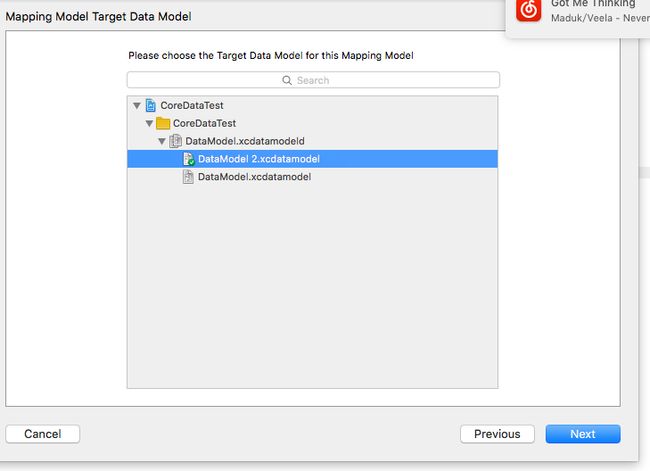
5.创建MappingModel,将之前的CoreData.xcdatamodel选作为Source,后面创建的CoreData2.xcdatamodel作为Target,前后不能选错。
之后会生成一个.xcmappingmodel文件:
运行新增100个迁移前后数据对比
2.2迁移管理器迁移
前面的两种操作都是需要对表进行一次操作才能完成数据库的迁移,包括插入数据,查询数据都可以完成数据库的迁移工作。这里的管理器迁移,不需要对表进行一次操作。
迁移管理器操作的前5个步骤和默认迁移的步骤一样,只是不需要对表进行一次操作,我们需要做的是使用迁移器进行操作,操作的基本步骤就是先判断是否需要迁移,这个里面有两部分,一部分是本地是否有这个数据库,一部分是在有数据库的基础上判断存储数据的元数据(NSManagedObjectModel),具体操作的代码如下:
1.是否需要迁移
- (BOOL)judgeDataMigrationIsNeed {
    //是否存在文件
    NSURL *storeURL = [[[[NSFileManager defaultManager] URLsForDirectory:NSDocumentDirectory inDomains:NSUserDomainMask] lastObject] URLByAppendingPathComponent:@"CoreDataTest.sqlite"];
    if (![[NSFileManager defaultManager] fileExistsAtPath:storeURL.path]) {
        return NO;
    }
    NSError *error = nil;

    //比较存储模型的元数据。
    NSDictionary *sourceMataData = [NSPersistentStoreCoordinator metadataForPersistentStoreOfType:NSSQLiteStoreType URL:storeURL error:&error];
    NSManagedObjectModel *destinationModel = _appDelegate.managedObjectModel;
    if ([destinationModel isConfiguration:nil compatibleWithStoreMetadata:sourceMataData]) {
        return NO;
    }
    return YES;
}
2.迁移器迁移数据具体代码
- (BOOL)executeMigration {
    BOOL success = NO;
    NSError *error = nil;

    NSURL *sourceStore = [[[[NSFileManager defaultManager] URLsForDirectory:NSDocumentDirectory inDomains:NSUserDomainMask] lastObject] URLByAppendingPathComponent:@"CoreDataTest.sqlite"];

    //原来的数据模型的原信息
    NSDictionary *sourceMetadata = [NSPersistentStoreCoordinator metadataForPersistentStoreOfType:NSSQLiteStoreType URL:sourceStore error:&error];
    //原数据模型
    NSManagedObjectModel *sourceModel = [NSManagedObjectModel mergedModelFromBundles:nil forStoreMetadata:sourceMetadata];

    //最新版数据模型
    NSManagedObjectModel *destinModel = _appDelegate.managedObjectModel;

    //数据迁移的映射模型
    NSMappingModel *mappingModel = [NSMappingModel mappingModelFromBundles:nil
                                                            forSourceModel:sourceModel
                                                          destinationModel:destinModel];
    if (mappingModel) {
        NSError *error = nil;

        //迁移管理器
        NSMigrationManager *migrationManager = [[NSMigrationManager alloc]initWithSourceModel:sourceModel
                                                                             destinationModel:destinModel];

        //这里可以注册监听  NSMigrationManager 的 migrationProgress来查看进度
        [migrationManager addObserver:self forKeyPath:@"migrationProgress" options:NSKeyValueObservingOptionNew context:nil];

        //先把模型存错到Temp.sqlite
        NSURL *destinStore = [[[[NSFileManager defaultManager] URLsForDirectory:NSDocumentDirectory inDomains:NSUserDomainMask] lastObject] URLByAppendingPathComponent:@"Temp.sqlite"];
        success = [migrationManager migrateStoreFromURL:sourceStore
                                                    type:NSSQLiteStoreType
                                                 options:nil
                                        withMappingModel:mappingModel
                                        toDestinationURL:destinStore
                                         destinationType:NSSQLiteStoreType
                                      destinationOptions:nil
                                                   error:&error];
        if (success) {
            //替换掉原来的旧的文件
            success = [[NSFileManager defaultManager] replaceItemAtURL:sourceStore withItemAtURL:destinStore backupItemName:@"backup.sqlite" options:NSFileManagerItemReplacementUsingNewMetadataOnly | NSFileManagerItemReplacementWithoutDeletingBackupItem resultingItemURL:nil error:nil];
            if (success) {
                //                这里移除监听就可以了。
                [migrationManager removeObserver:self forKeyPath:@"migrationProgress"];
            }
        }
    }
    return success;
}
Realm
其实这里不用说的太啰嗦,迁移的方法github的例子里面有关于迁移的部分。这里有一点说明一下,在没有完成迁移之前,只要对realm进行访问都会崩溃,包括访问数据库的位置。我这里就简单的做一下演示和说明:
1.我用之前的默认的realm创建了一个default.realm,打开文件,查看Student
表如下图:
2.迁移代码
- 2.1删除一个字段
- (void)excuteMigration {
    RLMMigrationBlock migratiobBlock = ^(RLMMigration *migration, uint64_t oldSchemaVersion) {
 //        你修改那个表就对那个进行枚举
        if (oldSchemaVersion < 1) {
            [migration enumerateObjects:Student.className  block:^(RLMObject * _Nullable oldObject, RLMObject * _Nullable newObject) {
//                删除一个属性值  我们不需要任何操作 只需要修改模型即可
            }];

        }
//    获取默认配置
    RLMRealmConfiguration *config = [RLMRealmConfiguration defaultConfiguration];
//    修改默认配置版本和迁移block 注意版本号的变化
    config.schemaVersion = 1;
    config.migrationBlock = migratiobBlock;
    [RLMRealmConfiguration setDefaultConfiguration:config];
//    执行打开realm,完成迁移
    [RLMRealm defaultRealm];
}
- 2.1.1 迁移之后
- 2.2增加一个字段
- (void)excuteMigration {
    RLMMigrationBlock migratiobBlock = ^(RLMMigration *migration, uint64_t oldSchemaVersion) {
//        你修改那个表就对那个进行枚举
        if (oldSchemaVersion < 1) {
            [migration enumerateObjects:Student.className  block:^(RLMObject * _Nullable oldObject, RLMObject * _Nullable newObject) {
//                删除一个属性值  我们不需要任何操作 只需要修改模型即可
            }];

        }

        //              在前面的基础上新增一个字段,如果不需要默认值,可不加这句话,如果一个字段需要其他字段的协助,需要自行进行操作
        if (oldSchemaVersion < 2) {
            [migration enumerateObjects:Student.className  block:^(RLMObject * _Nullable oldObject, RLMObject * _Nullable newObject) {
                //这里给新增的字段添加一个默认值
                newObject[@"sex"] = @"男";
            }];
        }
    //    获取默认配置
    RLMRealmConfiguration *config = [RLMRealmConfiguration defaultConfiguration];
//    修改默认配置版本和迁移block 注意版本号的变化
    config.schemaVersion = 2;
    config.migrationBlock = migratiobBlock;
    [RLMRealmConfiguration setDefaultConfiguration:config];
    //    执行打开realm,完成迁移
    [RLMRealm defaultRealm];
}
- 2.2.1迁移之后
- 2.3字段类型的变化
- (void)excuteMigration {
    RLMMigrationBlock migratiobBlock = ^(RLMMigration *migration, uint64_t oldSchemaVersion) {
//        你修改那个表就对那个进行枚举
        if (oldSchemaVersion < 1) {
            [migration enumerateObjects:Student.className  block:^(RLMObject * _Nullable oldObject, RLMObject * _Nullable newObject) {
//                删除一个属性值  我们不需要任何操作 只需要修改模型即可
            }];

        }

        //              在前面的基础上新增一个字段,如果不需要默认值,可不加这句话,如果一个字段需要其他字段的协助,需要自行进行操作
        if (oldSchemaVersion < 2) {
            [migration enumerateObjects:Student.className  block:^(RLMObject * _Nullable oldObject, RLMObject * _Nullable newObject) {
                //这里给新增的字段添加一个默认值
                newObject[@"sex"] = @"男";
            }];
        }

        if (oldSchemaVersion < 3) {
            [migration enumerateObjects:Student.className  block:^(RLMObject * _Nullable oldObject, RLMObject * _Nullable newObject) {
                if (oldObject && oldObject.objectSchema[@"sex"].type == RLMPropertyTypeString) {
                    newObject[@"sex"] = @([Student sexTypeForString:oldObject[@"sex"]]);
                }
            }];
        }

    };
    //    获取默认配置
    RLMRealmConfiguration *config = [RLMRealmConfiguration defaultConfiguration];
    //    修改默认配置版本和迁移block 注意版本号的变化
    config.schemaVersion = 3;
    config.migrationBlock = migratiobBlock;
    [RLMRealmConfiguration setDefaultConfiguration:config];
    //    执行打开realm,完成迁移
    [RLMRealm defaultRealm];
}
- 2.3.1执行之后
*3.Student模型变化
#import
#import "Book.h"
// V0
//@interface Student : RLMObject
//@property int num;
//@property NSString *name;
//@property int age;
//@property RLMArray *books;  //这里表示一对多的关系
//
//@end
RLM_ARRAY_TYPE(Student)  //宏定义  定义RLMArray这个类型

//V1
//@interface Student : RLMObject
//@property int num;
//@property NSString *name;
//@property RLMArray *books;  //这里表示一对多的关系
//
//@end

//V2
//@interface Student : RLMObject
//@property int num;
//@property NSString *name;
//@property NSString *sex;
//@property RLMArray *books;  //这里表示一对多的关系

//@end


//V3
typedef NS_ENUM(NSInteger, Sex) {
    Unknow = 0,
    Male,
    Female
};

@interface Student : RLMObject
@property int num;
@property NSString *name;
@property Sex sex;
@property RLMArray *books;  //这里表示一对多的关系

+ (Sex)sexTypeForString:(NSString *)typeString;
@end
SQLite
关于SQLite数据库的迁移涉及到iOS的基本全部是FMDB相关的一个三方库FMDBMigrationManager,其实就是利用SQLite提供的ALTER TABLE命令来进行数据库的迁移,关于SQLite数据库迁移大家可以自行相关FMDB的迁移,我在这里就不演示了,对比前面两种的迁移方式,我感觉自己以后不会再用FMDB这个三方库了。
总结
除非你们的数据库设计特别完美,完全能满足你们以后的版本迭代需求,你不需要进行数据库的升级,但是这种情况也极少数发生,所以数据库升级在所难免,都提前准备好自己需要使用那种,这里为你准备了一篇关于数据库迁移的,欢迎收藏,欢迎吐槽。
