*对比总结了页面传值六种方式,以便更好地记忆和应用:
1、属性传值
2、单例传值
3、NSUserDefaults传值
4、代理传值
5、block传值
6、通知传值
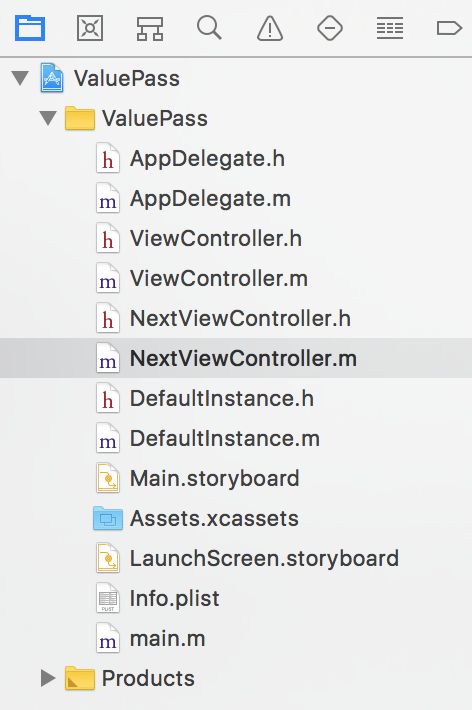
*注:本文中的传值,均以下图工程中ViewController和NextViewController页面之间的跳转为例。
ViewController.h
#import
@interface ViewController : UIViewController
@end
ViewController.m
#import "ViewController.h"
#import "NextViewController.h"
#import "DefaultInstance.h"

@interface ViewController ()
@property (nonatomic,strong) UILabel *label;
@property (nonatomic,strong) UIButton *button;

@end

@implementation ViewController

- (UILabel *)label {
    if(!_label){
        _label = [[UILabel alloc]initWithFrame:CGRectMake(100, 100, 200, 40)];
        _label.backgroundColor = [UIColor blackColor];
        _label.textColor = [UIColor whiteColor];
        _label.font = [UIFont systemFontOfSize:20];
    }
    return _label;
}
- (UIButton *)button {
    if(!_button){
        _button = [[UIButton alloc]initWithFrame:CGRectMake(100, 300, 200, 40)];
        _button.backgroundColor = [UIColor redColor];
        [_button setTitle:@"跳转到页面二" forState:UIControlStateNormal];
        [_button setTitleColor:[UIColor whiteColor] forState:UIControlStateNormal];
        [_button addTarget:self action:@selector(buttonClick) forControlEvents:UIControlEventTouchUpInside];
    }
    return _button;
}

- (void) buttonClick {
    //此处待页面传值
    [self presentViewController:vc animated:YES completion:nil];
}

- (void)viewDidLoad {
    [super viewDidLoad];
    // Do any additional setup after loading the view, typically from a nib.

    [self.view addSubview:self.label];
    [self.view addSubview:self.button];
}

- (void)didReceiveMemoryWarning {
    [super didReceiveMemoryWarning];
    // Dispose of any resources that can be recreated.
}
@end
NextViewController.h
#import

@interface NextViewController : UIViewController

@property (nonatomic, copy) NSString *str;
@end
NextViewController.m
#import "NextViewController.h"

@interface NextViewController ()
@property (nonatomic,strong) UITextField *textField;
@property (nonatomic,strong) UIButton *button;

@end

@implementation NextViewController
- (UITextField *)textField {
    if(!_textField){
        _textField = [[UITextField alloc]initWithFrame:CGRectMake(100, 100, 200, 40)];
        _textField.textColor = [UIColor blackColor];
        _textField.borderStyle = UITextBorderStyleLine;
    }
    return _textField;
}
- (UIButton *)button {
    if(!_button){
        _button = [[UIButton alloc]initWithFrame:CGRectMake(100, 300, 200, 40)];
        _button.backgroundColor = [UIColor redColor];
        [_button setTitle:@"返回上一个页面" forState:UIControlStateNormal];
        _button.titleLabel.font = [UIFont systemFontOfSize:20];
        [_button setTitleColor:[UIColor whiteColor] forState:UIControlStateNormal];
        [_button addTarget:self action:@selector(buttonClick) forControlEvents:UIControlEventTouchUpInside];
    }
    return _button;
}

//点击事件,回到页面一
- (void)buttonClick {
    [self dismissViewControllerAnimated:YES completion:nil];
}

- (void)viewDidLoad {
    [super viewDidLoad];
    // Do any additional setup after loading the view.
    self.view.backgroundColor = [UIColor whiteColor];

    [self.view addSubview:self.textField];
    [self.view addSubview:self.button];
}

- (void)didReceiveMemoryWarning {
    [super didReceiveMemoryWarning];
    // Dispose of any resources that can be recreated.
}

@end
1、属性传值
一般用于两个有直接跳转关系页面之间的正向传值,不能反向传值和跨页面传值。
//NextViewController.h
#import
@interface NextViewController : UIViewController
//增加一个对外暴露的属性
@property (nonatomic, copy) NSString *str;
@end
//ViewController.m
- (void) buttonClick {
    //属性传值
    NextViewController *vc = [[NextViewController alloc]init];
    vc.str = @"页面传值";
    [self presentViewController:vc animated:YES completion:nil];
}
//NextViewController.m
- (void)viewDidLoad {
    [super viewDidLoad];
    self.view.backgroundColor = [UIColor whiteColor];
    //属性传值--获取
    self.textField.text = self.str;

    //单例传值--获取
    //self.textField.text = [DefaultInstance sharedInstance].str;

    [self.view addSubview:self.textField];
    [self.view addSubview:self.button];
}
2、单例传值
写入内存中,另一个页面从内存中读取,跨页面、正向传值、反向传值都可以
但需要创建一个单例对象才可以传值
- 单例类的编写主要是通过static来控制
//  DefaultInstance.h
#import

@interface DefaultInstance : NSObject
//单例对象创建一个对外暴露的属性来传值
@property (nonatomic, copy) NSString *str;
+ (instancetype)sharedInstance;
@end
//  DefaultInstance.m
#import "DefaultInstance.h"

@implementation DefaultInstance

//通过类方法创建单例对象
+ (instancetype)sharedInstance {

    static DefaultInstance *sharedVC = nil;
    if (sharedVC == nil) {
        sharedVC = [[DefaultInstance alloc]init];
    }
    return sharedVC;
}
@end
- 接下来是利用单例对象进行传值,注意用到的地方都要引入单例类头文件 #import "DefaultInstance.h"
//ViewController.m
- (void)buttonClick {
     //单例传值--传值
    [DefaultInstance sharedInstance].str = @"单例传值";
    [self presentViewController:vc animated:YES completion:nil];
}
//NextViewController.m
- (void)viewDidLoad {
    [super viewDidLoad];
    self.view.backgroundColor = [UIColor whiteColor];

    //单例传值--获取
    self.textField.text = [DefaultInstance sharedInstance].str;

    [self.view addSubview:self.textField];
    [self.view addSubview:self.button];
}
3、NSUserDefaults传值
写入磁盘的沙盒文件中,正向传值、反向传值都可以
不需要创建类,直接用系统创建好的NSUserdefaults类就可以
但要写入文件,占用缓存
- 这次写一个从NextViewController到ViewController的反向传值
//  NextViewController.m
//点击事件,回到页面一
- (void)buttonClick {
    //NSUserDefault反向传值--传值
    //standardUserDefaults获取全局唯一的实例对象
    //setObject  forKey 以键值对的形式存储
    [[NSUserDefaults standardUserDefaults]setObject:self.textField.text forKey:@"NSUserDefault"];
    //同步命令,数据立即同步到沙盒文件中,防止程序意外退出数据丢失问题
    [[NSUserDefaults standardUserDefaults]synchronize];

    [self dismissViewControllerAnimated:YES completion:nil];
}
//ViewController.m
- (void)viewWillAppear:(BOOL)animated {
    [super viewWillAppear:animated];
    //NSUserDefault反向传值--获取
    self.label.text = [[NSUserDefaults standardUserDefaults]objectForKey:@"NSUserDefault"];
}
4、代理传值
一对一传值,常用于反向传值
委托方:定义、持有协议
代理方:实现协议方法
//  NextViewController.h
#import
//委托方——创建一个协议
@protocol valuePassDelegate
- (void)valuePass:(NSString *)str;
@end

@interface NextViewController : UIViewController

@property (nonatomic, copy) NSString *str;
@property (weak) id delegate;//持有协议

@end
//NextViewController.m
//点击事件,回到页面一
- (void)buttonClick {
    NSLog(@"代理反向传值——传值");
    [self.delegate valuePass:self.textField.text];

    [self dismissViewControllerAnimated:YES completion:nil];
}
//ViewController.m
//在扩展的部分遵守协议
@interface ViewController ()
@property (nonatomic,strong) UILabel *label;
@property (nonatomic,strong) UIButton *button;
@end
。。。。中间省略
- (void) buttonClick {
    NextViewController *vc = [[NextViewController alloc]init];
    //代理传值
    vc.delegate = self;
    [self presentViewController:vc animated:YES completion:nil];
}
//实现协议方法
- (void)valuePass:(NSString *)str {
    self.label.text = str;
    NSLog(@"代理反向传值——获取值");
}
5、block传值
一对一传值,主要用于反向传值
代理、block传值主要用于两个有直接跳转关系的页面传值
为了防止循环引用,block声明一般为copy属性
//  NextViewController.h
#import
@interface NextViewController : UIViewController

@property (nonatomic, copy) NSString *str;
@property (copy) void(^myBlock)(NSString *);//定义一个

@end
// NextViewController.m
//点击事件,回到页面一
- (void)buttonClick {
    //block传值——反向传值
    self.myBlock(self.textField.text);
    [self dismissViewControllerAnimated:YES completion:nil];
}
//ViewController.m
- (void) buttonClick {
    //实现vc中的block属性--定义--接受传值
    vc.myBlock = ^(NSString *str) {
        self.label.text = str;
    };
    [self presentViewController:vc animated:YES completion:nil];
}
6、通知传值
灵活
跨页面,多对多的传值
接受方先开始监听通知,通知方传值给接收方
// ViewController.m
- (void) buttonClick {
    //通知传值——创建监听
    //参数:监听者-自己,触发的方法-notify:,通知的名字-notify,nil表示接收所有对象发出的通知
    [[NSNotificationCenter defaultCenter] addObserver:self selector:@selector(notify:) name:@"notify" object:nil];
    [self presentViewController:vc animated:YES completion:nil];
}

- (void)notify:(NSNotification *)info {
    self.label.text = [info.userInfo objectForKey:@"noti"];
}
// NextViewController.m
//点击事件,回到页面一
- (void)buttonClick {
    //通知传值——发送通知
    //参数:通知的名字-notify,发送的对象nil-全部,发送的信息-以字典形式传值
    [[NSNotificationCenter defaultCenter]postNotificationName:@"notify" object:nil userInfo:@{@"noti":self.textField.text}];
    [self dismissViewControllerAnimated:YES completion:nil];
}
综上
六种传值方式各有利弊:
属性传值一般用于正向传值,不能反向和跨页;
单例传值和NSUserDefaults传值跨页面,正向,反向传值都可以,单例是写入内存中,NSUserDefaults是写入磁盘的沙盒文件中;单例传值需要自己创建类,NSUserDefaults直接用系统已经创建好的类;
代理传值和block传值一般用于反向传值,一对一,如果只需要一个方法时一般用block,比较简单好用,需要的方法很多时采用协议,来实现协议方法;
通知传值用于跨页面的,多对多类型的传值。
