常用的自定义View例子一( FlowLayout)
在Android开发中,我们经常会遇到流布式的布局,经常会用来一些标签的显示,比如qq中个人便签,搜索框下方提示的词语,这些是指都是流布式的布局,今天我就我们日常开放中遇到的流布式布局坐一些总结
转载请注明博客地址:http://blog.csdn.net/gdutxiaoxu/article/details/51765428
**源码下载地址:https://github.com/gdutxiaoxu/CustomViewDemo.git **
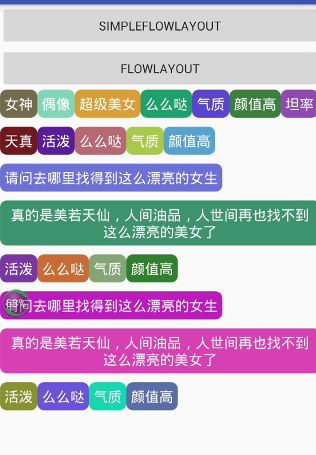
1. 先给大家看一下效果
- 图一
- 图二
仔细观察,我们可以知道图二其实是图一效果的升级版,图一当我们控件的宽度超过这一行的时候,剩余的宽度它不会自动分布到每个控件中,而图二的效果当我们换行的时候,如控件还没有占满这一行的时候,它会自动把剩余的宽度分布到每个控件中
2.废话不多说了,大家来直接看来看一下图一的源码
1)代码如下
/**
 * 博客地址:http://blog.csdn.net/gdutxiaoxu
 * @author xujun
 * @time 2016/6/20 23:49.
 */
public class SimpleFlowLayout extends ViewGroup {
    private int  verticalSpacing = 20;

    public SimpleFlowLayout(Context context ) {
        super(context);
    }

    /**
     * 重写onMeasure方法是为了确定最终的大小
     * @param widthMeasureSpec
     * @param heightMeasureSpec
     */
    @Override
    protected void onMeasure(int widthMeasureSpec, int heightMeasureSpec) {
        int widthSpecMode = MeasureSpec.getMode(widthMeasureSpec);
        int widthSpecSize = MeasureSpec.getSize(widthMeasureSpec);
        int heightSpecMode = MeasureSpec.getMode(heightMeasureSpec);
        int heightSpecSize = MeasureSpec.getSize(heightMeasureSpec);

        int paddingLeft = getPaddingLeft();
        int paddingRight = getPaddingRight();
        int paddingTop = getPaddingTop();
        int paddingBottom = getPaddingBottom();
//处理Padding属性,让当前的ViewGroup支持Padding
        int widthUsed = paddingLeft + paddingRight;
        int heightUsed = paddingTop + paddingBottom;

        int childMaxHeightOfThisLine = 0;
        int childCount = getChildCount();
        for (int i = 0; i < childCount; i++) {
            View child = getChildAt(i);
            if (child.getVisibility() != GONE) {
//       已用的宽度
                int childUsedWidth = 0;
//      已用的高度
                int childUsedHeight = 0;
//  调用ViewGroup自身的方法测量孩子的宽度和高度,我们也可以自己根据MeasureMode来测量
                measureChild(child,widthMeasureSpec,heightMeasureSpec);
                childUsedWidth += child.getMeasuredWidth();
                childUsedHeight += child.getMeasuredHeight();
//处理Margin,支持孩子的Margin属性
                Rect marginRect = getMarginRect(child);
                int leftMargin=marginRect.left;
                int rightMargin=marginRect.right;
                int topMargin=marginRect.top;
                int bottomMargin=marginRect.bottom;

                childUsedWidth += leftMargin + rightMargin;
                childUsedHeight += topMargin + bottomMargin;
//总宽度没有超过本行
                if (widthUsed + childUsedWidth < widthSpecSize) {
                    widthUsed += childUsedWidth;
                    if (childUsedHeight > childMaxHeightOfThisLine) {
                        childMaxHeightOfThisLine = childUsedHeight;
                    }
                } else {//总宽度已经超过本行
                    heightUsed += childMaxHeightOfThisLine + verticalSpacing;
                    widthUsed = paddingLeft + paddingRight + childUsedWidth;
                    childMaxHeightOfThisLine = childUsedHeight;
                }

            }

        }
//加上最后一行的最大高度
        heightUsed += childMaxHeightOfThisLine;
        setMeasuredDimension(widthSpecSize, heightUsed);
    }


    @Override
    protected void onLayout(boolean changed, int l, int t, int r, int b) {
        int paddingLeft = getPaddingLeft();
        int paddingRight = getPaddingRight();
        int paddingTop = getPaddingTop();
        int paddingBottom = getPaddingBottom();

        /**
         * 为了 支持Padding属性
         */
        int childStartLayoutX = paddingLeft;
        int childStartLayoutY = paddingTop;

        int widthUsed = paddingLeft + paddingRight;

        int childMaxHeight = 0;

        int childCount = getChildCount();
//摆放每一个孩子的高度
        for (int i = 0; i < childCount; i++) {
            View child = getChildAt(i);
            if (child.getVisibility() != GONE) {
                int childNeededWidth, childNeedHeight;
                int left, top, right, bottom;

                int childMeasuredWidth = child.getMeasuredWidth();
                int childMeasuredHeight = child.getMeasuredHeight();

                Rect marginRect = getMarginRect(child);
                int leftMargin=marginRect.left;
                int rightMargin=marginRect.right;
                int topMargin=marginRect.top;
                int bottomMargin=marginRect.bottom;
                childNeededWidth = leftMargin + rightMargin + childMeasuredWidth;
                childNeedHeight = topMargin + topMargin + childMeasuredHeight;

//                没有超过本行
                if (widthUsed + childNeededWidth <= r - l) {
                    if (childNeedHeight > childMaxHeight) {
                        childMaxHeight = childNeedHeight;
                    }
                    left = childStartLayoutX + leftMargin;
                    top = childStartLayoutY + topMargin;
                    right = left + childMeasuredWidth;
                    bottom = top + childMeasuredHeight;
                    widthUsed += childNeededWidth;
                    childStartLayoutX += childNeededWidth;
                } else {
                    childStartLayoutY += childMaxHeight + verticalSpacing;
                    childStartLayoutX = paddingLeft;
                    widthUsed = paddingLeft + paddingRight;
                    left = childStartLayoutX + leftMargin;
                    top = childStartLayoutY + topMargin;
                    right = left + childMeasuredWidth;
                    bottom = top + childMeasuredHeight;
                    widthUsed += childNeededWidth;
                    childStartLayoutX += childNeededWidth;
                    childMaxHeight = childNeedHeight;
                }
                child.layout(left, top, right, bottom);
            }
        }
    }

    private Rect getMarginRect(View child) {
        LayoutParams layoutParams = child.getLayoutParams();
        int leftMargin = 0;
        int rightMargin = 0;
        int topMargin = 0;
        int bottomMargin = 0;
        if (layoutParams instanceof MarginLayoutParams) {
            MarginLayoutParams marginLayoutParams = (MarginLayoutParams) layoutParams;
            leftMargin = marginLayoutParams.leftMargin;
            rightMargin = marginLayoutParams.rightMargin;
            topMargin = marginLayoutParams.topMargin;
            bottomMargin = marginLayoutParams.bottomMargin;

        }
        return new Rect(leftMargin, topMargin, rightMargin, bottomMargin);
    }

}
2)思路解析
首先我们重写onMeasure方法,在OnMeasure方法里面我们调用measureChild()这个方法去获取每个孩子的宽度和高度,每次增加一个孩子我们执行 widthUsed += childUsedWidth;
-
添加完一个孩子以后我们判断widthUsed是够超出控件本身的最大宽度widthSpecSize,
若没有超过执行widthUsed += childUsedWidth; if (childUsedHeight > childMaxHeightOfThisLine) { childMaxHeightOfThisLine = childUsedHeight; }
超过控件的宽度执行
heightUsed += childMaxHeightOfThisLine + verticalSpacing;
widthUsed = paddingLeft + paddingRight + childUsedWidth;
childMaxHeightOfThisLine = childUsedHeight;
最后调用 setMeasuredDimension(widthSpecSize, heightUsed);这个方法去设置它的大小
3.在OnLayout方法里面,所做的工作就是去摆放每一个孩子的位置 ,判断需不需要换行,不需要更改left值,需要换行,更改top值
3)注意事项
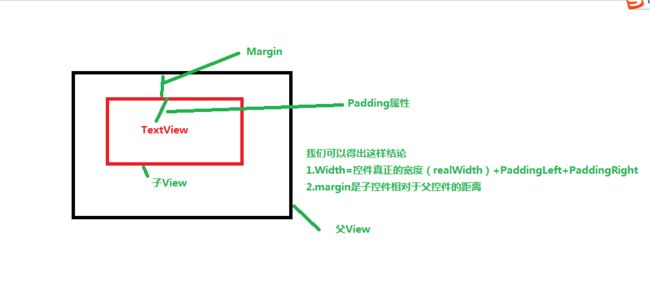
讲解之前,我们先来了解一下一个基本知识
从这张图片里面我们可以得出这样结论
- Width=控件真正的宽度(realWidth)+PaddingLeft+PaddingRight
- margin是子控件相对于父控件的距离
注意事项
- 为了支持控件本身的padding属性,我们做了处理,主要代码如下
int widthUsed = paddingLeft + paddingRight;
int heightUsed = paddingTop + paddingBottom;
----------
if (widthUsed + childUsedWidth < widthSpecSize) {
    widthUsed += childUsedWidth;
    if (childUsedHeight > childMaxHeightOfThisLine) {
     childMaxHeightOfThisLine = childUsedHeight;
     }
}
- 为了支持子控件的margin属性,我们同样也做了处理
                    Rect marginRect = getMarginRect(child);
                    int leftMargin=marginRect.left;
                    int rightMargin=marginRect.right;
                    int topMargin=marginRect.top;
                    int bottomMargin=marginRect.bottom;

                    childUsedWidth += leftMargin + rightMargin;
                    childUsedHeight += topMargin + bottomMargin;
即我们在计算孩子所占用的宽度和高度的时候加上margin属性的高度,接着在计算需要孩子总共用的宽高度的时候加上每个孩子的margin属性的宽高度,这样自然就支持了孩子的margin属性了
4.缺陷
如下图所见,在控件宽度参差不齐的情况下,控件换行会留下一些剩余的宽度,作为想写出鲁棒性的代码的我们会觉得别扭,于是我们相处了解决办法。
解决方法见下面
图二源码解析
废话不多说,先看源码
/**
 * 博客地址:http://blog.csdn.net/gdutxiaoxu
 * @author xujun
 * @time 2016/6/26 22:54.
 */
public class PrefectFlowLayout extends ViewGroup {


    public PrefectFlowLayout(Context context) {
        super(context);
    }

    public PrefectFlowLayout(Context context, AttributeSet attrs) {
        super(context, attrs);
    }

    public PrefectFlowLayout(Context context, AttributeSet attrs, int defStyleAttr) {
        super(context, attrs, defStyleAttr);
    }
    //父容器宽度
    private int parentWidthSize;
    //水平间距
    private int horizontalSpacing = 16;
    //垂直间距
    private int verticalSpacing = 16;
    //当前行
    private Line currentLine;
    //所有行的集合
    private List mLines = new ArrayList<>();
    //当前行已使用宽度
    private int userWidth = 0;

    /**
     * 行对象
     */
    private class Line {
        //一行里面所添加的子View集合
        private List children;
        //当前行高度
        private int height;
        //当前行已使用宽度
        private int lineWidth = 0;

        public Line() {
            children = new ArrayList<>();
        }

        /**
         * 添加一个子控件
         *
         * @param child
         */
        private void addChild(View child) {
            children.add(child);
            if (child.getMeasuredHeight() > height) {
                //当前行高度以子控件最大高度为准
                height = child.getMeasuredHeight();
            }
            //将每个子控件宽度进行累加,记录使用的宽度
            lineWidth += child.getMeasuredWidth();
        }

        /**
         * 获取行的高度
         *
         * @return
         */
        public int getHeight() {
            return height;
        }

        /**
         * 获取子控件的数量
         *
         * @return
         */
        public int getChildCount() {
            return children.size();
        }

        /**
         * 放置每一行里面的子控件的位置
         *
         * @param l 距离最左边的距离
         * @param t 距离最顶端的距离
         */
        public void onLayout(int l, int t) {
            //当前行使用的宽度,等于每个子控件宽度之和+子控件之间的水平距离
            lineWidth += horizontalSpacing * (children.size() - 1);
            int surplusChild = 0;
            int surplus = parentWidthSize - lineWidth;//剩余宽度
            if (surplus > 0) {
                //如果有剩余宽度,则将剩余宽度平分给每一个子控件
                surplusChild = (int) (surplus / children.size()+0.5);
            }
            for (int i = 0; i < children.size(); i++) {
                View child = children.get(i);
                child.getLayoutParams().width=child.getMeasuredWidth()+surplusChild;
                if (surplusChild>0){
                    //如果长度改变了后,需要重新测量,否则布局中的属性大小还会是原来的大小
                    child.measure(MeasureSpec.makeMeasureSpec(
                            child.getMeasuredWidth()+surplusChild,MeasureSpec.EXACTLY)
                            ,MeasureSpec.makeMeasureSpec(height,MeasureSpec.EXACTLY));
                }
                child.layout(l, t, l + child.getMeasuredWidth(), t + child.getMeasuredHeight());
                l += child.getMeasuredWidth() + horizontalSpacing;
            }
        }
    }
    //  getMeasuredWidth()   控件实际的大小
    // getWidth()  控件显示的大小

    @Override
    protected void onMeasure(int widthMeasureSpec, int heightMeasureSpec) {
        //将之前测量的数据进行清空,以防复用时影响下次测量
        mLines.clear();
        currentLine = null;
        userWidth = 0;
        //获取父容器的宽度和模式
        int widthMode = MeasureSpec.getMode(widthMeasureSpec);
        parentWidthSize = MeasureSpec.getSize(widthMeasureSpec)
                - getPaddingLeft() - getPaddingRight();
        //获取父容器的高度和模式
        int heigthMode = MeasureSpec.getMode(heightMeasureSpec);
        int heightSize = MeasureSpec.getSize(heightMeasureSpec)
                - getPaddingTop() - getPaddingBottom();
        int childWidthMode, childHeightMode;
        //为了测量每个子控件,需要指定每个子控件的测量规则
        //子控件设置为WRAP_CONTENT,具体测量规则详见,ViewGroup的getChildMeasureSpec()方法
        if (widthMode == MeasureSpec.EXACTLY) {
            childWidthMode = MeasureSpec.AT_MOST;
        } else {
            childWidthMode = widthMode;
        }
        if (heigthMode == MeasureSpec.EXACTLY) {
            childHeightMode = MeasureSpec.AT_MOST;
        } else {
            childHeightMode = heigthMode;
        }
        //获取到子控件高和宽的测量规则
        int childWidthMeasureSpec = MeasureSpec.makeMeasureSpec(parentWidthSize, childWidthMode);
        int childHeightMeasureSpec = MeasureSpec.makeMeasureSpec(heightSize, childHeightMode);
        currentLine = new Line();//创建第一行
        for (int i = 0; i < getChildCount(); i++) {
            View child = getChildAt(i);
            //测量每一个孩子
            child.measure(childWidthMeasureSpec, childHeightMeasureSpec);
            //获取当前子控件的实际宽度
            int childMeasuredWidth = child.getMeasuredWidth();
            //让当前行使用宽度加上当前子控件宽度
            userWidth += childMeasuredWidth;
            if (userWidth <= parentWidthSize) {
                //如果当前行使用宽度小于父控件的宽度,则加入该行
                currentLine.addChild(child);
                //当前行使用宽度加上子控件之间的水平距离
                userWidth += horizontalSpacing;
                //如果当前行加上水平距离后超出父控件宽度,则换行
                if (userWidth > parentWidthSize) {
                    newLine();
                }
            } else {
                //以防出现一个子控件宽度超过父控件的情况出现
                if (currentLine.getChildCount() == 0) {
                    currentLine.addChild(child);
                }
                newLine();
                //并将超出范围的当前的子控件加入新的行中
                currentLine.addChild(child);
                //并将使用宽度加上子控件的宽度;
                userWidth = child.getMeasuredWidth()+horizontalSpacing;
            }
        }
        //加入最后一行,因为如果最后一行宽度不足父控件宽度时,就未换行
        if (!mLines.contains(currentLine)) {
            mLines.add(currentLine);
        }
        int totalHeight = 0;//总高度
        for (Line line : mLines) {
            //总高度等于每一行的高度+垂直间距
            totalHeight += line.getHeight() + verticalSpacing;
        }
        //resolveSize(),将实际高度与父控件高度进行比较,选取最合适的
        setMeasuredDimension(parentWidthSize + getPaddingLeft() + getPaddingRight(),
                resolveSize(totalHeight + getPaddingTop() + getPaddingBottom(), heightMeasureSpec));
    }

    /**
     * 换行
     */
    private void newLine() {
        mLines.add(currentLine);//记录之前行
        currentLine = new Line();//重新创建新的行
        userWidth = 0;//将使用宽度初始化
    }

    /**
     * 放置每个子控件的位置
     *
     * @param changed
     * @param l
     * @param t
     * @param r
     * @param b
     */
    @Override
    protected void onLayout(boolean changed, int l, int t, int r, int b) {
        l += getPaddingLeft();
        t += getPaddingTop();
        for (int i = 0; i < mLines.size(); i++) {
            Line line = mLines.get(i);
            //设置每一行的位置,每一行的子控件由其自己去分配
            line.onLayout(l, t);
            //距离最顶端的距离,即每一行高度和垂直间距的累加
            t += line.getHeight() + verticalSpacing;
        }
    }

    /**
     * 获取子控件的测量规则
     *
     * @param mode 父控件的测量规则
     * @return 子控件设置为WRAP_CONTENT,具体测量规则详见,ViewGroup的getChildMeasureSpec()方法
     */
    private int getMode(int mode) {
        int childMode = 0;
        if (mode == MeasureSpec.EXACTLY) {
            childMode = MeasureSpec.AT_MOST;
        } else {
            childMode = mode;
        }
        return childMode;
    }
}
2.思路解析
- 对比图一的实现思路,我们封装了Line这个内部类,看到这个名字,相信大家都猜到是什么意思了,其实就是一个Line实例对象代表一行,Line里面的List
children用来存放孩子
private List children;//一行里面所添加的子View集合
- Line里面还封装了void onLayout(int l, int t)方法,即自己去拜访每个孩子的位置,
实现剩余的宽度平均分配,主要体现在这几行代码
     if (surplus > 0) {
     //如果有剩余宽度,则将剩余宽度平分给每一个子控件
          surplusChild = (int) (surplus / children.size()+0.5);
      }
              -------
 //重新分配每个孩子的大小

    child.measure(MeasureSpec.makeMeasureSpec(
    child.getMeasuredWidth()+surplusChild,MeasureSpec.EXACTLY)
               ,MeasureSpec.makeMeasureSpec(height,MeasureSpec.EXACTLY));
今天就写到这里了,有时间再来补充,最近考试比较忙,已经好久没有更新博客了。
源码下载地址:https://github.com/gdutxiaoxu/CustomViewDemo.git
最后的最后,卖一下广告,欢迎大家关注我的微信公众号,扫一扫下方二维码或搜索微信号 stormjun,即可关注。 目前专注于 Android 开发,主要分享 Android开发相关知识和一些相关的优秀文章,包括个人总结,职场经验等。


