网络程序设计课程项目总结
课程目标
本课程的目标是通过学习神经网络等机器学习算法来搭建一个完整的血常规检测报告单的年龄和性别预测系统。项目的最后效果就是,用户上传一张血常规报告单的图片,后台首先进行OCR识别出图片中的项目,然后通过机器学习算法生成的模型对用户数据进行预测。
心得总结
本学期的网络程序设计课是我认为很有价值的一门课。
首先,这是一门紧跟时代步伐的课程,随着硬件水平的飞速发展,人工智能发展已成为大势所趋,这门课的设计非常符合时代和社会的要求,可谓与时俱进。
其次,这门课很好地将知识融合在了一起。我们完成了医院体检单的OCR识别,并通过深度学习预测出了病人的性别和年龄。虽然只是一个很简单的功能,但使我系统的学习了OCR识别,web应用,以及神经网络编程等。
最后,这门课让我体会到了团队合作的快乐,在一个项目中,每个人擅长的方面不一样,有的人熟悉web,有的人熟悉神经网络,有的人会用OCR,大家都可以贡献自己的力量。在codingnet的平台上,我们向他人分享自己的代码,也同时学习着别人的代码,共同讨论,共同进步。
个人贡献
在这个项目中,我只有苦劳,没有功劳。。。曾经三次pr,但都被拒绝了,不过从中还是学到了很多东西。这就是我几次pr的截图:

第二次pr。失败原因,我只在本地删除了多余的文件夹,但codingnet上貌似还在。。。
第三次pr。失败原因,没有和caffe主目录合并。
最后我还是放弃继续pr了,总结一下,之所以一直被拒绝一是因为自己对pr的流程不熟悉,还有一点可能与老师的想法不太一样,老师一直让我与主目录合并,但我觉得实现的功能不同不能合并。这给我很多经验教训,今后在pr中我要更加注意文档的规范,要让读者觉得清晰明白。
项目介绍
项目托管地址
coding.net:血常规检验报告OCR
项目功能
主要功能:神经网络程序设计,基于深度学习神经网络等机器学习技术实现一个医学辅助诊断的专家系统原型,具体切入点为对血常规检验报告的OCR识别、深度学习与分析。
1, 将血常规检验报告的图片识别出年龄、性别及血常规检验的各项数据
图片上传页面,提交的结果是图片存储到了mongodb数据库得到一个OID或到指定目录到一个path
图片识别得到一个json数据存储到了mongodb数据库得到一个OID,json数据
自动截取目标区域,不同旋转角度的图片自动准备截取目标区域,预处理,比如增加对比度、锐化
2, 识别
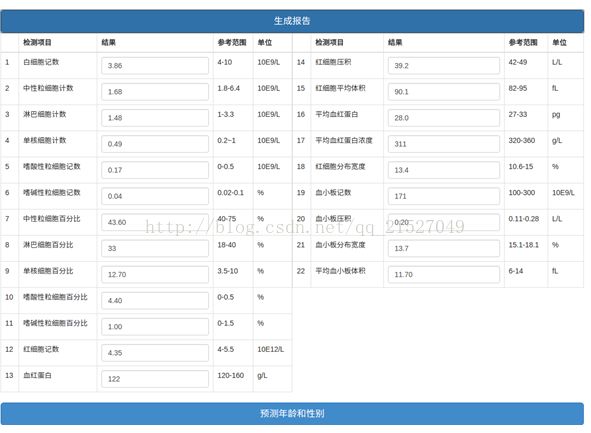
识别结果页面,上部是原始图片,下部是一个显示识别数据的表格,以便对照识别结果
学习血常规检验的各项数据及对应的年龄性别
根据血常规检验的各项数据预测年龄和性别
运行环境
安装numpy
$ sudo apt-get install python-numpy
安装opencv
$ sudo apt-get install python-opencv
安装pytesseract
$ sudo apt-get install tesseract-ocr
$ sudo pip install pytesseract
$ sudo apt-get install python-tk
$ sudo pip install pillow
安装Flask框架
$ sudo pip install Flask
安装mongodb
$ sudo apt-get install mongodb # 如果提示no modulename mongodb, 先执行sudo apt-get update
$ sudo service mongodb started
$ sudo pip install pymongo
安装Tensorflow
$ sudo apt-get install python-numpy
$ sudo apt-get install python-imaging
$ pip install --upgradehttps://storage.googleapis.com/tensorflow/linux/cpu/tensorflow-0.12.0rc0-cp27-none-linux_x86_64.whl
运行
$ cd BloodTestReportOCR
$ python view.py # upload图像,在浏览器打开http://yourip:8080
项目演示
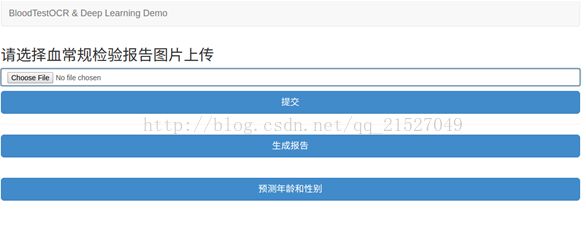
第一步,进入首页
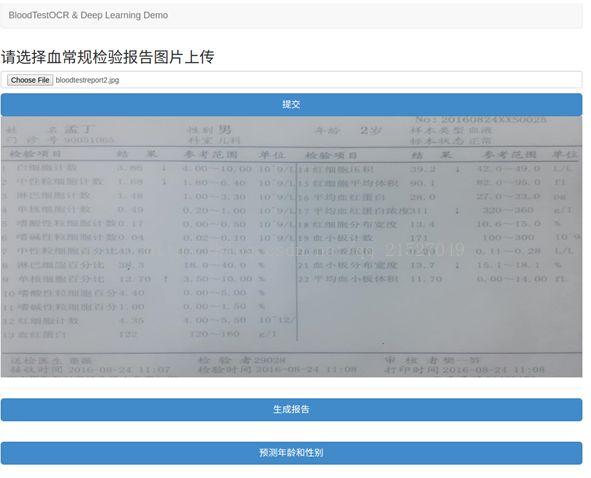
第二步,上传图片
第三步,生成OCR识别报告单
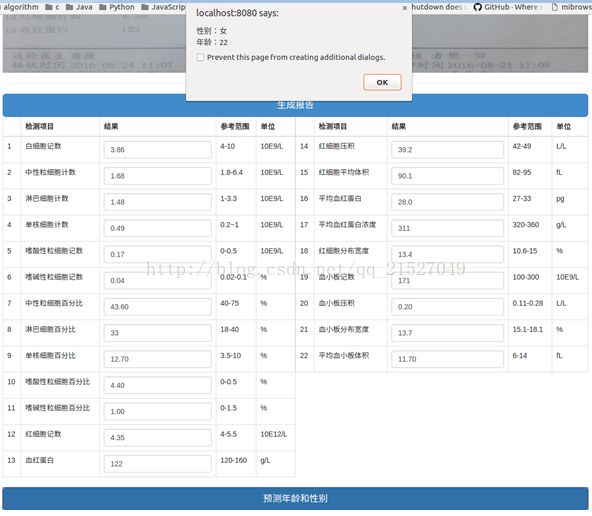
第四步,开始预测
项目模块分析
这次项目主要分为三大模块:web模块,OCR识别模块,学习预测模块。
web模块
web模块主要参考的其它同学。采用Flask来搭建,因为这是一个简单的web系统,Flask非常易于上手;前端采用Bootstrap,jQuery, Vue.js;最后web部分主要是json传输数据,模仿并实现了简单的REST架构。
OCR识别模块
OCR模块也参考的其它同学。我们的血常规报告图片大概是这样的表格:
首先是透视变换,就是把带角度拍的图片,变换到正面的坐标系之下,然后对其进行裁剪,思路就是首先锁定三条粗黑线,然后根据这三条粗线裁剪出统一大小的报告区域,而这个统一大小是固定的,只要报告一致,就可以采用固定的大小剪出每一个项目,
其次我们对裁剪出的22项目进行ocr,这一部分主要使用了图像形态学,二值化和膨胀等手段,使得每一个小区域内的文字间隔开一点,然后就更容易抽取出文字了,文字抽取部分就是采用了tesseract;为了提高文字识别率,我们还训练了自己的字库,使其只识别规定范围内的医学术语词典,这样就可以缩小搜索空间,从而增大识别率。
学习预测模块
我在caffe的深度学习平台上做了性别预测和年龄预测,性别预测正确率70%左右,年龄预测正确率只有百分之几。以性别预测为例:
首先是得到训练数据集。因为caffe读取数据都要基于lmdb数据库,所以要将数据转换为lmdb格式。附上相关代码:
/*************************************************************************
    > File Name: conver_data.cpp
    > Author: TDX
    > Mail: [email protected]
    > Created Time: 2016年12月13日 星期二 13时41分37秒
 *************************************************************************
#include
#include
#include
#if defined(USE_LEVELDB) && defined(USE_LMDB)
#include
#include
#include
#endif
#include
#include
#include
#include
#include
#include
#include"caffe/proto/caffe.pb.h"
#include"caffe/util/db.hpp"
#include"caffe/util/format.hpp"
using namespace std;
using namespace caffe;
using boost::scoped_ptr;
DEFINE_string(backend, "lmdb", "The backend for data result");
void conver_dataset(const char* data_filename, const char* label_filename, const char* db_path, const string& db_backend)
{
ifstream data_file(data_filename, std::ios::in);
ifstream label_file(label_filename, std::ios::in);
CHECK(data_file) << "Uable to open file " << data_file;
CHECK(label_file) << "Unable to open file " < data;
while(data_file >> dataStr)
{
data.push_back(dataStr);
}
int num_items = data.size() / 26;
uint32_t rows = 1;
uint32_t cols = 26;
//read label
string tmp_lable;
vector vLabel;
int temp;
while(label_file >> tmp_lable)
{
temp = atoi(tmp_lable.c_str());
vLabel.push_back(temp);
}
scoped_ptr db(db::GetDB(db_backend));
db->Open(db_path, db::NEW);
scoped_ptr txn(db->NewTransaction());
char* pixels = new char[rows * cols];
int count = 0;
string value;
Datum datum;
datum.set_channels(1);
datum.set_height(rows);
datum.set_width(cols);
LOG(INFO) << "A total of " << num_items << " items. " ;
LOG(INFO) << "Rows: " << rows << " Cols: " << cols;
for(int i = 0; i < num_items; i++)
{
for(int j = 0; j < 26; j++)
{
pixels[j] = atof(data[i * 26 + j].c_str());
}
datum.set_data(pixels, rows * cols);
datum.set_label(vLabel[i]);
string key_str = caffe::format_int(i,8);
datum.SerializeToString(&value);
txn->Put(key_str, value);
if(++count % 1000 == 0)
{
txn->Commit();
}
}
if(count % 1000 != 0)
{
txn->Commit();
}
LOG(INFO) << "Processed " << count << " files.";
delete [] pixels;
db->Close();
}
int main(int argc, char** argv)
{
namespace gflags = google;
FLAGS_alsologtostderr = 1;
gflags::ParseCommandLineFlags(&argc, &argv, true);
google::InitGoogleLogging(argv[0]);
const string& db_backend = FLAGS_backend;
conver_dataset(argv[1], argv[2], argv[3],db_backend);
return 0;
} 其次是定义神经网络。caffe内部已经写好了各种层的实现,所以我们要做的非常简单,就是将不同的层组合在一起,形成一个整体的神经网络。我用的就是最简单的BP神经网络,仅仅用三个全连接层就可以达到70%的准确率。附上相关代码:
name: "IDataNet"
layer {
  name: "IData"
  type: "Data"
  top: "data"
  top: "label"
  include {
    phase: TRAIN
  }
  transform_param {
    scale: 0.00390625
  }
  data_param {
    source: "examples/PredictSex/IData_train_lmdb"
    batch_size: 32
    backend: LMDB
  }
}
layer {
  name: "IData"
  type: "Data"
  top: "data"
  top: "label"
  include {
    phase: TEST
  }
  transform_param {
    scale: 0.00390625
  }
  data_param {
    source: "examples/PredictSex/IData_test_lmdb"
    batch_size: 10
    backend: LMDB
  }
}
layer {
  name: "ip1"
  type: "InnerProduct"
  bottom: "data"
  top: "ip1"
  param {
    lr_mult: 1
  }
  param {
    lr_mult: 2
  }
  inner_product_param {
    num_output: 500
    weight_filler {
      type: "xavier"
    }
    bias_filler {
      type: "constant"
    }
  }
}
layer {
  name: "relu1"
  type: "ReLU"
  bottom: "ip1"
  top: "ip1"
}
layer {
  name: "ip2"
  type: "InnerProduct"
  bottom: "ip1"
  top: "ip2"
  param {
    lr_mult: 1
  }
  param {
    lr_mult: 2
  }
  inner_product_param {
    num_output: 800
    weight_filler {
      type: "xavier"
    }
    bias_filler {
      type: "constant"
    }
  }
}
layer {
  name: "relu2"
  type: "ReLU"
  bottom: "ip2"
  top: "ip2"
}
layer {
  name: "ip3"
  type: "InnerProduct"
  bottom: "ip2"
  top: "ip3"
  param {
    lr_mult: 1
  }
  param {
    lr_mult: 2
  }
  inner_product_param {
    num_output: 2
    weight_filler {
      type: "xavier"
    }
    bias_filler {
      type: "constant"
    }
  }
}
layer {
  name: "accuracy"
  type: "Accuracy"
  bottom: "ip3"
  bottom: "label"
  top: "accuracy"
  include {
    phase: TEST
  }
}
layer {
  name: "loss"
  type: "SoftmaxWithLoss"
  bottom: "ip3"
  bottom: "label"
  top: "loss"
}
最后,要定义训练参数,附上相关代码:
# The train/test net protocol buffer definition
net: "examples/PredictSex/IData_train_test.prototxt"
# test_iter specifies how many forward passes the test should carry out.
# In the case of MNIST, we have test batch size 100 and 100 test iterations,
# covering the full 10,000 testing images.
test_iter: 20
# Carry out testing every 500 training iterations.
test_interval: 30
# The base learning rate, momentum and the weight decay of the network.
base_lr: 0.01
momentum: 0.9
weight_decay: 0.0005
# The learning rate policy
lr_policy: "inv"
gamma: 0.0001
power: 0.75
# Display every 100 iterations
display: 20
# The maximum number of iterations
max_iter: 10000
# snapshot intermediate results
snapshot: 5000
snapshot_prefix: "examples/PredictSex/IData"
# solver mode: CPU or GPU
solver_mode: CPU


