Qt数据库项目实例程序(各数据库通用)
【Qt数据库程序实例】
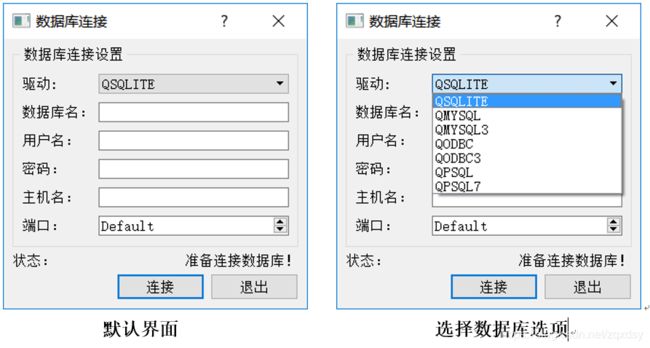
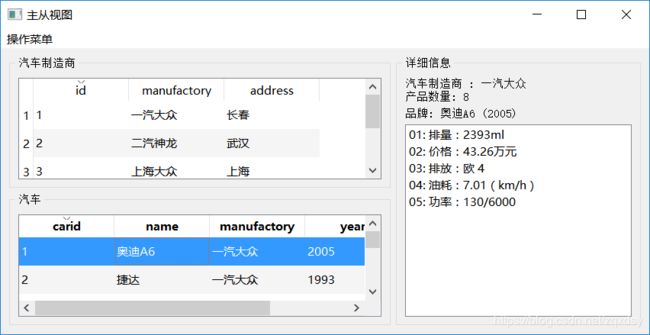
首先放几张程序运行的截图:
【备注】源码下载地址(可以直接运行):
https://download.csdn.net/download/zqxdsy/11049683
程序部分
程序介绍:
以主主从视图的形式展示汽车制造厂和生产汽车的关系。
当在汽车制造商中xuan选取某制造商时,下面的汽车列表中将显示出与制造商生产的所有产品;当选中某个车型时,右边的列表将显示出该车车型和制造商的详细信息,车型的相关信息信息存储在XML的文件中。PS:各部分程序的相关注释解析会在后续过程中逐渐加上,先把代码贴上。
一.主界面布局
1.主窗口MianWindow定义主显示界面
头文件mainmainwindow.h具体代码如下:
#ifndef MAINWINDOW_H
#define MAINWINDOW_H

#include
#include
#include
#include
#include
#include
#include
#include
#include
#include
#include

class MainWindow : public QMainWindow
{
    Q_OBJECT

public:
    //MainWindow(QWidget *parent = 0);
    MainWindow(const QString &factoryTable,const QString &carTable,QFile *carDetails,QWidget *parent = 0);   //构造函数
    ~MainWindow();
private slots:
    void addCar();
    void changeFactory(QModelIndex index);
    void delCar();
    void showCarDetails(QModelIndex index);
    void showFactorytProfile(QModelIndex index);
private:
    QGroupBox *createCarGroupBox();
    QGroupBox *createFactoryGroupBox();
    QGroupBox *createDetailsGroupBox();
    void createMenuBar();

    QTableView *carView;
    QTableView *factoryView;

    QListWidget *attribList;

    QLabel *profileLabel;
    QLabel *titleLabel;

    void decreaseCarCount(QModelIndex index);
    void getAttribList(QDomNode car);
    QModelIndex indexOfFactory(const QString &factory);
    void readCarData();
    void removeCarFromDatabase(QModelIndex index);
    void removeCarFromFile(int id);

    QDomDocument carData;
    QFile *file;
    QSqlRelationalTableModel *carModel;
    QSqlTableModel *factoryModel;
};

#endif // MAINWINDOW_H
2.源文件mainwindow.cpp,各函数的实现
2.1 构造函数的始化和析构函数
#include "mainwindow.h"
#include
#include
#include
#include
#include
#include
#include
#include
#include "editdialog.h"
extern int uniqueCarId;
extern int uniqueFactoryId;

MainWindow::MainWindow(const QString &factoryTable,const QString &carTable,QFile *carDetails,QWidget *parent)
    : QMainWindow(parent)
{
    file = carDetails;
    readCarData();

    carModel = new QSqlRelationalTableModel(this);
    carModel->setTable(carTable);
    carModel->setRelation(2, QSqlRelation(factoryTable, "id", "manufactory"));
    carModel->select();

    factoryModel = new QSqlTableModel(this);
    factoryModel->setTable(factoryTable);
    factoryModel->select();

    QGroupBox *factory = createFactoryGroupBox();
    QGroupBox *cars = createCarGroupBox();
    QGroupBox *details = createDetailsGroupBox();
    uniqueCarId = carModel->rowCount();
    uniqueFactoryId = factoryModel->rowCount();

    //布局
    QGridLayout *layout = new QGridLayout;
    layout->addWidget(factory, 0, 0);
    layout->addWidget(cars, 1, 0);
    layout->addWidget(details, 0, 1, 2, 1);
    layout->setColumnStretch(1, 1);
    layout->setColumnMinimumWidth(0, 500);

    QWidget *widget = new QWidget;
    widget->setLayout(layout);
    setCentralWidget(widget);
    createMenuBar();

    resize(850, 400);
    setWindowTitle(tr("主从视图"));
}

MainWindow::~MainWindow()
{

}
2.2 创建企业显示布局
createFactoryGroupBox()
{
    factoryView = new QTableView;
    factoryView->setEditTriggers(QAbstractItemView::NoEditTriggers);
    factoryView->setSortingEnabled(true);
    factoryView->setSelectionBehavior(QAbstractItemView::SelectRows);
    factoryView->setSelectionMode(QAbstractItemView::SingleSelection);
    factoryView->setShowGrid(false);
    factoryView->setAlternatingRowColors(true);

    factoryView->setModel(factoryModel);
    connect(factoryView,SIGNAL(clicked (QModelIndex )),this,SLOT(changeFactory(QModelIndex)));

    QGroupBox *box = new QGroupBox(tr("汽车制造商"));
    QGridLayout *layout = new QGridLayout;
    layout->addWidget(factoryView, 0, 0);
    box->setLayout(layout);

    return box;
}
2.3 创建汽车显示布局
createCarGroupBox()
{
    QGroupBox *box = new QGroupBox(tr("汽车"));

    carView = new QTableView;
    carView->setEditTriggers(QAbstractItemView::NoEditTriggers);
    carView->setSortingEnabled(true);
    carView->setSelectionBehavior(QAbstractItemView::SelectRows);
    carView->setSelectionMode(QAbstractItemView::SingleSelection);
    carView->setShowGrid(false);
    carView->verticalHeader()->hide();
    carView->setAlternatingRowColors(true);

    carView->setModel(carModel);
    connect(carView, SIGNAL(clicked(QModelIndex)),this,SLOT(showCarDetails(QModelIndex)));
    connect(carView, SIGNAL(activated(QModelIndex)),this,SLOT(showCarDetails(QModelIndex)));

    QVBoxLayout *layout = new QVBoxLayout;
    layout->addWidget(carView, 0, 0);
    box->setLayout(layout);

    return box;
}
2.4 创建详细信息布局
createDetailsGroupBox()
{
    QGroupBox *box = new QGroupBox(tr("详细信息"));

    profileLabel = new QLabel;
    profileLabel->setWordWrap(true);
    profileLabel->setAlignment(Qt::AlignBottom);

    titleLabel = new QLabel;
    titleLabel->setWordWrap(true);
    titleLabel->setAlignment(Qt::AlignBottom);

    attribList = new QListWidget;

    QGridLayout *layout = new QGridLayout;
    layout->addWidget(profileLabel, 0, 0, 1, 2);
    layout->addWidget(titleLabel, 1, 0, 1, 2);
    layout->addWidget(attribList, 2, 0, 1, 2);
    layout->setRowStretch(2, 1);
    box->setLayout(layout);
    return box;
}
2.5 创建菜单栏布局
createMenuBar()
{
    QAction *addAction = new QAction(tr("添加"), this);
    QAction *deleteAction = new QAction(tr("删除"), this);
    QAction *quitAction = new QAction(tr("退出"), this);

    addAction->setShortcut(tr("Ctrl+A"));
    deleteAction->setShortcut(tr("Ctrl+D"));
    quitAction->setShortcut(tr("Ctrl+Q"));

    QMenu *fileMenu = menuBar()->addMenu(tr("操作菜单"));
    fileMenu->addAction(addAction);
    fileMenu->addAction(deleteAction);
    fileMenu->addSeparator();
    fileMenu->addAction(quitAction);

    connect(addAction, SIGNAL(triggered(bool)), this, SLOT(addCar()));
    connect(deleteAction, SIGNAL(triggered(bool)), this, SLOT(delCar()));
    connect(quitAction, SIGNAL(triggered(bool)), this, SLOT(close()));
}
2.6 选择企业操作
changeFactory(QModelIndex  index)
{
    QSqlRecord record = factoryModel->record(index.row());
    QString factoryId = record.value("id").toString();
    carModel->setFilter("id = '"+ factoryId +"'") ;
    showFactorytProfile(index);
}
2.7 显示企业信息
showFactorytProfile(QModelIndex index)
{
    QSqlRecord record = factoryModel->record(index.row());
    QString name = record.value("manufactory").toString();
    int count = carModel->rowCount();

    profileLabel->setText(tr("汽车制造商 : %1 \n产品数量: %2").arg(name).arg(count));
    profileLabel->show();
    titleLabel->hide();
    attribList->hide();
}
2.8 显示汽车的详细信息
showCarDetails(QModelIndex index)
{
    QSqlRecord record = carModel->record(index.row());

    QString factory = record.value("manufactory").toString();
    QString name = record.value("name").toString();
    QString year = record.value("year").toString();
    QString carId = record.value("carid").toString();

    showFactorytProfile(indexOfFactory(factory));
    titleLabel->setText(tr("品牌: %1 (%2)").arg(name).arg(year));
    titleLabel->show();

    QDomNodeList cars = carData.elementsByTagName("car");
    for (int i = 0; i < cars.count(); i++)
    {
        QDomNode car = cars.item(i);
        if (car.toElement().attribute("id") == carId)
        {
            getAttribList(car.toElement());
            break;
        }
    }
    if (!attribList->count() == 0)
        attribList->show();
}
2.9 显示列表
getAttribList(QDomNode car)
{
    attribList->clear();
    QDomNodeList attribs = car.childNodes();
    QDomNode node;
    QString attribNumber;
    for (int j = 0; j < attribs.count(); j++)
    {
        node = attribs.item(j);
        attribNumber = node.toElement().attribute("number");
        QListWidgetItem *item = new QListWidgetItem(attribList);
        QString showText(attribNumber + ": " + node.toElement().text());
        item->setText(tr("%1").arg(showText));
    }
}
2.10 从数据库里删除汽车
delCar()
{
    QModelIndexList selection = carView->selectionModel()->selectedRows(0);
    if (!selection.empty())
    {
        QModelIndex idIndex = selection.at(0);
        int id = idIndex.data().toInt();
        QString name = idIndex.sibling(idIndex.row(), 1).data().toString();
        QString factory = idIndex.sibling(idIndex.row(), 2).data().toString();
        QMessageBox::StandardButton button;
        button = QMessageBox::question(this,tr("删除汽车记录"),QString(tr("确认删除由'%1'生产的'%2'吗?").arg(factory).arg(name)),QMessageBox::Yes|QMessageBox::No);

        if(button == QMessageBox::Yes)
        {
            removeCarFromFile(id);
            removeCarFromDatabase(idIndex);
            decreaseCarCount(indexOfFactory(factory));
        }else{
            QMessageBox::information(this, tr("删除汽车记录"),tr("请选择要删除的记录。"));
        }
    }
}
2.11 移除汽车记录
removeCarFromFile(int id)
{
    QDomNodeList cars = carData.elementsByTagName("car");
    for (int i = 0; i< cars.count(); i++)
    {
        QDomNode node = cars.item(i);
        if (node.toElement().attribute("id").toInt() == id)
        {
            carData.elementsByTagName("archive").item(0).removeChild(node);
            break;
        }
    }
}

removeCarFromDatabase(QModelIndex index)
{
    carModel->removeRow(index.row());
}
2.12 更新汽车数量
decreaseCarCount(QModelIndex index)
{
    int row = index.row();
    int count = carModel->rowCount();
    if (count == 0)
        factoryModel->removeRow(row);
}
2.13 读取汽车数据
readCarData()
{
    if (!file->open(QIODevice::ReadOnly))
        return;
    if (!carData.setContent(file))
    {
        file->close();
        return;
    }
    file->close();
}
2.14
indexOfFactory(const QString &factory)
{
    for (int i = 0; i < factoryModel->rowCount(); i++)
    {
        QSqlRecord record =  factoryModel->record(i);
        if (record.value("manufactory") == factory)
            return factoryModel->index(i, 1);
    }
    return QModelIndex();
}
2.15 添加汽车操作
addCar()
{
    Dialog *dialog = new Dialog(carModel,factoryModel,carData,file,this);
    int accepted = dialog->exec();

    if (accepted == 1)
    {
        int lastRow = carModel->rowCount() - 1;
        carView->selectRow(lastRow);
        carView->scrollToBottom();
        showCarDetails(carModel->index(lastRow, 0));
    }
}
二、连接数据库
以上是主界面布局,下面是数据库连接功能,用户在图形界面中配置数据库连接参数信息。
1.添加新文件,Qt设计师界面类-Dialog without Buttons,类名为ConnDlg,头文件为connectdlg.h,源文件为connectdlg.cpp,界面文件为connectdlg.ui,参考登陆界面将各个控件设置完成,运行程序,以便生成ui_connectdlg.h文件
2.头文件connectdlg.h
#ifndef CONNECTDLG_H
#define CONNECTDLG_H

#include
#include
#include "ui_connectdlg.h"
class QSqlError;

class ConnDlg : public QDialog
{
    Q_OBJECT
public:
    ConnDlg(QWidget *parent = 0);
    //~ConnDlg();

    QString driverName() const;
    QString databaseName() const;
    QString userName() const;
    QString password() const;
    QString hostName() const;
    int port() const;
    QSqlError addConnection(const QString &driver, const QString &dbName, const QString &host,\
                            const QString &user, const QString &passwd, int port = -1);
    void creatDB();
    void addSqliteConnection();
private slots:
    void on_okButton_clicked();
    void on_cancelButton_clicked() { reject(); }
    void driverChanged(const QString &);
private:
   Ui::QSqlConnectionDialogUi ui;
};

#endif // CONNECTDLG_H
3.源文件connect.cpp,构造函数完成了初始化ui界面以及查找当前数据库驱动,并将其加入ui界面的驱动组合框中,以及其他的一些功能。
#include "connectdlg.h"
#include "ui_connectdlg.h"

#include
#include

//构造函数赋初值
ConnDlg::ConnDlg(QWidget *parent) :
    QDialog(parent)
{
    ui.setupUi(this);
    QStringList drivers = QSqlDatabase::drivers();
    ui.comboDriver->addItems(drivers);
    connect(ui.comboDriver,SIGNAL(currentIndexChanged( const QString & )),this,SLOT(driverChanged(const QString &)));
    ui.status_label->setText(tr("准备连接数据库!"));
}
3.1 选择数据库驱动函数
void ConnDlg::driverChanged(const QString & text)
{
    if(text =="QSQLITE")
    {
        ui.editDatabase->setEnabled(false);
        ui.editUsername->setEnabled(false);
        ui.editPassword->setEnabled(false);
        ui.editHostname->setEnabled(false);
        ui.portSpinBox->setEnabled(false);
    }
    else
    {
        ui.editDatabase->setEnabled(true);
        ui.editUsername->setEnabled(true);
        ui.editPassword->setEnabled(true);
        ui.editHostname->setEnabled(true);
        ui.portSpinBox->setEnabled(true);
    }
}

QString ConnDlg::driverName() const
{
    return ui.comboDriver->currentText();
}

QString ConnDlg::databaseName() const
{
    return ui.editDatabase->text();
}

QString ConnDlg::userName() const
{
    return ui.editUsername->text();
}

QString ConnDlg::password() const
{
    return ui.editPassword->text();
}

QString ConnDlg::hostName() const
{
    return ui.editHostname->text();
}

int ConnDlg::port() const
{
    return ui.portSpinBox->value();
}
3.2 选择数据库函数的实现
void ConnDlg::on_okButton_clicked()
{
    if (ui.comboDriver->currentText().isEmpty())
    {
        ui.status_label->setText(tr("请选择一个数据库驱动!"));
        ui.comboDriver->setFocus();
    }
    else if(ui.comboDriver->currentText() =="QSQLITE")
    {
        addSqliteConnection();
        //创建数据库表,如已存在则无须执行
        creatDB();
        accept();
    }
    else
    {
        QSqlError err = addConnection(driverName(), databaseName(),
                                      hostName(),userName(), password(), port());
        if (err.type() != QSqlError::NoError)
            ui.status_label->setText(err.text());
        else
            ui.status_label->setText(tr("连接数据库成功!"));
        //创建数据库表,如已存在则无须执行
        //accept();
        }
}
3.3 添加数据库连接函数的实现
QSqlError ConnDlg::addConnection(const QString &driver, const QString &dbName,
                                 const QString &host,const QString &user,
                                 const QString &passwd, int port)
{
    QSqlError err;
    QSqlDatabase db = QSqlDatabase::addDatabase(driver);
    db.setDatabaseName(dbName);
    db.setHostName(host);
    db.setPort(port);
    if (!db.open(user, passwd))
    {
        err = db.lastError();
    }
    return err;
}
3.4 创建sqlite数据库
void ConnDlg::addSqliteConnection()
{
    QSqlDatabase db = QSqlDatabase::addDatabase("QSQLITE");
    db.setDatabaseName("databasefile");
    if (!db.open())
    {
        ui.status_label->setText(db.lastError().text());
        return;
    }
    ui.status_label->setText(tr("创建sqlite数据库成功!"));
}
3.5 创建表
void ConnDlg::creatDB()
{
    QSqlQuery query;
    query.exec("create table factory (id int primary key, manufactory varchar(40), address varchar(40))");
    query.exec(QObject::tr("insert into factory values(1, '一汽大众', '长春')"));
    query.exec(QObject::tr("insert into factory values(2, '二汽神龙', '武汉')"));
    query.exec(QObject::tr("insert into factory values(3, '上海大众', '上海')"));

    query.exec("create table cars (carid int primary key, name varchar(50), factoryid int, year int, foreign key(factoryid) references factory)");
    query.exec(QObject::tr("insert into cars values(1,'奥迪A6',1,2005)"));
    query.exec(QObject::tr("insert into cars values(2, '捷达', 1, 1993)"));
    query.exec(QObject::tr("insert into cars values(3, '宝来', 1, 2000)"));
    query.exec(QObject::tr("insert into cars values(4, '毕加索',2, 1999)"));
    query.exec(QObject::tr("insert into cars values(5, '富康', 2, 2004)"));
    query.exec(QObject::tr("insert into cars values(6, '标致307',2, 2001)"));
    query.exec(QObject::tr("insert into cars values(7, '桑塔纳',3, 1995)"));
    query.exec(QObject::tr("insert into cars values(8, '帕萨特',3, 2000)"));
}
4.修改main.cpp的程序如下
#include "mainwindow.h"
#include
#include
#include
#include "connectdlg.h"

int main(int argc, char *argv[])
{
    QApplication a(argc, argv);
    //MainWindow w;
    //w.show();
    ConnDlg dialog;
    if (dialog.exec() != QDialog::Accepted)
        return -1;
    //dialog.show();
    QFile *carDetails = new QFile("attribs.xml");
    MainWindow window("factory", "cars", carDetails);
    window.show();

    return a.exec();
}
5.在SQLEx.pro文件中添加如下内容
QT += sql
6.运行程序,会出现登陆界面,单机”连接“按钮,状态栏出现”创建sqlite数据库成功”,接下来实现主从视图模式浏览数据库中的
信息。
三、主从视图应用
1.在main.cpp、maindown.h和mianwindow.cpp中已经添加了主从视图相关程序,可以查看上面的源码。
2.新建一个XML文件attribs.xml,将该文件放在该工程目录下,以下是文件内容。
	  排量:2393ml
	  价格:43.26万元
	  排放:欧 4
	  油耗:7.01(km/h)
	  功率:130/6000


	  排量:2393ml
	  价格:43.26万元
	  排放:欧 4
	  油耗:7.01(km/h)
	  功率:130/6000
5.在SQLEx.pro文件中添加以下内容
QT += xml
四、添加记录功能
1.头文件editdialog.h
#ifndef EDITDIALOG_H
#define EDITDIALOG_H

#include
#include
#include
#include
#include "ui_connectdlg.h"
#include

class Dialog : public QDialog
{
    Q_OBJECT
public:
    Dialog(QSqlRelationalTableModel *cars,QSqlTableModel *factory,QDomDocument details,QFile *output,QWidget *parent = 0);

private slots:
    void revert();
    void submit();
private:
    int addNewCar(const QString &name, int factoryId);
    int addNewFactory(const QString &factory,const QString &address);
    void addAttribs(int carId, QStringList attribs);
    QDialogButtonBox *createButtons();
    QGroupBox *createInputWidgets();
    int findFactoryId(const QString &factory);
    int generateCarId();
    int generateFactoryId();

    QSqlRelationalTableModel *carModel;
    QSqlTableModel *factoryModel;
    QDomDocument carDetails;
    QFile *outputFile;

    QLineEdit *factoryEditor;
    QLineEdit *addressEditor;
    QLineEdit *carEditor;
    QSpinBox *yearEditor;
    QLineEdit *attribEditor;
};

#endif // EDITDIALOG_H
2.源文件editdialog.cpp
2.1 构造函数初始化
#include "editdialog.h"
#include
int uniqueCarId;
int uniqueFactoryId;

Dialog::Dialog(QSqlRelationalTableModel *cars,QSqlTableModel *factory,QDomDocument details,QFile *output,QWidget *parent) :
    QDialog(parent)
{
    carModel = cars;
    factoryModel = factory;
    carDetails = details;
    outputFile = output;

    QGroupBox *inputWidgetBox = createInputWidgets();
    QDialogButtonBox *buttonBox = createButtons();

    //界面布局
    QVBoxLayout *layout = new QVBoxLayout;
    layout->addWidget(inputWidgetBox);
    layout->addWidget(buttonBox);
    setLayout(layout);

    setWindowTitle(tr("添加产品"));
}
2.2 提交操作
submit()
{
    QString factory = factoryEditor->text();
    QString address = addressEditor->text();
    QString name = carEditor->text();

    if (factory.isEmpty() || address.isEmpty()||name.isEmpty())
    {
        QString message(tr("请输入厂名、厂址和商品名称!"));
        QMessageBox::information(this, tr("添加产品"), message);
    }
    else
    {
        int factoryId = findFactoryId(factory);
        if(factoryId == -1)
        {
            factoryId = addNewFactory(factory,address);
        }
        int carId = addNewCar(name, factoryId);
        QStringList attribs;
        attribs = attribEditor->text().split(";",QString::SkipEmptyParts);
        addAttribs(carId, attribs);
        accept();
    }
}
2.3 查找企业ID号
findFactoryId(const QString &factory)
{
    int row = 0;
    while (row < factoryModel->rowCount())
    {
        QSqlRecord record = factoryModel->record(row);
        if (record.value("manufactory") == factory)
            return record.value("id").toInt();
        else
            row++;
    }
    return -1;
}
2.4 添加企业操作
addNewFactory(const QString &factory,const QString &address)
{
    QSqlRecord record;

    int id = generateFactoryId();

    QSqlField f1("id", QVariant::Int);
    QSqlField f2("manufactory", QVariant::String);
    QSqlField f3("address", QVariant::String);

    f1.setValue(QVariant(id));
    f2.setValue(QVariant(factory));
    f3.setValue(QVariant(address));
    record.append(f1);
    record.append(f2);
    record.append(f3);
    factoryModel->insertRecord(-1, record);
    return id;
}
2.5 添加新车
addNewCar(const QString &name, int factoryId)
{
    int id = generateCarId();
    QSqlRecord record;

    QSqlField f1("carid", QVariant::Int);
    QSqlField f2("name", QVariant::String);
    QSqlField f3("factoryid", QVariant::Int);
    QSqlField f4("year", QVariant::Int);

    f1.setValue(QVariant(id));
    f2.setValue(QVariant(name));
    f3.setValue(QVariant(factoryId));
    f4.setValue(QVariant(yearEditor->value()));
    record.append(f1);
    record.append(f2);
    record.append(f3);
    record.append(f4);

    carModel->insertRecord(-1, record);
    return id;
}
2.6
addAttribs(int carId, QStringList attribs)
{
    QDomElement carNode = carDetails.createElement("car");
    carNode.setAttribute("id", carId);
    for (int i = 0; i < attribs.count(); i++)
    {
        QString attribNumber = QString::number(i+1);
        if (i < 10)
            attribNumber.prepend("0");
        QDomText textNode = carDetails.createTextNode(attribs.at(i));
        QDomElement attribNode = carDetails.createElement("attrib");
        attribNode.setAttribute("number", attribNumber);
        attribNode.appendChild(textNode);
        carNode.appendChild(attribNode);
    }
    QDomNodeList archive = carDetails.elementsByTagName("archive");
    archive.item(0).appendChild(carNode);
    if (!outputFile->open(QIODevice::WriteOnly))
    {
        return;
    }
    else
    {
        QTextStream stream(outputFile);
        archive.item(0).save(stream, 4);
        outputFile->close();
    }
}
2.7 清除操作
revert()
{
    factoryEditor->clear();
    addressEditor->clear();
    carEditor->clear();
    yearEditor->setValue(QDate::currentDate().year());
    attribEditor->clear();
}
2.8
createInputWidgets()
{
    QGroupBox *box = new QGroupBox(tr("添加产品"));

    QLabel *factoryLabel = new QLabel(tr("制造商:"));
    QLabel *addressLabel = new QLabel(tr("厂址:"));
    QLabel *carLabel = new QLabel(tr("品牌:"));
    QLabel *yearLabel = new QLabel(tr("上市时间:"));
    QLabel *attribLabel = new QLabel(tr("产品属性 (由分号;隔开):"));

    factoryEditor = new QLineEdit;
    carEditor = new QLineEdit;
    addressEditor = new QLineEdit;
    yearEditor = new QSpinBox;
    yearEditor->setMinimum(1900);
    yearEditor->setMaximum(QDate::currentDate().year());
    yearEditor->setValue(yearEditor->maximum());
    yearEditor->setReadOnly(false);
    attribEditor = new QLineEdit;

    QGridLayout *layout = new QGridLayout;
    layout->addWidget(factoryLabel, 0, 0);
    layout->addWidget(factoryEditor, 0, 1);
    layout->addWidget(addressLabel, 1, 0);
    layout->addWidget(addressEditor, 1, 1);

    layout->addWidget(carLabel, 2, 0);
    layout->addWidget(carEditor, 2, 1);
    layout->addWidget(yearLabel, 3, 0);
    layout->addWidget(yearEditor, 3, 1);
    layout->addWidget(attribLabel, 4, 0, 1, 2);
    layout->addWidget(attribEditor, 5, 0, 1, 2);
    box->setLayout(layout);

    return box;
}
2.9 操作槽函数的实现
createButtons()
{
    QPushButton *closeButton = new QPushButton(tr("关闭"));
    QPushButton *revertButton = new QPushButton(tr("撤销"));
    QPushButton *submitButton = new QPushButton(tr("提交"));

    closeButton->setDefault(true);

    connect(closeButton, SIGNAL(clicked()), this, SLOT(close()));
    connect(revertButton, SIGNAL(clicked()), this, SLOT(revert()));
    connect(submitButton, SIGNAL(clicked()), this, SLOT(submit()));

    QDialogButtonBox *buttonBox = new QDialogButtonBox;
    buttonBox->addButton(submitButton, QDialogButtonBox::ResetRole);
    buttonBox->addButton(revertButton, QDialogButtonBox::ResetRole);
    buttonBox->addButton(closeButton, QDialogButtonBox::RejectRole);

    return buttonBox;
}
2.10 更新企业和汽车ID
generateFactoryId()
{
    uniqueFactoryId += 1;
    return uniqueFactoryId;
}

generateCarId()
{
    uniqueCarId += 1;
    return uniqueCarId;
}
以上就是该程序各个函数的实现、界面布局以及数据库的具体操作应用,希望能够对大家有所帮助和启发。
【备注】如果需要直接下载源码可以点下面连接:
https://download.csdn.net/download/zqxdsy/11049683
这里我使用的时MySQL数据库,其他数据库也可以,因为Qt中对数据库的操作有内置的模块和驱动,各个数据库通用。
1.安装MySQL数据库可以参考这篇博文,很详细,按照教程一步步来肯定不会出错。
https://blog.csdn.net/zqxdsy/article/details/88566381
2.使用Qt打开数据库时可能会出现错误:
Qt连接MySQL的时候提示“QSqlDatabase: QMYSQL driver not loaded”,解决方法如下:
(1)原因一:缺少文件
解决办法:
将MySQL安装路径下的子文件夹lib中将的libmysql.dll 文件复制Qt安装路径下的D:\Qt\Qt5.6.1\5.6\mingw49_32\bin中(根据自己的实际情况复制),此时再运行Qt的程序就不会报错啦!
(2)原因二:Qt Creator与MySQL位数不一致
如果上面的方法未能解决问题,那么应该是你安装的MySQL和QT的位数不同,可以打开MySQL控制台
输入show variables like '%version_%';即可查看MySql位数。提示:Qt5.2及以上版本如果使用的是mingw编译器,Qt只有32位的。连接64位的mysql,即使把mysql安装目录下的libmysql.dll放到qt安装目录bin路径下,也是无法连接数据库。
解决办法:
A.如果不想重新安装32位的MySQL,可以安装一个32的驱动,mysql的官网给出了连接32位的驱动。链接为:
http://dev.mysql.com/downloads/connector/c/下载如下图标记的驱动。
![]()
下载后把解压目录下的libmysql.dll文件拷贝到D:Qt\Qt5.2\5.2.1\mingw48_32\bin(根据自己的实际情况放到对应目录下),重启Qt Creator后打开工程就可以正确运行了。 总之,必须保证你拿到libmysql.dll这个文件对应的mysql的位数必须与QT的位数相同。
B.对于8.0以上的MySQL版本,下载的压缩包里可能没有libmysql.dll这个文件,那就只能重新安装一个32位的MySQL吧,卸载的时候注意要卸载干净,否则安装的时候会失败。卸载方法如下。
【mysql数据库完全卸载步骤】
1.运行cmd,执行net start ,查看与mysql相关的服务名称,并记录(不需要的话可跳过)。
2.可以利用Navicat等IDE进行数据备份(若无重要的数据可直接跳过)
主要备份数据有:
(1)业务系统涉及的数据库;
(2)用户名和密码,如果不太多的话,可用不备份,下次重建即可;
(3)my.ini文件,这个文件在mysql的安装目录下。其中保存一些mysql端口,最大连结数等配置信息。
3.关闭MySQL服务器,MySQL服务器的关闭有两种方式。
(1)方法一:在管理员终端命令里输入 net stop mysql
(2)方法二:在 控制面板 -----> 管理工具 -----> 服务 -----> 关闭MySQL服务,也可以使用Window键 + r ,输入 services.msc 进入服务界面 关闭服务器。
4.卸载
对于程序安装版的MySQL, 用控制面板或者电脑管家等卸载MySQL;对于使用压缩包安装MySQL的朋友,可能不显示MySQL程序,可直接跳过这步,不用卸载。
5.删除MySQL相关文件
找到MySQL目录将MySQL相关文件删除;删除mysql管理工具,如navicat。这一步的目的是为了避免在注册用表中有太多的mysql项。如果您有足够的信息识别出注册用表中哪些包含mysql的项是与mysql数据库有关的哪些不是,这一项可跳过。
6.清理注册表
打开注册表:方式1:在终端命令里输入regedit,搜索mySQL,右键全部删除;或者将下面三个路径下的MySQL相关文件夹删除。
HKEY_LOCAL_MACHINE/SYSTEM/ControlSet001/Services/Eventlog/Application/MySQL
HKEY_LOCAL_MACHINE/SYSTEM/ControlSet002/Services/Eventlog/Application/MySQL
HKEY_LOCAL_MACHINE/SYSTEM/CurrentControlSet/Services/Eventlog/Application/MySQL
这样MySQL基本卸载完全了,如果还不放心可以在注册表里搜索,编辑->查找下一个,挨个搜索一遍,删除mysql的所有文件夹,以及包含mysql的所有键(注意区分下环境变量,尽量跳过去,如果跳过去后发现最后没卸载干净,再回来删掉一部分)。
7.重启电脑或者注销登陆然后再重新登录。
完成后以管理员身份运行cmd,执行sc delete mysql,(注意:这里的“mysql”指的是步骤1中记录的mysql服务名称,您的mysql服务名称有可能是mysql99,mysql666等),如果显示服务不存在,则说明注册用表删除干净了,否则重复执行第6步。
至此,mysql卸载完全,可以重新进行安装了,安装教程可以参考下面博文:
https://blog.csdn.net/zqxdsy/article/details/88566381


